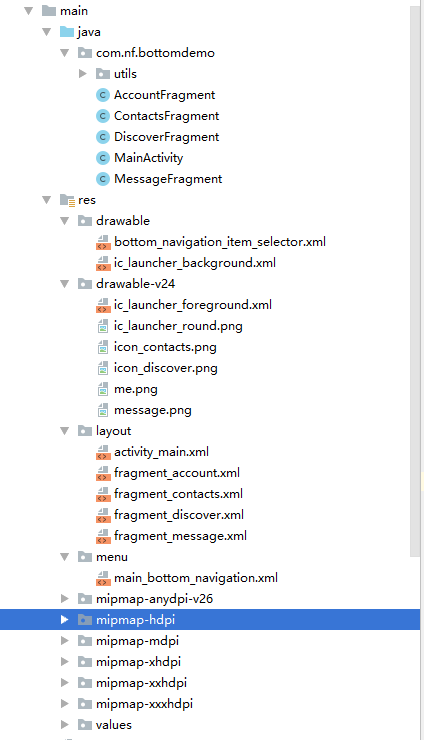
 项目目录结构,文章末尾有解决当item大于三出现布局不平均的问题
在开始之前导入这个包
implementation 'com.android.support:design:28.0.0'


将这几个图片添加进去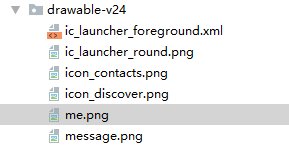
二、在res新建一个menu文件,在这文件夹下新建一个main_bottom_navigation.xml
插入如下代码,这是BottomNavigationView的item元素。
<?xml version="1.0" encoding="utf-8"?>
<menu xmlns:android="http://schemas.android.com/apk/res/android"
    xmlns:app="http://schemas.android.com/apk/res-auto">
    <item
        android:id="@+id/menu_message"
        android:enabled="true"
        android:icon="@drawable/message"
        app:showAsAction="ifRoom"
        android:title="消息" />
    <item
        android:id="@+id/menu_contacts"
        android:enabled="true"
        android:icon="@drawable/icon_contacts"
        app:showAsAction="ifRoom"
        android:title="联系人" />
    <item
        android:id="@+id/menu_discover"
        android:enabled="true"
        android:icon="@drawable/icon_discover"
        app:showAsAction="ifRoom"
        android:title="发现" />
    <item
        android:id="@+id/menu_me"
        android:enabled="true"
        app:showAsAction="ifRoom"
        android:icon="@drawable/me"
        android:title="我" />
</menu>
然后在drawable文件夹下新建bottom_navigation_item_selector.xml文件,插入如下代码,这段代码的作用是当你选定某个item,就将它的颜色变成蓝色,未选中则是灰色。
<?xml version="1.0" encoding="utf-8"?>
<selector xmlns:android="http://schemas.android.com/apk/res/android">

    <item android:color="@color/theme" android:state_checked="true" />
    <item android:color="@color/bottom_navigation_normal" android:state_checked="false" />
</selector>
activity_main.xml代码如下
<?xml version="1.0" encoding="utf-8"?>
<RelativeLayout xmlns:android="http://schemas.android.com/apk/res/android"
    xmlns:app="http://schemas.android.com/apk/res-auto"
    xmlns:tools="http://schemas.android.com/tools"
    android:layout_width="match_parent"
    android:layout_height="match_parent"
    tools:context=".MainActivity">

    <android.support.v7.widget.Toolbar
        android:id="@+id/toolbar"
        android:layout_width="match_parent"
        android:layout_height="50dp"
        android:background="@color/black_2c"
        app:titleTextColor="@color/write" />

    <FrameLayout
        android:id="@+id/ll_frameLayout"
        android:layout_width="match_parent"
        android:layout_height="match_parent"
        android:layout_above="@id/bv_bottomNavigation"
        android:layout_below="@id/toolbar" />


    <android.support.design.widget.BottomNavigationView
        android:id="@+id/bv_bottomNavigation"
        android:layout_width="match_parent"
        android:layout_height="wrap_content"
        android:layout_alignParentBottom="true"
        android:background="@color/write"
        app:labelVisibilityMode="labeled"
        app:itemIconTint="@drawable/bottom_navigation_item_selector"
        app:itemTextColor="@drawable/bottom_navigation_item_selector"
        app:menu="@menu/main_bottom_navigation" />
</RelativeLayout>
fragment_account.xml代码如下
<?xml version="1.0" encoding="utf-8"?>
<android.support.constraint.ConstraintLayout xmlns:android="http://schemas.android.com/apk/res/android"
    android:layout_width="match_parent"
    android:layout_height="match_parent">

    <TextView
        android:layout_width="match_parent"
        android:layout_height="match_parent"
        android:gravity="center"
        android:text="我"
        android:textColor="@color/theme"
        android:textSize="23sp" />

</android.support.constraint.ConstraintLayout>
其他的fragment_contacts.xml、fragment_discover.xml、fragment_message.xml分别对应
<?xml version="1.0" encoding="utf-8"?>
<android.support.constraint.ConstraintLayout
    xmlns:android="http://schemas.android.com/apk/res/android" android:layout_width="match_parent"
    android:layout_height="match_parent">
    <TextView
        android:layout_width="match_parent"
        android:layout_height="match_parent"
        android:gravity="center"
        android:text="联系人"
        android:textColor="@color/theme"
        android:textSize="23sp" />
</android.support.constraint.ConstraintLayout>
<?xml version="1.0" encoding="utf-8"?>
<android.support.constraint.ConstraintLayout
    xmlns:android="http://schemas.android.com/apk/res/android" android:layout_width="match_parent"
    android:layout_height="match_parent">
    <TextView
        android:layout_width="match_parent"
        android:layout_height="match_parent"
        android:gravity="center"
        android:text="发现"
        android:textColor="@color/theme"
        android:textSize="23sp" />
</android.support.constraint.ConstraintLayout>
<?xml version="1.0" encoding="utf-8"?>
<android.support.constraint.ConstraintLayout xmlns:android="http://schemas.android.com/apk/res/android"
    android:layout_width="match_parent"
    android:layout_height="match_parent">

    <TextView
        android:layout_width="match_parent"
        android:layout_height="match_parent"
        android:gravity="center"
        android:text="消息"
        android:textColor="@color/theme"
        android:textSize="23sp" />
</android.support.constraint.ConstraintLayout>
AccountFragment、ContactsFragment、DiscoverFragment、MessageFragment这几个Fragment分别对应如下代码,其实都是一样的,只是对应不一样的布局文件。
public class AccountFragment extends Fragment {

    @Nullable
    @Override
    public View onCreateView(@NonNull LayoutInflater inflater, @Nullable ViewGroup container, @Nullable Bundle savedInstanceState) {
        return inflater.inflate(R.layout.fragment_account, container, false);
    }
}
public class ContactsFragment extends Fragment {

    @Nullable
    @Override
    public View onCreateView(@NonNull LayoutInflater inflater, @Nullable ViewGroup container, @Nullable Bundle savedInstanceState) {
        return  inflater.inflate(R.layout.fragment_contacts, container, false);
    }
}
public class DiscoverFragment extends Fragment {
    @Nullable
    @Override
    public View onCreateView(@NonNull LayoutInflater inflater, @Nullable ViewGroup container, @Nullable Bundle savedInstanceState) {
        return inflater.inflate(R.layout.fragment_discover, container, false);
    }
}
public class MessageFragment extends Fragment {

    public MessageFragment(){

    }

    @Nullable
    @Override
    public View onCreateView(@NonNull LayoutInflater inflater, @Nullable ViewGroup container, @Nullable Bundle savedInstanceState) {
        return inflater.inflate(R.layout.fragment_message, container, false);
    }
}
接下来就是MainActivity代码了
public class MainActivity extends AppCompatActivity {

    private Toolbar mToolbar;
    private BottomNavigationView mBottomNavigationView;

    private int lastIndex;
    List<Fragment> mFragments;

    @Override
    protected void onCreate(Bundle savedInstanceState) {
        super.onCreate(savedInstanceState);
        setContentView(R.layout.activity_main);
        initView();
        initBottomNavigation();
        initData();

    }

    public void initView() {
        mToolbar = findViewById(R.id.toolbar);

    }

    public void initData() {
        setSupportActionBar(mToolbar);
        mFragments = new ArrayList<>();
        mFragments.add(new MessageFragment());
        mFragments.add(new ContactsFragment());
        mFragments.add(new DiscoverFragment());
        mFragments.add(new AccountFragment());
        // 初始化展示MessageFragment
        setFragmentPosition(0);
    }

    public void initBottomNavigation() {
        mBottomNavigationView = findViewById(R.id.bv_bottomNavigation);
//           解决当item大于三个时,非平均布局问题

//       BottomNavigationViewHelper.disableShiftMode(mBottomNavigationView);

        mBottomNavigationView.setOnNavigationItemSelectedListener(new BottomNavigationView.OnNavigationItemSelectedListener() {
            @Override
            public boolean onNavigationItemSelected(@NonNull MenuItem item) {
                switch (item.getItemId()) {
                    case R.id.menu_message:
                        setFragmentPosition(0);
                        break;
                    case R.id.menu_contacts:
                        setFragmentPosition(1);
                        break;
                    case R.id.menu_discover:
                        setFragmentPosition(2);
                        break;
                    case R.id.menu_me:
                        setFragmentPosition(3);
                        break;
                    default:
                        break;
                }
                // 这里注意返回true,否则点击失效
                return true;
            }
        });
    }


    private void setFragmentPosition(int position) {
        FragmentTransaction ft = getSupportFragmentManager().beginTransaction();
        Fragment currentFragment = mFragments.get(position);
        Fragment lastFragment = mFragments.get(lastIndex);
        lastIndex = position;
        ft.hide(lastFragment);
        if (!currentFragment.isAdded()) {
            getSupportFragmentManager().beginTransaction().remove(currentFragment).commit();
            ft.add(R.id.ll_frameLayout, currentFragment);
        }
        ft.show(currentFragment);
        ft.commitAllowingStateLoss();
    }
}
好了所有代码都已经完成,可以运行看效果了。
-----------------------------------------------------------------------------------------
-----------------------------------------------------------------------------------------
可以看到这里有段代码被注释了,这是句代码本来是为了解决当item大于三个的时候布局不平均,(ps:懒得作图,如有需要可以自行尝试)
那既然要解决为什么要注释呢,是因为我发现其实根本不需要了。

网上很多了都是写这样一个帮助类来解决问题然后在activity里用上面的代码来调用 BottomNavigationViewHelper
public class BottomNavigationViewHelper {
    @SuppressLint("RestrictedApi")
    public static void disableShiftMode(BottomNavigationView view) {
        BottomNavigationMenuView menuView = (BottomNavigationMenuView) view.getChildAt(0);
        try {
            Field shiftingMode = menuView.getClass().getDeclaredField("labelVisibilityMode");
            shiftingMode.setAccessible(true);
            shiftingMode.setInt(menuView, 1);//labelVisibilityMode
//            shiftingMode.setBoolean(menuView, false);//mShiftingMode
            shiftingMode.setAccessible(false);
            for (int i = 0; i < menuView.getChildCount(); i++) {
                BottomNavigationItemView item = (BottomNavigationItemView) menuView.getChildAt(i);
                //noinspection RestrictedApi
//                item.setShiftingMode(false);
                item.setShifting(false);
                // set once again checked value, so view will be updated
                //noinspection RestrictedApi
                item.setChecked(item.getItemData().isChecked());

            }
        } catch (NoSuchFieldException e) {
            Log.e("BNVHelper", "Unable to get shift mode field", e);
        } catch (IllegalAccessException e) {
            Log.e("BNVHelper", "Unable to change value of shift mode", e);
        }
    }
}
但是!现在只需要在activity_main.xml的
android.support.design.widget.BottomNavigationView下添加这一行代码就可以解决当item大于三个出现布局不平均的问题了
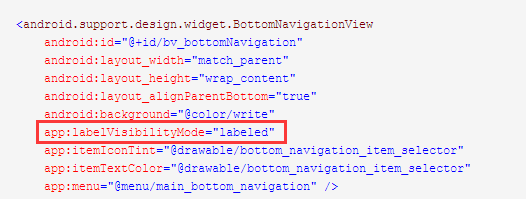
app:labelVisibilityMode="labeled"