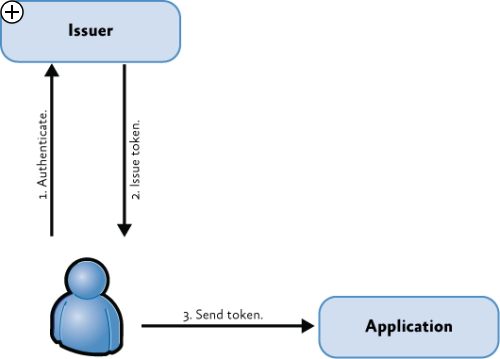
1.声明的介绍
基于角色的授权管理,适用于角色变化不大,并且用户权限不会频繁更改的场景。
在更复杂的环境下,仅仅通过给用户分配角色并不能有效地控制用户访问权限。
基于声明的授权有许多好处,它使认证和授权分离,同时分离了角色和授权逻辑,提供更细粒度的权限控制。
Claim就是关于用户信息的陈述,例如姓名、性别、电话、角色等。
声明被包装成令牌(Token),并可以通过JSON Web Token (JWT)传递。
.net中声明的属性(System.Security.Claims.Claim类)
Subject属性(System.Security.Claims.ClaimsIdentity,主题),
Type属性(声明类型,只读,String类型),
Value属性(声明的值,只读,String类型),
ValueType(声明的值类型,只读,String类型),
Issuer属性(声明的颁发者,只读,String类型)
//获取声明,这里通过获取认证用户(IPrincipal)的标识(Indentity)并通过linq遍历出所有的声明
public IHttpActionResult GetClaims()
        {
            var identity = User.Identity as ClaimsIdentity;//System.Security.Claims.ClaimsIndentity类
var claims = from c in identity.Claims
                         select new
                         {
                             subject = c.Subject.Name,
                             type = c.Type,
                             value = c.Value
                         };

            return Ok(claims);
        }
//返回值举例
[
{
    "subject": "Hamza",
    "type": "http://schemas.microsoft.com/accesscontrolservice/2010/07/claims/identityprovider",
    "value": "ASP.NET Identity"
  },
{
    "subject": "Hamza",
    "type": "iss",
    "value": "http://localhost:59822"
  },
{
]
2,实现基于声明的标志Implementing Claims-Based Identity

第一步,让第三方应用支持声明方式的授权
WIF4.5类库已经实现了基础类库(核心在System.Security.Claims命名空间),可以直接使用。
System.Security.Claims.ClaimsAuthenticationManager.Authenticate(string, System.Security.Claims.ClaimsPrincipal)方法,用于认证;
System.Security.Claims.ClaimsAuthorizationManager.CheckAccess(System.Security.Claims.AuthorizationContext context)方法,用于授权;
这两者都是virtual ,因此可以override
在支持owin规范的host中,可以使用middleware的方式拦截请求,实现认证和授权。
在Web API框架和MVC框架中,可以使用过滤器拦截机制。
另外Web API框架还支持继承System.Net.Http.HttpMessageHandler类(或者其子类System.Net.Http.DelegatingHandler)进行请求消息拦截。
以上方式混合使用时,请求管道参考(Web API框架下),其中“认证”使用HttpMessageHandler,“授权”使用过滤器

第二步,获取或者构造声明的颁发者(Issuer)。
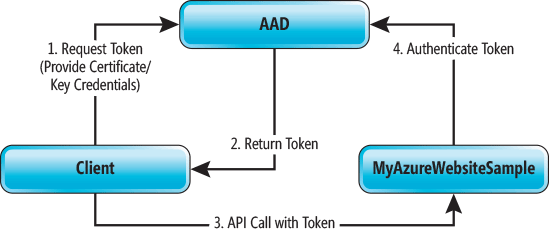
可以使用现有产品,例如ADFS或者Azure AD
Azure AD 身份验证库 (ADAL) .net类库参考https://msdn.microsoft.com/zh-cn/library/azure/microsoft.identitymodel.clients.activedirectory.aspx
命名空间: Microsoft.IdentityModel.Clients.ActiveDirectory
程序集: Microsoft.IdentityModel.Clients.ActiveDirectory(Microsoft.IdentityModel.Clients.ActiveDirectory.dll 中)
Azure AD的认证流程。

第三步,配置第三方应用“信任”颁发者。
例如,颁发者提供什么声明,令牌如何签名,获取令牌的URL等
进入Azure.cn管理门户,在Azure Active Directory中添加应用程序。
第四步,配置Issuer以便了解一些第三方的信息。
例如第三方用于接收Token的URL;Issuer提供的声明,哪些是必需的,哪些是可选的;是否需要对Issuer加密等。