• 使用Filezilla搭建FTP服务器


    1.FTP over TLS is not enabled, users cannot securely

    http://blog.sina.com.cn/s/blog_4cd978f90102vtwl.html

    FTP over TLS 0.9.51升级后, 进入管理面板, 会出现如下警告提示:
    Warning: FTP over TLS is not enabled, users cannot securely log in.
    表示未启用tls模式, 为此今天特别实地操作了一次.

    FTP <wbr>over <wbr>TLS <wbr>is <wbr>not <wbr>enabled, <wbr>users <wbr>cannot <wbr>securely <wbr>

    FTP <wbr>over <wbr>TLS <wbr>is <wbr>not <wbr>enabled, <wbr>users <wbr>cannot <wbr>securely <wbr>

    进入设置->ssl/tls设置.

    FTP <wbr>over <wbr>TLS <wbr>is <wbr>not <wbr>enabled, <wbr>users <wbr>cannot <wbr>securely <wbr>

    生成一个新证书. 服务器地址用机器的ip即可.

    FTP <wbr>over <wbr>TLS <wbr>is <wbr>not <wbr>enabled, <wbr>users <wbr>cannot <wbr>securely <wbr>

    点击生成证书, 一会儿就提示成功.

    FTP <wbr>over <wbr>TLS <wbr>is <wbr>not <wbr>enabled, <wbr>users <wbr>cannot <wbr>securely <wbr>

    密钥的密码随意输入一个. 注意看下面有一个端口. 这是表示ssl, tls连接端口.
    最后点击左下的确认即可.

    FTP <wbr>over <wbr>TLS <wbr>is <wbr>not <wbr>enabled, <wbr>users <wbr>cannot <wbr>securely <wbr>

    当你用sll 或者 tls连接时, 它会提示你证书信息, 你选择通过并且保存即可

    FTP <wbr>over <wbr>TLS <wbr>is <wbr>not <wbr>enabled, <wbr>users <wbr>cannot <wbr>securely <wbr>

    FTP日志显示, tls加密连接成功..

    FTP <wbr>over <wbr>TLS <wbr>is <wbr>not <wbr>enabled, <wbr>users <wbr>cannot <wbr>securely <wbr>

    默认的ftp模式, 21端口是无法连接的.

    FTP <wbr>over <wbr>TLS <wbr>is <wbr>not <wbr>enabled, <wbr>users <wbr>cannot <wbr>securely <wbr>

    你会收到它的异常信息.

    FTP <wbr>over <wbr>TLS <wbr>is <wbr>not <wbr>enabled, <wbr>users <wbr>cannot <wbr>securely <wbr>

    2.You appear to be behind a NAT router. Please configure the passive mode settings and forward a range of ports in your router

    https://www.cnblogs.com/qianzf/p/7064715.html

      • 问题与警告

        问题:You appear to be behind a NAT router. Please configure the passive mode settings and forward a range of ports in your router.
        解决方法:
        “Edit”-“Setting”或直接点击设置按钮(齿轮);
        选择“Passive mode settings”选项卡,勾选“Use the following IP:”并填写服务器的IP地址,之后点击“OK”保存;
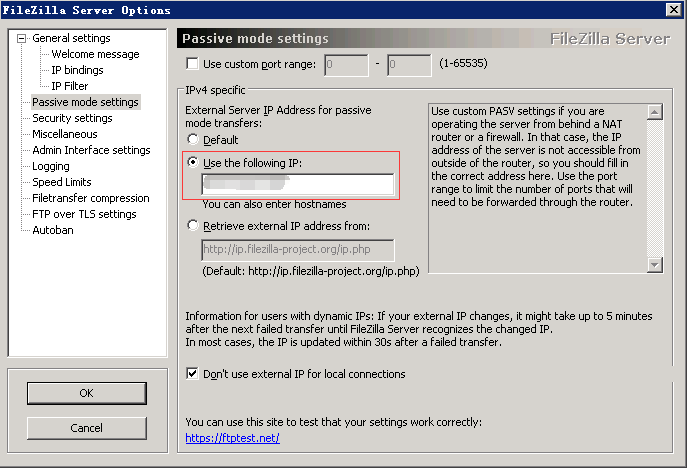
        接下来的提示信息中不再提示上述问题;
        另外上面的设置中如果没有设置“Use custom port range”,那么在客户端连接服务端读取目录时就会报以下的错误:响应: 425 Can't open data connection for transfer of "/"
        这个问题主要是由于使用Passive Mode模式造成的。
        解决方法:在上面的设置窗口中要勾选该项,设置端口范围,并在后面的防火墙设置中,将端口范围加入到入站端口中。

        警告:Warning: FTP over TLS is not enabled, users cannot securely log in.
        解决方法:启用TLS传输,具体操作如下:
        “Edit”-“Setting”或直接点击设置按钮(齿轮);
        选择“FTP over TLS settings”选项卡,点击“Generate new certificate...”;
        生成验证时Key size”根据自己的喜好选择即可,其他信息可以根据自己的情况随意填写,然后选择保存地址(最好放到安装路径下) “;

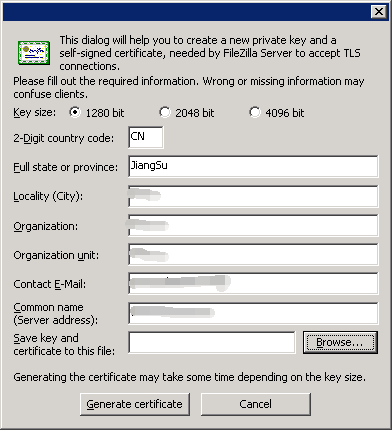
        名称默认为“certificate.crt”就好,最终选择生成;
        提示“Certificate generated successfully”则说明生成没有问题,点击“确定”关闭弹窗;
        点击“OK”保存设置;
        之后的信息提示不再出现警告。

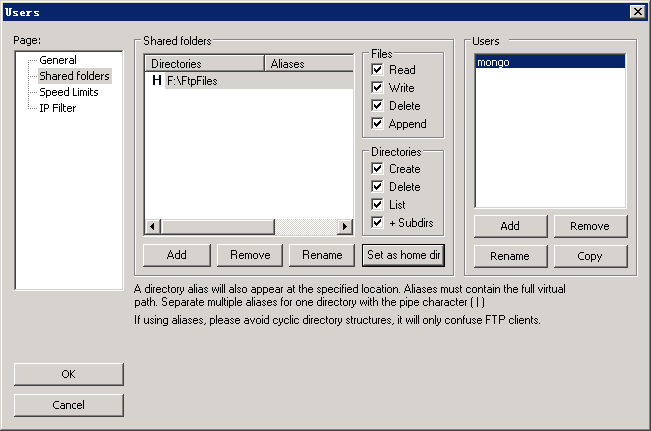
      • 接下来就是创建“Group”,“Users”并设置“Shared folders”

        不做详细解说,只需注意:

        1. 添加用户时为用户分配组;

        2. 为用户分配文件夹的权限,并指定Home文件夹(即“Set as home dir”,路径前出现“H”即可),如下图;

      • 端口设置

        默认端口:21 加密端口:990 自定义的端口范围:10000-10200(根据自己的情况更改)可以自行设置,但是需要注意的是无论使用什么端口,在后面一定要添加到防火墙的入站规则中去。
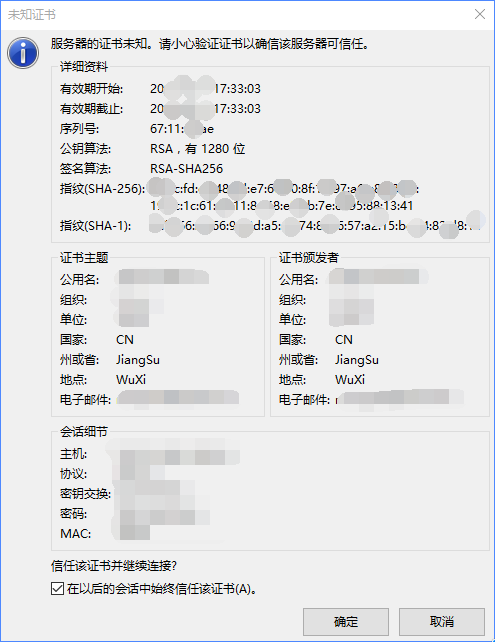
      • 在本地安装客户端

        通过客户端连接服务器就可以了。初次连接时会提示如下,选择信任,确定即可。

    3.服务器发回了不可路由的地址。使用服务器地址代替

    需要设置filezilla客户端的连接参数

    1. 选中某一连接项
    2. 高级——加密——只使用普通ftp
    3. 传输设置——传输模式——主动
    4. 重新连接

    3.用FileZilla Server新增FTP帐号

    https://jingyan.baidu.com/article/b907e627f4f5f446e7891cdf.html

  • 相关阅读:
    导出表结构语句
    closeChannel: close the connection to remote address[] result: true
    spingboot使用rabbitmq
    服务器很卡问题排查
    docker-compose安装nginx
    Docker方式安装ShowDoc
    "docker build" requires exactly 1 argument
    Intellij IDEA常用快捷键介绍 Intellij IDEA快捷键大全汇总
    IDEA 2018 3.4 激活破解方法
    jpress:v3.2.5的docker-compose安装
  • 原文地址:https://www.cnblogs.com/imstrive/p/9569364.html
Copyright © 2020-2023  润新知