目录
Cacti+nagios监控部署步骤... 2
一、Cacti安装... 2
1需要安装的依赖软件包:... 2
2安装rrdtool 2
3启动数据库和httpd服务... 3
4将servername和ip对应写入hosts 3
5安装cacti 3
6创建cacti数据库并授权:... 3
7导入cacti的数据表... 3
8修改配置文件,提供php连接mysql的用户名、密码(如图)... 3
9登录网页按照向导提示完成安装:... 4
10 配置本机snmp. 6
11 通过WEB页面添加监控设备... 7
12 为新创建图形生成数据,并将轮询加入计划任务... 9
13 更改php时区... 9
14 安装高效轮询器spine. 9
二、Cacti插件安装... 11
1 如不需打补丁(在cacti-0.8.8b版中默认已带plugin management),则只修改配置文件即可 11
2 安装monitor、settings、thold插件... 11
3 刷新web页面plugin management,出现插件的蓝色图标,依次全部启用... 12
4 thold警报功能... 12
5 安装weathermap插件... 15
三、cacti系统的客户端配置... 18
1 linux主机... 18
2 windows主机... 19
四、Nagios安装... 20
1 安装依赖关系... 20
2 创建用户组... 20
3 编译安装... 21
4 安装插件... 21
5 创建登录页面的密码文件... 21
6 创建Apache首页文件,启动nagios 21
7 登录地址,输入设定的用户名密码... 22
8 检查nagios配置文件语法是否错误... 22
五、将nagios集成到cacti 22
1 安装ndoutils 22
2 导入数据库... 23
3 修改配置文件... 23
Cacti+nagios监控部署步骤
一、Cacti安装
搭建cacti需下载的软件集合:
cacti-0.8.8b.tar.gz
cacti-spine-0.8.8b.tar.gz
monitor-v1.3-1.tgz
rrdtool-1.2.27.tar.gz
settings-v0.71-1.tgz
thold-v0.5.0.tgz
php-weathermap-0.97b.zip
其余为默认网络安装。
1需要安装的依赖软件包:
# yum install httpd php php-mysql php-ldap php-xml net-snmp-utils mysql mysql-server net-snmp crond lm_sensors mysql-devel php-pdo php-devel –y
2安装rrdtool
2.1安装rrdtool所需软件:
# yum install -y gcc gcc-c++ libart_lgpl-devel zlib-devel libpng-devel freetype-devel perl-devel zlib libpng perl
2.2解压rrdtool源码包安装:
# tar zxvf rrdtool-1.2.27.tar.gz
# cd rrdtool-1.2.27
# ./configure --prefix=/usr/local/
# make && make install
3启动数据库和httpd服务
# service httpd start;chkconfig httpd on
# service mysqld start;chkconfig mysqld on
4将servername和ip对应写入hosts
# echo '192.168.2.81 monitor' >>/etc/hosts
5安装cacti
# tar zxvf cacti-0.8.8b.tar.gz
# mv cacti-0.8.8b /var/www/html/cacti
创建cacti用户,并设置相关目录属主、属组
# useradd cactiuser
# cd /var/www/html/
# chown -R root.root *
# cd cacti
# chown -R cactiuser.cactiuser rra log
6创建cacti数据库并授权:
# mysql -uroot –p
mysql> show databases;
mysql> create database cactidb default character set utf8;
mysql> grant all on cactidb.* to 'cactiuser'@'localhost' identified by 'cactiuser';
mysql> grant all on cactidb.* to 'cactiuser'@'127.0.0.1' identified by 'cactiuser';
mysql> grant all on cactidb.* to 'cactiuser'@'%' identified by 'cactiuser';
mysql> flush privileges;
mysql> q
7导入cacti的数据表
# cd /var/www/html/cacti
# mysql -ucactiuser -pcactiuser cactidb <cacti.sql
8修改配置文件,提供php连接mysql的用户名、密码(如图)
# vim include/config.php
# vim include/global.php
……
/* make sure these values refect your actual database/host/user/password */
$database_type = "mysql";
$database_default = "cactidb";
$database_hostname = "localhost";
$database_username = "用户名";
$database_password = "密码";
$database_port = "3306";
……
9登录网页按照向导提示完成安装:
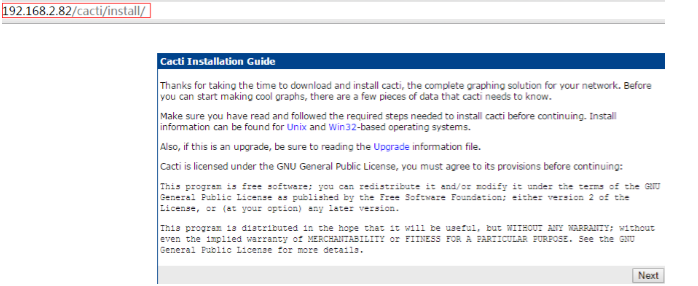
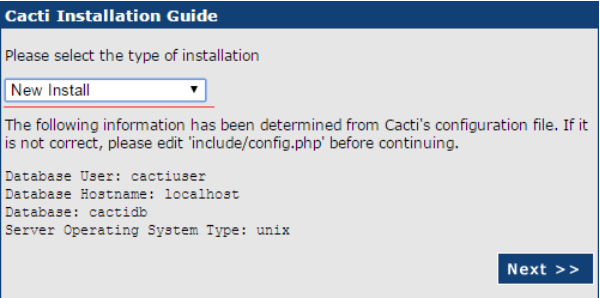

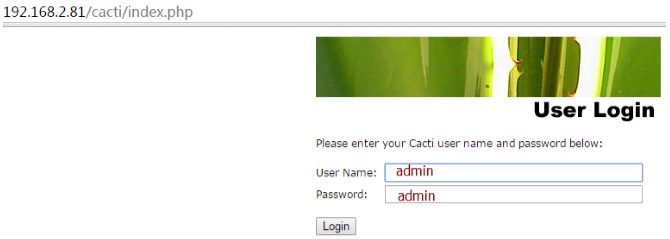
默认admin,首次登录后会要求修改密码:
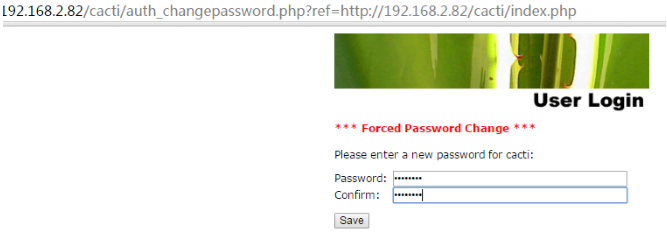
修改完密码进入管理界面:

10 配置本机snmp
10.1 修改配置文件
# vim /etc/snmp/snmpd.conf
……
com2sec notConfigUser 192.168.2.81 public
access notConfigGroup "" any noauth exact all none none
view all included .1 80
10.2 启动服务
# service snmpd start;chkconfig snmpd on
11 通过WEB页面添加监控设备
在Device中将默认主机删除:

在Device中添加监控主机:

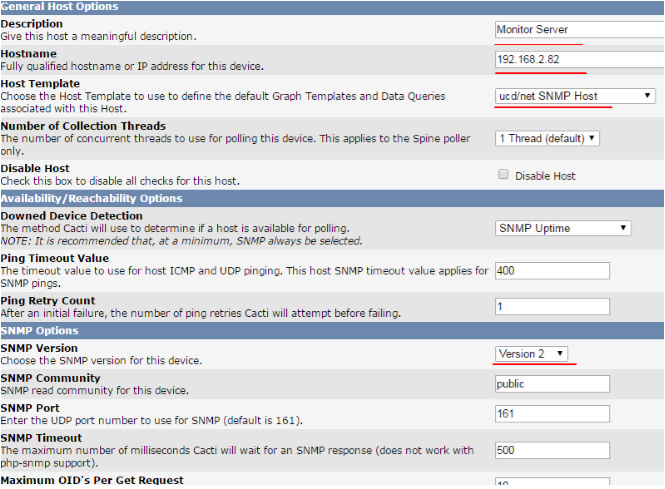
Create完成后,在Associated Data Queries栏将SNMP*项全部Add,其余点X删除。

点击save保存。
为监控项绘制图形:

在复选框中选择监控项目,然后Create
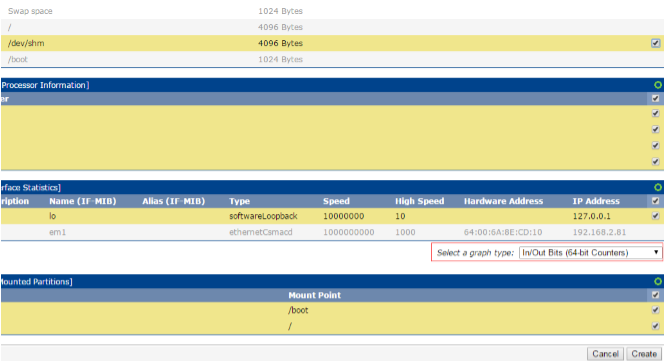
将新创建图形加入图形树


12 为新创建图形生成数据,并将轮询加入计划任务
# su – cactiuser
$ php /var/www/html/cacti/poller.php
$ crontab -e
*/1 * * * * /usr/bin/php /var/www/html/cacti/poller.php &> /dev/null
$ exit
# service crond restart
按此方式添加其他主机。
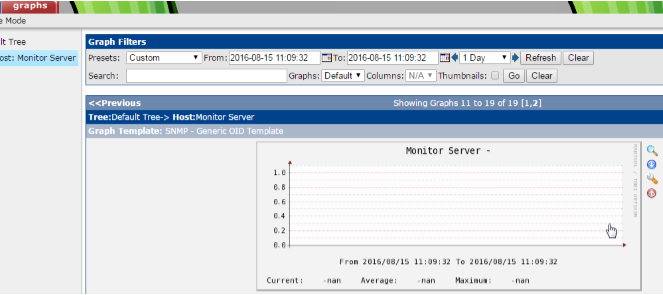
13 更改php时区
# /etc/php.ini
date.timezone = Asia/Shanghai (另外,若虚拟环境平台CACTI服务器最好进行时间同步)
14 安装高效轮询器spine
(下载Cacti-spine对应版本)
14.1 安装依赖
# yum -y install net-snmp-devel help2man openssl-devel
# tar -zxvf cacti-spine-0.8.8b.tar.gz
# cd cacti-spine-0.8.8b/
# ./configure //默认是安装在/usr/local/spine下
# make && make install
14.2 修改配置文件信息和位置
# cd /usr/local/spine/etc/
# mv spine.conf.list spine.conf
# vim spine.conf
……
DB_Host localhost
DB_Database cactidb
DB_User cactiuser
DB_Pass cactiuser
DB_Port 3306
# cp spine.conf /etc/spine.conf
14.3 运行spine
# /usr/local/spine/bin/spine
SPINE: Using spine config file [/etc/spine.conf]
SPINE: Version 0.8.8b starting
SPINE: Time: 1.1267 s, Threads: 5,
Hosts: 3
如上提示表示安装成功!
14.4 修改Cacti配置
Console -> Cacti Settings->Paths->Spine
Poller File Path,填入路径 /usr/local/spine/bin/spine
Console -> Cacti Settings->Poller->Poller Type,在下拉中选择spine切换到spine
Console -> Cacti Settings->Poller->Poller Interval,Cron Interval->Every Minute
Console -> Cacti Settings->Poller->Spine Specific Execution Parameters 里的 Maximum Threads per Process 为监控服务器cpu个数的2倍
(依次或批量)修改Console-Management->Templates->Data Templates中step和heartbeat的值:
(1) 在Associated
RRA's更改图形模板显示
(2) 将step设置为60s 绘图一次
(3) 将Heartbeat设置为120s
14.5 重建 Poller 缓存
Console -> System Utilities -> Rebuild Poller Cache
二、Cacti插件安装
主程序安装完成后,还需要通过安装插件来实现一些扩展的功能,例如定义警报阈值、添加模块选项等。
1 如不需打补丁(在cacti-0.8.8b版中默认已带plugin management),则只修改配置文件即可
# cd /var/www/html/cacti/
# vim include/global.php
……
$database_type = "mysql";
$database_default = "cactidb";
$database_hostname = "localhost";
$database_username = "cactiuser";
$database_password = "cactiuser";
$database_port = "3306";
……
# vim include/config.php
$url_path = "/cacti/" (默认)
2 安装monitor、settings、thold插件
monitor:通过简单明了的图标提供服务器的运行状态。
settings:给不同的插件提供一些共用的信息,如邮件信息,dns信息。
thold :提供设备异常预警。
将所需的对应插件下载解压并拷贝到相关目录下即可:

# cd /root/cacti/
# tar zxvf settings-v0.71-1.tgz
# tar zxvf thold-v0.5.0.tgz
# tar zxvf monitor-v1.3-1.tgz
# mv monitor settings thold /var/www/html/cacti/plugins
# cd –
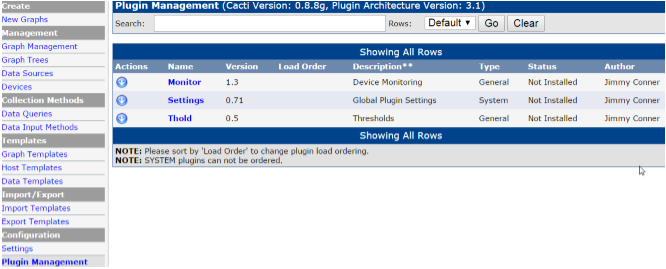
3 刷新web页面plugin management,出现插件的蓝色图标,依次全部启用

4 thold警报功能
4.1 定义通知邮件列表

4.2 设置发送邮件服务器等相关
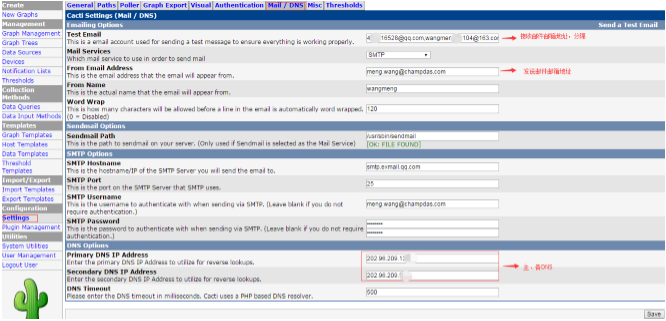
设置完点击save保存,并且可以点击右上角send a test email发送一封测试邮件。
4.3 邮件告警具体项应用
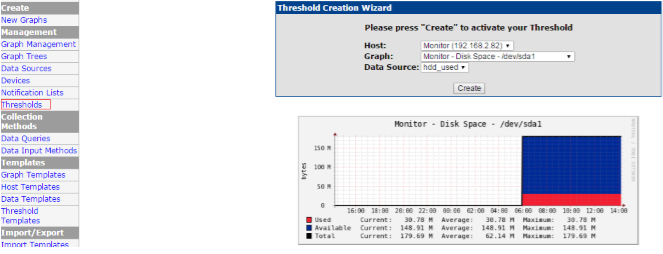
创建完后,按如下配置,save
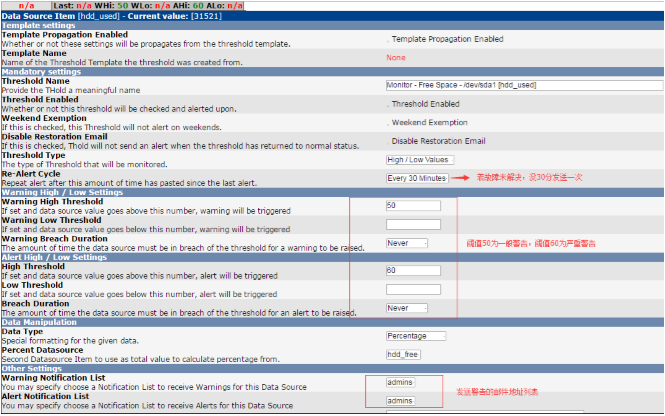
查看新添加警告状态

测试预警

# dd if=/dev/zero of=/boot/mail.img bs=1M count=120

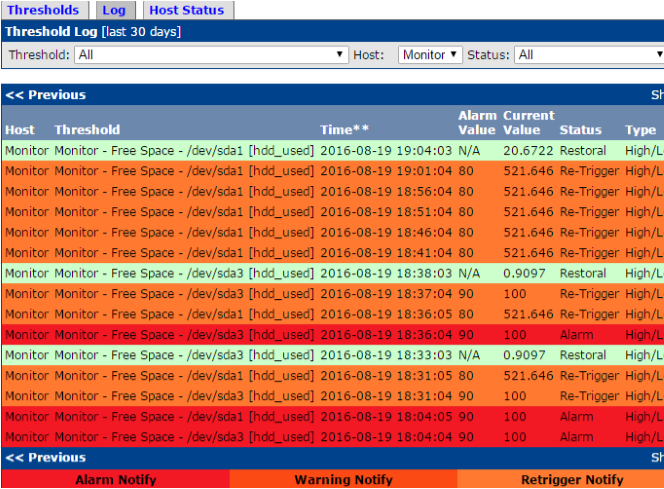
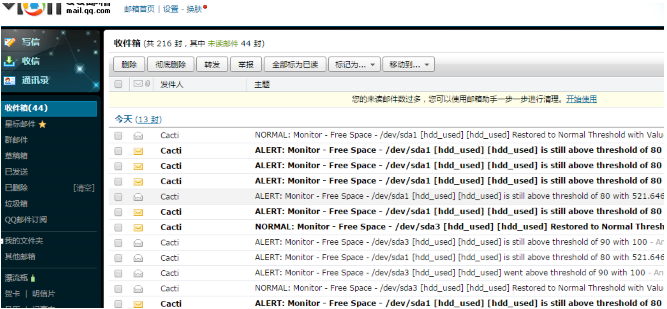
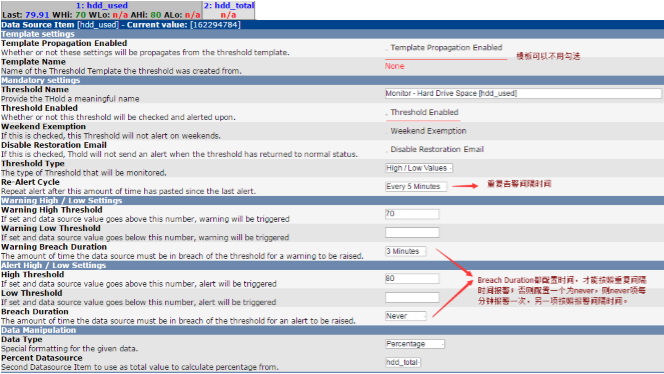
4.4 或者也可以先创建Threshold Templates,保存后创建报警项。



5 安装weathermap插件
(weathermap可以作为cacti的插件使用,也可以独立使用,需要php,php-gd支持)
5.1 下载软件包
php-weathermap-0.97b.zip
5.2 安装
# cd /root/cacti/
# unzip php-weathermap-0.97b.zip
# mv weathermap/ /var/www/html/cacti/plugins
# cd /var/www/html/cacti/plugins/weathermap/
# chown -R apache.apache configs/ output/
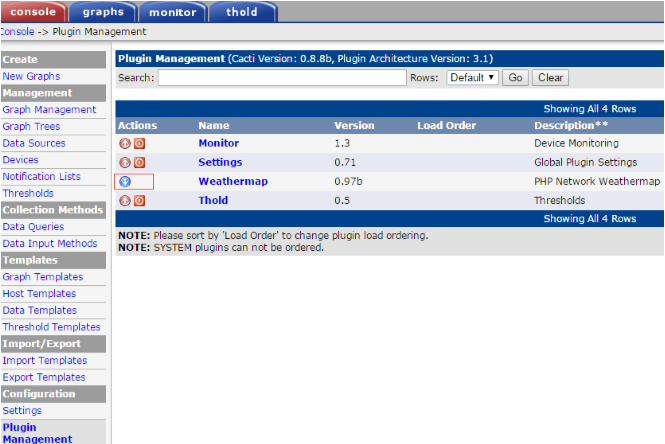
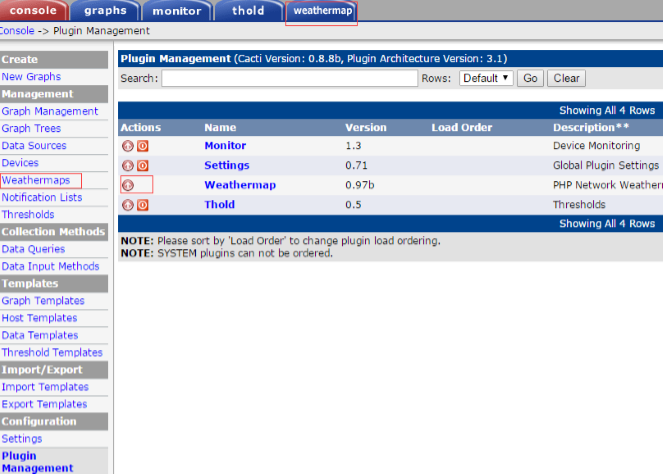
刷新cacti,console——Plugin Management,点击按钮安装
5.3 编辑
# yum install php php-gd
# service httpd restart
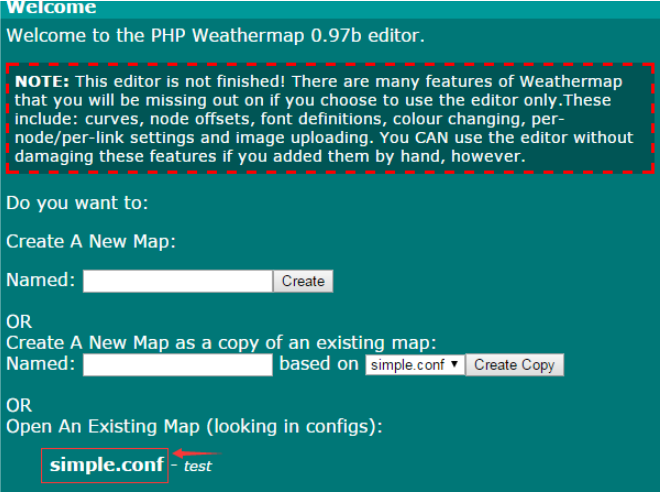
在console列表里找到weathermap,点击Add,添加一个weathermap配置文件,其中simple.conf是默认配置文件,点击进行编辑使用即可

或者直接进入weathermap模块的Editor,进入simple.conf编辑即可

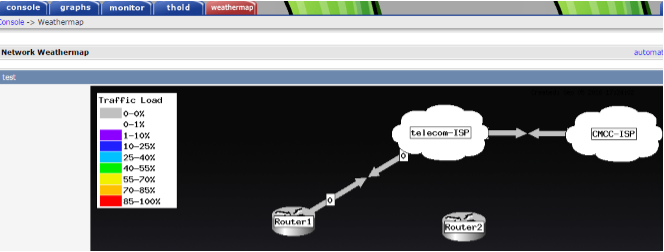
编辑完图形直接生效,查看编制拓扑图后的效果
三、cacti系统的客户端配置
1 linux主机
1.1 安装相关依赖
# yum install net-snmp* –y
# vim /etc/snmp/snmpd.conf
……
com2sec notConfigUser 192.168.2.82 public
access notConfigGroup "" any noauth exact all none none
view all included .1 80
1.2 启动snmp
# service snmpd start;chkconfig snmpd on
最后从web页面添加设备即可。
2 windows主机
在系统服务中开启snmp服务:

然后在属性中按如下图所示修改:

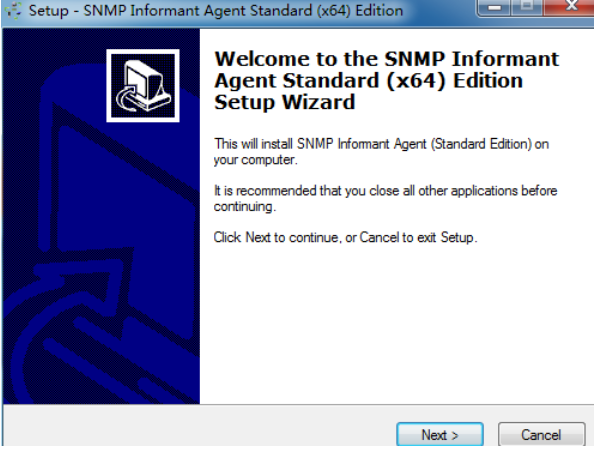
配置完snmp后,安装snmp informant-std-16.exe程序(需下载)即可。
四、Nagios安装
搭建nagios需下载的软件集合
nagios-4.1.1.tar.gz
nagios-plugins-2.1.1.tar.gz
ndoutils-2.0.0.tar.gz
npc-2.0.4.tar.gz
php-json-ext-1.2.1.tar.bz2
nrpe-2.15.tar.gz
NSClient++-Stable-64.msi
其他为默认安装。
1 安装依赖关系
# yum -y install httpd php gcc glibc glibc-common gd gd-devel libpng libjpeg zlib openssl-devel mysql-devel php-pdo
2 创建用户组
# useradd nagios
# usermod -G nagios apache
3 编译安装
# tar -zxvf nagios-4.1.1.tar.gz
# cd nagios-4.1.1
# ./configure --with-command-group=nagios
# make all
# make install
# make install-init
# make install-commandmode
# make install-config
# make install-webconf
# make install-exfoliation
# make install-classicui
【注: make install-exfoliation为naigios新的界面,想要换成以前经典主题需要执行make install-classicui老的界面。】
4 安装插件
# tar zxvf nagios-plugins-2.1.1.tar.gz
# cd nagios-plugins-2.1.1
# ./configure --with-nagios-user=nagios --with-nagios-group=nagios
# make && make install
5 创建登录页面的密码文件
# htpasswd -cm /usr/local/nagios/etc/htpasswd.users nagiosadmin

6 创建Apache首页文件,启动nagios
# touch /var/www/html/index.html
# service nagios start;chkconfig nagios on
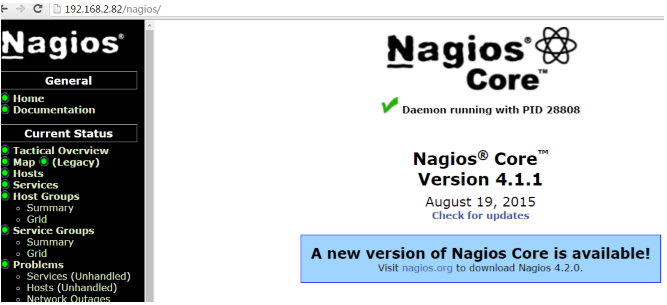
7 登录地址,输入设定的用户名密码
8 检查nagios配置文件语法是否错误
# cd /usr/local/nagios
# ./bin/nagios -v etc/nagios.cfg
……………
Checked 5 time periods.
Checked 0 host escalations.
Checked 0 service escalations.
Checking for circular paths...
Checked 1 hosts
Checked 0 service dependencies
Checked 0 host dependencies
Checked 5 timeperiods
Checking global event handlers...
Checking obsessive compulsive processor commands...
Checking misc settings...
Total Warnings: 0
Total Errors: 0
五、将nagios集成到cacti
1 安装ndoutils
# tar zxvf ndoutils-2.0.0.tar.gz
# cd ndoutils-2.0.0
# ./configure --prefix=/usr/local/nagios/ LDFLAGS=-L/usr/lib --with-mysql-inc=/usr/include/mysql/ --with-mysql-lib=/usr/lib64/mysql/(/var/lib/mysql/) --enable-mysql --disable-pgsql --with-ndo2db-user=nagios --with-ndo2db-group=nagios
# make && make install
2 导入数据库
# cd db/
# ./installdb -u cactiuser -p cactiuser -h localhost -d cactidb
3 修改配置文件
# cd ..
# cp config/ndomod.cfg-sample /usr/local/nagios/etc/ndomod.cfg
# cp config/ndo2db.cfg-sample /usr/local/nagios/etc/ndo2db.cfg
# vim /usr/local/nagios/etc/nagios.cfg
broker_module=/usr/local/nagios/bin/ndomod.o config_file=/usr/local/nagios/etc/ndomod.cfg
process_performance_data=1
# service nagios checkconfig
Running configuration check...
OK.
# vim /usr/local/nagios/etc/ndomod.cfg
output_type=tcpsocket
output=127.0.0.1
data_processing_options=-1
# vim /usr/local/nagios/etc/ndo2db.cfg
socket_type=tcp
db_name=cactidb
db_prefix=npc_
db_user=cactiuser
db_pass=cactiuser
debug_level=1
- tar zxvf npc-2.0.4.tar.gz
- mv npc /var/www/html/cacti/plugins/
- vim /var/www/html/cacti/include/config.php
- # 加入:
- $plugins[] = 'npc';
ndomod: Error writing to data sink! Some output may get lost.解决
安装 npc支持:json(白色未做)
4 安装json
npc展示需要php中的json支持
1) 安装依赖
# yum install -y php-devel
2) 安装json
# tar jxvf php-json-ext-1.2.1.tar.bz2
# cd php-json-ext-1.2.1
# phpize
# ./configure && make && make install
3) 启用json
# vim /etc/php.d/json.ini
extension=php_json.so
ln –s /usr/lib64/php/modules/json.so /usr/lib64/php/modules/php_json.so
# yum reinstall php-common -y
5 在cacti安装npc插件
# tar xvf npc2.0.4.tar
# mv npc /var/www/html/cacti/plugins/
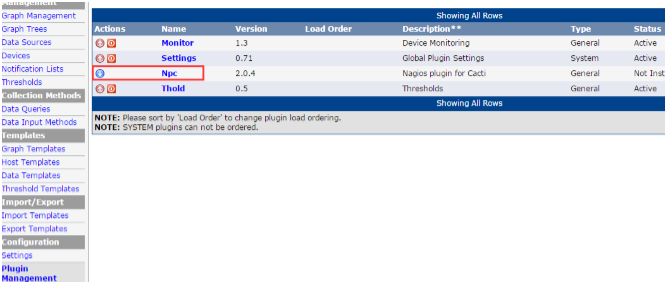
在web页启用插件
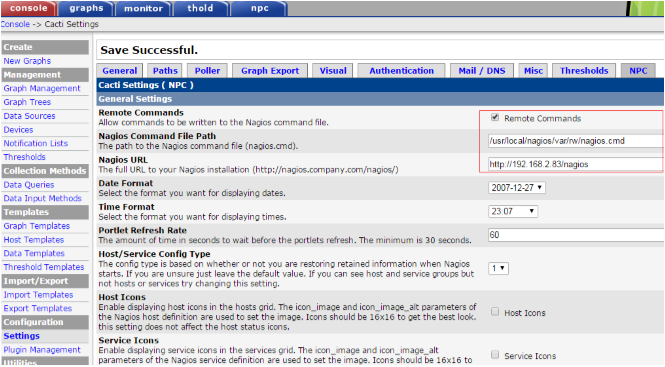
插件配置
修改文件权限
# cd /usr/local/nagios/etc/
# chmod 644 ndo2db.cfg ndomod.cfg
# chown nagios.nagios ndomod.cfg ndo2db.cfg
# chown .nagios htpasswd.users
启动服务
# service mysqld restart
# service httpd restart
# /usr/local/nagios/bin/ndo2db -c /usr/local/nagios/etc/ndo2db.cfg
# vim /etc/rc.local
/usr/local/nagios/bin/ndo2db -c /usr/local/nagios/etc/ndo2db.cfg
# service nagios restart
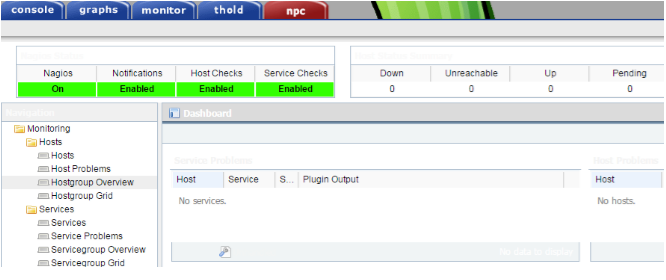
如果网页Host中无显示并且日志内有报错Aug 26 19:52:54 monitor ndo2db: mysql_error: 'Unknown column 'long_output' in 'field list''时,如下修改数据库:
mysql> use cactidb;
mysql> alter table npc_eventhandlers add long_output TEXT NOT NULL default '' after output;
mysql> alter table npc_hostchecks add long_output TEXT NOT NULL default '' after output;
mysql> alter table npc_hoststatus add long_output TEXT NOT NULL default '' after output;
mysql> alter table npc_notifications add long_output TEXT NOT NULL default '' after output;
mysql> alter table npc_servicechecks add long_output TEXT NOT NULL default '' after output;
mysql> alter table npc_servicestatus add long_output TEXT NOT NULL default '' after output;
mysql> alter table npc_statehistory add long_output TEXT NOT NULL default '' after output;
mysql> alter table npc_systemcommands add long_output TEXT NOT NULL default '' after output;
修改数据库后依次重启服务。

若此标签框内数据仍空白全部为0,且日志中有这样错误Aug 28 21:31:19 monitor ndo2db: mysql_error: 'Unknown column 'importance' in 'field list''时,如下修改数据库:
(到ndoutils中的mysql-upgrade-2.0.0.sql文件, 将mysql-upgrade-2.0.0.sql里所有nagios_修改为npc_)
mysql> use cactidb;
mysql> source /home/cacti/ndoutils-2.0.0/db/mysql-upgrade-2.0.0.sql
最终显示效果如下,
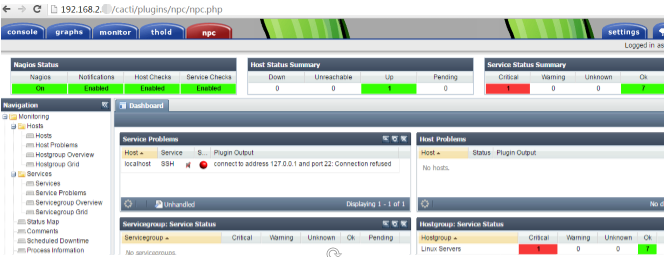

至此,cacti+nagios框架的整合和基本插件的安装就完成了。
四、Nagios配置
1 nagios服务器端配置
1) 只需安装check_nrpe插件(前面已经安装完nagios-plugins-2.1.1)
# cd /home/nagioss/
# tar zxvf nrpe-2.15.tar.gz
# yum install openssl openssl-devel
# cd nrpe-2.15
# ./configure && make all && make install
# make install-plugin
# make install-daemon
# make install-daemon-config
# ls /usr/local/nagios/libexec/

2) 定义check_nrpe命令
# cd etc/objects
# vim commands.cfg
# 'check_nt' command definition
define command{
command_name check_nrpe
command_line $USER1$/check_nrpe -H $HOSTADDRESS$ -c $ARG1$
}
3) 定义主机和服务
# vim hosts.cfg
define host{
use linux-server
host_name monitor
alias monitor
address 192.168.2.81
}
define host{
use windows-server
host_name TESTSERVER
alias TESTSERVER
address 192.168.2.6
}
define hostgroup{
hostgroup_name linux-servers
alias Linux Servers
members monitor,server-redis-1
}
define hostgroup{
hostgroup_name windows-servers
alias Windows Servers
members UATSERVER,TESTSERVER
}
# vim /usr/local/nagios/etc/nagios.cfg
cfg_file=/usr/local/nagios/etc/objects/hosts.cfg
cfg_dir=/usr/local/nagios/etc/objects/services
#cfg_file=/usr/local/nagios/etc/objects/localhost.cfg
新建服务目录,在目录下创建相应的服务文件

根据被监控端nrpe配置对服务文件做类似修改
# vim object/services/2.5.cfg
……
define service{
use generic-service
host_name server-redis-1
service_description HTTP
check_command check_nrpe!check_http
}
# vim object/services/win2.9.cfg
define service{
use generic-service
host_name UATSERVER
service_description W3SVC
check_command check_nt!SERVICESTATE!-d SHOWALL -l W3SVC
}
4) 检查文件语法是否正确
# service nagios configtest

或者
# /usr/local/nagios/bin/nagios -v ../../nagios.cfg
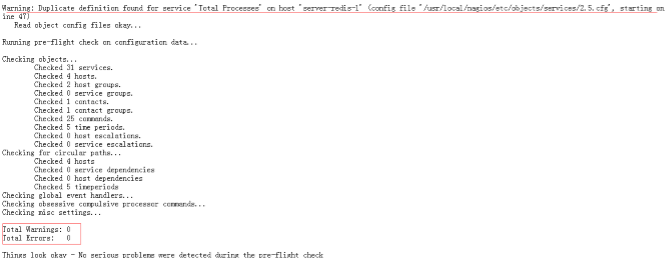
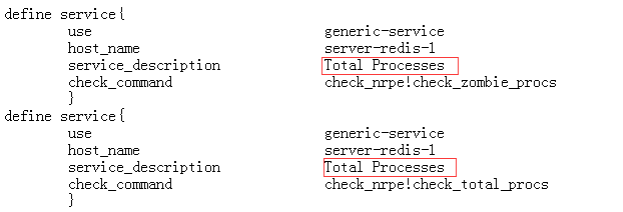
这里有一个警告,是因为复制内容后两个描述名相同,改一个即可

5)
2 被监控端linux服务器配置
1) 创建相关用户和组
# useradd nagios
2) 安装nagios插件
# tar zxvf nagios-plugins-2.1.1.tar.gz
# cd nagios-plugins-2.1.1
# yum install gcc gcc-c++ -y
# ./configure --with-nagios-user=nagios --with-nagios-group=nagios
# make && make install
3) 安装nrpe
# tar zxvf nrpe-2.15.tar.gz
# cd nrpe-2.15
# yum install openssl openssl-devel
# ./configure && make all && make install
# make install-plugin
# make install-daemon
# make install-daemon-config
# make install-xinetd
# ls /usr/local/nagios/libexec/

4) 配置nrpe
# vim /usr/local/nagios/etc/nrpe.cfg
allowed_hosts=127.0.0.1,192.168.2.81

# df –h

5) (以守护进程方式)启动nrpe daemon
nrpe服务有两种运行模式:’standalone daemon’ or ‘xinetd’
# /usr/local/nagios/bin/nrpe -c /usr/local/nagios/etc/nrpe.cfg -d
# echo ‘/usr/local/nagios/bin/nrpe -c /usr/local/nagios/etc/nrpe.cfg -d’ >>/etc/rc.local
查看nrpe端口是否已启动
# netstat -nptul|grep nrpe

6) 可在监控端测试一下nrpe是否正常通信
# ./check_nrpe -H 192.168.2.5

# ./check_nrpe -H 192.168.2.5 -c check_users(测试2.5上命令check_users是否可运行)

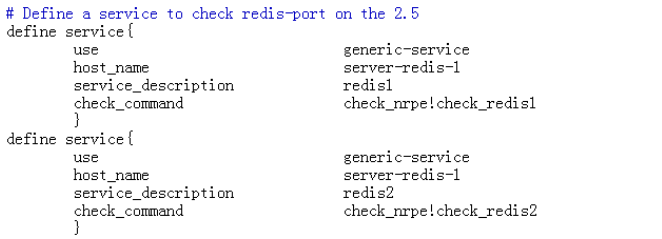
7) 其他,监控redis
在redis服上添加
# vim etc/nrpe.cfg

在监控服上添加
# vim services/2.5.cfg
8) 检查语法,重启nagios、httpd
# service nagios configtest
# service nagios restart;service httpd restart
3 被监控端windows服务器配置
在windows服上需安装NSClient++程序引擎,安装后服务器可通过check_nt来获取监控数据,如图:

1) 下载软件包:
NSClient++-Stable-64.msi
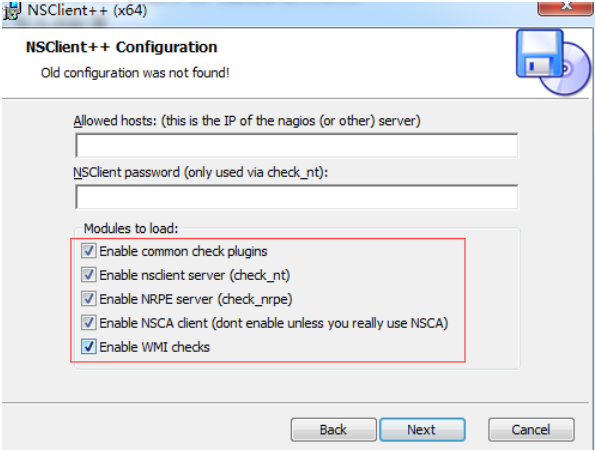
2) 客户端安装
一路默认即可,最后全选进行安装
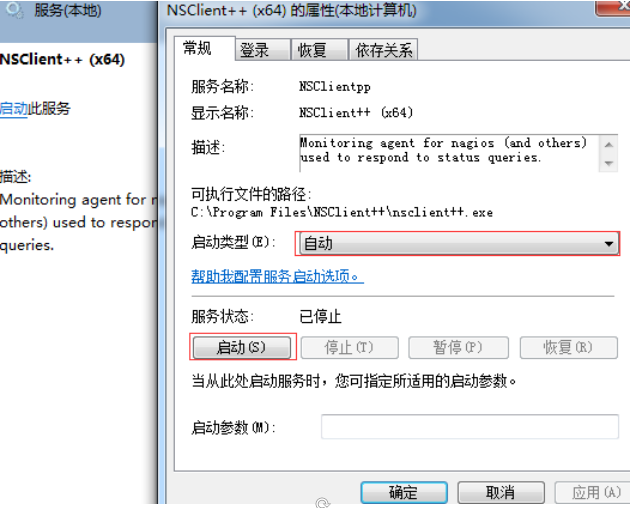
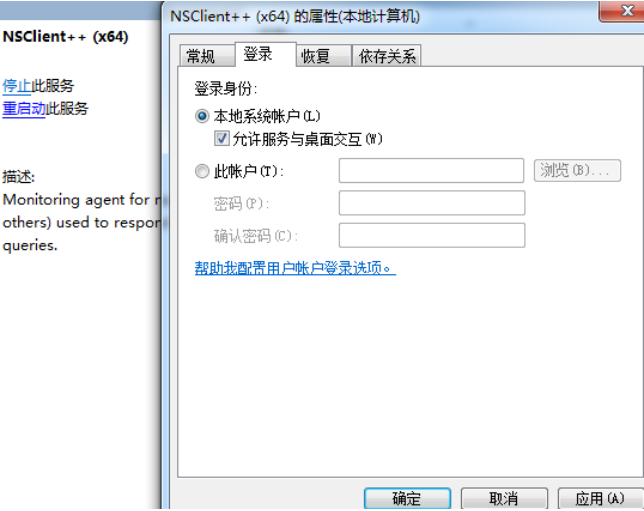
3) 将NSClient++服务开启(自动启动)
4) 配置NSClient++
编辑安装目录下的NSC.ini文件,打开NSClient++的端口,因为安装时候需要的模块已经勾选了,所以不用再设置。
[Settings]
allowed_hosts=192.168.2.81 //监控服务器地址
[NSClient]
port=12489 //启用12489端口
<cmd>查看”12489”和”5666”端口是否已监听:

5) 监控端服务器设置
确保命令文件中有check_nt(默认)

6) 测试check_nt是否通信正常
# ./libexec/check_nt -H 192.168.2.6 -v UPTIME -p 12489

# ./check_nt -H 192.168.2.9 -v SERVICESTATE -p 12489 -l ChampBEndService_3

# ./check_nt -H 192.168.2.9 -v PROCSTATE -p 12489 -l CHAMP_SERVICE_3.exe

7) 检查配置语法,重启nagios、httpd
# service nagios configtest
# service nagios restart;service httpd restart
五、添加cacti模板监控Mysql服务
1 需下载的软件包
percona-cacti-templates-1.1.6-1.noarch.rpm
2 将rpm包拷贝到cacti服务器并解压
# mv percona-cacti-templates-1.1.6-1.noarch.rpm /opt
# cd /opt
# rpm2cpio percona-cacti-templates-1.1.6-1.noarch.rpm | cpio –div
# cp usr/share/cacti/scripts/ss_get_mysql_stats.php usr/share/cacti/resource/percona/templates/cacti_host_template_percona_mysql_server_ht_0.8.6i-sver1.1.6.xml /opt/
# cp /opt/ss_get_mysql_stats.php /var/www/html/cacti/scripts/
# vim /var/www/html/cacti/scripts/ss_get_mysql_stats.php

3 导入模板文件
将/opt/cacti_host_template_percona_mysql_server_ht_0.8.6i-sver1.1.6.xml拷贝到本机,打开cacti页面——console——Import Templates——找到文件路径,导入。

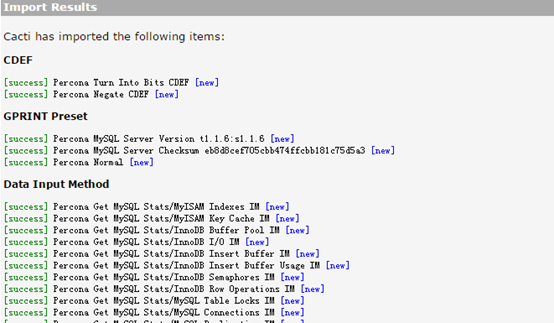
导入成功后,Add主机,在相关项选择使用模板即可。
六、添加cacti模板监控Windows主机
1 windows主机开启SNMP,安装informant-std-16.exe
2 下载软件包
Cacti_SNMP_Informant_Standard_Metrics_v13.zip
3 解压模板文件,将template文件夹中的模板文件通过界面操作全部导入;

然后将文件夹.. esourcesnmp_queries下的snmp_informant_standard_*.xml文件全部放到服务器的cacti/resource/snmp_queries/路径下,并且确保所有用户可读。
4 添加监控设备,在Host Template以及Associated Graph Templates、Associated Data Queries等相应项中选择模板。
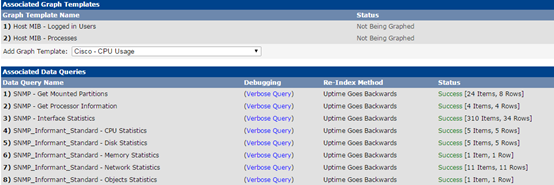
Create Graph for this Host


七、使用nagios监控windows服务(ChampBEndService_3)
1 先测试插件
# /usr/local/nagios/libexec
# ./check_nt -H 192.168.2.9 -v SERVICESTATE -p 12489 -d SHOWALL -l ChampBEndService_3

# ./check_nt -H 192.168.2.9 -v PROCSTATE -p 12489 -d SHOWALL -l CHAMP_SERVICE_3.exe

若测试OK,则说明被控端NSClient++配置及服务都正确
2 添加设置
# vim objects/commands.cfg

# vim services/win2.9.cfg

3 重启服务
# service nagios checkconfig
# service nagios restart
# service httpd restart
八、设置nagios发送报警邮件
若日志中有Warning: Check of host 'monitor' timed out after 30.00 seconds报错,将nagios.cfg中的notification_timeout=30改成notification_timeout=150。
1 安装postfix,删除sendmail
# yum remove sendmail
# service postfix start;chkconfig postfix on
2 将本机发送邮件的地址加入到邮箱白名单,不然会被第三方邮箱当成垃圾邮件。

3 测试收到邮件
九、cacti添加路由器、交换机

