MyBatis-plus
CRUD
Insert
问题:mybatis-plus进行插入的时候会自动生成主键
    void insert() {
        User user = new User();
        user.setName("yogurt");
        user.setAge(15);
        user.setEmail("128@qq.com");
        userMapper.insert(user);
    }

主键生成策略
/**
 * 数据库ID自增
 */
AUTO(0),
/**
 * 该类型为未设置主键类型
 */
NONE(1),
/**
 * 用户输入ID
 * 该类型可以通过自己注册自动填充插件进行填充
 */
INPUT(2),

/* 以下3种类型、只有当插入对象ID 为空,才自动填充。 */
/**
 * 全局唯一ID (idWorker)
 */
ID_WORKER(3),
/**
 * 全局唯一ID (UUID)
 */
UUID(4),
/**
 * 字符串全局唯一ID (idWorker 的字符串表示)
 */
ID_WORKER_STR(5);
如果不配置默认的就是ID_WORKER,是使用雪花算法创建的全局唯一的ID。
update
public void Update(){
    User user = new User();
    user.setName("yogurt11");
    user.setAge(15);
    user.setEmail("128@qq.com");
    user.setId(1371386560893714434L);
    userMapper.updateById(user);
}
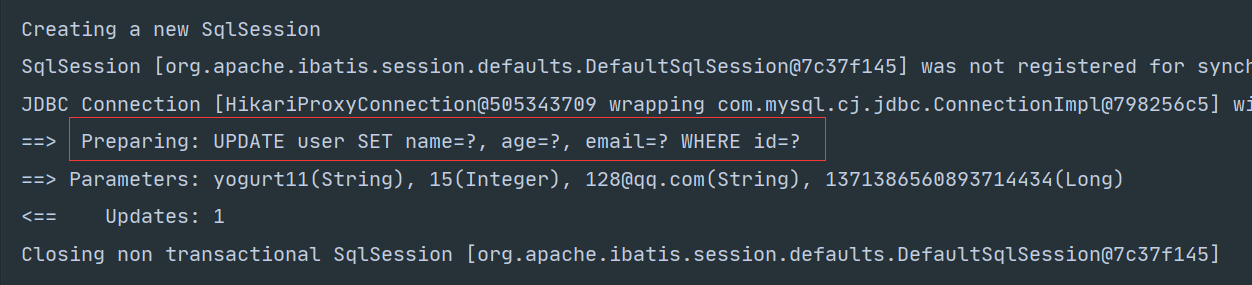
mybatis-plus会自动拼接动态sql。
自动添加
创建时间、修改时间!这些个操作一遍都是自动化完成的,我们不希望手动更新!
阿里巴巴开发手册:所有的数据库表: gmt_create、 gmt_modified几乎所有的表都要配置上!而且需要自动化!
方式一:数据库级别实现,开发时不推荐使用,是不允许修改数据库的
-
改变表,默认值写上CURRENT_TIMESTAMP

-
测试成功

方式二:代码级别实现
-
修改表

-
修改实体类
@TableField(fill = FieldFill.INSERT) private Date createTime; @TableField(fill = FieldFill.INSERT_UPDATE) private Date updateTime; -
添加处理器,mybatis-plus版本不同处理方式不一样,看官网
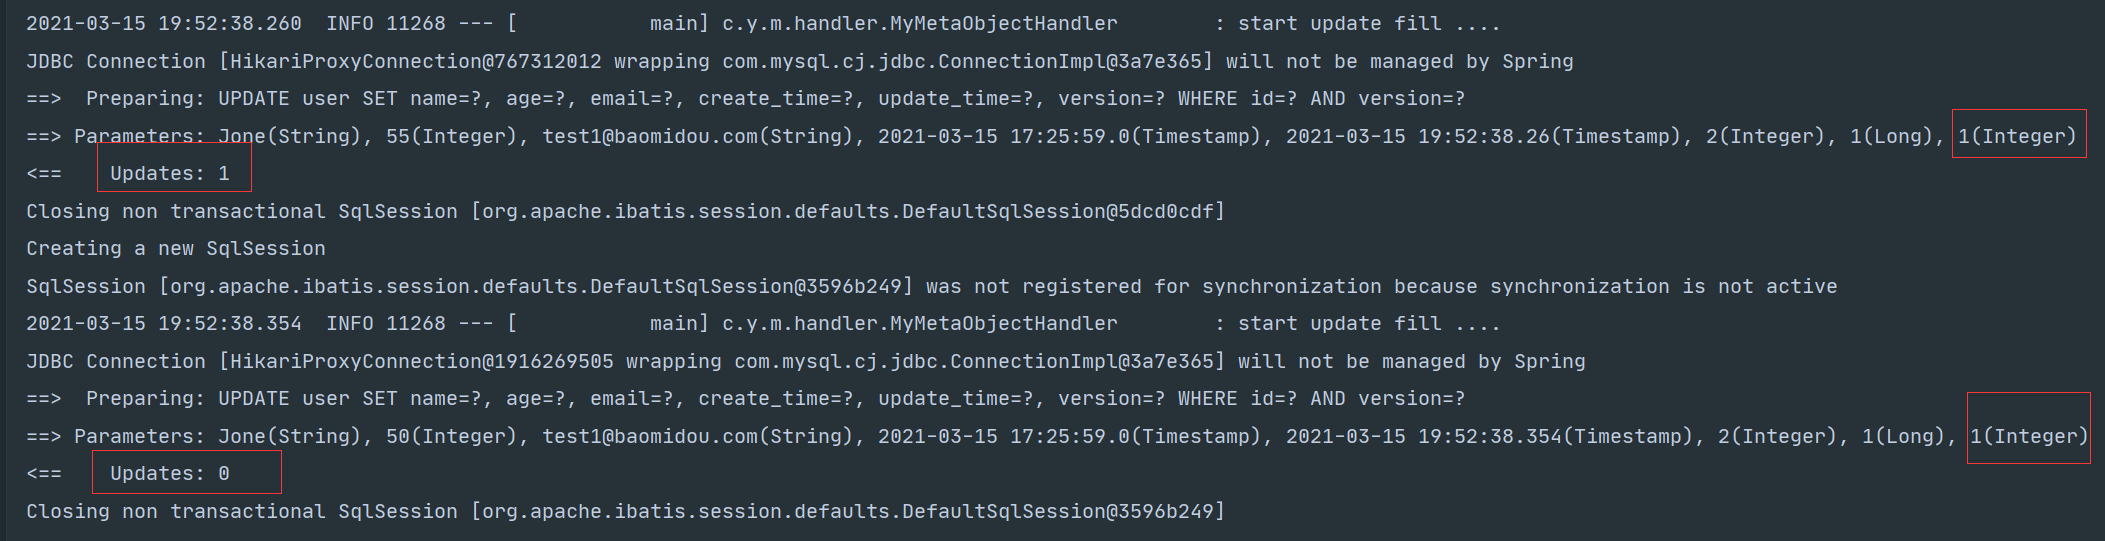
@Slf4j @Component //一定要进行注册 public class MyMetaObjectHandler implements MetaObjectHandler { @Override public void insertFill(MetaObject metaObject) { log.info("start insert fill ...."); this.setFieldValByName("createTime",new Date(),metaObject); this.setFieldValByName("updateTime",new Date(),metaObject); } @Override public void updateFill(MetaObject metaObject) { log.info("start update fill ...."); this.setFieldValByName("updateTime",new Date(),metaObject); } } -
测试结果

乐观锁
简介
乐观锁:乐观锁总是认为线程是安全的,直到出现了问题再进行加锁处理。
- 取出一行记录时会取出里面的Version字段
- 更新字段是会带上这个Version字段,并判断该Version子段是否是之前取出的那个Veriosn
- 如果第二步没有问题则更新成功并且Version = Version + 1,如果判断失败则不会进行更新操作
实现步骤
-
在数据库里面添加veriosn字段

-
修改pojo
@Version private Integer version; -
在配置文件里面添加配置类
@Configuration @MapperScan("com.yogurt.mybatisplus_study.mapper") public class MybatisPlusConfig { @Bean public MybatisPlusInterceptor optimisticLockerInnerInterceptor(){ MybatisPlusInterceptor interceptor = new MybatisPlusInterceptor(); interceptor.addInnerInterceptor(new OptimisticLockerInnerInterceptor()); return interceptor; } } -
测试
@Test public void optimisticLockTest() { //取出数据 User user = userMapper.selectById(1L); user.setAge(50); //模拟多线程B对它操作 User user1 = userMapper.selectById(1L); user1.setAge(55); userMapper.updateById(user1); //这次更新会失败,因为这样更新会覆盖掉user1的数据 userMapper.updateById(user); } -
结果
select
-
通过多个id查询
public void selectByIds(){ List<User> users = userMapper.selectBatchIds(Arrays.asList(1, 2, 3)); users.forEach(System.out::println); } -
使用map进行条件查询
@Test public void selectByMap(){ HashMap<String, Object> map = new HashMap<>(); map.put("name","yogurt"); List<User> users = userMapper.selectByMap(map); users.forEach(System.out::println); } -
分页查询
-
添加插件
//分页插件 @Bean public PaginationInterceptor paginationInterceptor () { return new PaginationInterceptor(); } -
查询
@Test
public void selectByPage(){
    Page<User> userPage = new Page<>(1,5);
    IPage<User> userIPage = userMapper.selectPage(userPage, null);
    //userPage和userIPage中都有数据
    userPage.getRecords().forEach(System.out::println);
    System.out.println("total -> " + userPage.getTotal() + "  pages -> " + userPage.getPages());
}
-
delete
- 通过id删除,返回的是删除的行数
public void deleteById(){
    int result = userMapper.deleteById(1371394747445358594L);
    System.out.println("result -> " + result);
}

@Test
public void deleteByIds() {
    int result = userMapper.deleteBatchIds(Arrays.asList(1371392321954799617L, 1371392128916234242L));
    System.out.println("result -> " + result);
}
-
条件删除,返回的是删除的行数
@Test
public void deleteByMap() {
    HashMap<String, Object> map = new HashMap<>();
    map.put("name","yogurt");
    int result = userMapper.deleteByMap(map);
    System.out.println("result -> " + result);
}
逻辑删除
-
在数据库里面添加逻辑字段delete

-
实体类中添加属性
@TableLogic private Integer deleted; -
添加配置
//逻辑删除插件
@Bean
public LogicSqlInjector logicSqlInjector() {
    return new LogicSqlInjector();
}
global-config: db-config: logic-delete-value: 1 logic-not-delete-value: 0 -
测试
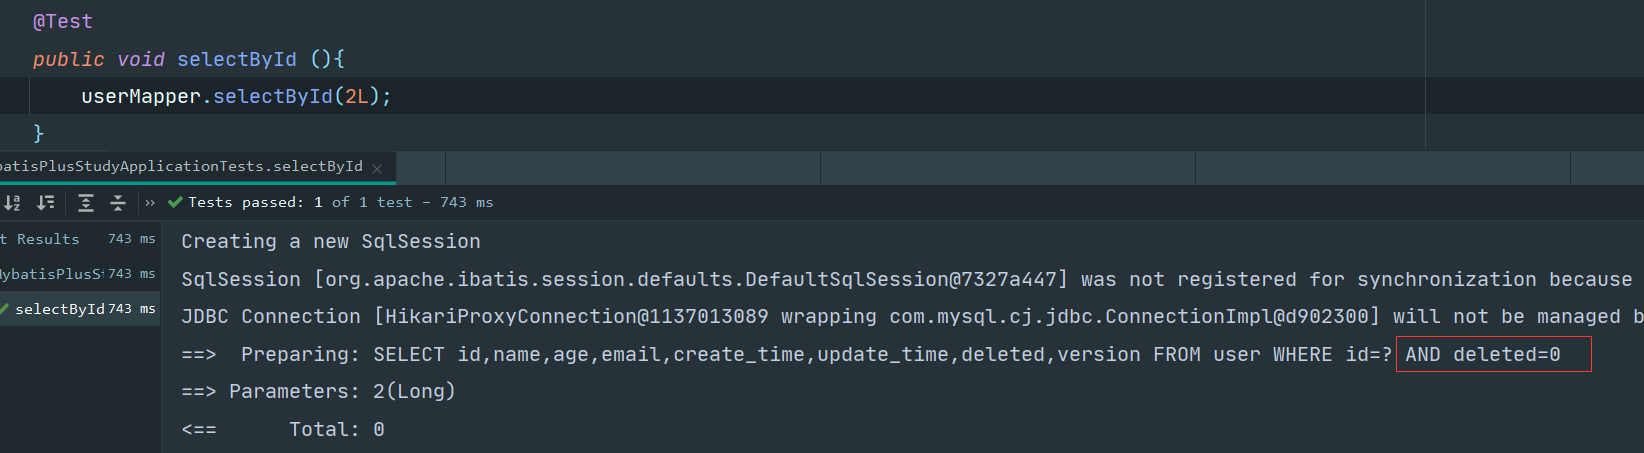
可以看到删除操作变成了更新操作,就是把delete字段由0 -> 1
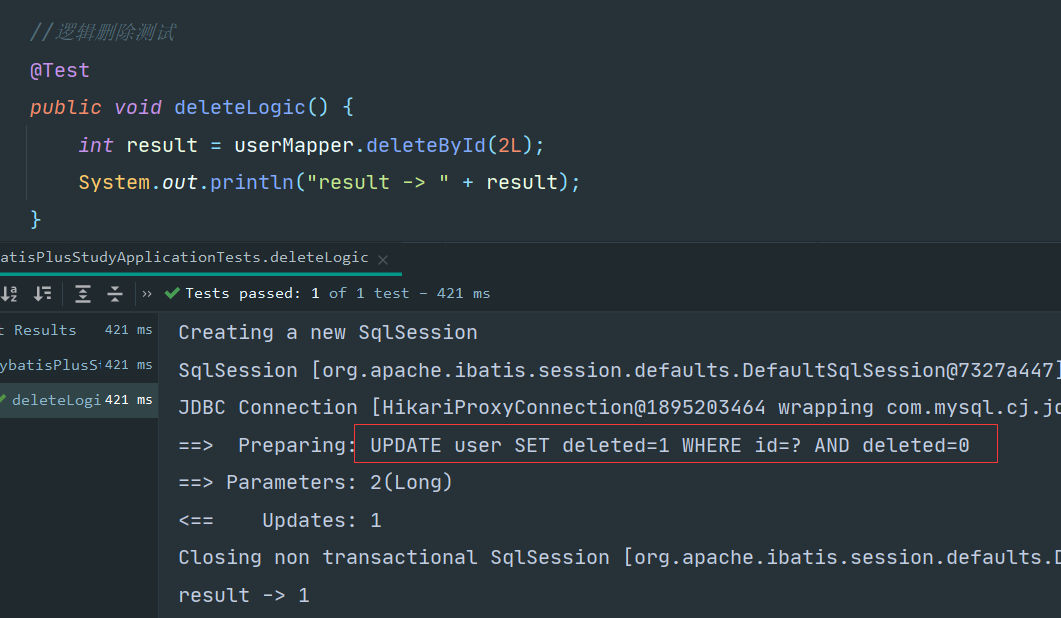
执行查询的时候会自动拼接上 and delete = 0
总结
mybatis-plus插件的注入时,版本不同,注入的方式不一样。
mybatis-plus插件都在另外的依赖mybatis-plus-extension里
<dependency>
    <groupId>com.baomidou</groupId>
    <artifactId>mybatis-plus-extension</artifactId>
    <version>3.0.5</version>
</dependency>
配置日志
mybatis-plus:
  configuration:
    log-impl: org.apache.ibatis.logging.stdout.StdOutImpl
条件构造器
-
名字和邮箱不为空且年龄 < 12的用户
void test1() { //名字和邮箱不为空且年龄 < 12的用户 QueryWrapper<User> wrapper = new QueryWrapper<>(); wrapper.isNotNull("name") .isNotNull("email") .le("age",12); List<User> users = userMapper.selectList(wrapper); users.forEach(System.out::println); } -
查询名字为yogurt的用户,也可以通过map来实现
void test2() { //查询名字为yogurt11的用户 QueryWrapper<User> wrapper = new QueryWrapper<>(); wrapper.eq("name","yogurt11"); List<User> users = userMapper.selectList(wrapper); users.forEach(System.out::println); } -
查询年龄 > 18 且 < 25的用户数量
@Test void test3() { //查询年龄 >= 21 且 < 24的用户数量 QueryWrapper<User> wrapper = new QueryWrapper<>(); wrapper.between("age",21,24); List<User> users = userMapper.selectList(wrapper); users.forEach(System.out::println); } -
名字中不包含e的且以T开头邮箱的用户
void test4() {
    //名字中不包含e的且以T开头邮箱的用户
    QueryWrapper<User> wrapper = new QueryWrapper<>();
    //likeRight = xx% 百分号在右边
    wrapper.notLike("name","e")
            .likeRight("email","t");
    List<User> users = userMapper.selectList(wrapper);
    users.forEach(System.out::println);
}
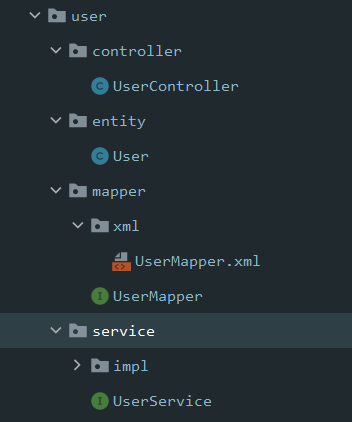
代码生成器
AutoGenerator 是 MyBatis-Plus 的代码生成器,通过 AutoGenerator 可以快速生成 Entity、Mapper、Mapper XML、Service、Controller 等各个模块的代码,极大的提升了开发效率。
-
添加依赖
<!--代码生成器--> <dependency> <groupId>com.baomidou</groupId> <artifactId>mybatis-plus-generator</artifactId> <version>3.0.5</version> </dependency> <!--代码生成器模板引擎--> <dependency> <groupId>org.apache.velocity</groupId> <artifactId>velocity-engine-core</artifactId> <version>2.3</version> </dependency> <!-- https://mvnrepository.com/artifact/io.springfox/springfox-swagger2 --> <dependency> <groupId>io.springfox</groupId> <artifactId>springfox-swagger2</artifactId> <version>2.7.0</version> </dependency> <!-- https://mvnrepository.com/artifact/io.springfox/springfox-swagger-ui --> <dependency> <groupId>io.springfox</groupId> <artifactId>springfox-swagger-ui</artifactId> <version>2.7.0</version> </dependency> -
编写配置类
public class CodeGeneration { public static void main(String[] args) { AutoGenerator mpg = new AutoGenerator(); // 配置策略 // 1、全局配置 GlobalConfig gc = new GlobalConfig(); String projectPath = System.getProperty("user.dir"); gc.setOutputDir(projectPath+"/src/main/java"); gc.setAuthor("iandf"); gc.setOpen(false); gc.setFileOverride(false); // 是否覆盖 gc.setServiceName("%sService"); // 去Service的I前缀 gc.setIdType(IdType.ID_WORKER); gc.setDateType(DateType.ONLY_DATE); gc.setSwagger2(true); mpg.setGlobalConfig(gc); //2、设置数据源 DataSourceConfig dsc = new DataSourceConfig(); dsc.setUrl("jdbc:mysql://localhost:3306/mybatis_plus_study?useUnicode=true&characterEncoding=utf8&useSSL=true"); dsc.setDriverName("com.mysql.cj.jdbc.Driver"); dsc.setUsername("root"); dsc.setPassword("123456"); dsc.setDbType(DbType.MYSQL);//设置数据库类型 mpg.setDataSource(dsc); //3、包的配置 PackageConfig pc = new PackageConfig(); pc.setModuleName("user"); pc.setParent("com.yogurt.mybatisplus_study"); pc.setEntity("entity"); pc.setMapper("mapper"); pc.setService("service"); pc.setController("controller"); mpg.setPackageInfo(pc); //4、策略配置 StrategyConfig strategy = new StrategyConfig(); strategy.setInclude("user"); // 设置要映射的表名 strategy.setNaming(NamingStrategy.underline_to_camel);//下划线转驼峰 strategy.setColumnNaming(NamingStrategy.underline_to_camel); strategy.setEntityLombokModel(true); // 自动lombok; strategy.setLogicDeleteFieldName("deleted"); //设置逻辑删除属性名 // 自动填充配置 TableFill gmtCreate = new TableFill("gmt_create", FieldFill.INSERT); TableFill gmtModified = new TableFill("gmt_modified", FieldFill.INSERT_UPDATE); ArrayList<TableFill> tableFills = new ArrayList<>(); tableFills.add(gmtCreate); tableFills.add(gmtModified); strategy.setTableFillList(tableFills); // 乐观锁 strategy.setVersionFieldName("version"); strategy.setRestControllerStyle(true); strategy.setControllerMappingHyphenStyle(true); //localhost:8080/hello_id_2 mpg.setStrategy(strategy); mpg.execute(); //执行 } } -
执行之后生成的效果