目录
Android 布局管理器
一丶简介布局管理器
通过上一讲,我们用 Android Studio 创建了一个简单的Android项目.并且成功运行.
我们知道了Android Studio的目录结构. 也知道我们的 HelloWord是在哪里存放的.
那么我们应该这样想. Android有很多控件.等. 类似于MFC 程序.有按钮啊 编辑框啊等等.
那么要怎么进行统一管理的哪. 这里其实就是Android布局管理器在管理.
Android Studio -> app ->src ->main -res ->Layout 记录着的就是HelloWorld文件存放位置
主要分为两种
LinearLayout(线性布局)
RelativeLayout(相对布局)
下面就介绍下布局的 xml属性等
二丶 LinerLayout 线性布局
2.1 LinerLayout线性布局的属性
如下表所示
| 属性 | 作用 | 对应Value值 | 作用 |
|---|---|---|---|
| android:id | 控件的id标识,通过id可以找到控件, 有一个@+id 标识自动创建 | @+id/ | 表示自动创建ID.随便定义一个即可 |
| android:layout_width | 控件的宽度,对应值 | wrap_content match_parent | wrap_content,标识根据内容,宽度字修改,match_parent就是匹配父控件父控件多宽我就多宽 |
| android:layout_height | 高度 | ||
| android:background | 背景 可以设置颜色,图片.或者自定义的. | ||
| android:layout_margin | 外边距,表示我这个控件距离外部边距是多少 | ||
| android:layout_padding | 内边距,距离内部元素的距离是多少.比如你设置20dp那么内部距离外部就要有20 | padding paddingleft paddingtop paddingbottom | 这里的padding代表的是上下左右都设置,那么left就射只设置左边.反之也有设置上边 下边右边等 |
| android:orientation | 方向,属于LinerLayout特有的.因为横着也是线性,竖着也是线性,你也表示你是横着表示 还是竖着表示 | vertical horizontal | vertical表示线性布局是垂直方向 horizontal则表示是水平的方向 |
| android:gravity | 表示你内部控件的属性,是居中显示 还是从左到右 还是上到下等等,注意没有layout前缀 | bottom center | 从下向上 或者居中 |
| android:layout_weight | 权重值 比如我们一个view宽度设置为都设置为1.我们要在一个布局中一分为2.第一种方法就是建立两个view,分别设置宽度.第二种就是宽度修改为0,权重值改为1.那么就代表两个view的宽度值是平分的,权重值一样,也可以理解为分别占了几分之几,比如两个view都是1.那么就是各占二分之一,一个是2,一个是1.那么就是三分之2,另一个就占了三分之一 |
这些属性不是说特有的属于这个布局的属性.基本上很多属性都会用到.所以了解了啥意思.
以后编写xml布局就很简单了.
我们可以修改Android Studio看到效果
<?xml version="1.0" encoding="utf-8"?>
<LinearLayout xmlns:android="http://schemas.android.com/apk/res/android"
xmlns:app="http://schemas.android.com/apk/res-auto"
xmlns:tools="http://schemas.android.com/tools"
android:layout_width="match_parent"
android:layout_height="match_parent"
android:orientation="vertical"
tools:context=".MainActivity">
<LinearLayout
android:id="@+id/m_1"
android:layout_width="200dp"
android:layout_height="200dp"
android:orientation="vertical"
android:paddingTop="30dp"
android:paddingBottom="20dp"
android:paddingLeft="20dp"
android:paddingRight="30dp"
android:background="#cfe2f3">
<!-- view加不加闭合标签都可以 /> 或者</viwName> -->
<TextView
android:text="HelloWorld"
android:layout_height="match_parent"
android:layout_width="match_parent"
android:background="#cc4125"></TextView>
</LinearLayout>
<!--学习外边距-->
<LinearLayout
android:layout_width="match_parent"
android:layout_height="200dp"
android:orientation="horizontal"
android:background="#3c78d8"
android:layout_marginTop="20dp">
<!-- android:gravity="center"> <!– 居中显示–>-->
<!-- 设置为垂直之后我们的这个LinerLayout就与上面上贴住的.所以设置下外边距-->
<TextView
android:text="HelloWorld1"
android:layout_height="match_parent"
android:layout_width="0dp"
android:background="#5cb85c"
android:layout_weight="1"></TextView>
<TextView
android:text="HelloWord2"
android:layout_height="match_parent"
android:layout_width="0dp"
android:background="#0000"
android:layout_weight="1"></TextView>
</LinearLayout>
</LinearLayout>
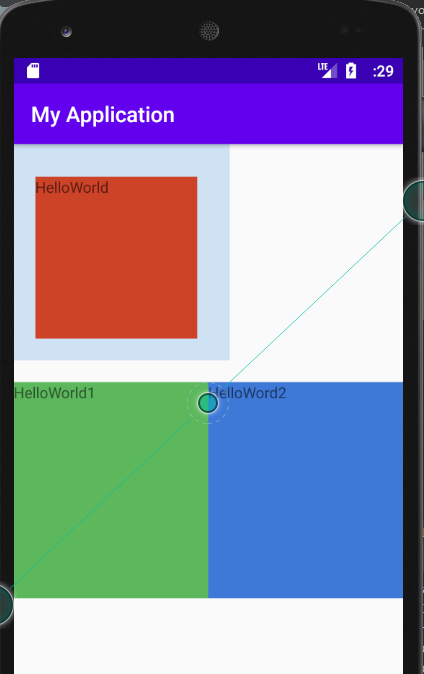
直接使用Android中的 Run即可看到效果
效果图如下.
三丶相对布局 RelativeLayout
3.1 相对布局 RelatvieLayout属性
| 属性 | 作用 | 值 | 作用 |
|---|---|---|---|
| android:layout_toLeftOf | 参照的概念,在谁的左边 填写一个view的ID 可以相对于这个view设置在它的左边 | ||
| android:layout_toRightOf | 同上在谁的右边. | ||
| android:layout_alignBottom | 跟谁底部对齐 | ||
| android:layout_alignParentBottom | 跟父控件底部对齐,比如一个view想设置在底部,有两种方法 1.使用android:gravity 设置为 bottom ,2.在view使用此属性设置为TRUE | ||
| android:layout_below | 在谁的下边 | ||
其它网上资料
RelativeLayout用到的一些重要的属性:

一、相对于父容器而言的属性

android:layout_centerInparent          相对于父容器完全居中

android:layout_alignParentTop         贴紧父容器的上边

android:layout_alignParentBottom   贴紧父容器的下边

android:layout_alignParentLeft         贴紧父容器的左边

android:layout_alignParentRight      贴紧容器的右边

二、相对于控件而言的属性

android:layout_below            在某个组件的下边

android:layout_above            在某个组件的上方

android:layout_toLeftOf         在某个组件的左边

android:layout_toRightOf      在某组件的右边

android:layout_alignTop       个组件之间是顶部对齐

android:layout_alignBottom 两个组件之间是底部对齐

android:layout_alignLeft       两个组件之间是左边缘对齐

android:layout_alignRight    两个组件之间是右边缘对齐

三、属性值为具体的像素值

android:layout_marginTop 离某元素上边缘的距离

android:layout_marginBottom 离某元素底边缘的距离

android:layout_marginLeft 离某元素左边缘的距离

android:layout_marginRight 离某元素右边缘的距离
Xml 数据如下
<?xml version="1.0" encoding="utf-8"?><!--设置为相对布局-->
<RelativeLayout xmlns:android="http://schemas.android.com/apk/res/android"
    xmlns:app="http://schemas.android.com/apk/res-auto"
    xmlns:tools="http://schemas.android.com/tools"
    android:layout_width="match_parent"
    android:layout_height="match_parent"
    tools:context=".MainActivity">

<!--    设置view1在下面显示-->
    <view
        android:id="@+id/View_1"
        android:layout_width="100dp"
        android:layout_height="100dp"
        android:layout_alignParentBottom="true">
    </view>

<!--    设置view2在右下角显示-->
    <view
        android:id="@+id/view_2"
        android:layout_width="100dp"
        android:layout_height="100dp"
        android:layout_alignParentBottom="true"
        android:layout_alignParentRight="true">

    </view>

<!--    设置view4相对于view3的左边-->
    <view
        android:id="@+id/view_3"
        android:layout_width="100dp"
        android:layout_height="100dp">
    </view>

    <view
        android:id="@+id/view4"
        android:layout_width="100dp"
        android:layout_height="100dp"
        android:layout_toRightOf="@+id/view_3">

    </view>

<!--    设置view5相对于vie3的下方-->
    <view
        android:id="@+id/view_5"
        android:layout_width="100dp"
        android:layout_height="100dp"
        android:layout_below="@+id/view_3">
    </view>


<!--    设置view6相对于view2的左边,并且也有设置为底部显示-->
    <view
        android:id="@+id/view_6"
        android:layout_width="100dp"
        android:layout_height="100dp"
        android:layout_alignParentBottom="true"
        android:layout_toLeftOf="@+id/view_2">

    </view>

<!--    设置线性布局,位于view6的上方-->
    <LinearLayout

        android:id="@+id/Lin_view1"
        android:layout_above="@+id/view_6"
        android:background="#5cb85c"
        android:orientation="vertical"
        android:layout_width="match_parent"
        android:layout_height="200dp">

    </LinearLayout>

<!--    其它自定义xml布局-->
    <LinearLayout
        android:layout_above="@+id/Lin_view1"
        android:layout_width="match_parent"
        android:layout_height="200dp"
        android:orientation="horizontal"
        android:padding="15dp"
        android:background="#1167f0">
<!--        设置内边距为15 那么外部控件距离内部控件就有15-->
        <view
            android:id="@+id/view_7"
            android:layout_width="100dp"
            android:layout_height="match_parent">

        </view>

        <view
            android:layout_marginLeft="10dp"
            android:layout_width="100dp"
            android:layout_height="match_parent">

        </view>
        <RelativeLayout
            android:layout_width="match_parent"
            android:layout_height="match_parent"
            android:background="#ffff00"
            android:layout_marginLeft="10dp"
            android:padding="10dp">
            <view
                android:layout_width="120dp"
                android:layout_height="120dp"
                android:background="#d41f1f">
            </view>

        </RelativeLayout>
    </LinearLayout>


</RelativeLayout>
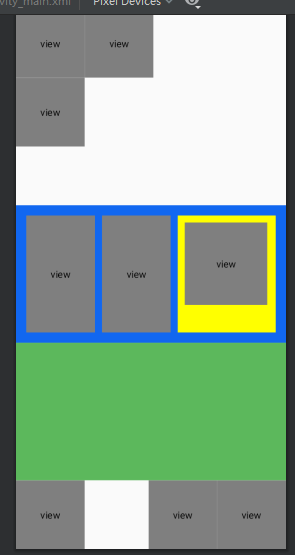
实现效果