摘自官方说明:
Spring Cloud Netflix provides Netflix OSS integrations for Spring Boot apps through autoconfiguration and binding to the Spring Environment and other Spring programming model idioms. With a few simple annotations you can quickly enable and configure the common patterns inside your application and build large distributed systems with battle-tested Netflix components. The patterns provided include Service Discovery (Eureka), Circuit Breaker (Hystrix), Intelligent Routing (Zuul) and Client Side Load Balancing (Ribbon)..
通过上述可以了解到:
Eureka:服务发现
Hystrix:断路器
Zuul:智能路由
Ribbon:客户端负载均衡
先图话后
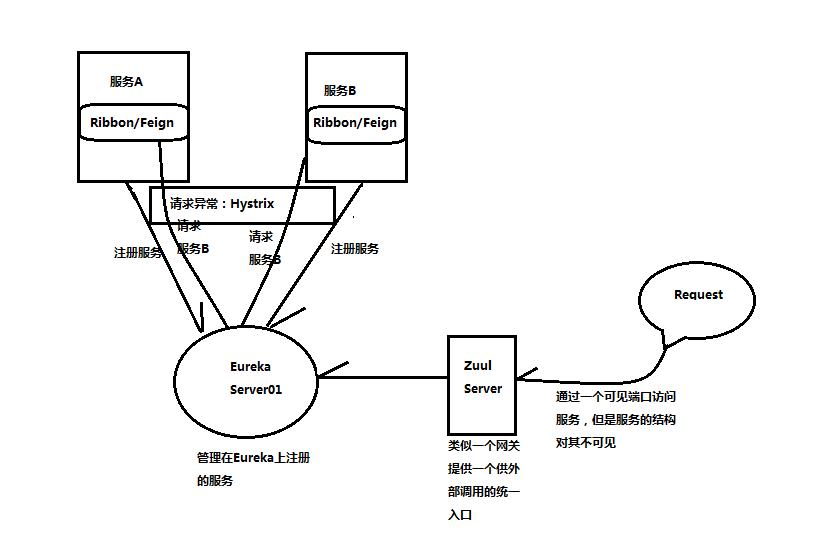
Eureka:实际上在整个过程中维护者每个服务的生命周期。每一个服务都要被注册到Eureka服务器上,这里被注册到Eureka的服务又称为Client。Eureka通过心跳来确定服务是否正常。Eureka只做请求转发。同时Eureka是支持集群的呦!!!
Zuul:类似于网关,反向代理。为外部请求提供统一入口。
Ribbon/Feign:可以理解为调用服务的客户端。
Hystrix:断路器,服务调用通常是深层的,一个底层服务通常为多个上层服务提供服务,那么如果底层服务失败则会造成大面积失败,Hystrix就是就调用失败后触发定义好的处理方法,从而更友好的解决出错。也是微服务的容错机制。
多说不如看代码
下面我们将搭建一个单Eureka服务器的案例,我们将会注册两个微服务,并配置Zuul。
目标:
1.模拟外部请求,访问暴漏端口(Eureka监听端口)访问其中一个内部服务。
2.演示服务间如何通过Feign进行调用。
综述:
我们要写的包括:
一个Eureka服务器
两个微服务
抽取出公共的POM部分,让我们专注重点
<project xmlns="http://maven.apache.org/POM/4.0.0" xmlns:xsi="http://www.w3.org/2001/XMLSchema-instance"
    xsi:schemaLocation="http://maven.apache.org/POM/4.0.0 http://maven.apache.org/xsd/maven-4.0.0.xsd">
    <modelVersion>4.0.0</modelVersion>
    <groupId>com.xbz.eureka.demo</groupId>
    <artifactId>demo-eureka-server</artifactId>
    <version>0.0.1-SNAPSHOT</version>

    <properties>
        <java.version>1.7</java.version>
        <file.encoding>UTF-8</file.encoding>
    </properties>
    <dependencyManagement>
        <dependencies>
            <dependency>
                <groupId>org.springframework.cloud</groupId>
                <artifactId>spring-cloud-netflix</artifactId>
                <version>1.2.2.RELEASE</version>
                <type>pom</type>
                <scope>import</scope>
            </dependency>
        </dependencies>
    </dependencyManagement>
    <dependencies>
        <!-- 引入的依赖 -->
    </dependencies>
<build>
        <plugins>
            <plugin>
                <artifactId>maven-compiler-plugin</artifactId>
                <version>2.3.2</version>
                <configuration>
                    <source>${java.version}</source>
                    <target>${java.version}</target>
                    <encoding>${file.encoding}</encoding>
                </configuration>
            </plugin>
        </plugins>
    </build>

    <repositories>
        <repository>
            <id>spring-snapshots</id>
            <name>Spring Snapshots</name>
            <url>https://repo.spring.io/libs-snapshot</url>
            <snapshots>
                <enabled>true</enabled>
            </snapshots>
        </repository>
    </repositories>
</project>- 1
- 2
- 3
- 4
- 5
- 6
- 7
- 8
- 9
- 10
- 11
- 12
- 13
- 14
- 15
- 16
- 17
- 18
- 19
- 20
- 21
- 22
- 23
- 24
- 25
- 26
- 27
- 28
- 29
- 30
- 31
- 32
- 33
- 34
- 35
- 36
- 37
- 38
- 39
- 40
- 41
- 42
- 43
- 44
- 45
- 46
- 47
- 48
- 49
- 50
Eureka单例服务器(即不将自身作为一个Client)
我们只需要三个步骤就可以启动服务器
1.POM引入
<dependency>
    <groupId>org.springframework.cloud</groupId>
    <artifactId>spring-cloud-starter-eureka</artifactId>
</dependency>
<dependency>
    <groupId>org.springframework.cloud</groupId>
    <artifactId>spring-cloud-starter-zuul</artifactId>
</dependency>
<dependency>
    <groupId>org.springframework.cloud</groupId>
    <artifactId>spring-cloud-starter-eureka-server</artifactId>
</dependency>- 1
- 2
- 3
- 4
- 5
- 6
- 7
- 8
- 9
- 10
- 11
- 12
2.搞个Main启动类
@EnableEurekaServer
@EnableZuulProxy
package com.xbz.eureka.demo.server;

import org.springframework.boot.autoconfigure.SpringBootApplication;
import org.springframework.boot.builder.SpringApplicationBuilder;
import org.springframework.cloud.netflix.eureka.server.EnableEurekaServer;
import org.springframework.cloud.netflix.zuul.EnableZuulProxy;

@SpringBootApplication
@EnableEurekaServer
@EnableZuulProxy
public class EnurekaServer {
    public static void main(String[] args) {
        new SpringApplicationBuilder(EnurekaServer.class).web(true).run(args);
    }
}
- 1
- 2
- 3
- 4
- 5
- 6
- 7
- 8
- 9
- 10
- 11
- 12
- 13
- 14
- 15
- 16
3.重点:application.yml
#单例模式启动Eureka Server
server:
  port: 8761 #启动端口
eureka:
  client:
    registerWithEureka: false #false:不作为一个客户端注册到注册中心
    fetchRegistry: false #为true时,可以启动,但报异常:Cannot execute request on any known server
zuul:
  prefix: /techouse #为zuul设置一个公共的前缀
  #ignoredServices: '*'
  routes:
    cloud-client: #随便定义,当不存在serviceId时,默认该值为serviceId(就是注册服务的名称,属性spring.application.name)
      path: /usersystem/** #匹配/techouse/usersystem/** 均路由到cloud-client
      serviceId: cloud-client #指定路由到的serviceId
ribbon:
  eureka:
    enabled: false #配置zuul路由时用将此属性设置为false

cloud-client:
  ribbon:
listOfServers: 127.0.0.1:8800 #为cloud-client服务指定一组服务地址,应该是用于负载均衡- 1
- 2
- 3
- 4
- 5
- 6
- 7
- 8
- 9
- 10
- 11
- 12
- 13
- 14
- 15
- 16
- 17
- 18
- 19
- 20
- 21
两个微服务
服务cluod-client
客户端pom
<dependency>
    <groupId>org.springframework.cloud</groupId>
    <artifactId>spring-cloud-starter-eureka</artifactId>
</dependency>
<dependency>
    <groupId>org.springframework.cloud</groupId>
    <artifactId>spring-cloud-starter-hystrix</artifactId>
</dependency>- 1
- 2
- 3
- 4
- 5
- 6
- 7
- 8
这个服务我们在上面的application.yml中配置了,等下我们就可以用Eureka服务器地址访问此服务。
该服务包含一个HellController,和ServerApplication(启动类)
HelloController.java
package com.xbz.eureka.demo.client.controller;

import org.springframework.web.bind.annotation.PathVariable;
import org.springframework.web.bind.annotation.RequestMapping;
import org.springframework.web.bind.annotation.RestController;

import com.netflix.hystrix.contrib.javanica.annotation.HystrixCommand;

@RestController
public class HelloController {
    @RequestMapping("/hello/{fallback}")
    @HystrixCommand(fallbackMethod="helloFallbackMethod")/*调用方式失败后调用helloFallbackMethod*/
    public String hello(@PathVariable("fallback") String fallback){
        if("1".equals(fallback)){
            throw new RuntimeException("...");
        }
        return "hello";
    }

    public String helloFallbackMethod(String fallback){
        return "fallback 参数值为:"+fallback;
    }
}
- 1
- 2
- 3
- 4
- 5
- 6
- 7
- 8
- 9
- 10
- 11
- 12
- 13
- 14
- 15
- 16
- 17
- 18
- 19
- 20
- 21
- 22
- 23
- 24
ServerApplication.java
@EnableEurekaClient,确保该应用注册到Eureka服务器
@EnableHystrix 断路器生效
package com.xbz.eureka.demo.client;

import org.springframework.boot.SpringApplication;
import org.springframework.boot.autoconfigure.SpringBootApplication;
import org.springframework.cloud.netflix.eureka.EnableEurekaClient;
import org.springframework.cloud.netflix.hystrix.EnableHystrix;

@SpringBootApplication
@EnableEurekaClient
@EnableHystrix
public class ServiceApplication {
    public static void main(String[] args) {
        SpringApplication.run(ServiceApplication.class, args);
    }
}
- 1
- 2
- 3
- 4
- 5
- 6
- 7
- 8
- 9
- 10
- 11
- 12
- 13
- 14
- 15
- 16
重要的application.xml
server:
  port: 8800
spring:
  application:
    name: cloud-client #为你的应用起个名字,该名字将注册到eureka注册中心
eureka:
  instance:
    statusPageUrlPath: ${management.context-path}/info
    healthCheckUrlPath: ${management.context-path}/health
  client:
    serviceUrl:
      defaultZone: http://localhost:8761/eureka/ #去哪里注册,eureka服务地址
- 1
- 2
- 3
- 4
- 5
- 6
- 7
- 8
- 9
- 10
- 11
- 12
- 13
服务cluod-client-consumer
这个服务要调用cloud-client服务中的/hello/{fallback}方法
使用@Feign(“服务名称”),接口中随便定义方法,然后@RequestMapping(“/hello/{fallback}”)即可,内部调用就是如此简单。
涉及HelloService(演示如何使用@Feign)调用服务。HelloController演示调用服务的输出结果,以及ConsumerApplication启动类。
HelloService.java
package com.xbz.eureka.demo.consumer;

import org.springframework.cloud.netflix.feign.FeignClient;
import org.springframework.web.bind.annotation.PathVariable;
import org.springframework.web.bind.annotation.RequestMapping;

@FeignClient("cloud-client")
public interface HelloService {
    @RequestMapping("/hello/{fallback}")
    public String hello(@PathVariable("fallback") String fallback);
}
- 1
- 2
- 3
- 4
- 5
- 6
- 7
- 8
- 9
- 10
- 11
- 12
HelloController.java
package com.xbz.eureka.demo.consumer;

import org.springframework.beans.factory.annotation.Autowired;
import org.springframework.web.bind.annotation.PathVariable;
import org.springframework.web.bind.annotation.RequestMapping;
import org.springframework.web.bind.annotation.RestController;
@RestController
public class HelloController {
    @Autowired
    private HelloService helloServcie;
    @RequestMapping("/test/{fallback}")
    public String hello(@PathVariable("fallback") String fallback){
        String res=helloServcie.hello(fallback);
        return "调用服务结果为"+res;
    }
}- 1
- 2
- 3
- 4
- 5
- 6
- 7
- 8
- 9
- 10
- 11
- 12
- 13
- 14
- 15
- 16
启动类ConsumerApplication.java
@EnableEurekaClient注册到Eureka
@EnableFeignClients 内部使用Feign调用服务
@EnableZuulProxy 必须要有这个注解
package com.xbz.eureka.demo.consumer;

import org.springframework.boot.SpringApplication;
import org.springframework.boot.autoconfigure.SpringBootApplication;
import org.springframework.cloud.netflix.eureka.EnableEurekaClient;
import org.springframework.cloud.netflix.feign.EnableFeignClients;
import org.springframework.cloud.netflix.zuul.EnableZuulProxy;

@SpringBootApplication
@EnableEurekaClient
@EnableZuulProxy
@EnableFeignClients
public class ConsumerApplication {
    public static void main(String[] args) {
        SpringApplication.run(ConsumerApplication.class, args);
    }
}
- 1
- 2
- 3
- 4
- 5
- 6
- 7
- 8
- 9
- 10
- 11
- 12
- 13
- 14
- 15
- 16
- 17
- 18
重要application.xml
server:
 port: 8080
spring:
  application:
   name: cloud-consumer #为你的应用起个名字,该名字将注册到eureka注册中心
eureka:
  instance:
    statusPageUrlPath: ${management.context-path}/info
    healthCheckUrlPath: ${management.context-path}/health
  client:
    serviceUrl:
defaultZone: http://hadoopMaster:8761/eureka/ #去哪里注册,eureka服务地址- 1
- 2
- 3
- 4
- 5
- 6
- 7
- 8
- 9
- 10
- 11
- 12
至此,我们的服务就搭建起来了!!!
按顺序启动三个类:
EurekaServer
ServiceApplication
ConsumerApplication
正常情况下,访问http://127.0.0.1:8761将看到如下界面
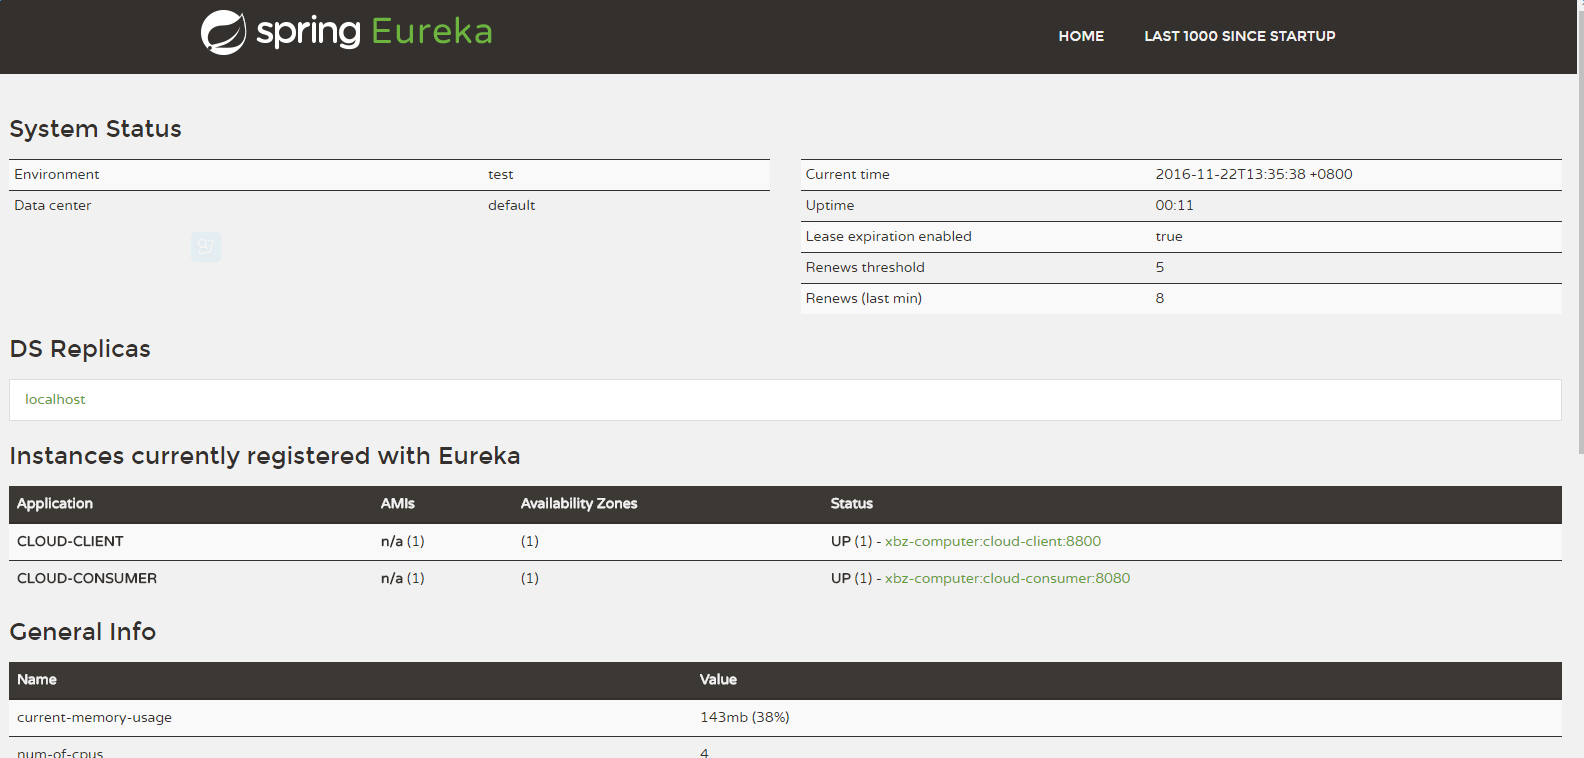
图中展示了我们启动的两个服务。
1.访问http://127.0.0.1:8080/test/1测试服务内部调用,且失败会调用fallback方法返回值。
2.访问http://127.0.0.1:8080/test/2测试服务内部调用,则正常调用cloud-client的服务。
3.我们可以使用统一入口,调用cloud-client服务:
访问的url:http://127.0.0.1:8761/techouse/usersystem/hello/2
以上便是一个简单的微服务搭建喽!!!