简介
IBM Bluemix (http://www.ibm.com/bluemix)是一个基于cloud的应用开发和部署平台,提供包括多种服务和运行环境的支持。对Hyperledger应用开发者而言,IBM Bluemix提供免费的入门级区块运行环境。本文介绍了在IBM Bluemix上部署Hyperledger应用的基本过程。
第一步: 在 Bluemix中选择区块服务
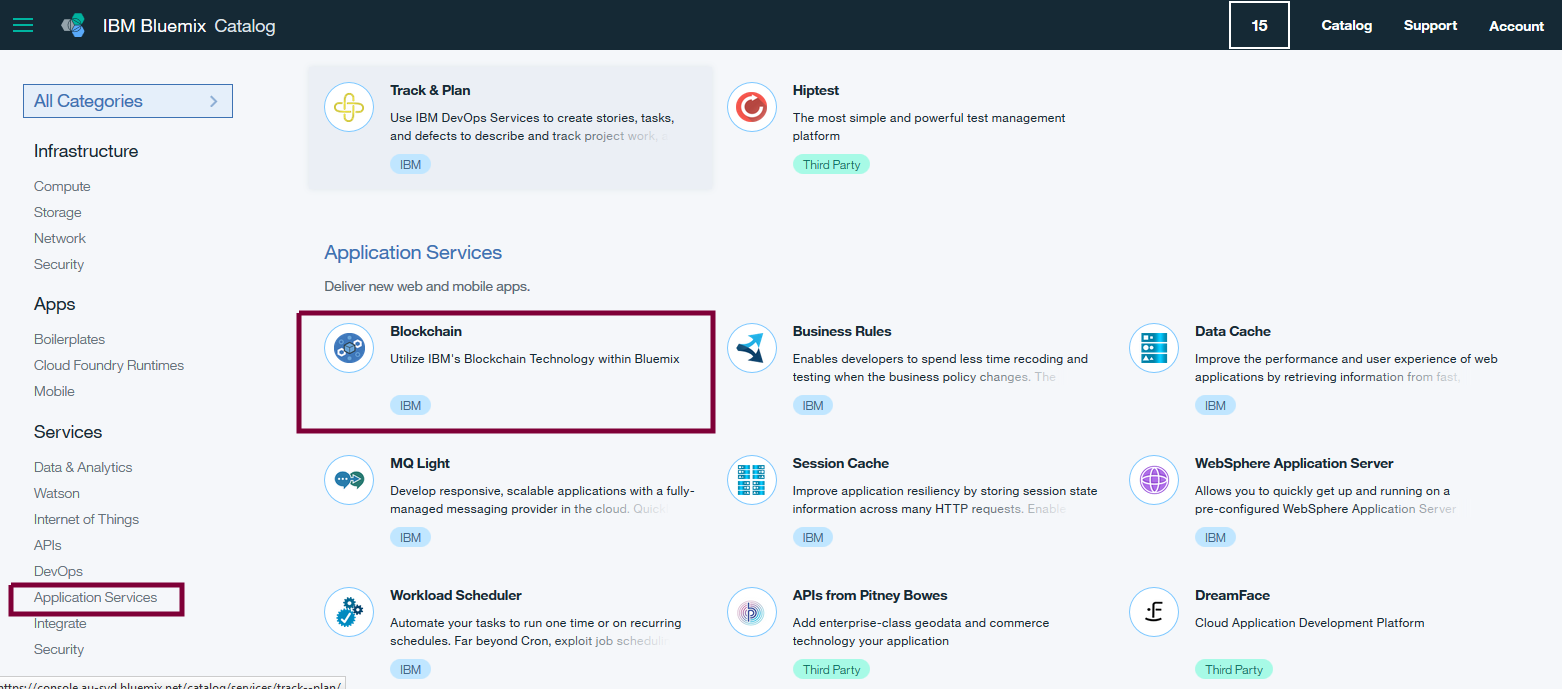
登录Bluemix后,在Catalog页面中选择Application Services下的Blochain服务。

确认区块服务的名称,然后点击Create按钮以创建区块服务。

在新建的区块服务页面上点击LAUNCH按钮以启动区块服务,并显示其具体信息。


第二步: 在 Bluemix区块服务中注册用户
首先在区块服务页面中选择 APIs, 然后展开Network's Enroll IDs列表以获取预置的用户名和密码列表 。

然后向选定的区块节点发送如下请求以注册用户
    POST https://e1bb641577f249a88acca04da0272249-vp3.us.blockchain.ibm.com:444/registrar
    Content-Type: application/json

    {
        "enrollId": "admin",
        "enrollSecret": "19725f3d88"
    }
注册成功的响应为
  {
    "OK": "Login successful for user 'admin'."
  }
第三步: 在 Bluemix区块服务中发布应用代码, 前提是应用的GoLang代码必须在github.com上。
    POST https://e1bb641577f249a88acca04da0272249-vp3.us.blockchain.ibm.com:444/chaincode
    Content-Type: application/json

    {
        "jsonrpc": "2.0",
        "method": "deploy",
        "params": {
            "type": 1,
            "chaincodeID": {
                "path": "https://github.com/huyouhengbc/Hyperledger/HelloWorld"
            },
            "ctorMsg": {
                "function": "init",
                "args": [
                ]
            },
            "secureContext": "admin"
        },
        "id": 1
    }
发布成功的响应为
    {
        "jsonrpc": "2.0",
        "result": {
            "status": "OK",
            "message": "e2623e76371a16ca86d97bfb90bdab95885939bf4f2fa40133d65bca4aace27eaf94d8cd10438b80de097442916f6bfef87fb45a6cd678e3cb6ec0bd8dd008c2"
        },
        "id": 1
    }
第四步: 测试应用代码,
Query请求
    POST https://e1bb641577f249a88acca04da0272249-vp3.us.blockchain.ibm.com:444/chaincode
    Content-Type: application/json
    {
        "jsonrpc": "2.0",
        "method": "query",
        "params": {
            "type": 1,
            "chaincodeID": {
                "name": "e2623e76371a16ca86d97bfb90bdab95885939bf4f2fa40133d65bca4aace27eaf94d8cd10438b80de097442916f6bfef87fb45a6cd678e3cb6ec0bd8dd008c2"
            },
            "ctorMsg": {
                "function": "hello",
                "args": [
                ]
            },
            "secureContext": "admin"
        },
        "id": 3
    }
Query响应
    200 OK
    access-control-allow-headers:  accept, content-type
    Access-Control-Allow-Origin:  *
    Content-Type:  application/json
    Date:  Sun, 30 Oct 2016 05:13:58 GMT
    Content-Length:  73
    Server:  nghttpx nghttp2/1.14.0-DEV
    Via:  1.1 nghttpx
    X-Firefox-Spdy:  h2

    {"jsonrpc":"2.0","result":{"status":"OK","message":"Hello World"},"id":3}
Invoke请求
    POST https://e1bb641577f249a88acca04da0272249-vp3.us.blockchain.ibm.com:444/chaincode
    Content-Type: application/json
    {
        "jsonrpc": "2.0",
        "method": "invoke",
        "params": {
            "type": 1,
            "chaincodeID": {
                "name": "e2623e76371a16ca86d97bfb90bdab95885939bf4f2fa40133d65bca4aace27eaf94d8cd10438b80de097442916f6bfef87fb45a6cd678e3cb6ec0bd8dd008c2"
            },
            "ctorMsg": {
                "function": "hello",
                "args": [
                ]
            },
            "secureContext": "admin"
        },
        "id": 3
    }
Invoke响应
    200 OK
    access-control-allow-headers:  accept, content-type
    Access-Control-Allow-Origin:  *
    Content-Type:  application/json
    Date:  Sun, 30 Oct 2016 05:13:22 GMT
    Content-Length:  98
    Server:  nghttpx nghttp2/1.14.0-DEV
    Via:  1.1 nghttpx
    X-Firefox-Spdy:  h2

    {"jsonrpc":"2.0","result":{"status":"OK","message":"d74495ff-f3d3-44ba-acc6-5fbc767bbf21"},"id":3}
后记
- 发布应用代码中的path指向的是GoLang代码所在的目录,而不是GoLang源码文件, 错误响应如下:
    POST  https://e1bb641577f249a88acca04da0272249-vp0.us.blockchain.ibm.com:444/chaincode
    Content-Type: application/json
        {
            "jsonrpc": "2.0",
            "method": "deploy",
            "params": {
                "type": 1,
                "chaincodeID": {
                    "path": "https://github.com/huyouhengbc/Hyperledger/blob/master/HelloWorld/HelloWorld.go"
                },
                "ctorMsg": {
                    "function": "init",
                    "args": [
                    ]
                },
                "secureContext": "user_type8_0"
            },
            "id": 1
        }
    -- response --
    200 OK
    access-control-allow-headers:  accept, content-type
    Access-Control-Allow-Origin:  *
    Content-Type:  application/json
    Date:  Sun, 30 Oct 2016 04:00:14 GMT
    Content-Length:  721
    Server:  nghttpx nghttp2/1.14.0-DEV
    Via:  1.1 nghttpx
    X-Firefox-Spdy:  h2

    {"jsonrpc":"2.0","error":{"code":-32001,"message":"Deployment failure","data":"Error when deploying chaincode: Error getting chaincode package bytes: Error getting code 'go get' failed with error: 'exit status 1'
package github.com/huyouhengbc/Hyperledger/blob/master/HelloWorld/HelloWorld.go: cannot find package 'github.com/huyouhengbc/Hyperledger/blob/master/HelloWorld/HelloWorld.go' in any of:
	/usr/local/go/src/github.com/huyouhengbc/Hyperledger/blob/master/HelloWorld/HelloWorld.go (from $GOROOT)
	/go/_usercode_/234208637/src/github.com/huyouhengbc/Hyperledger/blob/master/HelloWorld/HelloWorld.go (from $GOPATH)
	/go/src/github.com/huyouhengbc/Hyperledger/blob/master/HelloWorld/HelloWorld.go
"},"id":1}
- Bluemix提供基于基于Hyperledger Fabric v0.5的服务,如果使用最新的Hyperledger Fabric接口, 发布应用时错误响应如下:
    {
        "jsonrpc": "2.0",
        "error": {
            "code": -32001,
            "message": "Deployment failure",
            "data": "Error when deploying chaincode: Error getting chaincode package bytes: Error getting code 'go get' failed with error: 'exit status 2'
# github.com/huyouhengbc/Hyperledger/HelloWorld
/go/_usercode_/730749822/src/github.com/huyouhengbc/Hyperledger/HelloWorld/HelloWorld.go:15: undefined: shim.ChaincodeStubInterface
/go/_usercode_/730749822/src/github.com/huyouhengbc/Hyperledger/HelloWorld/HelloWorld.go:21: undefined: shim.ChaincodeStubInterface
/go/_usercode_/730749822/src/github.com/huyouhengbc/Hyperledger/HelloWorld/HelloWorld.go:27: undefined: shim.ChaincodeStubInterface
"
        },
        "id": 1
    }
- 发布应用报错
    {
        "jsonrpc": "2.0",
        "error": {
            "code": -32001,
            "message": "Deployment failure",
            "data": "Error when deploying chaincode: Failed loading TCerts from TCA"
        },
        "id": 1
    }
解决方法: 在 Demo Chaincoded下发布示例应用,选择Show API details输出中使用的节点。
总结
本文介绍了在IBM Bluemix上部署Hyperledger应用的基本过程。