一、Zookeeper简介
ZooKeeper是一个分布式的,开放源码的分布式应用程序协调服务,是Google的Chubby一个开源的实现,是Hadoop和Hbase的重要组件。它是一个为分布式应用提供一致性服务的软件,提供的功能包括:命名服务、配置管理、集群管理、域名服务、分布式同步、分布式锁组服务等。
ZooKeeper的目标就是封装好复杂易出错的关键服务,将简单易用的接口和性能高效、功能稳定的系统提供给用户。
ZooKeeper包含一个简单的原语集,提供Java和C的接口。
ZooKeeper代码版本中,提供了分布式独享锁、选举、队列的接口,代码在zookeeper-3.4.3src
ecipes。其中分布锁和队列有Java和C两个版本,选举只有Java版本。
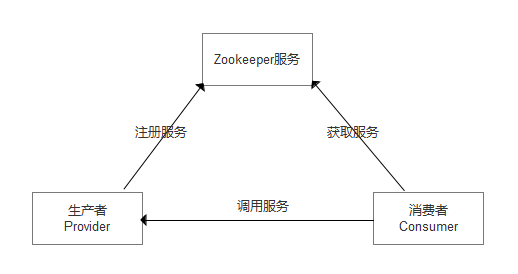
ZooKeeper服务注册原理图,如下:
官网地址: http://zookeeper.apache.org/
下载地址:https://archive.apache.org/dist/zookeeper/
二.ZooKeeper服务安装
ZooKeeper服务下载解压,既可以使用,不需要编译安装,具体安装步骤如下:
1、创建安装目录:
#mkdir -p /usr/local/services/zookeeper
2、进入安装目录:
#cd /usr/local/services/zookeeper
3、下载zookeeper安装包:
#wget https://archive.apache.org/dist/zookeeper/zookeeper-3.4.9/zookeeper-3.4.9.tar.gz
4、解压缩zookeeper安装包:
tar -zxvf zookeeper-3.4.9.tar.gz
5、进入到配置目录中:
#cd zookeeper-3.4.9/conf/
6、复制zoo_sample.cfg并重命名配置文件:
#cp zoo_sample.cfg zoo.cfg
7、修改zoo.cfg配置文件,修改内容为如下:
# 客户端与服务器之间维持心跳的间隔,单位毫秒
tickTime=2000
# The number of ticks that the initial
# synchronization phase can take
initLimit=10
# The number of ticks that can pass between
# sending a request and getting an acknowledgement
syncLimit=5
# the directory where the snapshot is stored.
# do not use /tmp for storage, /tmp here is just
# example sakes.

# 数据文件夹
dataDir=/usr/local/services/zookeeper/zookeeper-3.4.9/data

# 日志文件夹
dataLogDir=/usr/local/services/zookeeper/zookeeper-3.4.9/logs

# 客户端连接 Zookeeper 服务器的端口
clientPort=2181
# the maximum number of client connections.
# 客户端与服务器之间的连接数的限制,0表示不限制
#maxClientCnxns=60
#
# Be sure to read the maintenance section of the
# administrator guide before turning on autopurge.
#
# http://zookeeper.apache.org/doc/current/zookeeperAdmin.html#sc_maintenance
#
# The number of snapshots to retain in dataDir
#autopurge.snapRetainCount=3
# Purge task interval in hours
# Set to "0" to disable auto purge feature
#autopurge.purgeInterval=1
8、保存并关闭 zoo.cfg 文件:
按键shift + zz
9、进入到 /usr/local/services/zookeeper/zookeeper-3.4.9/bin 目录中:
#cd /usr/local/services/zookeeper/zookeeper-3.4.9/bin
10、修改/etc/目录下的profile(文件默认隐藏)并在其尾部追加配置:
#vim /etc/profile
追加内容如下:
export ZOOKEEPER_HOME=/usr/local/services/zookeeper/zookeeper-3.4.9/
export PATH=$ZOOKEEPER_HOME/bin:$PATH
export PATH
11、使得profile文件执行并立刻生效:
#source /etc/profile
12、Zookeeper服务操作:
启动服务
#./zkServer.sh start
启动状态
#./zkServer.sh status
重启服务
#./zkServer.sh restart
关闭服务
#./zkServer.sh stop
注意: zkServer.sh 路径在 /usr/local/services/zookeeper/zookeeper-3.4.9/bin 中,解压即可得到