虽然FFmpeg本身有cuvid硬解,但是找不到什么好的资料,英伟达的SDK比较容易懂,参考FFmpeg源码,将NVIDIA VIDEO CODEC SDK的数据获取改为FFmpeg获取,弥补原生SDK不能以流作为数据源的不足。所用SDK版本为Video_Codec_SDK_7.1.9,英伟达官网可下载。
1.修改数据源
首先是FFmpeg的一些常规的初始化
bool VideoSource::init(const std::string sFileName, FrameQueue *pFrameQueue)
{
    assert(0 != pFrameQueue);
    oSourceData_.hVideoParser = 0;
    oSourceData_.pFrameQueue = pFrameQueue;

    int                i;
    AVCodec            *pCodec;

    av_register_all();
    avformat_network_init();
    pFormatCtx = avformat_alloc_context();

    if (avformat_open_input(&pFormatCtx, sFileName.c_str(), NULL, NULL) != 0){
        printf("Couldn't open input stream.
");
        return false;
    }
    if (avformat_find_stream_info(pFormatCtx, NULL)<0){
        printf("Couldn't find stream information.
");
        return false;
    }
    videoindex = -1;
    for (i = 0; i<pFormatCtx->nb_streams; i++)
    if (pFormatCtx->streams[i]->codec->codec_type == AVMEDIA_TYPE_VIDEO){
        videoindex = i;
        break;
    }

    if (videoindex == -1){
        printf("Didn't find a video stream.
");
        return false;
    }

    pCodecCtx = pFormatCtx->streams[videoindex]->codec;

    pCodec = avcodec_find_decoder(pCodecCtx->codec_id);
    if (pCodec == NULL){
        printf("Codec not found.
");
        return false;
    }

    //Output Info-----------------------------
    printf("--------------- File Information ----------------
");
    av_dump_format(pFormatCtx, 0, sFileName.c_str(), 0);
    printf("-------------------------------------------------
");

    memset(&g_stFormat, 0, sizeof(CUVIDEOFORMAT));

    switch (pCodecCtx->codec_id) {
    case AV_CODEC_ID_H263:
        g_stFormat.codec = cudaVideoCodec_MPEG4;
        break;

    case AV_CODEC_ID_H264:
        g_stFormat.codec = cudaVideoCodec_H264;
        break;

    case AV_CODEC_ID_HEVC:
        g_stFormat.codec = cudaVideoCodec_HEVC;
        break;

    case AV_CODEC_ID_MJPEG:
        g_stFormat.codec = cudaVideoCodec_JPEG;
        break;

    case AV_CODEC_ID_MPEG1VIDEO:
        g_stFormat.codec = cudaVideoCodec_MPEG1;
        break;

    case AV_CODEC_ID_MPEG2VIDEO:
        g_stFormat.codec = cudaVideoCodec_MPEG2;
        break;

    case AV_CODEC_ID_MPEG4:
        g_stFormat.codec = cudaVideoCodec_MPEG4;
        break;

    case AV_CODEC_ID_VP8:
        g_stFormat.codec = cudaVideoCodec_VP8;
        break;

    case AV_CODEC_ID_VP9:
        g_stFormat.codec = cudaVideoCodec_VP9;
        break;

    case AV_CODEC_ID_VC1:
        g_stFormat.codec = cudaVideoCodec_VC1;
        break;
    default:
        return false;
    }

    //这个地方的FFmoeg与cuvid的对应关系不是很确定,不过用这个参数似乎最靠谱
    switch (pCodecCtx->sw_pix_fmt)
    {
    case AV_PIX_FMT_YUV420P:
        g_stFormat.chroma_format = cudaVideoChromaFormat_420;
        break;
    case AV_PIX_FMT_YUV422P:
        g_stFormat.chroma_format = cudaVideoChromaFormat_422;
        break;
    case AV_PIX_FMT_YUV444P:
        g_stFormat.chroma_format = cudaVideoChromaFormat_444;
        break;
    default:
        g_stFormat.chroma_format = cudaVideoChromaFormat_420;
        break;
    }

    //找了好久,总算是找到了FFmpeg中标识场格式和帧格式的标识位
    //场格式是隔行扫描的,需要做去隔行处理
    switch (pCodecCtx->field_order)
    {
    case AV_FIELD_PROGRESSIVE:
    case AV_FIELD_UNKNOWN:
        g_stFormat.progressive_sequence = true;
        break;
    default:
        g_stFormat.progressive_sequence = false;
        break;
    }

    pCodecCtx->thread_safe_callbacks = 1;

    g_stFormat.coded_width = pCodecCtx->coded_width;
    g_stFormat.coded_height = pCodecCtx->coded_height;

    g_stFormat.display_area.right = pCodecCtx->width;
    g_stFormat.display_area.left = 0;
    g_stFormat.display_area.bottom = pCodecCtx->height;
    g_stFormat.display_area.top = 0;

    if (pCodecCtx->codec_id == AV_CODEC_ID_H264 || pCodecCtx->codec_id == AV_CODEC_ID_HEVC) {
        if (pCodecCtx->codec_id == AV_CODEC_ID_H264)
            h264bsfc = av_bitstream_filter_init("h264_mp4toannexb");
        else
            h264bsfc = av_bitstream_filter_init("hevc_mp4toannexb");
    }

    return true;
}
这里面非常重要的一段代码是
if (pCodecCtx->codec_id == AV_CODEC_ID_H264 || pCodecCtx->codec_id == AV_CODEC_ID_HEVC) {
    if (pCodecCtx->codec_id == AV_CODEC_ID_H264)
        h264bsfc = av_bitstream_filter_init("h264_mp4toannexb");
    else
        h264bsfc = av_bitstream_filter_init("hevc_mp4toannexb");
}
网上有许多代码和伪代码都说实现了把数据源修改为FFmpeg,但我在尝试的时候发现cuvidCreateVideoParser创建的Parser的回调函数都没有调用。经过一番折腾,综合英伟达网站、stackoverflow和FFmpeg源码,才发现对H264数据要做一个处理才能把AVPacket有效的转为CUVIDSOURCEDATAPACKET。其中h264bsfc的定义为AVBitStreamFilterContext* h264bsfc = NULL;
2.AVPacket转CUVIDSOURCEDATAPACKET,并交给cuvidParseVideoData
void VideoSource::play_thread(LPVOID lpParam)
{
    AVPacket *avpkt;
    avpkt = (AVPacket *)av_malloc(sizeof(AVPacket));
    CUVIDSOURCEDATAPACKET cupkt;
    int iPkt = 0;
    CUresult oResult;
    while (av_read_frame(pFormatCtx, avpkt) >= 0){
        if (bThreadExit){
            break;
        }
        bStarted = true;
        if (avpkt->stream_index == videoindex){

            cuCtxPushCurrent(g_oContext);

            if (avpkt && avpkt->size) {
                if (h264bsfc)
                {
                    av_bitstream_filter_filter(h264bsfc, pFormatCtx->streams[videoindex]->codec, NULL, &avpkt->data, &avpkt->size, avpkt->data, avpkt->size, 0);
                }

                cupkt.payload_size = (unsigned long)avpkt->size;
                cupkt.payload = (const unsigned char*)avpkt->data;

                if (avpkt->pts != AV_NOPTS_VALUE) {
                    cupkt.flags = CUVID_PKT_TIMESTAMP;
                    if (pCodecCtx->pkt_timebase.num && pCodecCtx->pkt_timebase.den){
                        AVRational tb;
                        tb.num = 1;
                        tb.den = AV_TIME_BASE;
                        cupkt.timestamp = av_rescale_q(avpkt->pts, pCodecCtx->pkt_timebase, tb);
                    }
                    else
                        cupkt.timestamp = avpkt->pts;
                }
            }
            else {
                cupkt.flags = CUVID_PKT_ENDOFSTREAM;
            }

            oResult = cuvidParseVideoData(oSourceData_.hVideoParser, &cupkt);
            if ((cupkt.flags & CUVID_PKT_ENDOFSTREAM) || (oResult != CUDA_SUCCESS)){
                break;
            }
            iPkt++;
            //printf("Succeed to read avpkt %d !
", iPkt);
            checkCudaErrors(cuCtxPopCurrent(NULL));
        }
        av_free_packet(avpkt);
    }

    oSourceData_.pFrameQueue->endDecode();
    bStarted = false;
}
这里FFmpeg读取数据包后,对H264和HEVC格式,有一个重要的处理,就是前面提到的,
if (h264bsfc)
{
    av_bitstream_filter_filter(h264bsfc, pFormatCtx->streams[videoindex]->codec, NULL, &avpkt->data, &avpkt->size, avpkt->data, avpkt->size, 0);
}
这个处理的含义见雷霄华的博客http://blog.csdn.net/leixiaohua1020/article/details/39767055。
这样,通过FFmpeg,CUVID就可以对流进行处理了。个人尝试过读取本地文件和rtsp流。FFmpeg读取rtsp流的方式竟然只需要把文件改为rtsp流的地址就可以,以前没做过流式的,我还以为会很复杂的。
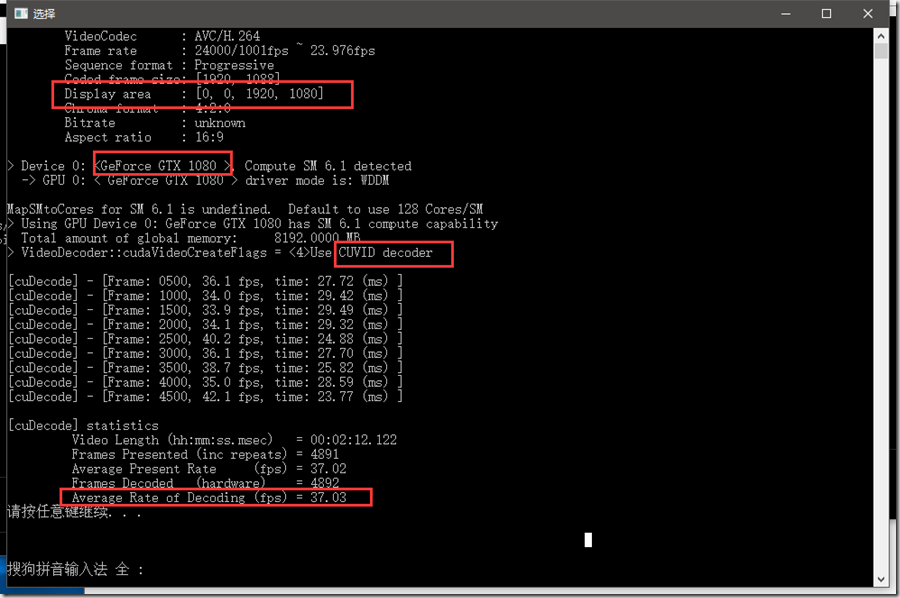
3.一点数据
这是在GTX 1080上把解码进程(没做显示)开了20路解码得到的数据。20路1920X1080解码还能到平局37fps,这显卡也是6得不行。

