今天主要说说,nginx如何配置tomcat集群,首先我们先介绍一下各个软件:
一:
1.Nginx介绍:
下载地址:http://nginx.org/en/download.html
nginx这个轻量级,高性能的web server;那么nginx可以做两件事:第一件事;直接做为web server ,一般用作静态服务器。代替apache
第二事情;作为反向代理服务器,实现负载均衡。这就是我们这次要说的。
2.环境:
本地是windows系统。nginx仅仅处理静态页面,动态的页面 通通给jsp处理,也就是后台两个apache下的tomcat处理。那么我们就可以把静态页面或文件放置nginx目录下。动态的页面和数据访问都放在后台apache服务器上。
3.常用的命令:
Windows下Nginx的启动、停止等命令
在Windows下使用Nginx,我们需要掌握一些基本的操作命令,比如:启动、停止Nginx服务,重新载入Nginx等,下面我就进行一些简单的介绍。
1、启动:
C:server ginx-1.0.2>start nginx
或
C:server ginx-1.0.2>nginx.exe
注:建议使用第一种,第二种会使你的cmd窗口一直处于执行中,不能进行其他命令操作。
2、停止:
C:server ginx-1.0.2>nginx.exe -s stop
或
C:server ginx-1.0.2>nginx.exe -s quit
注:stop是快速停止nginx,可能并不保存相关信息;quit是完整有序的停止nginx,并保存相关信息。
3、重新载入Nginx:
C:server ginx-1.0.2>nginx.exe -s reload
当配置信息修改,需要重新载入这些配置时使用此命令。
我们可以看到一个窗口一闪而过,这样nginx就已经被开启了,我们在任务管理器中可以找到它的进程。
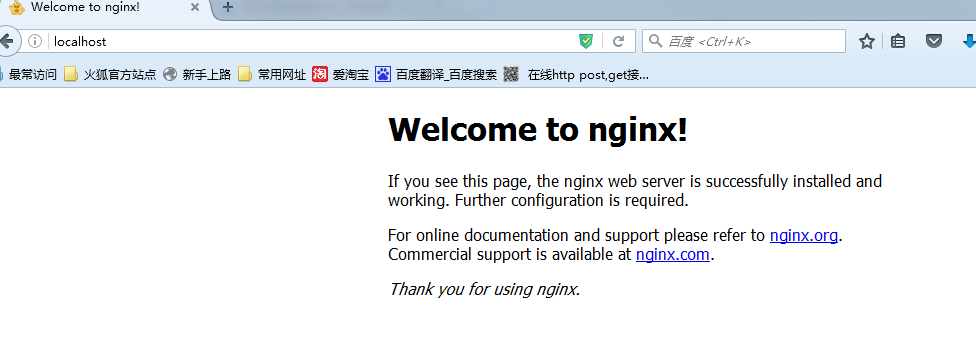
现在我们在浏览器中输入localhost。可以看到出现一个页面,虽然简陋了点,但这确确实实就是nginx的欢迎页面,就类似tomcat刚启动完成的locahost:8080的欢迎页面。
4、重新打开日志文件:
C:server ginx-1.0.2>nginx.exe -s reopen
5、查看Nginx版本:
C:server ginx-1.0.2>nginx -v
4.Nginx如何配置负责均衡:
http {
    include       mime.types;
    default_type  application/octet-stream;

    #log_format  main  '$remote_addr - $remote_user [$time_local] "$request" '
    #                  '$status $body_bytes_sent "$http_referer" '
    #                  '"$http_user_agent" "$http_x_forwarded_for"';

    #access_log  logs/access.log  main;

    sendfile        on;
    #tcp_nopush     on;

    #keepalive_timeout  0;
    keepalive_timeout  65;

    #gzip  on;
    #1.配置服务器组
    upstream huojg{
    server 127.0.0.1:8082;
    server 127.0.0.1:8083;

    }

    server {
        listen       8080;#2.配置监听器端口
        server_name  localhost;

        #charset koi8-r;

        #access_log  logs/host.access.log  main;

        location / {
            root   html;
            index  index.html index.htm;
        #3.配置方向代理地址
        proxy_pass http://huojg;
        }
完成上面粗体三步配置,就完成了nginx 的基本配置,tomcat就不介绍了,大家都比较熟悉:
二:
负责均衡完成步骤:
1.安装nginx
2.自己配置maven项目。启动两个tomcat
3.在nginx.conf配置上面粗体的三个步骤。
4.启动nginx。输入网址,完成均衡配置。(例如localhost:8080/huojg)
其中,最重要的就是nginx配置。
三,session共享配置:
下载redis
1.redis简介及下载安装
作为这次的主角,相信大家对redis应该都一定印象,redis是一款开源的高性能key-value数据库,拥有丰富的键值储存类型,并提供多种语言的API。
与一般数据库不同,redis是使用内存作为主存,而使用硬盘来实现数据持久化,而且redis是周期性的将数据写到硬盘上。这就意味着一旦我们服务器出现断电、重启之类的情况,我们很可能会出现数据丢失的情况,所以不建议使用redis来存放关键的数据。当然,也正因为redis读写数据都使用内存,所以它的速度是非常快的,很适合我们来存放一些临时性的数据。
此外,redis能实现的作用很多,诸如队列、缓存之类的,但我也还没使用过,无法在这里为大家说明,但不影响我们今天的session共享功能。
首先我们先下载redis,这是windows版本的下载地址 https://github.com/ServiceStack/redis-windows。
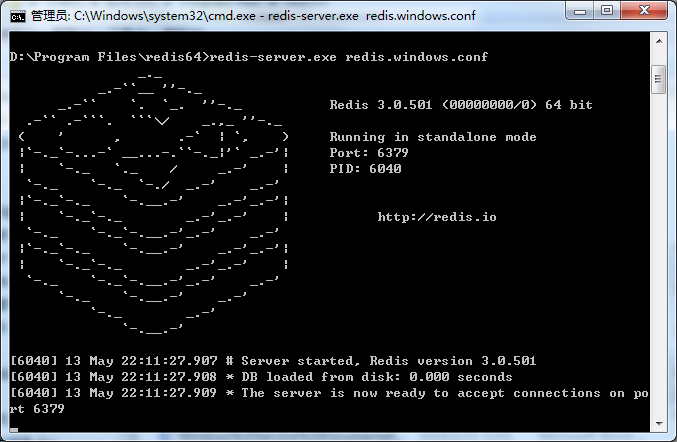
下面我们打开redis。首先打开cmd,进入我们redis目录下,输入redis-server.exe redis.windows.conf。出现下面界面,则打开成功。(不可偷懒想双击redis-server.exe完事,这样虽然也能打开,但不会加载配置文件)。
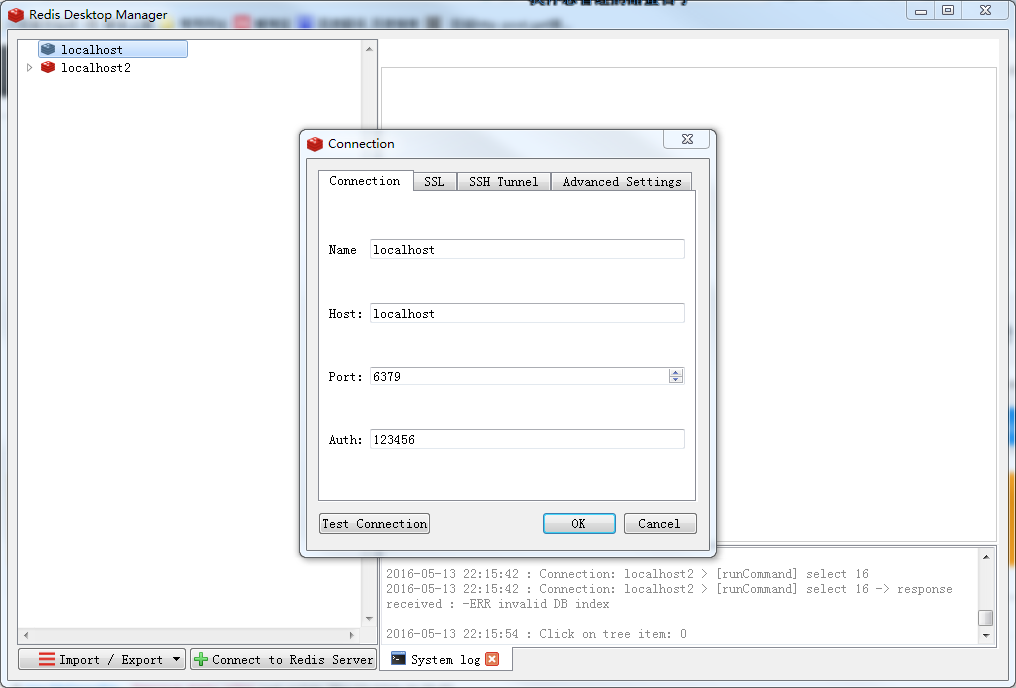
我们下载windows版本,安装完成后,还没有任何连接对象,那就让我们给它添加一个。点击下方的connect to redis server,出现个弹出框。然后Name我们可以随便输,Host添我们redis服务器的ip地址,本地可以直接填写localhost,端口默认为6379,Auth就是密码,不是必填项,如果没设置密码可不填,点击OK,建立完成。
至此,我们的准备工作都已经完成,
下面开始我们的spring与redis的整合之旅。
其实Spring本身就有提供对redis的支持,就是spring-session,我们只需将这个在pom.xml添加如下代码,maven便会自己下载所需的jar包及依赖包。

1 <dependency>
2       <groupId>org.springframework.session</groupId>
3       <artifactId>spring-session-data-redis</artifactId>
4       <version>1.1.1.RELEASE</version>
5       <type>pom</type>
6 </dependency>
随后我们在resources文件夹中新建一个redis.properties,往里面添加如下内容。
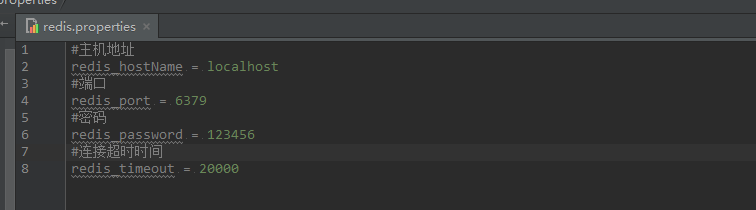
再新建一个spring-redis.xml,往里面添加我们redis相关的配置。其中maxInactiveIntervalInSeconds是设置session有效时间,以秒为单位,但实际上无论怎么设,session真实有效时间还是会比我们设置的稍微长一些。
 1 <?xml version="1.0" encoding="UTF-8"?>
 2 <beans xmlns="http://www.springframework.org/schema/beans"
 3        xmlns:xsi="http://www.w3.org/2001/XMLSchema-instance"
 4        xsi:schemaLocation="http://www.springframework.org/schema/beans
 5        http://www.springframework.org/schema/beans/spring-beans.xsd">
 6
 7     <!-- session设置 -->
 8     <bean class="org.springframework.session.data.redis.config.annotation.web.http.RedisHttpSessionConfiguration">
 9         <property name="maxInactiveIntervalInSeconds" value="3600"></property>
10     </bean>
11     <!-- redis连接池 -->
12     <bean id="poolConfig" class="redis.clients.jedis.JedisPoolConfig"/>
13
14     <!-- redis连接工厂 -->
15     <bean id="connectionFactory" class="org.springframework.data.redis.connection.jedis.JedisConnectionFactory">
16         <property name="hostName" value="${redis_hostName}"/>
17         <property name="port" value="${redis_port}"/>
18         <property name="password" value="${redis_password}"/>
19         <property name="timeout" value="${redis_timeout}"/>
20         <property name="poolConfig" ref="poolConfig"></property>
21     </bean>
22
23
24
25 </beans>
最后我们还需要在web.xml中加入spring的session过滤器,我个人理解这个过滤器的作用是告诉spring来接管对session管理与创建工作。
1 <!--session过滤器-->
2   <filter>
3     <filter-name>springSessionRepositoryFilter</filter-name>
4     <filter-class>org.springframework.web.filter.DelegatingFilterProxy</filter-class>
5   </filter>
6   <filter-mapping>
7     <filter-name>springSessionRepositoryFilter</filter-name>
8     <url-pattern>/*</url-pattern>
9   </filter-mapping>
3.Session共享测试
看看是不是session共享,完成,目前最新项目的搭配组合:
springmvc+mybatis+mysql+Nginx+tomcat+redis;