一、摘要
1、所需软件列表:
1) tomcat : apache-tomcat-7.0.54 服务端容器
2) Intellij: Intellij IDEA 14.0.3 开发工具
3) Syslog: SQLyog Community 数据库工具
2. 步骤简述:
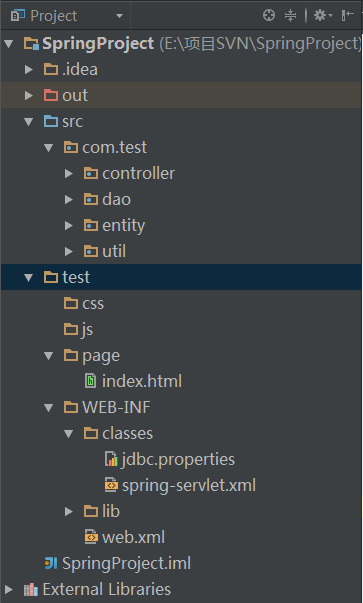
1) 新建一个 Java 项目,在项目下新建一个文件夹 test(置于tomcat webapps 文件夹目录下) ,然后在该文件夹下新建一个 WEB-INF 文件夹;
2) test文件夹下新建前台页面相关目录(css/js/page/data等)
3) 在 WEB-INF文件夹下建立 web.xml 文件(可以从 tomcat 安装路径 /conf/web.xml 中拷贝基本的文档结构,修改相应编码为 utf-8);
4) WEB-INF文件夹下新建classes文件夹,用于存放相关配置文件
5) 在 WEB-INF 下建立 lib 文件夹,用来存放相关 jar 包;
6) 在 WEB-INF 下建立 web.xml 文件。
完成后的工程目录如下:

二、Spring配置:
1、需要导入的包如下:

2、 相关配置文件
1)web.xml配置
<?xml version="1.0" encoding="ISO-8859-1"?>
<web-app xmlns="http://xmlns.jcp.org/xml/ns/javaee"
         xmlns:xsi="http://www.w3.org/2001/XMLSchema-instance"
         xsi:schemaLocation="http://xmlns.jcp.org/xml/ns/javaee http://xmlns.jcp.org/xml/ns/javaee/web-app_3_1.xsd"
         version="3.1">

    <context-param>
        <param-name>contextConfigLocation</param-name>
        <param-value>classpath:spring-servlet.xml</param-value>
    </context-param>
    <welcome-file-list>
        <welcome-file>index.html</welcome-file>
    </welcome-file-list>

    <!--前端控制器配置-->
    <servlet>
        <servlet-name>spring</servlet-name>
        <servlet-class>org.springframework.web.servlet.DispatcherServlet</servlet-class>
         <init-param>
                <param-name>contextConfigLocation</param-name>
                <param-value>classpath*:spring-servlet.xml</param-value>
        </init-param>
        <load-on-startup>1</load-on-startup>
    </servlet>
    <servlet-mapping>
        <servlet-name>spring</servlet-name>
            <url-pattern>/</url-pattern>
    </servlet-mapping>

    <filter>
        <filter-name>encodingFilter</filter-name>
        <filter-class>org.springframework.web.filter.CharacterEncodingFilter</filter-class>
        <init-param>
            <param-name>encoding</param-name>
            <param-value>UTF-8</param-value>
        </init-param>
        <init-param>
            <param-name>forceEncoding</param-name>
            <param-value>true</param-value>
        </init-param>
    </filter>

    <filter-mapping>
        <filter-name>encodingFilter</filter-name>
        <url-pattern>/*</url-pattern>
    </filter-mapping>

    <listener>
        <listener-class>org.springframework.web.context.ContextLoaderListener</listener-class>
    </listener>

    <listener>
        <listener-class>org.apache.logging.log4j.web.Log4jServletContextListener</listener-class>
    </listener>
</web-app >
2)spring-servlet.xml配置
<?xml version="1.0" encoding="UTF-8"?>

<beans xmlns="http://www.springframework.org/schema/beans"
       xmlns:xsi="http://www.w3.org/2001/XMLSchema-instance"
       xmlns:context="http://www.springframework.org/schema/context"
       xmlns:mvc="http://www.springframework.org/schema/mvc"
       xsi:schemaLocation="http://www.springframework.org/schema/beans
        http://www.springframework.org/schema/beans/spring-beans.xsd
        http://www.springframework.org/schema/context http://www.springframework.org/schema/context/spring-context.xsd
        http://www.springframework.org/schema/mvc http://www.springframework.org/schema/mvc/spring-mvc.xsd  ">

    <context:component-scan base-package="com.test">
        <context:include-filter type="annotation" expression="org.springframework.stereotype.Controller"/>
        <context:exclude-filter type="annotation" expression="org.springframework.stereotype.Service"/>
    </context:component-scan>

    <context:property-placeholder location="classpath:jdbc.properties"/>

    <bean id="fastJsonHttpMessageConverter"
          class="com.alibaba.fastjson.support.spring.FastJsonHttpMessageConverter">
        <property name="supportedMediaTypes">
            <list>
                <value>text/html;charset=UTF-8</value>
                <value>application/json</value>
            </list>
        </property>
        <property name="features">
            <list>
                <!-- 输出key时是否使用双引号 -->
                <value>QuoteFieldNames</value>
                <!-- 是否输出值为null的字段 -->
                <value>WriteMapNullValue</value>
                <!-- 数值字段如果为null,输出为0,而非null -->
                <value>WriteNullNumberAsZero</value>
                <!-- List字段如果为null,输出为[],而非null -->
                <value>WriteNullListAsEmpty</value>
                <!-- 字符类型字段如果为null,输出为"",而非null -->
                <value>WriteNullStringAsEmpty</value>
                <!-- Boolean字段如果为null,输出为false,而非null -->
                <value>WriteNullBooleanAsFalse</value>
                <!-- null String不输出  -->
                <value>WriteNullStringAsEmpty</value>
                <!-- Date的日期转换器 -->
                <value>WriteDateUseDateFormat</value>
            </list>
        </property>
    </bean>
    <!-- 启动注解,注册服务,如验证框架、全局类型转换器-->
    <mvc:annotation-driven>
        <mvc:message-converters>
            <ref bean="fastJsonHttpMessageConverter" />
        </mvc:message-converters>
    </mvc:annotation-driven>
    <mvc:default-servlet-handler/>

    <bean id="internalResourceViewResolver" class="org.springframework.web.servlet.view.InternalResourceViewResolver">
        <property name="prefix" value="/WEB-INF/page" />
        <property name="suffix" value=".html" />
    </bean>

    <!-- 配置事务管理器 -->
    <bean id="dataSource" class="org.apache.commons.dbcp.BasicDataSource">
        <property name="driverClassName" value="${jdbc.driverClassName}"/>
        <property name="url" value="${jdbc.url}"/>
        <property name="username" value="${jdbc.username}"/>
        <property name="password" value="${jdbc.password}"/>
    </bean>
    <bean id="transactionManager" class="org.springframework.jdbc.datasource.DataSourceTransactionManager">
        <property name="dataSource" ref="dataSource"/>
    </bean>
    <bean id="jdbcTemplate" class="org.springframework.jdbc.core.JdbcTemplate">
        <property name="dataSource" ref="dataSource"></property>
    </bean>

</beans>
3) 对应的数据库配置文件 jdbc.properties 根据实际情况配置
jdbc.driverClassName= 数据库驱动
jdbc.url= 数据库连接url
jdbc.username= 用户名
jdbc.password= 密码
三、 服务端代码
User实体类:
public class UserBean{
    private int id;
    private String name;
    private int age;

    public int getId() {
        return id;
    }

    public void setId(int id) {
        this.id = id;
    }

    public String getName() {
        return name;
    }

    public void setName(String name) {
        this.name = name;
    }

    public int getAge() {
        return age;
    }

    public void setAge(int age) {
        this.age = age;
    }
}


数据库交互相关:
public class UserDAO {
    private static final String querySql = "SELECT * FROM user;";
    private static UserDAO instance = new UserDAO();
    private UserDAO(){

    }

    public static UserDAO getInstance(){
        return instance;
    }

    public List<UserBean> getUserInfo(){
        //启动IoC容器
        ApplicationContext ctx = new ClassPathXmlApplicationContext("spring-servlet.xml");
        //获取IoC容器中JdbcTemplate实例
        JdbcTemplate jdbcTemplate = (JdbcTemplate) ctx.getBean("jdbcTemplate");

        RowMapper<UserBean> rowMapper = new BeanPropertyRowMapper<UserBean>(UserBean.class);
        return jdbcTemplate.query(querySql, rowMapper);
    }
}


返回结果处理类(alibaba.fastjson格式返回)
public class ResultFormat {
    private Object object;
    public ResultFormat() {}

    public ResultFormat(Object object) {
        this.object = object;
    }

    public Object getObject() {
        return object;
    }

    public void setObject(Object object) {
        this.object = object;
    }
}


Controller实现类:
@Controller
public class UserController {
    @RequestMapping("/getUserInfo")
    @ResponseBody
    public ResultFormat getUserInfo() {
        List<UserBean> userList = UserDAO.getInstance().getUserInfo();
        return new ResultFormat(userList);
    }
}
四、 Tomcat配置:
1)将整个test文件夹放入 tomcat 解压包的 apache-tomcat-7.0.54webapps 目录下;
2) 将编译后的jar包放入 WEB-INF 目录下的lib文件夹下
ps: tomcat 的debug方法:
tomcat bin文件夹下修改 catalina.bat 文件,增加如下配置:
SET CATALINA_OPTS=-server -Xdebug -Xnoagent -Djava.compiler=NONE -Xrunjdwp:transport=dt_socket,server=y,suspend=n,address=8899
四、 效果展示:
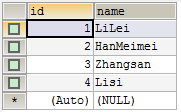
1. 数据库原有数据:

2. 界面查询:

3. 静态界面展示:
