一、前言
提供服务的时候,为了保证服务的正确性,有时候需要编写测试类验证其正确性和可用性。以前的做法都是自己简单写一个控制层,然后在控制层里调用服务并测试,这样做虽然能够达到测试的目的,但是太不专业了。还是老老实实的编写测试类进行测试吧。
二、Junit4依赖
<dependency>
     <groupId>junit</groupId>
     <artifactId>junit</artifactId>
     <version>4.12</version>
</dependency>
<dependency>
    <groupId>org.springframework</groupId>
    <artifactId>spring-test</artifactId>
    <version>4.2.5.RELEASE</version>
    <scope>test</scope>
</dependency>
如果出现如下异常:
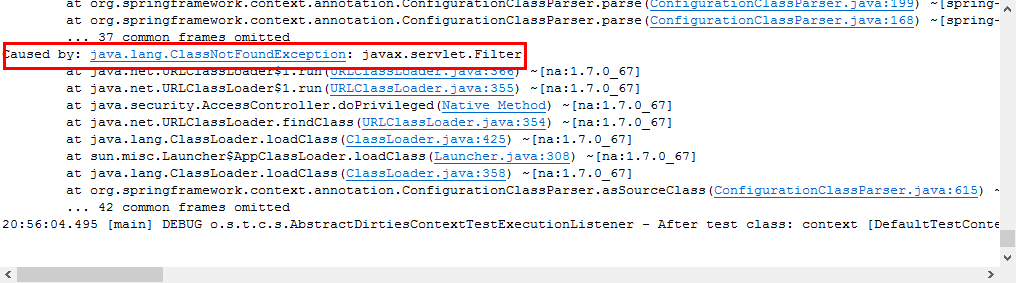
则加入如下依赖。
<dependency>
    <groupId>javax.servlet</groupId>
    <artifactId>servlet-api</artifactId>
    <version>3.0.1</version>
    <scope>test</scope>
</dependency>
三、目录结构

四、测试类
通过自动注入方式获取bean
import org.junit.Test;
import org.junit.runner.RunWith;
import org.springframework.beans.factory.annotation.Autowired;
import org.springframework.test.context.ContextConfiguration;
import org.springframework.test.context.junit4.SpringJUnit4ClassRunner;
import com.alibaba.fastjson.JSONObject;
import com.yyjz.icop.usercenter.service.ISupplierService;
import com.yyjz.icop.usercenter.vo.SupplierVO;

@RunWith(SpringJUnit4ClassRunner.class)
@ContextConfiguration(locations={"file:src/main/webapp/WEB-INF/config/applicationContext.xml",
        "file:src/main/webapp/WEB-INF/config/applicationContext-jpa.xml",
}) // 加载配置
public class UserExtTest{
    @Autowired
    private ISupplierService supplierService;

    @Test
    public void addSupplier(){
        SupplierVO vo = new SupplierVO();
        vo.setSupplierId("1234567890");
        vo.setUserName("hjzgg");
        vo.setUserCode("hjzgg");
        vo.setUserMobile("1567c637914");
        JSONObject ans = supplierService.addSupplier(vo);
        System.out.println(ans.toJSONString());
    }
}
注:@ContextConfiguration中locations文件配置,如果文件放在了WEB-INF/config目录下,配置如上所示。如果配置文件放入src/main/resources目录下,则改成"calsspath:applicationContext.xml"和"calsspath:applicationContext-jpa.xml" 。
同时,如果配置文件中引用了properties的文件,也要改一下路径。测试完成之后在改回去。

通过上下文获取bean
import org.junit.Test;
import org.junit.runner.RunWith;
import org.springframework.beans.factory.annotation.Autowired;
import org.springframework.context.ApplicationContext;
import org.springframework.test.context.ContextConfiguration;
import org.springframework.test.context.junit4.SpringJUnit4ClassRunner;
import org.springframework.test.context.web.WebAppConfiguration;

import com.alibaba.fastjson.JSONObject;
import com.yyjz.icop.usercenter.service.ISupplierService;
import com.yyjz.icop.usercenter.service.impl.SupplierServiceImpl;
import com.yyjz.icop.usercenter.vo.SupplierVO;

@RunWith(SpringJUnit4ClassRunner.class)
@ContextConfiguration(locations={"file:src/main/webapp/WEB-INF/config/applicationContext.xml",
        "file:src/main/webapp/WEB-INF/config/applicationContext-jpa.xml",
}) // 加载配置
@WebAppConfiguration
public class UserExtTest{
    @Autowired
    private ApplicationContext ac;

    @Test
    public void addSupplier(){
        ISupplierService supplierService = ac.getBean(SupplierServiceImpl.class);
        SupplierVO vo = new SupplierVO();
        vo.setSupplierId("1234567890");
        vo.setUserName("hjzgg");
        vo.setUserCode("hjzgg");
        vo.setUserMobile("15670637914");
        JSONObject ans = supplierService.addSupplier(vo);
        System.out.println(ans.toJSONString());
    }
}
@WebAppConfiguration:测试环境使用,用来表示测试环境使用的ApplicationContext将是WebApplicationContext类型的;value指定web应用的根。默认值是:String value() default "src/main/webapp";
五、总结
至此,测试类的简单使用完成。还需要更进一步学习测试类。