yapi是高效、易用、功能强大的API管理平台,旨在为开发、产品、测试人员提供更优雅的接口管理服务
部署环境要求:
1)nodejs(7.6+)
2)mongodb(2.6+)
一、部署nodejs
参考文档:https://www.cnblogs.com/hujinzhong/p/11994526.html
[root@yapi ~]# node -v
v12.13.1
[root@yapi ~]# npm -v
6.12.1
[root@yapi ~]# pm2 -v
4.2.0
二、部署mongodb
参考文档:https://www.cnblogs.com/hujinzhong/p/11621909.html
#1、关闭大叶内存
[root@yapi ~]# echo never > /sys/kernel/mm/transparent_hugepage/enabled
[root@yapi ~]# echo never > /sys/kernel/mm/transparent_hugepage/defrag

#2、修改文件描述符
[root@yapi ~]# vim /etc/security/limits.conf
#*               -       nofile          65535  #注释即可,reboot重启生效

#3、创建用户
[root@yapi ~]# useradd mongod
[root@yapi ~]# echo 123456|passwd --stdin mongod

#4、创建mongodb所需目录结构
[root@yapi ~]# mkdir -p /mongodb/{bin,conf,log,data}

#5、上传并解压软件到指定位置
[root@yapi ~]# mkdir /server/tools -p
[root@yapi ~]# mv mongodb-linux-x86_64-rhel70-v3.6-latest.gz /server/tools/
[root@yapi ~]# ll /server/tools/
total 117936
-rw-r--r-- 1 root root 120764476 Dec  6 15:19 mongodb-linux-x86_64-rhel70-v3.6-latest.gz
[root@yapi ~]# cd /server/tools/
[root@yapi tools]# tar xf mongodb-linux-x86_64-rhel70-v3.6-latest.gz
[root@yapi tools]# cp -a mongodb-linux-x86_64-rhel70-3.6.11-14-g48d999c/bin/* /mongodb/bin/

#6、设置目录权限
[root@yapi tools]# chown -R mongod:mongod /mongodb
[root@yapi tools]# ll /mongodb
total 0
drwxr-xr-x 2 mongod mongod 248 Dec  6 15:27 bin
drwxr-xr-x 2 mongod mongod   6 Dec  6 15:24 conf
drwxr-xr-x 2 mongod mongod   6 Dec  6 15:24 data
drwxr-xr-x 2 mongod mongod   6 Dec  6 15:24 log

#7、设置用户环境变量
[root@yapi tools]# su - mongod
[mongod@yapi ~]$ vim .bash_profile
export PATH=/mongodb/bin:$PATH
[mongod@yapi ~]$ source .bash_profile

#8、启动mongodb(切换到mongod)
[mongod@yapi ~]$ mongod --dbpath=/mongodb/data --logpath=/mongodb/log/mongodb.log --port=27017 --logappend --fork
about to fork child process, waiting until server is ready for connections.
forked process: 40637
child process started successfully, parent exiting

#9、登录mongodb
[mongod@yapi ~]$ mongo
MongoDB shell version v3.6.11-14-g48d999c
connecting to: mongodb://127.0.0.1:27017/?gssapiServiceName=mongodb
Implicit session: session { "id" : UUID("a00b73d1-cb47-45f2-a915-086e20a90768") }
MongoDB server version: 3.6.11-14-g48d999c
Welcome to the MongoDB shell.
For interactive help, type "help".
For more comprehensive documentation, see
	http://docs.mongodb.org/
Questions? Try the support group
	http://groups.google.com/group/mongodb-user
Server has startup warnings:
2019-12-06T15:31:59.318+0800 I CONTROL  [initandlisten]
2019-12-06T15:31:59.318+0800 I CONTROL  [initandlisten] ** WARNING: Access control is not enabled for the database.
2019-12-06T15:31:59.318+0800 I CONTROL  [initandlisten] **          Read and write access to data and configuration is unrestricted.
2019-12-06T15:31:59.318+0800 I CONTROL  [initandlisten]
2019-12-06T15:31:59.318+0800 I CONTROL  [initandlisten] ** WARNING: This server is bound to localhost.
2019-12-06T15:31:59.318+0800 I CONTROL  [initandlisten] **          Remote systems will be unable to connect to this server.
2019-12-06T15:31:59.318+0800 I CONTROL  [initandlisten] **          Start the server with --bind_ip <address> to specify which IP
2019-12-06T15:31:59.318+0800 I CONTROL  [initandlisten] **          addresses it should serve responses from, or with --bind_ip_all to
2019-12-06T15:31:59.318+0800 I CONTROL  [initandlisten] **          bind to all interfaces. If this behavior is desired, start the
2019-12-06T15:31:59.318+0800 I CONTROL  [initandlisten] **          server with --bind_ip 127.0.0.1 to disable this warning.
2019-12-06T15:31:59.318+0800 I CONTROL  [initandlisten]
> show dbs
admin   0.000GB
config  0.000GB
local   0.000G

#10、编辑配置文件
[mongod@yapi ~]$ vim /mongodb/conf/mongo.conf
systemLog:
   destination: file
   path: "/mongodb/log/mongodb.log"
   logAppend: true
storage:
   journal:
      enabled: true
   dbPath: "/mongodb/data/"
processManagement:
   fork: true
net:
   port: 27017
   bindIp: 192.168.11.11,127.0.0.1

#11、重启mongodb
[mongod@yapi ~]$ mongod -f /mongodb/conf/mongo.conf --shutdown
killing process with pid: 40637
[mongod@yapi ~]$ mongod -f /mongodb/conf/mongo.conf
about to fork child process, waiting until server is ready for connections.
forked process: 42694
child process started successfully, parent exiting
三、部署yapi
参考文档:
https://www.linuxidc.com/Linux/2018-01/150513.htm
https://blog.csdn.net/kxzhaohuan/article/details/81713949
https://hellosean1025.github.io/yapi/devops/index.html
[root@yapi ~]# npm install -g yapi-cli --registry https://registry.npm.taobao.org
/usr/local/node/bin/yapi -> /usr/local/node/lib/node_modules/yapi-cli/bin/yapi-cli
/usr/local/node/bin/yapi-cli -> /usr/local/node/lib/node_modules/yapi-cli/bin/yapi-cli
+ yapi-cli@1.5.0
added 266 packages from 125 contributors in 31.938s
[root@yapi ~]# yapi server
在浏览器打开 http://0.0.0.0:9090 访问。非本地服务器,请将 0.0.0.0 替换成指定的域名或ip
根据提示,浏览器访问 http://部署YApi服务器的IP:9090。
如果报错如下:
可以考虑更换aliyun的dns地址
[root@yapi ~]# cat /etc/resolv.conf
# Generated by NetworkManager
nameserver 223.5.5.5
nameserver 114.114.114.114
启动yapi:
[root@yapi my-yapi]# node vendors/server/app.js &>/dev/null &
[1] 54729
[root@yapi my-yapi]# netstat -lntp|grep 3000
tcp6       0      0 :::3000                 :::*                    LISTEN      54729/node
[root@yapi my-yapi]# ps -ef|grep 54729
root      54729  49546  4 15:52 pts/1    00:00:01 node vendors/server/app.js
root      55083  49546  0 15:53 pts/1    00:00:00 grep --color=auto 54729
浏览器访问:http://192.168.11.11:3000/
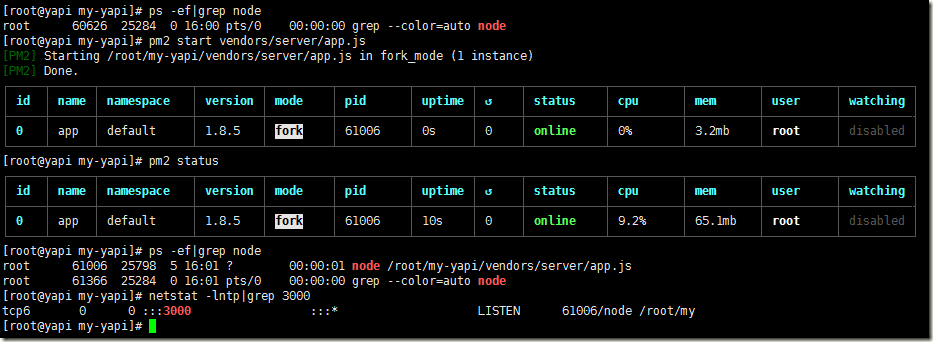
可以使用pm2进行管理:
四、docker化部署yapi
参考文档:https://www.jianshu.com/p/a97d2efb23c5
官方文档:https://github.com/YMFE/yapi
1)安装docker
参考文档:https://www.cnblogs.com/hujinzhong/p/11934559.html
2)配置aliyun镜像加速
[root@yapi ~]# vim /etc/docker/daemon.json
{
   "registry-mirrors": ["https://bkajg8ma.mirror.aliyuncs.com"]
}

[root@yapi ~]# systemctl restart docker
3)启动 MongoDB
docker run -d --name mongo-yapi mongo
4)获取 Yapi 镜像,版本信息可在 阿里云镜像仓库 查看
docker pull registry.cn-hangzhou.aliyuncs.com/anoy/yapi
5)初始化 Yapi 数据库索引及管理员账号
docker run -it --rm
  --link mongo-yapi:mongo
  --entrypoint npm
  --workdir /api/vendors
  registry.cn-hangzhou.aliyuncs.com/anoy/yapi
  run install-server
6)启动 Yapi 服务
docker run -d
  --name yapi
  --link mongo-yapi:mongo
  --workdir /api/vendors
  -p 3000:3000
  registry.cn-hangzhou.aliyuncs.com/anoy/yapi
  server/app.js
7)浏览器访问
访问 http://ip:3000 登录账号 admin@admin.com,密码 ymfe.org
五、docker-compose安装yapi
参考文档:
https://github.com/fjc0k/docker-YApi


