一、安装和运行nexus
1、下载nexus:http://www.sonatype.org/nexus/go
可选择tgz和zip格式,以及war,选择tgz或zip时不同版本可能在启动时存在一定问题,可能是因为jdk版本问题,若无法启动请选择2.5或更早的版本
注:nexus 2.6版本之后不再支持jdk1.6
2、安装nexus
若下载war,则将其放置tomcat下的webapp目录中,改名为nexus,运行tomcat服务,即可访问http://localhost:8081/nexus 默认用户名:admin;密码admin123
若下载tgz或者zip,将其解压至usr/local/目录下(也可自己指定目录),在root/Download目录下:
cp nexus-2.2-01-bundle.zip /usr/local
unzip nexus-2.2-01-bundle.zip
或者
cp nexus-2.2-01-bundle.tar.gz /usr/local
tar xvzf nexus-2.2-01-bundle.tar.gz
为了方便更新和切换版本,创建链接,更新或者切换版本只需更新链接即可:
ln -s nexus-2.2-01 nexus
3、运行nexus
在没有安装为service的情况下运行nexus。
若为较新版本:
cd /usr/local/nexus
./bin/nexus start
若启动成功,nexus会监听8081端口,在日志中可进行查看
tail -f logs/wrapper.log
较早的版本需要进入平台目录下进行启动(较新版本也可以进行启动)
cd /usr/local/nexus/
./bin/jsw/linux-x84-64/nexus start
浏览器中输入http://localhost:8081/nexus即可进入
4、安装nexus为service
以root用户身份,设置为系统服务
cd /etc/init.d
cp /usr/local/nexus/bin /nexus ./nexus
chmod 755 /etc/init.d/nexus
在Red Hat, Fedora, and CentOS中增加nexus服务
$ cd /etc/init.d
增加nexus服务
$ chkconfig --add nexus
添加运行级别3、4、5
$ chkconfig --levels 345 nexus on
启动nexus
$ service nexus start
验证关系成功启动
$ tail -f /usr/local/nexus/logs/wrapper.log
编辑/etc/init.d/nexus的文本
NEXUS_HOME="/usr/local/nexus"
PIDDIR="${NEXUS_HOME}"
RUN_AS_USER = "nexus" 此处用户名可随意选择,最好不要是root
注:①如果使用root,未创建其它用户,则改为root(不建议使用root)
②如果使用该设置,需要:
• nexus 用户存在
useradd nexus
• 更改nexus 安装目录的Owner和Group为nexus
chown nexus nexus nexus
启动服务
service nexus start
二、配置maven使用nexus
这里先对Maven的安装作一简单介绍:
下载maven安装包,如apache-maven-3.1.0-bin.tar.gz,并解压
cp apache-maven-3.1.1-bin.tar.gz /usr/local/
tar –zxvf apache-maven-3.1.1-bin.tar.gz
ln –s apache-maven-3.1.1 maven
编辑/etc/profile文件,添加如下代码
export MAVEN_HOME=/opt/apache-maven-3.2.1
export PATH=$JAVA_HOME/bin:$MAVEN_HOME/bin:$PATH
可运行以下命令检查maven安装:
显示路径
echo $MAVEN_HOME
显示信息即成功
mvn -v
接下来要使用Nexus,则需要配置Maven去检查Nexus而非公共的仓库。
创建~/.m2/settings.xml(初始状态下该文件不存在),编辑内容:
<settings>
<profiles>
<profile>
<id>nexus</id>
<repositories>
<repository>
<id>central-snapshots</id>
<url>http://localhost:8081/nexus/content/groups/public-snapshots</url>
<releases><enabled>false</enabled></releases>
<snapshots><enabled>true</enabled></snapshots>
</repository>
<repository>
<id>central-releases</id>
<!-- url原为http://central,指向http://repos.d.xxx.com/nexus/content/groups/public 其中xxx一般为公司名--->
<url>http://localhost:8081/nexus/content/groups/public</url>
<!-- 表示可以从此仓库下载release版本 -->
<releases><enabled>true</enabled></releases>
<!-- 表示不可以从此仓库下载snapshot版本 -->
<snapshots><enabled>false</enabled></snapshots>
</repository>
</repositories>
<!-- 插件仓库 -->
<pluginRepositories>
<pluginRepository>
<id>central-snapshots</id>
<url>http://localhost:8081/nexus/content/groups/public-snapshots</url>
<releases><enabled>false</enabled></releases>
<snapshots><enabled>true</enabled></snapshots>
</pluginRepository>
<pluginRepository>
<id>central-releases</id>
<url>http://localhost:8081/nexus/content/groups/public</url>
<releases><enabled>true</enabled></releases>
<snapshots><enabled>false</enabled></snapshots>
</pluginRepository>
</pluginRepositories>
<servers>
<server>
<!--配置所有的releases版本构件部署Nexus的releases仓库中-->
<id>nexus-releases</id>
<username>admin</username>
<password>admin123</password>
</server>
<server>
<!--配置所有的snapshot版本构件部署到Nexus的Snapshots仓库中-->
<id>nexus-snapshots</id>
<username>admin</username>
<password>admin123</password>
</server>
</servers>
</profile>
<!-- 配置activeProfiles后,此处添加snapshots,可以使snapshots被搜索到。-->
</profiles>
<!--添加id,激活profile。-->
<activeProfiles>
<activeProfile>nexus</activeProfile>
</activeProfiles>
</settings>
注:将nexus配置成所有仓库的镜像之后,maven会从本地的nexus安装查阅,而非去外面查阅中央maven仓库。如果对nexus有一个构件请求,本地的nexus安装会提供这个构件;如果Nexus没有这个构件,nexus会从远程仓库获取这个构件,然后添加至远程仓库的本地镜像。
三、配置nexus仓库
Nexus有许多默认仓库:Central,Releases,Snapshots,和3rd Party
1.配置central仓库
Nexus内置了Maven中央代理仓库Central。选择仓库列表中的 Central,如图3.1:
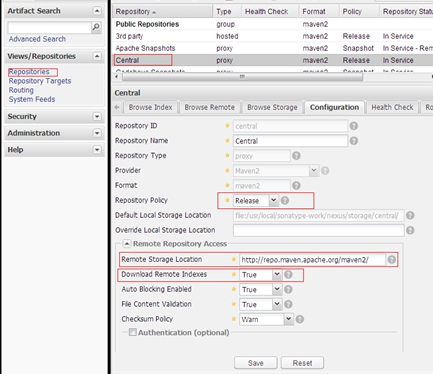
图3.1
点击Configuration进行配置:
Repository Policy为release,则不会代理远程仓库的snapshot构件(snapshot版本构件不稳定且不受控制,使用这样的构件含有潜在的风险)。
“Remote Storage Location”为远程仓库地址,http://repo.maven.org/maven2/ ;
“Download Remote Indexes”是否下载远程索引文件,默认为False,(中央仓库有大量的构件,其索引文件也很大,容易消耗大量的 中央仓库带宽)。将其设置为True(其他代理仓库也需要改成True),然后点击Save。在Nexus下载的中央仓库索引文件之后,我们就可以在本地搜索中央仓库的所有构件。
2.Releases用于部署自己的release构件,Snapshots用于自己的snapshot构件。3rd Party用于部署第三方构件,修改Configuration下Deployment Policy为Allow Redeploy,则可以在Artifact Upload中上传本地文件。
新增代理仓库
1.新增代理仓库。如图3.2
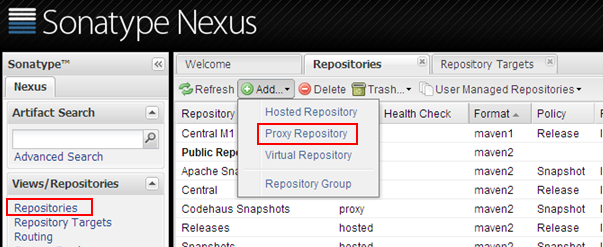
图3.2 nexus新增代理仓库
2.添加信息具体。如图3.3
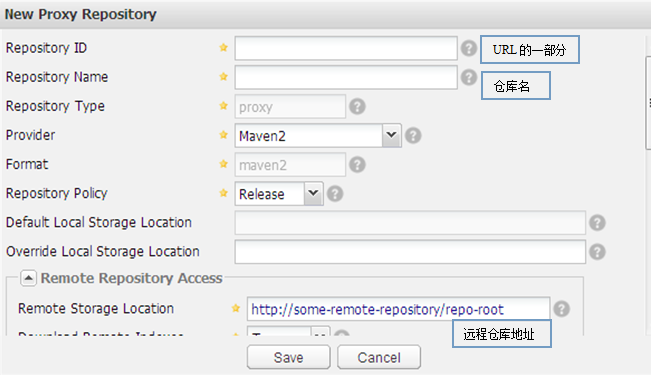
3.3 添加仓库信息
3.添加仓库至组
添加仓库到公共nexus仓库组。如图3.4
Ordered Group Repositories:已在使用中的仓库。检索顺序与排序一致
Available Repositories:已有未被使用
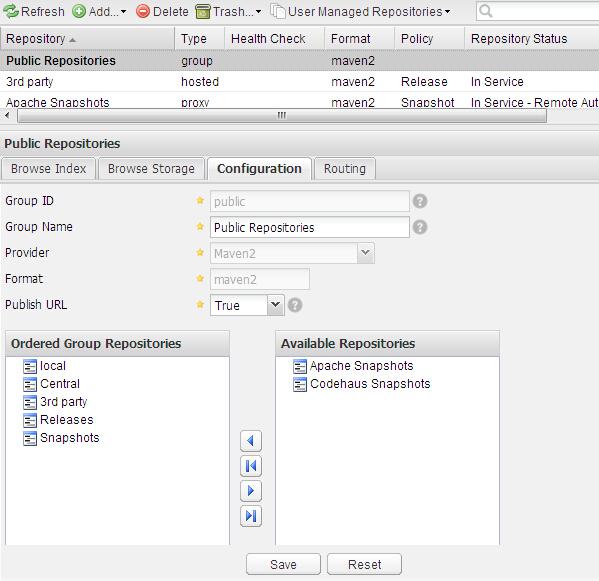
如图3.4
四、用户使用
1.在开发环境中替换/rhome/用户名/.m2 目录下的文件settings.xml(新环境中可能没有此文件);
2.修改maven安装目录下/conf/settings.xml文件。修改成干净的文件。
<localRepository>/workspace/repository</localRepository>此标签可以修改本地仓库路径,也可以在eclipse中User Settings中设置。
3.在【工程名】下面执行 mvn clean install,即从私服里面下载pom文件里的 jar 包;
4.在eclipse开发工具中 clean 【工程名】,刷新jar包目录即可;
前提条件:
1、安装了nexus
2、配置了release和snapshots
http://192.168.122.164:8081/nexus-2.1/content/repositories/releases/
http://192.168.122.164:8081/nexus-2.1/content/repositories/snapshots/
配置权限:
1、添加权限
定位到Security 下的Privileges 并且点击右边Add..进行添加:添加release和snapshots 配置如下:

之后点击Save进行保存
2、建立权限
定位到Security 下的Role 并且点击右边Add..进行添加刚才配置的:release和snapshots 如下:

点击Save进行保存
3、和用户进行绑定
定位到Security 下的Users 选择deployment用户 添加刚刚建立的权限:

点击Save保存
授权完毕 注意一定要重新启动tomcat 才会生效。
其他用户根据
http://192.168.122.164:8081/nexus-2.1/content/repositories/releases/
http://192.168.122.164:8081/nexus-2.1/content/repositories/snapshots/
就可用发布到 私服上了
注意用户需要在本机配置登录的用户名密码
1、打开maven 的setting文件添加如下配置
<server>
<id>releases</id>
<username>admin</username>
<password>admin123</password>
</server>
<server>
<id>snapshots</id>
<username>deployment</username>
<password>deployment</password>
</server>
2、将项目进行发布 需要在pom.xml配置如下:
<distributionManagement>
<repository>
<id>releases</id>
<url>http://192.168.122.164:8081/nexus-2.1/content/repositories/releases/</url>
</repository>
<snapshotRepository>
<id>snapshots</id>
<url>http://192.168.122.164:8081/nexus-2.1/content/repositories/snapshots/</url>
</snapshotRepository>
</distributionManagement>
注意配置中的id需要与服务器读releases和snapshots进行对应