基础知识
appDemo.js
var one = new Vue({   //实例一个vue对象
    el:"#vue-app-one",    //获取element,id为vue-app的element里此实例对象生效

    data:{    //data,用于存储各种数据
        age:30,
        sex:"男",
        website:"https://www.cnblogs.com/huihuihero/",
        websiteTag:"<a href='https://www.cnblogs.com/huihuihero/'>链接</a>",  //插入新元素
        bindName:"jack",  //双向绑定
        colorChange:false,   //动态改变class属性值
        error:false,   //v-if指令使用
        success:true,
        friends:[{name:"剑姬",age:22},{name:"亚索",age:24},{name:"剑圣",age:20}],
    },

    methods:{   //methods,用于存储各种方法
        add:function(inc){
            this.age+=inc;   //通过this.age便可调用data里的age,不用this.data.age
        },
        subtract:function(dec){
            this.age-=dc;
        },

        descSex:function(name){   //传参name
            return name+"的性别是"+this.sex
        },

        inputThings:function(){   //键盘事件
            console.log("您正在输入")
        },

        handleBindName:function(){   //双向绑定
            this.bindName=this.$refs.bothBind.value;   //通过 ref 双向绑定
            console.log(this.bindName);
        },
    },

    computed:{   //【计算属性computed】  methods里的一个方法执行时,其他不相干方法也会激活。而computed里的属性执行时则不会。
                    //因此若要在网页中使用搜索,大量计算等功能,使用methods来写方法则会很耗费性能。故使用computed
                    //此外计算属性是属性,调用时不能像方法那样调用,故不能带()。
        addNumber:function(){
            return this.age++
        }
    },
});

var two=new Vue({
    el:"#vue-app-two",
    data:{

    },
    methods:{
        changeSex:function(){
            one.sex="女"   //通过这种方式在当前实例对象中改变其他实例对象的data
        },
    },
})
indexDemo.html
<div id="vue-app-one">  //根元素
    <button v-on:click="add(1)">涨一岁</button>   //【v-on用于绑定事件】,调用add方法,click单击事件
    <button @click="add(1)">涨一岁</button>   //v-on方法也可用@代替,效果是一样的
    <button v-on:click="add(1)">减一岁</button>
    <button v-on:dblclick="add(10)">涨十岁</button>  //dblclick双击事件

    <input type="text" v-bind:value="age" />   //v-bind绑定age值
    <a v-bind:href="website">我的技术博客</a>   //【v-bind用于绑定属性】,给属性绑定对应的值

    <span>性别是:{{sex}}</span>   // {{ }} 渲染data里的数据,直接调用sex即可,不用this.sex或者this.data.sex
    <span>{{descSex("二狗")}}</span>    // {{ }} 直接调用函数并传参,注意直接调用方法用{{}},且需要带()

    <p v-html="websiteTag"></p>   //【v-html识别元素】,用于插入新元素

    <button v-on:click.once="add(1)">涨一岁</button>   //【事件修饰符】,.once(执行一次),.stop(阻止事件冒泡),.prevent(阻止跳转,如a标签)

    <input type="text" v-on:keyup="inputThings" />   //【键盘事件】,keyup,keydown
    <input type="text" v-on:keyup.enter="inputThings"  />  【键值修饰符】,.enter(在点击键盘上enter键后输入),.alt.enter(可以链式,同时输入alt+enter)

    <input type="text" v-model="bindName"/>   【双向绑定】第一种方法 v-model,v-model直接绑定data中定义的属性即可实现双向绑定,注意:v-model只能用在表单元素中(input select textarea checkbox等)
    <input type="text" ref="bothBind" v-on:keyup="handleBindName" />双向第二种方法  这里ref定义的名称是bothBind,则在handleBindName中使用this.$refs.bothBind.value

    <span>{{addNumber}}<span>   //【计算属性】不是方法,调用时不用带()

    <div v-bind:class="{red:true,blue:false}"></div>    //【绑定class属性】,true则生效,false则不生效
    <div v-on:click="colorChange=!colorChange" v-bind:class="{redColor:colorChange}"></div>   //动态改变class,点击后data里定义的colorChange取反,class属性生效,再点击再取反,失效

    <button v-on:click="error=!error">切换网络</button>
    <div  v-if="error">网络连接错误404</div>  //【v-if v-else-if】,v-if指令为false时是直接抹除的,元素不占位。v-show指令为false时,元素还在,只是display:none了
    <div v-else-if="success">网络连接成功200</div>
    <div v-show="error">网络连接错误404</div>   //【v-show】

    <ul>
        <li v-for="every in friends" :key="every.id">姓名:{{every.name}} - 年龄:{{every.age}}</li>    //【v-for】循环遍历数组,严格来说每个遍历出来的标签都应该有:key="id"
    </ul>
    <ul>
        <li v-for="(every,index) in friends">序号:{{index}} - 姓名:{{every.name}} - 年龄:{{every.age}}</li>    //将index也遍历出来
    </ul>
    <template v-for="(every,index) in friends">   //v-for遍历【数组】,template是vue特定的元素,它只负责包裹元素,但不会被渲染出来,非常好用。此处若将template替换成div,则div会被渲染出来,会有些冗余
            <div v-for="(val,key) in every">   //v-for遍历【对象】。其中key对应对象的“键”。val对应对象的“值”
                <p>{{key}} - {{val}}</p>
            </div>
    </template>
</div>
组件
vue-app.js---------------------------------------
Vue.component("greeting",{     //自定义一个组件
    template:`
        <div>  //要有一个根标签
            <p>{{name}}:开黑吗?我亚索贼6</p>
            <button v-on:click="changeName">改名字</button>
        </div>
    `,
    data(){    //这里为什么这样写,这样每次都会return数值,保证了每一个组件都是独立运行互不干扰的
        return {
            name:"李二狗",
            age:22,
        }
    },
    methods:{
        changeName:function(){
            this.name="王铁蛋";
        }
    }
})

new Vue({
    el:"#vue-app-one",
})
new Vue({
    el:"#vue-app-two",
})


index.html----------------------------------------
<div id="vue-app-one">
    <greeting></greeting>   //这里会渲染greeting组件
</div>
<div id="vue-app-two">
    <greeting></greeting>  //这里也会渲染greeting组件,并且和上面vue-app-one里的greeting是各自独立互不干扰的
</div>
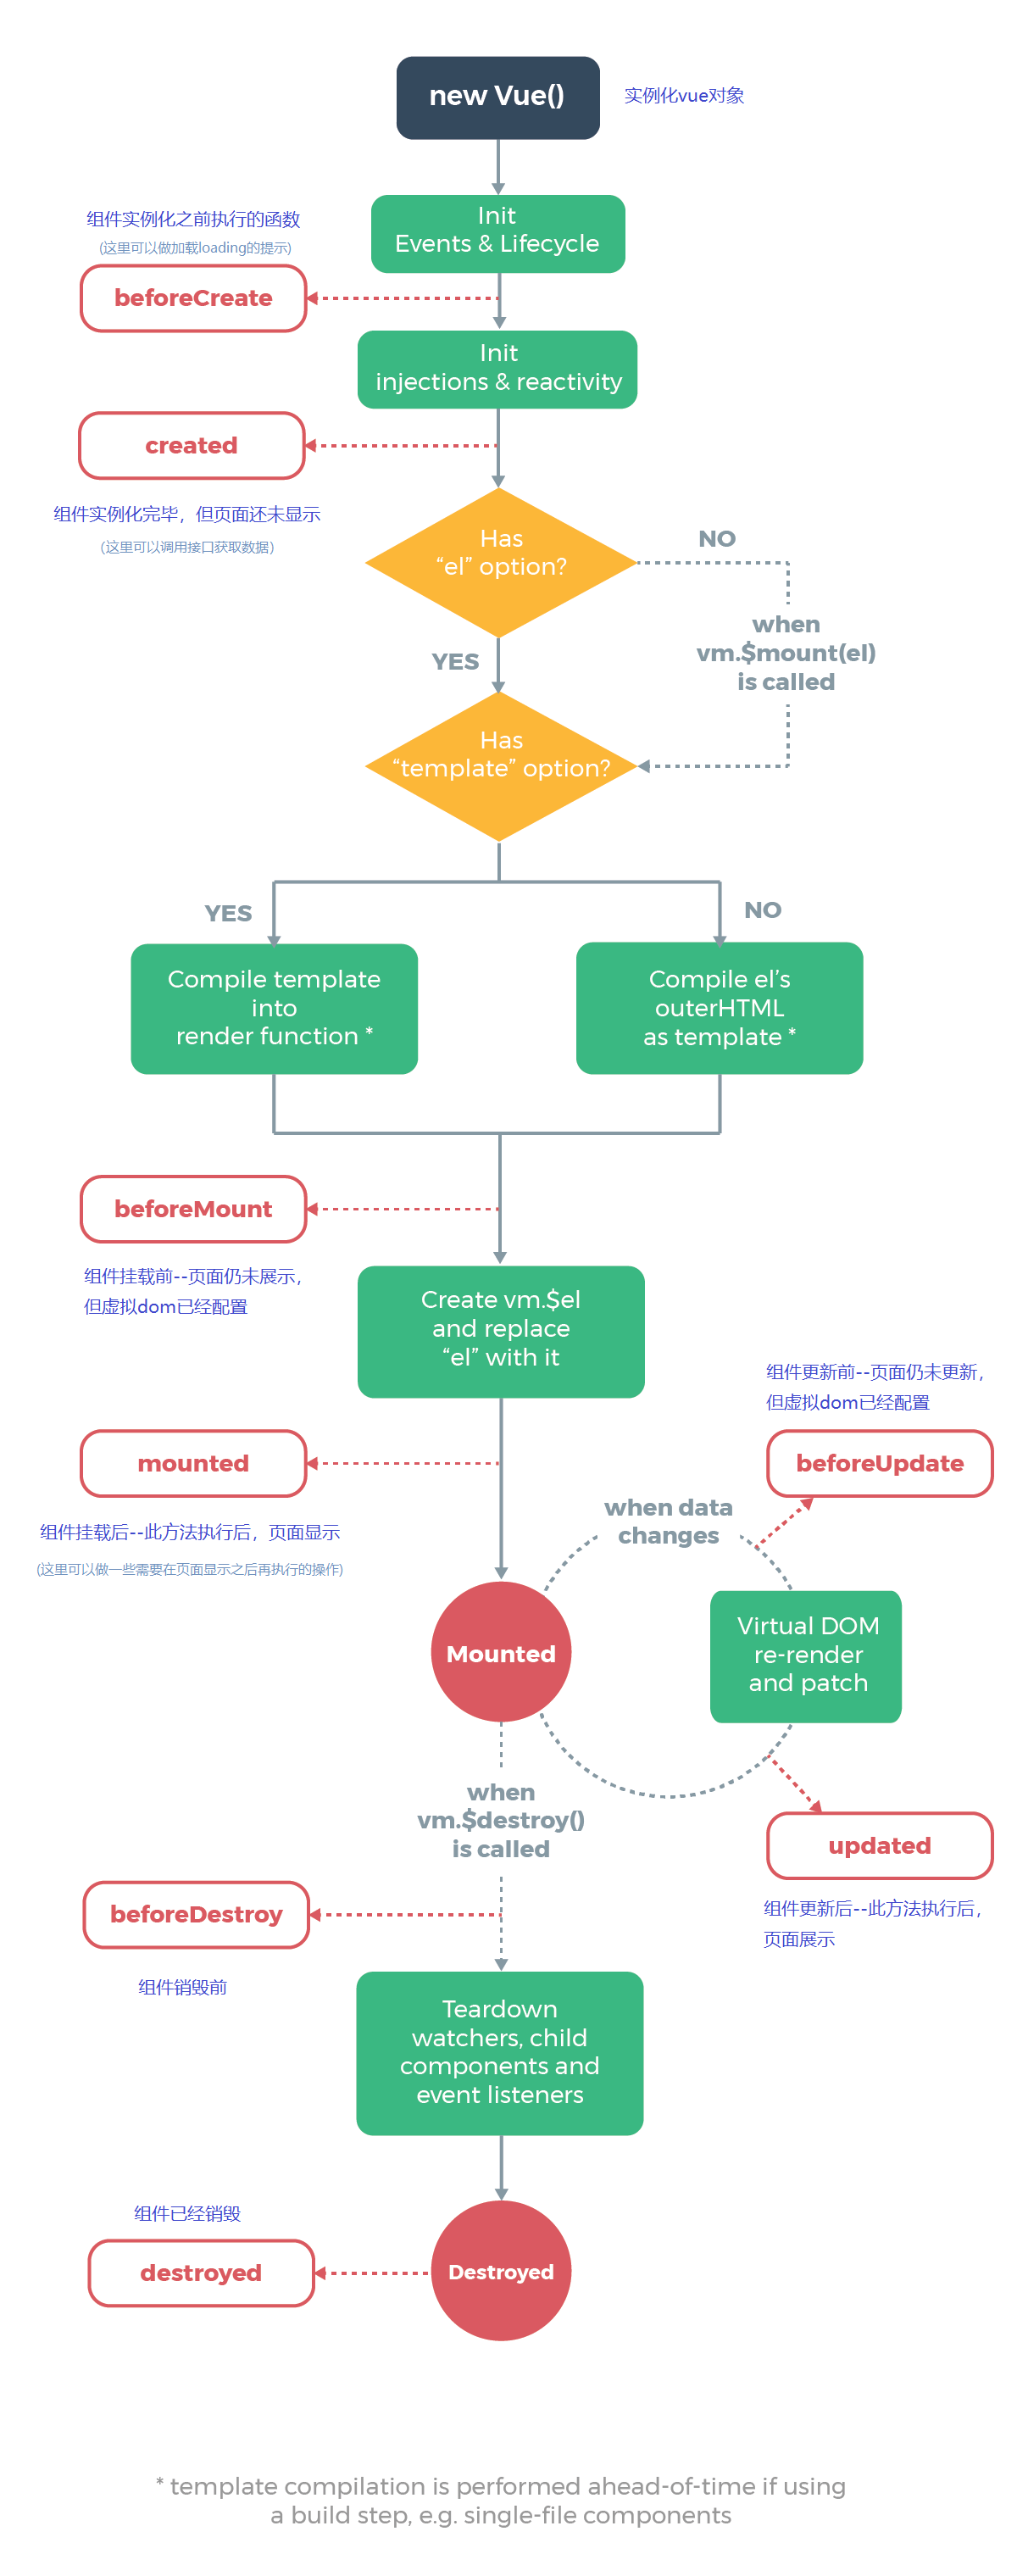
vue生命周期,直接上图
————————————————————
————————————————————