简述:
CountDownLatch、Semaphore和CyclicBarrier都是并发编程常用、好用的工具类,不需要开发人员使用底层的api,例如join(),可以通过CountDownLatch代替,开箱即用,减少使用底层api出错的可能,而且功能更加强大,CountDownLatch和Semaphore直接实现了AQS进而实现功能,而CyclicBarrier通过ReentrantLock实现,而ReentrantLock也是通过AQS实现,所以归根结底这三个工具类都是AQS实现。不了解AQS的请参考下面的连接,这里不会过多介绍AQS实现
AbstractQueuedSynchronizer源码(上)–排他锁
AbstractQueuedSynchronizer源码(下)–共享锁和Condition条件队列
ReentrantLock源码解析
CountDownLatch
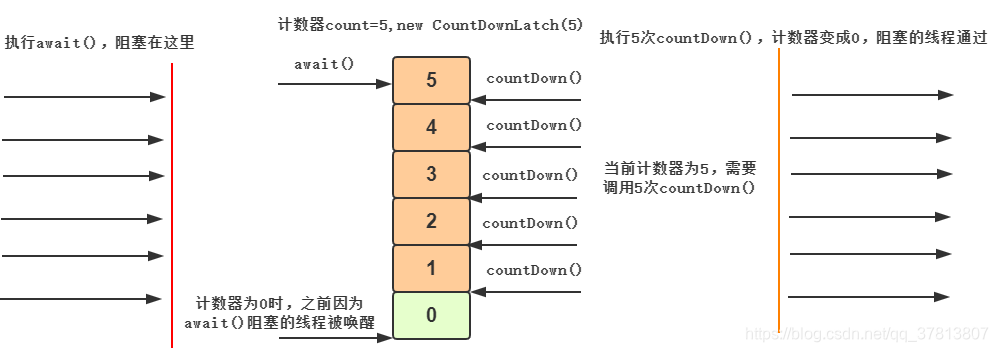
CountDownLatch我们一般称为闭锁或者计数器,内部通过计数器的实现功能,内部通过AQS实现,代码非常简单,主要有两种应用场景:
1.让一个或多个线程等待其他线程操作完成后再继续执行,就是join()的思想。
2.让多个线程执行到锁的位置(await()代码位置)停止,通过countdown()统一释放。
原理图:
先写一下demo,然后再查看源码实现。
demo:
public static void main(String[] args) throws InterruptedException {
    CountDownLatch latch1 = new CountDownLatch(5);
    CountDownLatch latch2 = new CountDownLatch(1);
    for (int i = 0; i < 5; i++) {
        new Thread(() -> {
            System.out.println(Thread.currentThread().getName()+"启动成功");
            try {
                //这里保证多个线程同时执行后续代码,是前面提到的第二种场景
                latch2.await();
                System.out.println(Thread.currentThread().getName()+"执行代码逻辑");
                latch1.countDown();
            } catch (InterruptedException e) {
                e.printStackTrace();
            }

        }).start();
    }
    System.out.println("Main开始执行");
    Thread.sleep(1000);
    latch2.countDown();
    //主线程等待其他线程执行完成继续执行,第一种使用场景
    latch1.await();
    System.out.println("Main结束执行");
}
Thread-0启动成功
Thread-2启动成功
Thread-1启动成功
Thread-3启动成功
Main开始执行
Thread-4启动成功
Thread-0执行代码逻辑
Thread-2执行代码逻辑
Thread-1执行代码逻辑
Thread-3执行代码逻辑
Thread-4执行代码逻辑
Main结束执行
上面demo是CountDownLatch的两种简单适用场景,下面看下重要的方法实现。
await():
//①Sync为静态内部类,实现了AQS
public CountDownLatch(int count) {
	if (count < 0) throw new IllegalArgumentException("count < 0");
	this.sync = new Sync(count);
}
//②
Sync(int count) {
	setState(count);
}
//③
public void await() throws InterruptedException {
	sync.acquireSharedInterruptibly(1);
}
//④
public final void acquireSharedInterruptibly(int arg)
		throws InterruptedException {
	if (Thread.interrupted())
		throw new InterruptedException();
	//⑤
	if (tryAcquireShared(arg) < 0)
	//⑦
		doAcquireSharedInterruptibly(arg);
}
//⑥
protected int tryAcquireShared(int acquires) {
	return (getState() == 0) ? 1 : -1;
}
上面是await()方法的实现方式,我们一步步看下:
①.通过构造函数设置计数器count的值
②.将count赋值给AQS中state变量
③.调用await(),获取可中断的共享锁
④.相应中断,尝试获取共享锁(判断当前state是否为0),如果失败,直接调用AQS中doAcquireSharedInterruptibly(),基本步骤是:将当前线程生成共享节点加入到队列尾部,然后判断当前节点是否为head的后驱节点,true,尝试获取共享锁,成功将自己设置为head,并且唤醒后续的节点,false,将node对应的前驱结点的状态设置为signal,然后阻塞自己,直到被唤醒。
所以整体的思路是:给state设置>0的值,await()就能让线程加入队列阻塞,实现await()功能。
countDown():
//java
public void countDown() {
    sync.releaseShared(1);
}
public final boolean releaseShared(int arg) {
    //尝试释放共享锁
    if (tryReleaseShared(arg)) {
        //调用AQS中的方法,从head节点开始唤醒状态为signal,及其后面的符合条件的节点
        doReleaseShared();
        return true;
    }
    return false;
}
//代码很简单,就不描述了
protected boolean tryReleaseShared(int releases) {
    // Decrement count; signal when transition to zero
    for (;;) {
        int c = getState();
        if (c == 0)
            return false;
        int nextc = c-1;
        if (compareAndSetState(c, nextc))
            return nextc == 0;
    }
}
到这里,我们了解了闭锁的两个关键方法,通过AQS实现比较简单,通过简单的demo介绍了CountDownLatch的适用场景,对其有了基本的了解。
Semaphore:
Semaphore也就是信号量,一般用来控制当前资源的访问并发数,就像春运坐火车安检,每条通道的安检人员每次只放进去几个人,而Semaphore也是一样的,根据设置的permits设置每次允许通过的线程个数,设置每次acquire几个permits,释放几个permits。
public static void main(String[] args) throws InterruptedException {
    ExecutorService executorService = Executors.newCachedThreadPool();
    CountDownLatch countDownLatch = new CountDownLatch(200);
    Semaphore semaphore = new Semaphore(3);
    for (int i = 0; i < 200; i++) {
        executorService.execute(() -> {
            try {
                semaphore.acquire();
                log.info("线程:{}do something",Thread.currentThread().getName());
                Thread.sleep(1000);
                semaphore.release();
            } catch (InterruptedException e) {
                e.printStackTrace();
            } finally {
                countDownLatch.countDown();
            }
        });
    }
    countDownLatch.await();
    executorService.shutdown();
    log.info("finish");
}
上面运行代码的过程中可以看到,日志每3个打印一次,代码设置每次有3个permits,一个线程每次acquire 1个permits,所以可以有3个线程获得permits,休眠1s,然后release permits,所以最终出现日志每次打印3行代码。
类定义:
//Sync为静态内部类实现AQS
private final Sync sync;
//默认非公平锁
public Semaphore(int permits) {
    sync = new NonfairSync(permits);
}
//fair对应是否公平锁
public Semaphore(int permits, boolean fair) {
    sync = fair ? new FairSync(permits) : new NonfairSync(permits);
}
FairSync和NonFairSync
    static final class NonfairSync extends Sync {
        private static final long serialVersionUID = -2694183684443567898L;

        NonfairSync(int permits) {
            super(permits);
        }

        protected int tryAcquireShared(int acquires) {
            return nonfairTryAcquireShared(acquires);
        }
    }

    static final class FairSync extends Sync {
        private static final long serialVersionUID = 2014338818796000944L;

        FairSync(int permits) {
            super(permits);
        }

        protected int tryAcquireShared(int acquires) {
            for (;;) {
            	//判断是否有前驱节点,如果有,返回-1
                if (hasQueuedPredecessors())
                    return -1;
                //得到当前state变量值
                int available = getState();

                int remaining = available - acquires;
                //如果当前持有锁的余额不足,或者CAS设置成功,直接返回,remaining>0说明可以acquire,否则被阻塞
                if (remaining < 0 ||
                    compareAndSetState(available, remaining))
                    return remaining;
            }
        }
    }
FairSync和NonFairSync是Sync的两个子类,对应着公平锁和非公平锁的版本,两个类的构造函数都是讲permits设置到AQS的State变量,然后就是tryAcquireShared的区别,公平锁获取会判断同步队列中是否有前驱节点,如果有,秉承着FIFO的特性,返回-1,其余代码和非公平锁一致。
acquire():
	//每次获取1一个permits
	public void acquire() throws InterruptedException {
		sync.acquireSharedInterruptibly(1);
	}
	//每次获取预设个人的permits
	public void acquire(int permits) throws InterruptedException {
		if (permits < 0) throw new IllegalArgumentException();
		sync.acquireSharedInterruptibly(permits);
	}
	public final void acquireSharedInterruptibly(int arg)
			throws InterruptedException {
			//响应中断
		if (Thread.interrupted())
			throw new InterruptedException();
		//尝试获取锁,对应着FairSync和NonFairSync两种版本锁的方法,默认为非公平锁,可以通过构造函数设置选择公平锁
		if (tryAcquireShared(arg) < 0)
			//将当前线程加入同步队列尾部,自旋尝试获取锁(当前驱节点为head的时候可以尝试获取锁),失败阻塞,等待被唤醒,被唤醒后还是尝试获取锁。
			doAcquireSharedInterruptibly(arg);
	}
release()释放许可
	//release()及其重载方法release(int permits)
	public void release() {
		sync.releaseShared(1);
	}
	public void release(int permits) {
		if (permits < 0) throw new IllegalArgumentException();
		sync.releaseShared(permits);
	}
	//释放arg个permits
	public final boolean releaseShared(int arg) {
		//尝试释放共享锁,失败返回false,成功,doReleaseShared()去释放锁,及其后面的节点
		if (tryReleaseShared(arg)) {
			doReleaseShared();
			return true;
		}
		return false;
	}
	//尝试获取锁
	protected final boolean tryReleaseShared(int releases) {
		for (;;) {
			int current = getState();
			int next = current + releases;
			//如果超过integer最大值,抛出异常
			if (next < current) // overflow
				throw new Error("Maximum permit count exceeded");
			//如果CAS设置当前state为next成功,返回true
			if (compareAndSetState(current, next))
				return true;
		}
	}
	//尝试获取锁之后,释放锁及后面的节点
	private void doReleaseShared() {
	//自旋
		for (;;) {
			Node h = head;
			//当前队列至少两个节点
			if (h != null && h != tail) {
				int ws = h.waitStatus;
				//如果head的waitStatus为signal
				if (ws == Node.SIGNAL) {
					//跳过第一次
					if (!compareAndSetWaitStatus(h, Node.SIGNAL, 0))
						continue;            // loop to recheck cases
					//唤醒后面的节点
					unparkSuccessor(h);
				}
				//如果ws为初始状态,CAS失败的跳过
				else if (ws == 0 &&
						 !compareAndSetWaitStatus(h, 0, Node.PROPAGATE))
					continue;                // loop on failed CAS
			}
			//最终h和head还是相同的,直接break
			//head可能发生变化,因为AQS获取锁和释放锁都会调用这个方法
			if (h == head)                   // loop if head changed
				break;
		}
	}
其余方法:
	//查询当前许可的数量
	public int availablePermits() {
		return sync.getPermits();
	}

	//获取所有的permits,返回
	public int drainPermits() {
		return sync.drainPermits();
	}
	final int drainPermits() {
    	for (;;) {
            int current = getState();
            if (current == 0 || compareAndSetState(current, 0))
                return current;
        }
    }
这道理,介绍了Semaphore的基本使用与源码实现,和CountDownLatch一样都是通过AQS实现特定的功能,但是使用方式又不同,得到的功能也不同,现在来对比一下,能够更加直观的了解。
CountDownLatch和Semaphore实现对比:
1.CountDownLatch:使用AQS共享锁
设置state:构造函数设置计数器
await():通过判断当前state==0,if true放行,if false阻塞执行的线程,相当于一个栅栏。
countDown():每次讲state-1,直到减为0,释放阻塞在同步队列中线程。
2.Semaphore:使用AQS共享锁,可选择公平锁,非公平锁
设置state:构造函数
acquire(int permits):将state - permits> 0,if false,无法获得许可,阻塞到同步队列,if true,可以获得许可。
PS:acquire区分是否公平锁,release不区分
release(int permits):将state + permits赋值给state,permits必须是正整数,然后释放阻塞在同步队列的线程。
举个栗子:
CountDownLatch:就像超市大减价,很多人排队等着早上开门,时间到了,8点开门(state=0),然后人哗啦直接全部放行。
Semaphore:就像火车站安检,工作人员每次控制过去一个或几个人去通过安检,通过安检一个或几个人,然后又放行一个或几个人去安检。
CyclicBarrier
前面了解了CountDownLatch的基本使用,但是有个缺点,就是无法循环使用,当countDown()将计数器减到0时,释放所有阻塞线程,然后就没然后了,而CyclicBarrier同样是起到栅栏的作用,但是可以循环使用。CyclicBarrier的作用就是让线程之间相互等待,直到内部计数器减到0,释放所有阻塞线程。
举个栗子:
public static void main(String[] args) throws InterruptedException, BrokenBarrierException {
        CyclicBarrier barrier = new CyclicBarrier(3, () -> {
            System.out.println("先执行Runnable command");
        });

        for (int i = 0; i < 3; i++) {
            new Thread(() -> {
                System.out.println(Thread.currentThread().getName() + "到达栅栏之前");
                try {
                    barrier.await();
                } catch (InterruptedException e) {
                    e.printStackTrace();
                } catch (BrokenBarrierException e) {
                    e.printStackTrace();
                }
                System.out.println(Thread.currentThread().getName() + "通过栅栏了");
            }).start();
        }
    }
Thread-0到达栅栏之前
Thread-2到达栅栏之前
Thread-1到达栅栏之前
先执行Runnable command
Thread-0通过栅栏了
Thread-2通过栅栏了
Thread-1通过栅栏了
将CyclicBarrier的计数器设置为3,当三个线程都执行的await(),将计数器减为0,就会继续执行。如果设置Runnable指令,通过栅栏的时候,优先执行Runnable指令。
相关属性:
public class CyclicBarrier {

    //Generation为CyclicBarrier内部的年代的概念
    private static class Generation {
        boolean broken = false;
    }
    //可重入锁
    private final ReentrantLock lock = new ReentrantLock();

    //condition实例
    private final Condition trip = lock.newCondition();

    //permit的条件
    private final int parties;

    //Runnable指令
    private final Runnable barrierCommand;

    //
    private Generation generation = new Generation();

    //计数器,初始等于parties
    private int count;

	//设置parties,Runnable指令
	public CyclicBarrier(int parties, Runnable barrierAction) {
        if (parties <= 0) throw new IllegalArgumentException();
        this.parties = parties;
        this.count = parties;
        this.barrierCommand = barrierAction;
    }

    //设置parties,也就是计数器的初始值
    public CyclicBarrier(int parties) {
        this(parties, null);
    }
}
因为CyclicBarrier是可以重复使用的,满足条件通过栅栏,当通过之后,就是一个新的Generation。我们知道当通过栅栏的时候,会优先执行Runnable的Run(),这就是barrierCommand存在的意义。
await():
    public int await() throws InterruptedException, BrokenBarrierException {
    	try {
    		return dowait(false, 0L);
    	} catch (TimeoutException toe) {
    		throw new Error(toe); // cannot happen
    	}
    }
    public int await(long timeout, TimeUnit unit)
    	throws InterruptedException,
    		   BrokenBarrierException,
    		   TimeoutException {
    	return dowait(true, unit.toNanos(timeout));
    }
await()是CyclicBarrier主要方法,线程调用每次讲计数器--count,直到等于0,然后通过condition.notifyAll()唤醒全部线程。当然Generation就是下一个新的年代了,一起看下dowait()的实现。
dowait():
	private int dowait(boolean timed, long nanos)
        throws InterruptedException, BrokenBarrierException,
               TimeoutException {
        //获得lock,然后加锁
        final ReentrantLock lock = this.lock;
        lock.lock();
        try {
            //获得当前generation
            final Generation g = generation;

            //年代是否被broken,默认为false,if true,抛出BrokenBarrierException
            if (g.broken)
                throw new BrokenBarrierException();
            //是否被打断,如果打断,打断栅栏(将generation.broken设置为true,重置计数器,执行signalAll()),并且响应中断
            if (Thread.interrupted()) {
                breakBarrier();
                throw new InterruptedException();
            }
            //每次count减1
            int index = --count;
            //如果计数器值count为0,或者说当前generation最终一个线程到达栅栏
            if (index == 0) {  // tripped
                boolean ranAction = false;
                try {
                    final Runnable command = barrierCommand;
                    //优先执行Runnable指令
                    if (command != null)
                        command.run();
                    ranAction = true;
                    //开启下个generation,执行signalAll(),唤醒之前等待的线程,重置计数器,generation重置初始化
                    nextGeneration();
                    return 0;
                } finally {
                    //如果失败,将generation的broker设置为true,重置计数器,generation重置初始化。
                    if (!ranAction)
                        breakBarrier();
                }
            }

            for (;;) {
                try {

//如果没有设置timeout,调用await()阻塞在条件队列,直到被signal()/signalAll()唤醒,加入到同步队列,去获取锁
                    if (!timed)
                        trip.await();
                    //如果设置timeout,调用awaitNanos
                    else if (nanos > 0L)
                        nanos = trip.awaitNanos(nanos);
                } catch (InterruptedException ie) {
                    //线程必须是当前generation,且broken为false
                    if (g == generation && ! g.broken) {
                        breakBarrier();
                        throw ie;
                    } else {
                        //如果不是当前generation的线程被中断,jvm认为已经完成任务,直接中断线程。
                        Thread.currentThread().interrupt();
                    }
                }
                //如果有任何一个线程breakBarrier,唤醒的线程,也必须抛出异常。
                if (g.broken)
                    throw new BrokenBarrierException();
                //判断是否是当前带
                if (g != generation)
                    return index;

                if (timed && nanos <= 0L) {
                    breakBarrier();
                    throw new TimeoutException();
                }
            }
        } finally {
            lock.unlock();
        }
    }
实现功能最重要的有两个概念,计数器count和年代generation,为什么需要generation呢?
因为同一个线程可以使用多个CyclicBarrier,如果没有generation,就无法区分了,所以通过generation判断年代是否发生变化,来保证栅栏的正确使用。
如果break被设置为true,其余线程被唤醒也是会判断break,最终导致这个CyclicBarrier就无法使用。
CountDownLatch和CyclicBarrier区别:
1.CountDownLatch只能使用一次,而CyclicBarrier的await()可以循环利用,或者使用reset()进行重置。
2.CyclicBarrier是多个线程之间相互等待,直到满足条件,打开栅栏,而CountDownLatch同样可以完成这样的功能,就是将CountDownLatch的计数器设置为1,通过await()去阻塞在栅栏,需要依赖外部的线程执行一次countDown()。
3.主线程需要等待其他线程执行完成之后继续执行的场景,这两个锁都是可以完成的。
4.如果不是循环使用的场景,lz认为CountDownLatch的使用能够更加灵活,所以更推荐的。