自己做了一个简单的提示框,供自己使用,也可以供他人参考,看懂此文,是理解组件开发的入门
思路比较简单:
1.常规写法:
1.1. 创建一个构造函数
1.2. 给构造函数的原型对象添加show 和hide方法
1.3. 实力化调用构造函数
css 代码:


 1 .alert {
 2     padding: 15px;
 3     margin-bottom: 20px;
 4     border: 1px solid transparent;
 5     border-radius: 4px;
 6 }
 7
 8 .alert-warning {
 9     color: #8a6d3b;
10     background-color: #fcf8e3;
11     border-color: #faebcc;
12 }
13
14 .alert-success {
15     color: #3c763d;
16     background-color: #dff0d8;
17     border-color: #d6e9c6;
18 }
19
20 .alert .close {
21     text-decoration: none;
22     float: right;
23     font-size: 21px;
24     font-weight: 700;
25     line-height: 1;
26     color: #000;
27     text-shadow: 0 1px 0 #fff;
28     filter: alpha(opacity=20);
29     opacity: .2;
30 }
31
32 .alert-info {
33     color: #31708f;
34     background-color: #d9edf7;
35     border-color: #bce8f1;
36 }
37
38 .alert-danger {
39     color: #a94442;
40     background-color: #f2dede;
41     border-color: #ebccd1;
42 }
html代码:
 1 <!DOCTYPE html>
 2 <html lang="en">
 3 <head>
 4     <meta charset="UTF-8">
 5     <title>Document</title>
 6     <link rel="stylesheet" href="./css/layout1.css">
 7     <script>
 8       //构造一个函数,参数为一个对象,实例化时,有值则进行传值,没有则赋值一个空对象
 9       function popAlert( opt ){
10           this.opt = opt || {};
11       };
12       // 显示函数的设置
13       popAlert.prototype.show = function(){
14          //   创建一个div元素
15           var Odiv = document.createElement('div');
16           var that = this;
17           var aclose ;
18           //   给div添加class属性,这里使用的是多个属性的添加,同时将opt的class传递过来
19           Odiv.classList.add('alert',this.opt['class']||'' );
20           //   设定div包含的内容
21           Odiv.innerHTML = this.opt['content'] || '';
22           Odiv.innerHTML += "<a href='javascript:;' class='close'> X </a>";
23           // 把div元素整体插入body内,appendChild是插在最后面
24           document.body.appendChild(Odiv);
25
26           aclose = document.querySelectorAll('.alert > .close');
27           // 点击close按钮,则影藏此按钮的父级元素
28           aclose.forEach(function(val){
29               val.addEventListener( 'click',function(){
30                   that.hide( this.parentNode );
31               });
32           });
33       };
34       //   影藏函数设置
35       popAlert.prototype.hide = function( obj ){
36           obj.style.display = 'none';
37       };
38
39        window.onload = function(){
40            //    新对象实例化及调用show函数
41            var oAlertSuccess = new popAlert({
42                'class':'alert-success',
43                'content':'这是成功提示信息,恭喜你!'
44            });
45            oAlertSuccess.show();
46
47             var oAlertInfo = new popAlert({
48                'class':'alert-info',
49                'content':'这是信息提示信息,如果你已经知道了,请忽略!'
50            });
51            oAlertInfo.show();
52
53             var oAlertWarning = new popAlert({
54                'class':'alert-warning',
55                'content':'这是警告提示信息,请知悉!'
56            });
57            oAlertWarning.show();
58
59             var oAlertDanger = new popAlert({
60                'class':'alert-danger',
61                'content':'这是危险提示信息,重要!请知悉!'
62            });
63            oAlertDanger.show();
64        }
65     </script>
66 </head>
67 <body>
68 </body>
69 </html>
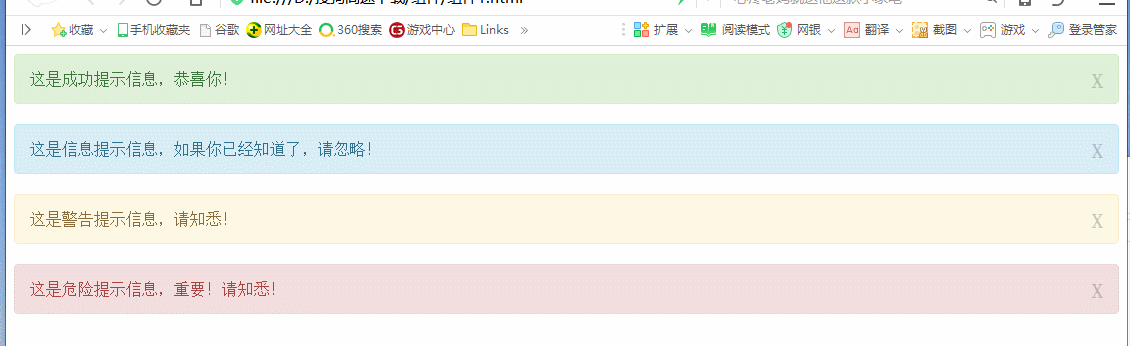
运行结果:

2. 换一种方式写:
把 js 调用和代码分开:
css 代码:还是和上面是一样的
 1 .alert {
 2     padding: 15px;
 3     margin-bottom: 20px;
 4     border: 1px solid transparent;
 5     border-radius: 4px;
 6 }
 7
 8 .alert-warning {
 9     color: #8a6d3b;
10     background-color: #fcf8e3;
11     border-color: #faebcc;
12 }
13
14 .alert-success {
15     color: #3c763d;
16     background-color: #dff0d8;
17     border-color: #d6e9c6;
18 }
19
20 .alert .close {
21     text-decoration: none;
22     float: right;
23     font-size: 21px;
24     font-weight: 700;
25     line-height: 1;
26     color: #000;
27     text-shadow: 0 1px 0 #fff;
28     filter: alpha(opacity=20);
29     opacity: .2;
30 }
31
32 .alert-info {
33     color: #31708f;
34     background-color: #d9edf7;
35     border-color: #bce8f1;
36 }
37
38 .alert-danger {
39     color: #a94442;
40     background-color: #f2dede;
41     border-color: #ebccd1;
42 }
html 代码:script标签内,只写调用的代码
 1 <!DOCTYPE html>
 2 <html lang="en">
 3 <head>
 4     <meta charset="UTF-8">
 5     <title>Document</title>
 6     <link rel="stylesheet" href="./css/layout1.css">
 7     <script src="./js/layout.js"></script>
 8     <script>
 9        window.onload = function(){
10            //    新对象实例化及调用show函数
11            var oAlertSuccess = new huanying2015.popAlert({
12                'class':'alert-success',
13                'content':'这是成功提示信息,恭喜你!'
14            });
15            oAlertSuccess.show();
16
17             var oAlertInfo = new huanying2015.popAlert({
18                'class':'alert-info',
19                'content':'这是信息提示信息,如果你已经知道了,请忽略!'
20            });
21            oAlertInfo.show();
22
23             var oAlertWarning = new huanying2015.popAlert({
24                'class':'alert-warning',
25                'content':'这是警告提示信息,请知悉!'
26            });
27            oAlertWarning.show();
28
29             var oAlertDanger = new huanying2015.popAlert({
30                'class':'alert-danger',
31                'content':'这是危险提示信息,重要!请知悉!'
32            });
33            oAlertDanger.show();
34        }
35     </script>
36 </head>
37 <body>
38 </body>
39 </html>
js 代码:与之前写在一起的差异是:一,用一个匿名的立即执行表达式函数把代码包含起来了,二是在表达式内部增加了几行代码,即增加了一个空对象huanying2015,然后把popAlert 挂在huanying2015 下面,再把huanying2015挂到window下面
 1 ;(function(window,undefined){
 2      //构造一个函数,参数为一个对象,实例化时,有值则进行传值,没有则赋值一个空对象
 3       function popAlert( opt ){
 4           this.opt = opt || {};
 5       };
 6       // 显示函数的设置
 7       popAlert.prototype.show = function(){
 8          //   创建一个div元素
 9           var Odiv = document.createElement('div');
10           var that = this;
11           var aclose ;
12           //   给div添加class属性,这里使用的是多个属性的添加,同时将opt的class传递过来
13           Odiv.classList.add('alert',this.opt['class']||'' );
14           //   设定div包含的内容
15           Odiv.innerHTML = this.opt['content'] || '';
16           Odiv.innerHTML += "<a href='javascript:;' class='close'> X </a>";
17           // 把div元素整体插入body内,appendChild是插在最后面
18           document.body.appendChild(Odiv);
19
20           aclose = document.querySelectorAll('.alert > .close');
21           // 点击close按钮,则影藏此按钮的父级元素
22           aclose.forEach(function(val){
23               val.addEventListener( 'click',function(){
24                   that.hide( this.parentNode );
25               });
26           });
27       };
28       //   影藏函数设置
29       popAlert.prototype.hide = function( obj ){
30           obj.style.display = 'none';
31       };
32
33       // 设置一个空对象:huanying2015
34       var huanying2015 = {};
35       //   把popAlert 挂在huanying2015下面
36       huanying2015 = {
37           'popAlert' : popAlert,
38       };
39       //   然后把huanying2015挂在window 对象下面,这样就可以在外面使用huanying2015调用popAlert 了
40       window.huanying2015 = huanying2015;
41
42 })(window,undefined);
运行结果:还是一样的