Spring学习笔记01
一、Spring
Spring是一个开源的免费框架;Spring是一个轻量级的非入侵式的框架;控制反转ioc,面向切片编程AOP;支持事务的处理对框架整合的支持。
二、IOC创建对象的方式
1.默认方式是使用无参构造方法创建对象
2.当实体类中有有参构造方法时:
    <!--第一种方式通过下标索引赋值-->
    <bean id="user1" class="com.hx.pojo.User" name="blinks">
        <constructor-arg index="0" value="JENNIE"/>
        <constructor-arg index="1" value="female"/>
    </bean>

    <!--第二种方式通过参数类型创建(不推荐)-->
    <bean id="user2" class="com.hx.pojo.User" name="blinks">
        <constructor-arg type="java.lang.String" value="LISA"/>
        <constructor-arg type="java.lang.String" value="female"/>
    </bean>

    <!--第三章方式通过参数名创建-->
    <bean id="user3" class="com.hx.pojo.User" name="blinks">
        <constructor-arg name="name" value="BP"/>
        <constructor-arg name="gender" value="female"/>
    </bean>
三、applicationContext.xml文件配置
1.起别名
见下例
方式一:
<!--将user1替换成qwertyu-->
<alias name="user1" alias="qwertyu"/>
方式二(bean的配置):
    <!--将user3替换成blinks-->
    <bean id="user3" class="com.hx.pojo.User" name="blinks">
        <constructor-arg name="name" value="BP"/>
        <constructor-arg name="gender" value="female"/>
    </bean>
四、依赖注入
1.构造器注入
2.set方式注入
    <bean id="student" class="com.hx.pojo.Student">
        <!--普通注入-->
        <property name="name" value="JENNIE"/>

        <!--bean注入-->
        <property name="address" ref="address"/>

        <!--数组注入-->
        <property name="books">
            <array>
                <value>LIGHT UP THE SKY</value>
                <value>THE MOVIE</value>
                <value>THE SHOW</value>
            </array>
        </property>

        <!--LIST注入-->
        <property name="hobbys">
            <list>
                <value>SING</value>
                <value>DANCE</value>
                <value>TAKE PHOTO</value>
            </list>
        </property>

        <!--MAP注入-->
        <property name="card">
            <map>
                <entry key="idNum" value="0327"/>
                <entry key="bankCard" value="123456789"/>
            </map>
        </property>

        <!--SET注入-->
        <property name="games">
            <set>
                <value>LOL</value>
                <value>CF</value>
                <value>NZ</value>
            </set>
        </property>

        <!--NULL值注入-->
        <property name="wife">
            <null/>
        </property>

        <!--Properties注入-->
        <property name="info">
            <props>
                <prop key="practiceNum">0327</prop>
                <prop key="solo">LALISA</prop>
                <prop key="gender">female</prop>
                <prop key="nickName">lalalalisa</prop>
            </props>
        </property>
    </bean>
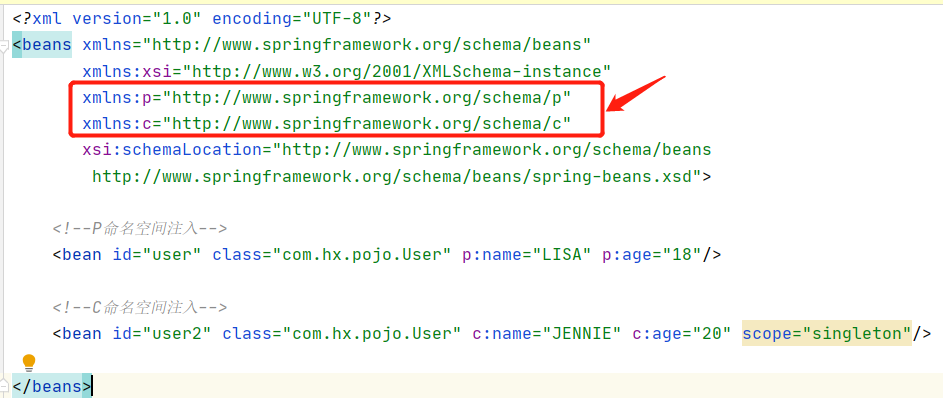
3.拓展方式注入(p命名空间注入和c命名空间注入)
<?xml version="1.0" encoding="UTF-8"?>
<beans xmlns="http://www.springframework.org/schema/beans"
       xmlns:xsi="http://www.w3.org/2001/XMLSchema-instance"
       xmlns:p="http://www.springframework.org/schema/p"
       xmlns:c="http://www.springframework.org/schema/c"
       xsi:schemaLocation="http://www.springframework.org/schema/beans
        http://www.springframework.org/schema/beans/spring-beans.xsd">

    <!--P命名空间注入-->
    <bean id="user" class="com.hx.pojo.User" p:name="LISA" p:age="18"/>

    <!--C命名空间注入-->
    <bean id="user2" class="com.hx.pojo.User" c:name="JENNIE" c:age="20" scope="singleton"/>

</beans>
p命名空间注入和c命名空间注入时头文件需要加入这两个url
五、Bean的作用域
①单例模式"singleton":(Spring默认机制)创建的对象均为同一个
<bean id="user2" class="com.hx.pojo.User" c:name="JENNIE" c:age="20" scope="singleton"/>
②原型模式"prototype":每次从容器中get的时候都会创建一个新的对象
<bean id="user2" class="com.hx.pojo.User" c:name="JENNIE" c:age="20" scope="prototype"/>
③其余的request、session、application在web开发中使用到
六、Bean的自动装配
自动装配:自动装配是Spring满足bean依赖的一种方式,Spring会在上下文中自动寻找并自动给bean装配属性
1.在xml中显示的配置
<bean id="person" class="com.hx.pojo.Person" autowire="byName"/>
byName:需要保证所有bean的id唯一,并且这个bean需要和自动注入的属性的set方法一致
byType:需要保证所有的bean的class一致,并且这个bean需要和自动注入的属性的类型一致
2.使用注解自动装配
第一步:xml头文件导入约束并配置注解的支持(重点)
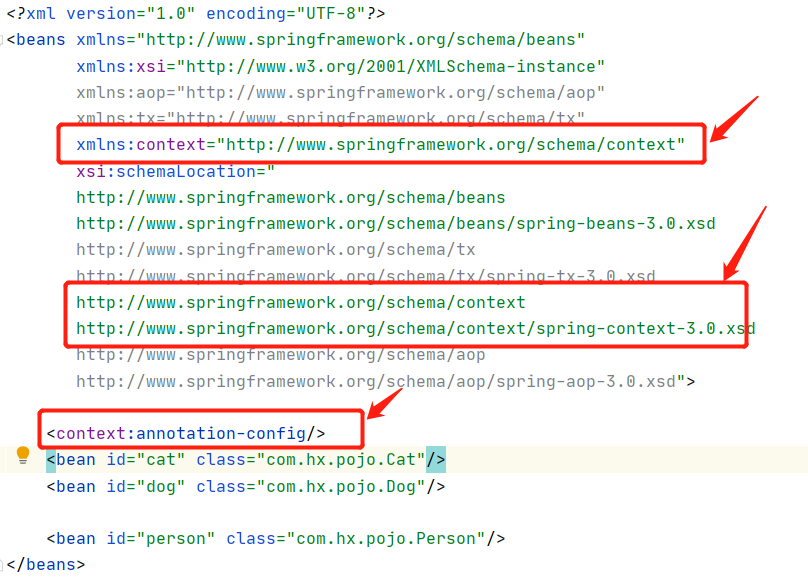
标准的applicationContext.xml文件
<?xml version="1.0" encoding="UTF-8"?>
<beans xmlns="http://www.springframework.org/schema/beans"
       xmlns:xsi="http://www.w3.org/2001/XMLSchema-instance"
       xmlns:aop="http://www.springframework.org/schema/aop"
       xmlns:tx="http://www.springframework.org/schema/tx"
       xmlns:context="http://www.springframework.org/schema/context"
       xsi:schemaLocation="
       http://www.springframework.org/schema/beans
       http://www.springframework.org/schema/beans/spring-beans-3.0.xsd
       http://www.springframework.org/schema/tx
       http://www.springframework.org/schema/tx/spring-tx-3.0.xsd
       http://www.springframework.org/schema/context
       http://www.springframework.org/schema/context/spring-context-3.0.xsd
       http://www.springframework.org/schema/aop
       http://www.springframework.org/schema/aop/spring-aop-3.0.xsd">


</beans>
第二步:在属性上加上注解@Autowired
    @Autowired
    private Cat cat;
    @Autowired
    private Dog dog;
    private String name;
自动装配的环境比较复杂时可以配合@Qualifier注解一起使用:自动装配无法通过一个注解@Autowired完成的时候就可以使用@Qualifier(value="xxx")去指定一个唯一的bean对象注入
    @Autowired
    @Qualifier(value = "cat1")
    private Cat cat;
    @Autowired
    private Dog dog;
    private String name;
@Resource注解也可以实现自动装配
@Resource和@Autowired的区别:都是用来自动装配的,都可以放在属性字段上,@Autowired通过byName方式实现,要求这个对象存在@Resource默认通过byName方式实现,如果找不到这个名字则通过byType实现,如果两个都找不到就会报错。
七、注解开发
注解
1.@Component Component 组件 等价于
<bean id="user" class="com.hx.pojo.User"/>
2.@Value("LISA") 相当于
<property name="name" value="LISA"/>
3.@Component的几个衍生注解:@Repository @Service @Controller这些注解功能都是一样的,代表将这些类注册到Spring中装配bean
自动装配注解
1.@Autowired
2.@Nullable:该注解标记的字段允许为null
3.@Qualifler(value="xxx")配合@Autowired注解一起可以适用于自动装配环境比较复杂的情况
4.@Resource注解:@Resouce(name = "xxx")
作用域注解
1.@Scope