一.为什么要进行读写分离呢?
因为数据库的“写操作”操作是比较耗时的(写上万条条数据到Mysql可能要1分钟分钟)。但是数据库的“读操作”却比“写操作”耗时要少的多(从Mysql读几万条数据条数据可能只要十秒钟)。
所以读写分离解决的是,数据库的“写操作”影响了查询的效率问题。
如下图所示:
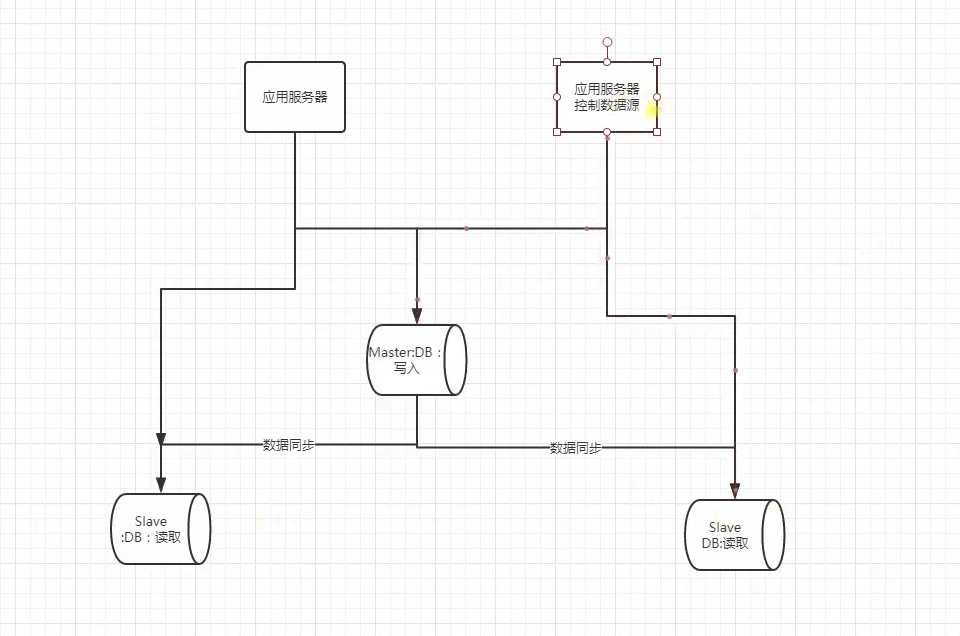
读写分离: 大多数站点的数据库读操作比写操作更加密集,而且查询条件相对复杂,数据库的大部分性能消耗在查询操作上了。为保证数据库数据的一致性,我们要求所有对于数据库的更新操作都是针对主数据库的,但是读操作是可以针对从数据库来进行。
如下图所示:
以下进行一个代码层面的自动切换数据源进行读写分离的例子。
第一。首先搭建一个SSM框架的web工程。省略。
jdb.properties配置如下:
#主数据库连接
jdbc_url_m=jdbc:mysql://localhost:3306/mama-bike?useUnicode=true&characterEncoding=UTF-8&zeroDateTimeBehavior=convertToNull
#两个从数据库连接
jdbc_url_s_1=jdbc:mysql://localhost:3307/mama-bike?useUnicode=true&characterEncoding=UTF-8&zeroDateTimeBehavior=convertToNull
jdbc_url_s_2=jdbc:mysql://localhost:3308/mama-bike?useUnicode=true&characterEncoding=UTF-8&zeroDateTimeBehavior=convertToNull
jdbc_username=root
jdbc_password=root
web.xml配置省略
第二。spring-cfg.xml文件中配置一个主数据源,两个从数据源,具体配置如下:
<?xml version="1.0" encoding="UTF-8"?>
<beans xmlns="http://www.springframework.org/schema/beans"
       xmlns:xsi="http://www.w3.org/2001/XMLSchema-instance"
       xmlns:context="http://www.springframework.org/schema/context"
       xmlns:tx="http://www.springframework.org/schema/tx" xmlns:aop="http://www.springframework.org/schema/aop"
       xsi:schemaLocation="http://www.springframework.org/schema/beans
    http://www.springframework.org/schema/beans/spring-beans-4.0.xsd
    http://www.springframework.org/schema/context
    http://www.springframework.org/schema/context/spring-context-4.0.xsd
    http://www.springframework.org/schema/tx
    http://www.springframework.org/schema/tx/spring-tx-4.0.xsd http://www.springframework.org/schema/aop http://www.springframework.org/schema/aop/spring-aop.xsd">


    <!--扫描注解生成bean-->
    <context:annotation-config/>
    <!--包扫描-->
    <context:component-scan base-package="com.coder520"/>

    <context:property-placeholder location="classpath:jdbc.properties"/>

    <bean id="sqlSessionFactory" class="org.mybatis.spring.SqlSessionFactoryBean">
        <property name="dataSource" ref="dataSource"/>
        <property name="mapperLocations" value="classpath:com/coder520/**/**.xml"/>
    </bean>

    <bean class="org.mybatis.spring.mapper.MapperScannerConfigurer">
        <property name="basePackage" value="com.coder520.*.dao"/>
        <property name="sqlSessionFactoryBeanName" value="sqlSessionFactory"/>
    </bean>

    <!--声明事务管理 采用注解方式-->
    <tx:annotation-driven transaction-manager="transactionManager"/>
    <bean id="transactionManager" class="org.springframework.jdbc.datasource.DataSourceTransactionManager">
        <property name="dataSource" ref="dataSource"/>
    </bean>

    <!--开启切面代理-->
    <aop:aspectj-autoproxy/>

    <!--切换数据源切面-->
    <bean id="switchDataSourceAspect" class="com.coder520.common.DataSourceAspect"/>

    <!--切面配置-->
    <aop:config>
        <aop:aspect ref="switchDataSourceAspect">
            <aop:pointcut id="tx" expression="execution(* com.coder520.*.service.*.*(..))"/>
            <aop:before method="before" pointcut-ref="tx"/>
        </aop:aspect>
    </aop:config>

    <!--主数据库设置-->
    <bean id="masterdataSource" class="com.alibaba.druid.pool.DruidDataSource"
          destroy-method="close" init-method="init">
        <property name="url" value="${jdbc_url_m}"/>
        <property name="username" value="${jdbc_username}"/>
        <property name="password" value="${jdbc_password}"/>
    </bean>
    <!--从数据库设置-->
    <bean id="slavedataSource_1" class="com.alibaba.druid.pool.DruidDataSource"
          destroy-method="close" init-method="init">
        <property name="url" value="${jdbc_url_s_1}"/>
        <property name="username" value="${jdbc_username}"/>
        <property name="password" value="${jdbc_password}"/>
    </bean>
    <!--从数据库设置-->
    <bean id="slavedataSource_2" class="com.alibaba.druid.pool.DruidDataSource"
          destroy-method="close" init-method="init">
        <property name="url" value="${jdbc_url_s_2}"/>
        <property name="username" value="${jdbc_username}"/>
        <property name="password" value="${jdbc_password}"/>
    </bean>
    <bean id="dataSource" class="com.coder520.common.DynamicDataSource">
        <property name="targetDataSources">
            <map>
                <entry key="master" value-ref="masterdataSource"/>
                <entry key="slave_1" value-ref="slavedataSource_1"/>
                <entry key="slave_2" value-ref="slavedataSource_2"/>
            </map>
        </property>
        <!--默认数据源为主数据库-->
        <property name="defaultTargetDataSource" ref="masterdataSource"/>
    </bean>


</beans>
spring-mvc.xml配置如下:
<?xml version="1.0" encoding="UTF-8"?>
<beans xmlns="http://www.springframework.org/schema/beans"
       xmlns:context="http://www.springframework.org/schema/context"
       xmlns:mvc="http://www.springframework.org/schema/mvc"
       xmlns:xsi="http://www.w3.org/2001/XMLSchema-instance"
       xmlns:aop="http://www.springframework.org/schema/aop"
       xsi:schemaLocation="http://www.springframework.org/schema/beans
      http://www.springframework.org/schema/beans/spring-beans-4.0.xsd
      http://www.springframework.org/schema/context
      http://www.springframework.org/schema/context/spring-context.xsd
      http://www.springframework.org/schema/aop
      http://www.springframework.org/schema/aop/spring-aop-4.0.xsd
      http://www.springframework.org/schema/mvc
      http://www.springframework.org/schema/mvc/spring-mvc-4.0.xsd">

    <!--开启切面编程自动代理-->

    <mvc:annotation-driven>
        <mvc:message-converters>
            <bean class="org.springframework.http.converter.StringHttpMessageConverter"/>
            <bean class="com.alibaba.fastjson.support.spring.FastJsonHttpMessageConverter">
                <property name="supportedMediaTypes">
                    <list>
                        <value>text/html;charset=UTF-8</value>
                        <value>application/json;charset=UTF-8</value>
                    </list>
                </property>
            </bean>
        </mvc:message-converters>
    </mvc:annotation-driven>
    <!--包扫描-->
    <context:component-scan base-package="com.coder520.*.controller">
    </context:component-scan>

    <!--开启注解扫描-->
    <mvc:annotation-driven/>
    <!--处理静态资源-->
    <mvc:default-servlet-handler/>


    <bean id="velocityConfigurer" class="org.springframework.web.servlet.view.velocity.VelocityConfigurer">
        <property name="resourceLoaderPath" value="/WEB-INF/views"/>
        <property name="velocityProperties">
            <props>
                <prop key="input.encoding">utf-8</prop>
                <prop key="output.encoding">utf-8</prop>
                <prop key="file.resource.loader.cache">false</prop>
                <prop key="file.resource.loader.modificationCheckInterval">1</prop>
                <prop key="velocimacro.library.autoreload">false</prop>
            </props>
        </property>
    </bean>
    <bean class="org.springframework.web.servlet.handler.SimpleMappingExceptionResolver">
        <property name="exceptionMappings">
            <props>
                <prop key="org.apache.shiro.authz.UnauthorizedException">403</prop>
            </props>
        </property>
    </bean>
    <bean class="org.springframework.web.servlet.view.velocity.VelocityViewResolver">
        <property name="suffix" value=".vm"/>
        <property name="contentType" value="text/html;charset=utf-8"/>
        <property name="dateToolAttribute" value="date"/><!--日期函数名称-->
    </bean>


</beans>
Spring提供了一个AbstractRoutingDataSource这个类来帮我们切换数据源。故名思意,Routing,是路由的意思,可以帮我们切换到我们想切换到的数据库。因此我们需要自己创建一个类来继承它。
我们再进入看一下AbstractRoutingDataSource源码是如何实现。
里面的方法到底干嘛用的,都在源码里面写明注释,并且标记执行顺序。如下://
// Source code recreated from a .class file by IntelliJ IDEA
// (powered by Fernflower decompiler)
//

package org.springframework.jdbc.datasource.lookup;

import java.sql.Connection;
import java.sql.SQLException;
import java.util.HashMap;
import java.util.Iterator;
import java.util.Map;
import java.util.Map.Entry;
import javax.sql.DataSource;
import org.springframework.beans.factory.InitializingBean;
import org.springframework.jdbc.datasource.AbstractDataSource;
import org.springframework.util.Assert;

public abstract class AbstractRoutingDataSource extends AbstractDataSource implements InitializingBean {
  //装载spring-cfg.xml中配置的那三个数据源。
    private Map<Object, Object> targetDataSources;
  //默认数据源
    private Object defaultTargetDataSource;
  //出错回滚
    private boolean lenientFallback = true;
  //Map中各个数据源对应的key
    private DataSourceLookup dataSourceLookup = new JndiDataSourceLookup();
  //装载Map<Object,Object> targetDataSources,即一个MAP装载一个旧MAP
    private Map<Object, DataSource> resolvedDataSources;
  //这属性是为了得到defaultTargetDataSource,
    private DataSource resolvedDefaultDataSource;

    public AbstractRoutingDataSource() {
    }

   //1.装载spring-cfg.xml中配置的那三个数据源
    public void setTargetDataSources(Map<Object, Object> targetDataSources) {
        this.targetDataSources = targetDataSources;
    }
   //1.设置默认数据源
    public void setDefaultTargetDataSource(Object defaultTargetDataSource) {
        this.defaultTargetDataSource = defaultTargetDataSource;
    }


    public void setLenientFallback(boolean lenientFallback) {
        this.lenientFallback = lenientFallback;
    }

    public void setDataSourceLookup(DataSourceLookup dataSourceLookup) {
        this.dataSourceLookup = (DataSourceLookup)(dataSourceLookup != null?dataSourceLookup:new JndiDataSourceLookup());
    }

  // 2.根据spring-cfg.xml中配置targetDataSources可以在afterPropertiesSet方法中对targetDataSources进行解析,获取真正的datasources
    public void afterPropertiesSet() {
        if(this.targetDataSources == null) {
            throw new IllegalArgumentException("Property 'targetDataSources' is required");
        } else {
       //新建一个跟MAP targetDataSource一样的MAP
            this.resolvedDataSources = new HashMap(this.targetDataSources.size());
        //遍历MAP
            Iterator var1 = this.targetDataSources.entrySet().iterator();
        //判断MAP中是否还有数据源
            while(var1.hasNext()) {
          //获取数据源Entry
                Entry<Object, Object> entry = (Entry)var1.next();
          //设置每一个数据源Entry对应的key
                Object lookupKey = this.resolveSpecifiedLookupKey(entry.getKey());
          //设置数据源Entry对应的value,即数据源
                DataSource dataSource = this.resolveSpecifiedDataSource(entry.getValue());
          //放入到新建的MAP中
                this.resolvedDataSources.put(lookupKey, dataSource);
            }
        //设置默认数据源
            if(this.defaultTargetDataSource != null) {
                this.resolvedDefaultDataSource = this.resolveSpecifiedDataSource(this.defaultTargetDataSource);
            }

        }
    }

    protected Object resolveSpecifiedLookupKey(Object lookupKey) {
        return lookupKey;
    }

    protected DataSource resolveSpecifiedDataSource(Object dataSource) throws IllegalArgumentException {
        if(dataSource instanceof DataSource) {
            return (DataSource)dataSource;
        } else if(dataSource instanceof String) {
            return this.dataSourceLookup.getDataSource((String)dataSource);
        } else {
            throw new IllegalArgumentException("Illegal data source value - only [javax.sql.DataSource] and String supported: " + dataSource);
        }
    }

    public Connection getConnection() throws SQLException {
        return this.determineTargetDataSource().getConnection();
    }

    public Connection getConnection(String username, String password) throws SQLException {
        return this.determineTargetDataSource().getConnection(username, password);
    }

    public <T> T unwrap(Class<T> iface) throws SQLException {
        return iface.isInstance(this)?this:this.determineTargetDataSource().unwrap(iface);
    }

    public boolean isWrapperFor(Class<?> iface) throws SQLException {
        return iface.isInstance(this) || this.determineTargetDataSource().isWrapperFor(iface);
    }

  //3.最关键的一个方法。此方法决定选择哪一个数据源
    protected DataSource determineTargetDataSource() {
        Assert.notNull(this.resolvedDataSources, "DataSource router not initialized");
    //决定选择数据源的key,即传进来的那个数据源
        Object lookupKey = this.determineCurrentLookupKey();
    //获取相应的数据源
        DataSource dataSource = (DataSource)this.resolvedDataSources.get(lookupKey);
    //如果为空,就用默认的那个数据源
        if(dataSource == null && (this.lenientFallback || lookupKey == null)) {
            dataSource = this.resolvedDefaultDataSource;
        }
    //如果默认数据源还是为空,证明没配置默认数据源,就会抛异常
        if(dataSource == null) {
            throw new IllegalStateException("Cannot determine target DataSource for lookup key [" + lookupKey + "]");
        } else {
            return dataSource;
        }
    }
  //这是最重要的方法,要我们实现改方法的。
    protected abstract Object determineCurrentLookupKey();
}
因此实现该determineCurrentLookupKey()方法:首先自己创建的类要继承AbstractRoutingDataSource
如下代码
package com.coder520.common;

import org.springframework.jdbc.datasource.lookup.AbstractRoutingDataSource;

/**
 * Created by cong on 2018/3/14.
 */
public class DynamicDataSource extends AbstractRoutingDataSource {
    @Override
    protected Object determineCurrentLookupKey() {
        return DynamicDataSourceHolder.getDataSource();
    }
}
DynamicDataSourceHolder.getDataSource()是获取数据源。但是呢,spring中的数据源是唯一,每一个用户过来都是共用这个数据源的。我们知道高并发的情况下,多个用户共享一个资源,这是有线程问题的,这样获取数据源是不安全的。
因此我们要用到并发编程问题呢,我们要用到并发编程里面的一个类ThreadLocal这个类,这个类用来ThreadLocal类用来提供线程内部的局部变量。这种变量在多线程环境下访问(通过get或set方法访问)时能保证各个线程里的变量相对独立于其他线程内的变量。
ThreadLocal实例通常来说都是private static类型的,用于关联线程和线程的上下文。

那么我们在两个从库中进行读操作如何公平的分配来读操作呢?我们自然想到要有轮询的思维。通过一个计时器来自增求模运算。这个计时器的只从-1开始,这样得到的结果就只有0和1了,根据0 和 1来分配两个从库进行读操作。
注意这个计时器如果用Inter类型的话,必然会出现线程安全问题的,因为这是共享的数据类型。因此我们可以用并发编程里面的AtomicInterger原子属性的类。解决线程安全问题。我们知道Integer是有范围的,我们不能让
这个计数器一直自增,这样下去会去问题的。因此还需要来一个计数器重置。
DynamicDataSourceHolder类代码如下:
package com.coder520.common;

import java.util.concurrent.atomic.AtomicInteger;

/**
 * Created by cong on 2018/3/14.
 */
public class DynamicDataSourceHolder {

    //绑定本地线程
    public static final ThreadLocal<String> holder = new ThreadLocal<>();

    //计数器
    private static AtomicInteger counter = new AtomicInteger(-1);


    //写库对应的数据源Key
    private static final String MASTER = "master";

    //从库对应的数据源key
    private static final String SLAVE_1 = "slave_1";
    private static final String SLAVE_2 = "slave_2";

    //设置数据源,判断传进来的主库还是从库的类型
    public static void setDataSource(DataSourceType dataSourceType){
        if (dataSourceType == DataSourceType.MASTER){
            System.out.println("-----MASTER------");
            holder.set(MASTER);
        }else if (dataSourceType == DataSourceType.SLAVE){
            holder.set(roundRobinSlaveKey());
        }
    }
    //获取数据源
    public static String getDataSource(){
        return holder.get();
    }


    //轮询选择哪一个从数据库去读操作
    private static String roundRobinSlaveKey() {
        //计数器模运算
        Integer index = counter.getAndIncrement() % 2;
        //计数器重置
        if (counter.get()>9999){
            counter.set(-1);
        }
        //轮询判断
        if (index == 0){
            System.out.println("----SLAVE_1-----");
            return SLAVE_1;
        }else {
            System.out.println("----SLAVE_2-----");
            return SLAVE_2;
        }

    }

}
DataSourceType是一个枚举类型,这些这样写是让代码美观一些。
DataSourceType枚举类型代码如下:
package com.coder520.common;

/**
 */
public enum DataSourceType {

    MASTER,SLAVE;

}
到这里已经万事具备了,到了关键一步了,那么我们什么时候切换数据源呢?我怎么切换数据源呢?
我们要切换数据源的时候我们手动去控制它,我们希望在业务层打一个注解,比如现在我们需要读库了,业务层的方法都是读库了,我们只要打一个注解就把它搞定,例如@DataSource(DataSourceType.SLAVE),
然后让DynamicDataSourceHolder这个类自动帮我们切换一下,用它setDataSource(DataSourceType dataSourceType)方法将数据源设置成SLAVE.这样读操作就走读库了。
那么问题来了,我们想达到这个效果,那改怎么办呢?那么首先我们要定义一个注解。
那么又有疑问了,为什么我们不在每一个查询的方法里面调用DynamicDataSourceHolder.setDataSource(DataSourceType dataSourceType)方法设置一下不就行了吗?
这样做也可以,但是这样做岂不是很蛋疼?因为这样做代码就不够优雅了,要重复写很多代码。每一个查询方法里面都这样写,岂不是烦死?
因此我们自定义一个注解,代码如下:
package com.coder520.common;

import java.lang.annotation.ElementType;
import java.lang.annotation.Retention;
import java.lang.annotation.RetentionPolicy;
import java.lang.annotation.Target;

/**
 * Created by cong on 2018/3/14.
 */

//运行时影响程序注解
@Retention(RetentionPolicy.RUNTIME)
//这个注解作用于所有方法
@Target({ElementType.METHOD})
public @interface DataSource {
    //打了这个注解,如果没设置值,我们就默认用MASTER主库
    DataSourceType value() default DataSourceType.MASTER;

}
那么我们到这里就OK了吗?并不是的,我们只是打了个注解,还没进行数据源的切换呢。然后做呢?
这时我们就要用切面编程AOP方法来执行所有的切面,我们切哪个方法呢?我们切所有的业务层,service层的方法,然后获取到它的注解,看一下注解标记的是MASTER,还是SLAVE
然后调用DynamicDataSourceHolder.setDataSource(DataSourceType dataSourceType)方法设置一下就行了。这是正是切面编程大显身手的时候,切面编程让我们一段代码让我们给每一个方法执行一段业务逻辑,
减少我们的代码量。
我们都是AOP有前置通知,后置通知,环绕通知,我们在这里一定要用前置通知,因为进入方法前就一定先要切换数据源,方法执行完了,再切换数据源还有个屁用。
DataSourceAspect切面类的代码如下:
package com.coder520.common;

import org.aspectj.lang.JoinPoint;
import org.aspectj.lang.reflect.MethodSignature;

import java.lang.reflect.Method;

/***/
public class DataSourceAspect {

    public void before(JoinPoint point) throws NoSuchMethodException {
        //获取切点
        Object target = point.getTarget();
        //获取方法的名字
        String method = point.getSignature().getName();
        //获取字节码对象
        Class classz = target.getClass();
        //获取方法上的参数
        Class<?>[] parameterTypes = ((MethodSignature)point.getSignature()).getMethod().getParameterTypes();
        //获取方法
        Method m = classz.getMethod(method,parameterTypes);
        //判断方法是否存在,并且判断是否有DataSource这个注释。
        if (m != null && m.isAnnotationPresent(DataSource.class)){
            //获取注解
            DataSource dataSource = m.getAnnotation(DataSource.class);
            //设置数据源
            DynamicDataSourceHolder.setDataSource(dataSource.value());
        }
    }

}
注意:必须在spirng-cfg.xml中声明切面这个BEAN,并指定切哪里。
如下:
<!--开启切面代理-->
    <aop:aspectj-autoproxy/>

    <!--切换数据源切面Bean-->
    <bean id="switchDataSourceAspect" class="com.coder520.common.DataSourceAspect"/>

    <!--切面配置-->
    <aop:config>
        <aop:aspect ref="switchDataSourceAspect">
            <aop:pointcut id="tx" expression="execution(* com.coder520.*.service.*.*(..))"/>
            <aop:before method="before" pointcut-ref="tx"/>
        </aop:aspect>
    </aop:config>
package com.coder520.user.service;

import com.coder520.common.DataSource;
import com.coder520.common.DataSourceType;
import com.coder520.common.DynamicDataSourceHolder;
import com.coder520.user.dao.UserMapper;
import com.coder520.user.entity.User;
import org.springframework.beans.factory.annotation.Autowired;
import org.springframework.stereotype.Service;
import org.springframework.transaction.annotation.Transactional;

import java.io.UnsupportedEncodingException;
import java.security.NoSuchAlgorithmException;


@Service("userServiceImpl")
public class UserServiceImpl implements UserService{

    @Autowired
    private UserMapper userMapper;


    /**
     *@Description 根据用户名查询用户
     */
    @DataSource(DataSourceType.SLAVE)
    @Override
    public User findUserByUserId(long id) {
        User user=null;
        try {
             user =userMapper.selectByPrimaryKey(id);
        }catch (Exception e){
            e.printStackTrace();
            throw e;
        }
        return user;
    }

    @Override
    @Transactional
    public int insertUser() {
        User user = new User();
        user.setMobile("1234567");
        user.setNickname("laowang");
        User user1 = new User();
        user1.setId(2L);
        user1.setMobile("11111111");
        user1.setNickname("laowang2");
         userMapper.insertSelective(user);
         userMapper.insertSelective(user1);
         return 0;
    }


    @Override
    public void createUser(User user) {
        userMapper.insertSelective(user);
    }
}
Controller层代码:
package com.coder520.user.controller;

import com.coder520.user.entity.User;
import com.coder520.user.service.UserService;
import org.springframework.beans.factory.annotation.Autowired;
import org.springframework.stereotype.Controller;
import org.springframework.ui.Model;
import org.springframework.web.bind.annotation.RequestMapping;
import org.springframework.web.bind.annotation.ResponseBody;
import org.springframework.web.servlet.ModelAndView;

import javax.servlet.http.HttpSession;

/***/
@Controller
@RequestMapping("user")
public class UserController {


    @Autowired
    private UserService userService;


    /**
     *@Description  获取用户信息
     */
    @RequestMapping("/getuser")
    @ResponseBody
    public User getUser(){
       return userService.findUserByUserId(1);
    }

    @RequestMapping("/setuser")
    @ResponseBody
    public int setUser(){
       return userService.insertUser();
    }


}
mybatis那部分的代码省略。
运行结果如下:
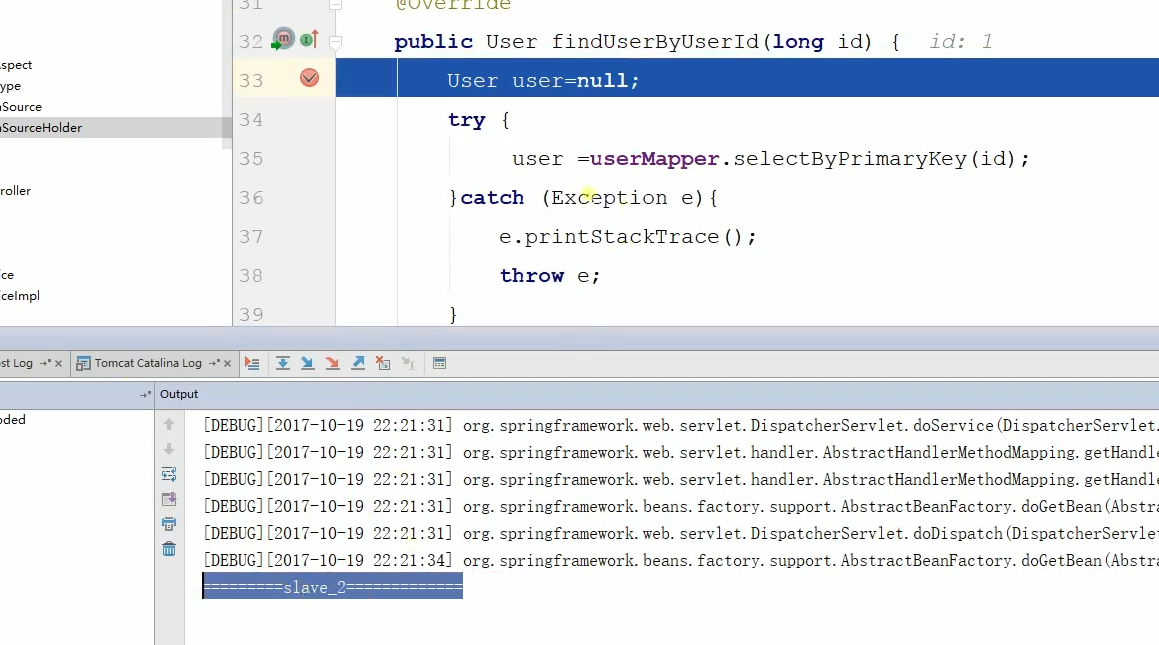
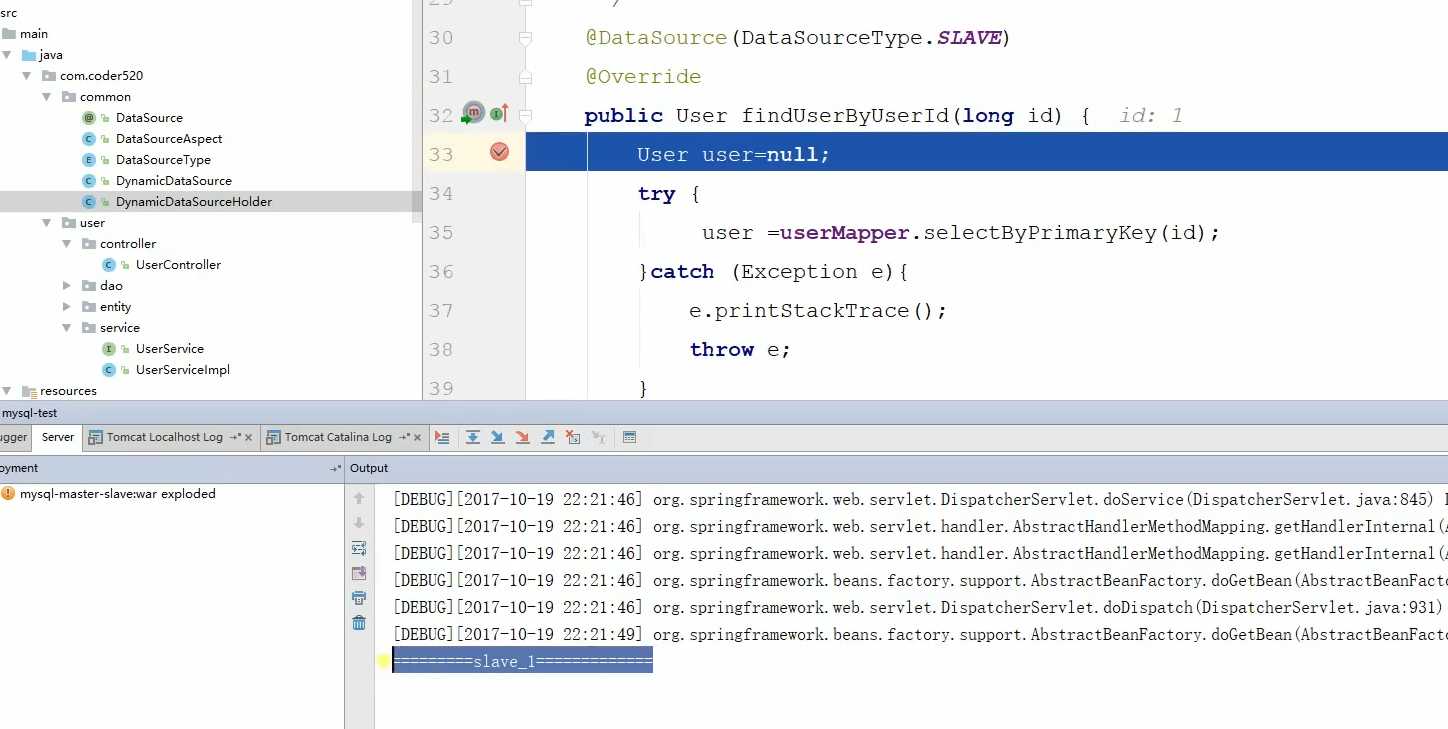
可以看到两个SLVE是轮询切换的。
接着自己可以测试一下插入,修改数据源,是否切换到主库中。查看3个数据库是否同步了,这里就不演示了。
就算中途出错,事务会回滚的。这里不演示了,自己可以去试一下。
主从复制数据是异步完成的,这就导致主从数据库中的数据有一定的延迟,在读写分离的设计中必须要考虑这一点。
以博客为例,用户登录后发表了一篇文章,他需要马上看到自己的文章,但是对于其它用户来讲可以允许延迟一段时间(1分钟/5分钟/30分钟),不会造成什么问题。
这时对于当前用户就需要读主数据库,对于其他访问量更大的外部用户就可以读从数据库。
解决办法:
适当放弃一致性:在一些实时性要求不高的场合,我们适当放弃一致性要求。这样就可以充分利用多种手段来提高系统吞吐量,例如页面缓存(cookie,session)、分布式数据缓存(redis)、数据库读写分离、查询数据搜索索引化。
总结:
我的想法是要使用读写分离来实现系统吞吐量的提升就要从业务上想办法降低一致性的要求。
对必须要有一致性的功能是无法进行读写分离的,可以采用多库不区分读写以及redis缓存等技术来实现。
所以主从分离后,去从数据库读的话,可能还没同步过来。
下一篇用中间件来屏蔽掉这些复杂的操作来进行数据源切换