配置文件
SpringBoot使用一个全局的配置文件,配置文件名是固定的;
•application.properties •application.yml
配置文件的作用:修改SpringBoot自动配置的默认值;
SpringBoot在底层都给我们自动配置好;
YAML(YAML Ain't Markup Language) YAML A Markup Language:是一个标记语言

YAML isn't Markup Language:不是一个标记语言; 标记语言:
以前的配置文件;大多都使用的是 xxxx.xml文件; YAML:以数据为中心,比json、xml等更适合做配置文件;
YAML:配置例子
server:
  port: 8081
XML:
<server>
    <port>8081</port>
</server>
2、YAML语法
1、基本语法 k:(空格)v:表示一对键值对(空格必须有);
以空格的缩进来控制层级关系;只要是左对齐的一列数据,都是同一个层级的,属性和值也是大小写敏感;
server:
    port: 8081
    path: /hello
2、值的写法
字面量:普通的值(数字,字符串,布尔)
k: v:字面直接来写;
字符串默认不用加上单引号或者双引号;
" ":双引号;不会转义字符串里面的特殊字符;
特殊字符会作为本身想表示的意思 name: "zhangsan lisi":输出--》;zhangsan 换行 lisi '':
单引号;会转义特殊字符,特殊字符最终只是一个普通的字符串数据 name: ‘zhangsan lisi’:输出;zhangsan lisi
对象、Map(属性和值)(键值对):
k: v:在下一行来写对象的属性和值的关系;注意缩进 对象还是k: v的方式
friends:
    lastName: zhangsan
    age: 20
行内写法:
friends: {lastName: zhangsan,age: 18}
数组(List、Set): 用- 值表示数组中的一个元素
pets:
    ‐ cat
    ‐ dog
    ‐ pig
行内写法
pets: [cat,dog,pig]
3、配置文件值注入
配置文件
person:
    lastName: hello
    age: 18
    boss: false
    birth: 2017/12/12
    maps: {k1: v1,k2: 12}
    lists:
        ‐ lisi
        ‐ zhaoliu
    dog:
    name: 小狗
    age: 12
javaBean:/** 将配置文件中配置的每一个属性的值,映射到这个组件中
* @ConfigurationProperties:告诉SpringBoot将本类中的所有属性和配置文件中相关的配置进行绑定;
* prefix = "person":配置文件中哪个下面的所有属性进行一一映射
*
* 想要使用springboot 的自动注入配置文件功能必须两个注解一起使用
* @Component 只有这个组件是容器中的组件,才能容器提供的@ConfigurationProperties功能;
*
*/
@Component
@ConfigurationProperties(prefix = "person")
public class Person {
    private String lastName;
    private Integer age;
    private Boolean boss;
    private Date birth;
    private Map<String,Object> maps;
    private List<Object> lists;
    private Dog dog;
//getter setter
我们可以导入配置文件处理器,以后编写配置就有提示了
<!‐‐导入配置文件处理器,配置文件进行绑定就会有提示‐‐>
<dependency>
    <groupId>org.springframework.boot</groupId>
        <artifactId>spring‐boot‐configuration‐processor</artifactId>
    <optional>true</optional>
</dependency>
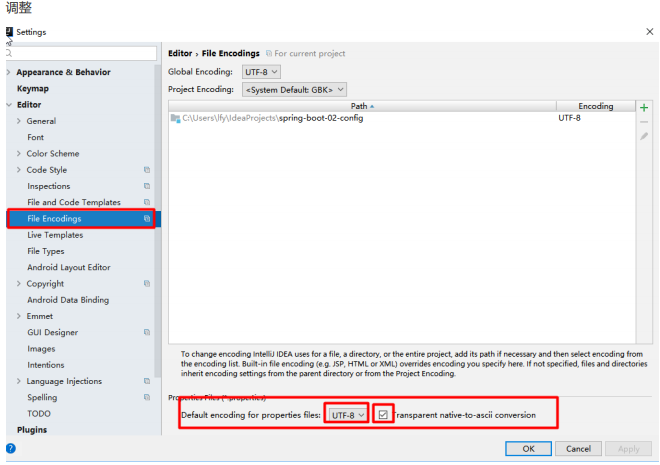
1、properties配置文件在idea中默认utf-8可能会乱码
2、@Value获取值和@ConfigurationProperties获取值比较
| @ConfigurationProperties | @Value | |
| 功能 | 批量注入配置文件中的属性 | 一个个指定 |
| 松散绑定(松散语法) | 支持(配置文件写(person.last-name与lastName都行)) | 不支持 |
| SpEL | 不支持 | 支持@Value("#{11 * 2}") |
| JSR303(@Vaildated 数据校验) | 支持 (比如@Email 校验Email格式 导入@Vaildated注解) | 不支持 |
| 复杂类型封装 | 支持 (map类型List类型数据的获取) | 不支持 |
(@Value从配置文件获取值的语法 @Value("${person.boos}"))
配置文件无论是yml还是properties他们都能获取到值;
@Value 与 @ConfidurationProperties 使用的技巧:
如果说,我们只是在某个业务逻辑中需要获取一下配置文件中的某项值,使用@Value;
如果说,我们专门编写了一个javaBean来和配置文件进行映射,我们就直接使用@ConfigurationProperties;
3、配置文件注入值数据校验
@Component
@ConfigurationProperties(prefix = "person")
@Validated
public class Person {
//    @Value("huanghuanghui")
    private String name;
    private Integer age;
    @Email
    private String email;
    @Value("${person.boos}")
    private Boolean boos;
    private List<Object> lists;
    private Map<String,Object> maps;
    private Date Brith;
//getter and setter
4、@PropertySource&@ImportResource&@Bean
@PropertySource:加载指定的配置文件;在实际开发中,我们不可能把所有的配置文件都写在springboot的配置全局配置文件中,
应该要自己创建配置文件进行注入才是合理的方式
/**
* 将配置文件中配置的每一个属性的值,映射到这个组件中
* @ConfigurationProperties:告诉SpringBoot将本类中的所有属性和配置文件中相关的配置进行绑定;
* prefix = "person":配置文件中哪个下面的所有属性进行一一映射
*
* 只有这个组件是容器中的组件,才能容器提供的@ConfigurationProperties功能;
* @ConfigurationProperties(prefix = "person")默认从全局配置文件中获取值;
*
*/
@PropertySource(value = {"classpath:person.properties"})
@Component
@ConfigurationProperties(prefix = "person")
//@Validated
public class Person {
/**
* <bean class="Person">
* <property name="lastName" value="字面量/${key}从环境变量、配置文件中获取值/#{SpEL}"></property>
* <bean/>
*/
//lastName必须是邮箱格式
// @Email
//@Value("${person.last‐name}")
private String lastName;
//@Value("#{11*2}")
private Integer age;
//@Value("true")
private Boolean boss;
@ImportResource:导入Spring的配置文件,让配置文件里面的内容生效; Spring Boot里面没有Spring的配置文件,
我们自己编写的配置文件,也不能自动识别; 想让Spring的配置文件生效,加载进来必须要将@ImportResource标注在一个配置类上
@ImportResource(locations = {"classpath:beans.xml"})
导入Spring的配置文件让其生效
不来编写Spring的配置文件:一下配置文件无法被spring配置文件识别:
<?xml version="1.0" encoding="UTF‐8"?>
<beans xmlns="http://www.springframework.org/schema/beans"
  xmlns:xsi="http://www.w3.org/2001/XMLSchema‐instance"
  xsi:schemaLocation="http://www.springframework.org/schema/beans
  http://www.springframework.org/schema/beans/spring‐beans.xsd">
    <bean id="helloService" class="com.atguigu.springboot.service.HelloService"></bean>
</beans>
/**
     * 取得spring的ioc容器,测试容器中是否含有helloService这个组件
     */
    @Autowired
    ApplicationContext ioc;

    @Test
    public void testHelloService(){
        boolean helloService = ioc.containsBean("helloService");
        System.out.println(helloService);//输出false
    }
SpringBoot推荐给容器中添加组件的方式;推荐使用全注解的方式
可以将配置类定义为主配置类,但是不推荐这么做:
@ImportResource(locations = "classpath:beans.xml")
@SpringBootApplication
public class SpringbootYamlApplication {

    public static void main(String[] args) {
        SpringApplication.run(SpringbootYamlApplication.class, args);
    }
}
推荐的方法是:
1、创建config文件夹,将左右的配置类全部放置在该文件下
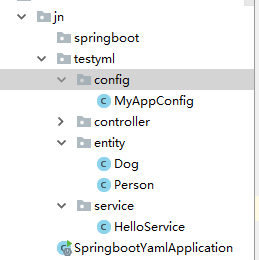
2、配置类@Configuration- >Spring配置文件
3、使用@Bean给容器中添加组件
/**
 * @Configuration:指明当前类是一个配置类,这个配置类相当于我们之前的spring配置文件
 *
 * 我们以前在配置文件中使用<bean></bean>标签中添加组件
 * 我们在配置文件中是用 @Bean 注解
 */
@Configuration
public class MyAppConfig {
    /**
     * 作用是将方法的返回值添加到容器中
     * 这个组件的默认id就是这个方法的方法名
     * @return
     */
    @Bean
    public HelloService helloService(){
        System.out.println("开始向容器中添加组件。。。");
        return new HelloService();
    }
}
测试:
  @Autowired
  ApplicationContext ioc;
  @Test
    public void testHelloService(){
        boolean helloService = ioc.containsBean("helloService");
        System.out.println(helloService);
    }
输出:

