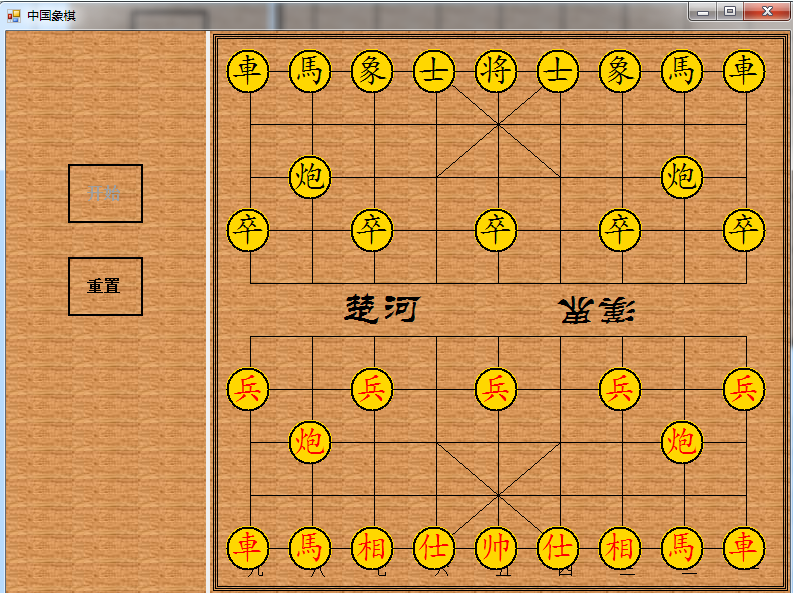
本文是利用C# 实现中国象棋的棋盘绘制,以及初始化布局,并不实现中国象棋的对弈逻辑。仅供学习参考使用。
思路:
- 绘制中国象棋棋盘,竖线九条,横线十条。再中间绘制‘楚河’,‘汉界’ 。
- 绘制棋子,然后将棋子布局在棋盘上即可。
涉及知识点:
- 用户控件:用于实现棋盘的绘制,重写 OnPaint(PaintEventArgs e) 方法。
- Matrix:封装表示几何变换的 3x3 仿射矩阵。本例中主要用于旋转绘制反方的‘汉界’。
- GraphicsPath:表示一系列相互连接的直线和曲线。本例中主要用于绘制圆形棋子。
效果图如下:
(一)

(二)

核心代码
棋盘核心代码如下:

  1 protected override void OnPaint(PaintEventArgs e)
  2         {
  3             base.OnPaint(e);
  4
  5             //初始化数组
  6             InitArrPieceInfo();
  7
  8             Graphics g = e.Graphics;
  9             int width = this.Width;
 10             int height = this.Height;
 11             int padding = this.Padding.All * 20;
 12             int center = height / 2;//垂直中心位置
 13             int s_width = (width - 2 * padding) / 8;//每一条横线的间距
 14             int s_heigth = (height - 2 * padding) / 9;//每一条竖线的间距
 15             int start_x = padding;//起始位置
 16             int start_y = padding;//起始位置
 17             Pen pen = new Pen(Brushes.Black, 1.5f);
 18             Dictionary<string, string[]> dicNums = new Dictionary<string, string[]>();
 19             dicNums.Add("up", new string[9] { "1", "2", "3", "4", "5", "6", "7", "8", "9" });
 20             dicNums.Add("down", new string[9] { "九", "八", "七", "六", "五", "四", "三", "二", "一" });
 21             Font font = new Font("宋体", 12, FontStyle.Regular);
 22             for (int i = 0; i < 9; i++)
 23             {
 24                 //竖线九条
 25                 Point p0 = new Point(start_x + i * s_width, start_y);
 26                 Point p1 = new Point(start_x + i * s_width, start_y + (s_heigth * 4));
 27                 Point p2 = new Point(start_x + i * s_width, start_y + (s_heigth * 5));
 28                 Point p3 = new Point(start_x + i * s_width, start_y + (s_heigth * 9));
 29                 g.DrawLine(pen, p0, p1);
 30                 g.DrawLine(pen, p2, p3);
 31                 //上下的文字
 32                 Point p_up = new Point(start_x + i * s_width - 5, padding / 2);
 33                 Point p_down = new Point(start_x + i * s_width - 5, start_y + (s_heigth * 9) + padding / 3);
 34                 g.DrawString(dicNums["up"][i], font, Brushes.Black, p_up);
 35                 g.DrawString(dicNums["down"][i], font, Brushes.Black, p_down);
 36                 //数组赋值
 37                 for (int j = 0; j < 10; j++)
 38                 {
 39                     Point absLocation = ArrPiece[i, j].AbsoluteLocation;
 40                     absLocation.X = start_x + i * s_width;
 41                     ArrPiece[i, j].AbsoluteLocation = absLocation;
 42                 }
 43             }
 44             for (int i = 0; i < 10; i++)
 45             {
 46                 //横线十条
 47                 Point p0 = new Point(start_x, start_y + i * s_heigth);
 48                 Point p1 = new Point(start_x + s_width * 8, start_y + i * s_heigth);
 49                 g.DrawLine(pen, p0, p1);
 50                 //数组赋值
 51                 for (int j = 0; j < 9; j++)
 52                 {
 53                     Point absLocation = ArrPiece[j, i].AbsoluteLocation;
 54                     absLocation.Y = start_y + i * s_heigth;
 55                     ArrPiece[j, i].AbsoluteLocation = absLocation;
 56                 }
 57             }
 58             //绘制九宫格
 59             for (int i = 0; i < 2; i++)
 60             {
 61                 Point p0 = new Point(start_x + (3 + i * 2) * s_width, start_y);
 62                 Point p1 = new Point(start_x + (5 - i * 2) * s_width, start_y + (s_heigth * 2));
 63                 Point p2 = new Point(start_x + (3 + i * 2) * s_width, start_y + (s_heigth * 7));
 64                 Point p3 = new Point(start_x + (5 - i * 2) * s_width, start_y + (s_heigth * 9));
 65                 g.DrawLine(pen, p0, p1);
 66                 g.DrawLine(pen, p2, p3);
 67             }
 68
 69             //兵和卒处有拐角,从左往右
 70             for (int i = 0; i < 5; i++)
 71             {
 72                 int p_x = start_x + 2 * i * s_width;
 73                 int p_y = start_y + 3 * s_heigth;
 74                 DrawCorner(g, pen, p_x, p_y);//兵
 75                 p_y = start_y + 6 * s_heigth;
 76                 DrawCorner(g, pen, p_x, p_y);//卒
 77             }
 78             //炮处的拐角,从左往右
 79             for (int i = 0; i < 2; i++)
 80             {
 81                 int p_x = start_x + (1 + 6 * i) * s_width;
 82                 int p_y = start_y + 2 * s_heigth;
 83                 DrawCorner(g, pen, p_x, p_y);//炮
 84                 p_y = start_y + 7 * s_heigth;
 85                 DrawCorner(g, pen, p_x, p_y);//炮
 86             }
 87             //绘制楚河汉界
 88             Point p_0 = new Point(2 * s_width, center - 25);
 89             Point p_1 = new Point(7 * s_width, center + 20);
 90             font = new Font("方正隶二繁体", 30, FontStyle.Regular);
 91             g.DrawString("楚河", font, Brushes.Black, p_0);
 92             Matrix mtxSave = g.Transform;
 93             Matrix mtxRotate = g.Transform;
 94             mtxRotate.RotateAt(180, p_1);
 95             g.Transform = mtxRotate;
 96             g.DrawString("汉界", font, Brushes.Black, p_1);
 97             g.Transform = mtxSave;
 98             //绘制外边框
 99             g.DrawRectangle(pen, 3, 3, width - 6, height - 6);
100             g.DrawRectangle(pen, 5, 5, width - 10, height - 10);
101             g.DrawRectangle(pen, 7, 7, width - 14, height - 14);
102         }
棋子核心代码如下:

 1         protected override void OnPaint(PaintEventArgs e)
 2         {
 3             base.OnPaint(e);
 4             Graphics g = e.Graphics;
 5             GraphicsPath gPath = new GraphicsPath();
 6             // Set a new rectangle to the same size as the button's ClientRectangle property.
 7             Rectangle rectangle = this.ClientRectangle;
 8             g.DrawEllipse(new Pen(this.FlatAppearance.BorderColor), rectangle);
 9             gPath.AddEllipse(rectangle);
10
11             // Set the button's Region property to the newly created  circle region.
12             this.Region = new Region(gPath);
13             Rectangle inRect = new Rectangle(2, 2, this.Width - 4, this.Height - 3);
14             g.FillEllipse(new SolidBrush(this.BackColor), rectangle);
15             g.DrawEllipse(new Pen(Color.Black,2), inRect);
16
17             Font font = new Font("楷体", 25, FontStyle.Regular);
18             g.DrawString(this.Text, font, new SolidBrush(this.ForeColor), 0,5);
19         }
源码下载链接
