快速阅读
生产者和消费者启动以后,都有一个接收事件,消费者是接收事件是处理调用方法以后等待生产者的返回,生产者的接收事件是处理接收生产者发送的消息,进行处理。消费者发送的时候要在回调队列中加入一个标识,标明是哪个方法进行的调用 。生产者接收到消费以后,如果发现有消息标识 ,把消息标识继续返回去,这样消费者可以保证接收到的消息是哪个方法调用的
关于RPC调用的建议
- 明确哪个函数是调用本地的,哪个函数是调用远程的
- 组合之间的依赖要清晰明了
- 应该能处理当远程服务挂掉的时的错误
消费者代码
主方法通过实例化rpcclient,然后调用rpcclient里面的方法,获得结果以后关闭
rpcclient的逻辑如下
- 声明连接和信道
- 创建一个回调的队列 。
- 定义一个消费者的事件,绑定信道。
- 为信道创建一个消息头,在里面标识消息id,和回调队列的名称
- 消费者接收事件处理,当收到消息以后,判断消息头,如果是发送的消息id,则加入到返回的消息集合中。
- 从消息集合中取值
static void Main(string[] args)
{
    //TopicMessageTest();
    RpcClient rpc = new RpcClient();
    Console.WriteLine("开始启动");
    var response = rpc.Call("30");
    Console.WriteLine("the result is :"+response);
    rpc.Close();
    Console.WriteLine("调用结束");
    Console.ReadLine();
}
 public class RpcClient
 {

     private readonly IConnection connection;
     private readonly IModel channel;
     private readonly string replyQueueName;
     private readonly EventingBasicConsumer consumer;
     private readonly IBasicProperties props;

     private readonly BlockingCollection<string> respQueue = new BlockingCollection<string>(); //线程安全的集合
     public RpcClient()
     {
         var factory = new ConnectionFactory() { HostName="localhost"}; //创建一个实例

         connection = factory.CreateConnection(); //创建连接

         channel = connection.CreateModel(); //创建信道

         replyQueueName = channel.QueueDeclare().QueueName; //创建队列

         consumer = new EventingBasicConsumer(channel);//通过指定的model初台化消费者

         props = channel.CreateBasicProperties();

         var relationId = Guid.NewGuid().ToString();
         props.CorrelationId = relationId;//应用相关标识
         props.ReplyTo = replyQueueName;  //回复队列指定

         consumer.Received += (sender,e)=>
         {
             var body = e.Body;
             var response = Encoding.UTF8.GetString(body);
             if (e.BasicProperties.CorrelationId == relationId)
             {
                 respQueue.Add(response);
             }
         };


     }

     public string Call(string message)
     {
         var messageBytes = Encoding.UTF8.GetBytes(message);
         channel.BasicPublish(exchange: "", routingKey: "rpcqueue", basicProperties: props, body: messageBytes);
         channel.BasicConsume(consumer: consumer, queue: replyQueueName, autoAck: true);
         return respQueue.Take();
     }
生产者代码
- 创建链接和信道
- 声明一个队列,指定队列名称。
- 配置Qos,每次取几条消息
- 创建消费者在接收事件中对消费者发送的消息进行处理。
- 事件处理中,body表示接收到的消息 ,basicProperties是消息头,对消息进行处理以后,再把消息以及消息的队列发送给消费者
static void Main(string[] args)
{
var factory = new ConnectionFactory() { HostName = "localhost" };
using (var connection = factory.CreateConnection())
using (var channel = connection.CreateModel())
{
channel.QueueDeclare(queue: "rpcqueue",durable:false,exclusive:false,autoDelete:false,arguments:null);
channel.BasicQos(0, 1, false);
var consumer = new EventingBasicConsumer(channel);
channel.BasicConsume(queue: "rpcqueue", autoAck: false,consumer:consumer);
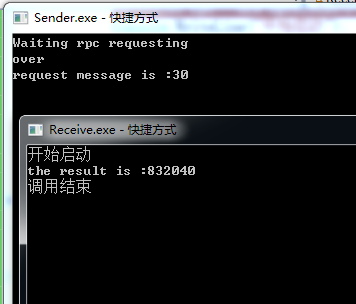
Console.WriteLine("Waiting rpc requesting");
consumer.Received += (sender, e) =>
{
string response = null;
var body = e.Body;
var props = e.BasicProperties;
var replyProps = channel.CreateBasicProperties();
replyProps.CorrelationId = props.CorrelationId;
var message = Encoding.UTF8.GetString(body);
int n = int.Parse(message);
Console.WriteLine("request message is :" + message);
response = fib(n).ToString();
var responseBytes = Encoding.UTF8.GetBytes(response);
channel.BasicPublish(exchange: "", routingKey: props.ReplyTo, basicProperties: replyProps, body: responseBytes);
channel.BasicAck(deliveryTag: e.DeliveryTag, multiple: false);
};
Console.WriteLine("over");
Console.ReadLine();
}
Console.WriteLine(" Press [enter] to exit.");
Console.ReadLine();
}
private static int fib(int n)
{
if (n == 0 || n == 1) return n;
return fib(n - 1) + fib(n - 2);
}
测试结果
友情提示
我对我的文章负责,发现好多网上的文章 没有实践,都发出来的,让人走很多弯路,如果你在我的文章中遇到无法实现,或者无法走通的问题。可以直接在公众号《爱码农爱生活 》留言。必定会再次复查原因。让每一篇 文章的流程都能顺利实现。