本篇文章的目的是记录并实现在Spring Boot中,动态设定与执行定时任务。
我的开发项目是 Maven 项目,所以首先需要在 pom.xml 文件中加入相关的依赖。依赖代码如下所示:
<dependency>
    <groupId>org.quartz-scheduler</groupId>
    <artifactId>quartz</artifactId>
    <version>RELEASE</version>
</dependency>
下图是定时任务的列表及功能展示。
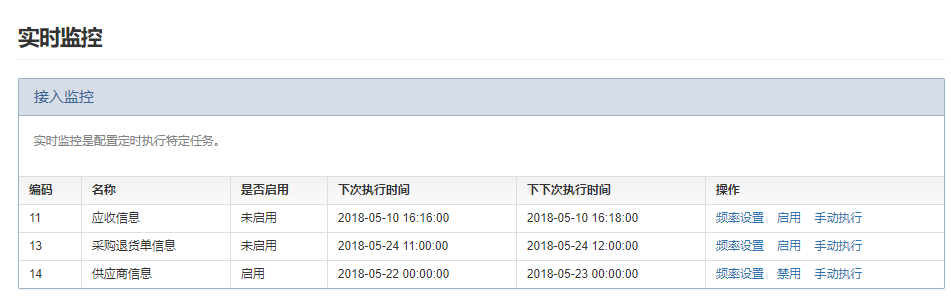
一般情况下,定时任务列表都是初始化生成,所以此处并无定时任务的新增功能。每个定时任务的操作栏中都有三种操作,分别是 频率设置、启用(禁用)、手动执行。
频率设置:设置定时任务的执行频率,设置成功后,可以重新设置定时任务的执行频率,这个功能是动态设定执行频率的保证。
启用(禁用):控制定时任务的执行状态,定时执行或者不执行。启用前,需先设置定时任务的执行频率。
手动执行:手动调用定时任务的执行方法,无需等到下次执行时间。手动执行前,定时任务的状态应该为启用状态。

在执行频率的设定上,我选择了直接使用Cron表达式,为了简单与方便,我在末端小图标上加了一个链接,点击图标后,便会跳转到在线Cron表达式页面。
<div class="row">
    <label class="label col col-3 text-align-right">频率设置<font color="red">*</font>:</label>
    <div class="col col-8">
         <div class="input-group ">
             <input type="text" class="form-control" id="cron" name="cron" th:value="${monitor.cron}" placeholder="点击末端小图标在线获取Cron表达式"/>
             <span onclick="getCron()" class="input-group-addon"><i class="fa fa-calendar"></i></span>
         </div>
    </div>
</div>
//在线获取Cron表达式
function getCron() {
     window.open("http://cron.qqe2.com/");  //打开一个新的网页,不会覆盖当前网页
 }
在新打开的网页上,根据需求设定执行频率,将生成的Cron表达式复制到文本框中,点击 “确定” 按钮。下面的代码是点击 “确定” 按钮后,后台的处理逻辑。
  @RequestMapping(value = "setFrequencyCron", method = RequestMethod.POST)
  @ResponseBody
  @OperationLog(success = "设置频率成功", failure = "设置频率失败")
  public Json setFrequencyCron(Monitor monitor) {
        try {
            Monitor m=monitorService.getMonitorById(monitor.getId());
            m.setCron(monitor.getCron());
            CronSequenceGenerator cronSequenceGenerator = new CronSequenceGenerator(monitor.getCron());
            Date currentTime = new Date();  //当前系统时间
            Date nextTimePoint = cronSequenceGenerator.next(currentTime);   //下次执行时间
            Date nextNextTimePoint = cronSequenceGenerator.next(nextTimePoint);  //下下次执行时间
            SimpleDateFormat sdf = new SimpleDateFormat("yyyy-MM-dd HH:mm:ss");
            String nextTime=sdf.format(nextTimePoint);
            String nextDoubleTme=sdf.format(nextNextTimePoint);
            m.setNextTime(nextTime);
            m.setNextDoubleTime(nextDoubleTme);
            m.setEnable("0");   //设置频率,让其状态变为“禁用”
            monitorService.updateMonitor(m);
            return Json.ok("频率设置成功");
        } catch (Exception e) {
            LOGGER.error("频率设置失败: " + e.getMessage(), e);
            return Json.fail("频率设置失败");
        }
    }
根据Cron表达式,使用 Spring 自带的 CronSequenceGenerator 类可以获得下次执行时间和下下次执行时间。每次设定新的执行频率后,该定时任务的状态都会变为“禁用”,需要重新启用,定时任务才能生效。
下面的代码是点击 “启用”或“禁用” 按钮后,后台的处理逻辑。
    @RequestMapping(value = "setEnable", method = {RequestMethod.GET, RequestMethod.POST})
    @ResponseBody
    @OperationLog(success = "操作成功", failure = "操作失败")
    public Json setEnable(Long id, String enable) {
        Json json=new Json();
        try {
            String msg="";
            Monitor monitor=monitorService.getMonitorById(id);
            monitor.setEnable(enable);
            monitorService.updateMonitor(monitor);
            if (enable.equals("1")){
                msg="启用成功";
            }else if (enable.equals("0")){
                msg="禁用成功";
            }

            //启用或禁用时,清空redis中的监控信息
            redisUtils.remove(KEY);

            json.setMsg(msg);
            json.setSuccess(true);
        } catch (Exception e) {
            LOGGER.error(e.getMessage(), e);
            return Json.fail("操作失败");
        }
        return json;
    }
在定时任务的执行过程中,为了减少与数据库的交互,所以使用了缓存工具类 RedisUtils ,会将最新的定时任务信息保存到 RedisUtils 中。所以在启用与禁用定时任务时,将会清除以前保存在 RedisUtils 中的定时任务信息,加载最新的定时任务信息。
在启动类的上方加上 @EnableScheduling 注解,该注解的作用是开启Spring Boot对定时任务的支持。
@EnableScheduling
public class DueUIApplication extends AbstractStdApplication {public static void main(String[] args) {
        SpringApplication.run(DueUIApplication.class, args);
    }

}
新建一个定时任务执行类 MonitorTask ,在该类中加一个用于扫描定时任务的方法,在该方法上方需要加上 @Scheduled 注解,同时需要带上参数,设定扫描频率。
代码如下所示:
@Component
public class MonitorTask extends AbstractStdAction {
    private static final Logger LOGGER = Logger.getLogger(MonitorTask.class);

    @Autowired
    private MonitorService monitorService;

    private String KEY="pbeechina:due:ui:monitor:action";    //redis的key


    /**
     * 每隔一分钟秒扫描一次监控信息
     */
    @Scheduled(cron = "0 0/1 * * * ? ")
    @Transactional(propagation= Propagation.NOT_SUPPORTED)   //不需要事物管理
    public void scanMonitor(){
        try {
            if (LOGGER.isDebugEnabled()) {
                LOGGER.debug("**********开始扫描监控的定时任务***********");
            }

            List<Monitor> monitorList=null;  //预警监控信息

            boolean isKey=redisUtils.exists(KEY);   //判断key值是否存在
            if (isKey){   //key存在,代表监控信息是最新的
                monitorList=(List<Monitor>)redisUtils.get(KEY);
            }else {
                monitorList=monitorService.getMonitorList();   //查询所有已被启用的监控
                if (monitorList != null && monitorList.size() > 0){
                    redisUtils.set(KEY,monitorList, 1,TimeUnit.DAYS);  //设置过期时间一天
                }
            }

            if (monitorList != null && monitorList.size() > 0){
                for (Monitor monitor:monitorList){
                    if(StringUtils.isNotEmpty(monitor.getCron())){
                        CronExpression expression = new CronExpression(monitor.getCron());
                        if(expression.isSatisfiedBy(new Date(System.currentTimeMillis()))){
                            LOGGER.info("开始执行定时任务...");
                            monitorService.autoExecute(monitor);
                        }
                    }
                }
            }

            if (LOGGER.isDebugEnabled()) {
                LOGGER.debug("*******扫描结束***********");
            }
        } catch (Exception e) {
            LOGGER.error("监控定时任务扫描失败", e);
        }
    }
}
至此,Spring Boot动态执行定时任务的功能就实现了。