一、准备工作
1)关闭selinux,iptables
[root@centos ~]# sed -i 7s/enforcing/disabled/ /etc/selinux/config
[root@centos ~]# service iptables stop
[root@centos ~]# chkconfig iptables off
#记得重启
2)配置好本地光盘yum源,实验机器为cenos6.8
[root@centos ~]# mount /dev/sr0 /mnt/cdrom1
[root@centos ~]# mount /dev/sr1 /mnt/cdrom2
#光盘源配置
    [c6-media]
    name=CentOS-$releasever - Media
    baseurl=file:///mnt/cdrom1/
            file:///mnt/cdrom2/
    gpgcheck=0
    enabled=1
    gpgkey=file:///etc/pki/rpm-gpg/RPM-GPG-KEY-CentOS-6
3)安装相关编译工具
[root@centos ~]# yum -y install gcc gcc-c++ make
4)准备好相关源码包
#建立一个专门存放源码包文件夹
mkdir  /lamp
#解压参考脚本
#!/bin/bash
cd /lamp
/bin/ls *.tar.gz >ls.txt
for i in `/bin/cat ls.txt`
do
	tar -zxf $i
	if [ $? -eq 0 ];then
		echo " $i 解压成功"
	else
		echo " $i 解压失败" >> error.txt
	fi
done
/bin/rm -rf ls.txt
二、编译安装
1、安装 libxml2
Libxml2 是一个 xml c 语言版的解析器,本来是为 Gnome 项目开发的工具,是一个基于 MIT License 的免 费开源软件。它除了支持 c 语言版以外,还支持 c++、PHP、Pascal、 Ruby、Tcl 等语言的绑定,能在 Windows、 Linux、Solaris、MacOsX 等平台上运行。
[root@centos ~]#  yum install -y libxml2-devel python-devel
[root@centos ~]# cd /lamp/libxml2-2.9.8
[root@centos libxml2-2.9.8]# ./configure --prefix=/usr/local/libxml2/
[root@centos libxml2-2.9.8]# make && make install
2、安装libmcrypt
libmcrypt 是加密算法扩展库。支持 DES, 3DES, RIJNDAEL, Twofish, IDEA, GOST, CAST-256, ARCFOUR, SERPENT, SAFER+等算法。
[root@centos libxml2-2.9.8]# cd /lamp/libmcrypt-2.5.8
[root@centos libmcrypt-2.5.8]# ./configure --prefix=/usr/local/libmcrypt/
[root@centos libmcrypt-2.5.8]# make && make install
安装 libltdl,也在 libmcrypt 源码目录中
[root@centos libmcrypt-2.5.8]# cd /lamp/libmcrypt-2.5.8/libltdl
[root@centos libltdl]#  ./configure --enable-ltdl-install
[root@centos libltdl]# make && make install
3、 安装 mhash
mhash 是基于离散数学原理的不可逆向的 php 加密方式扩展库,其在默认情况下不开启。mhash 的可 以用于创建校验数值,消息摘要,消息认证码,以及无需原文的关键信息保存(如密码)等。
[root@centos libltdl]# cd /lamp/mhash-0.9.9.9
[root@centos mhash-0.9.9.9]# ./configure && make && make install
4、安装 mcrypt
mcrypt 是 php 里面重要的加密支持扩展库。mcrypt 库支持 20 多种加密算法和 8 种加密模式
[root@centos mhash-0.9.9.9]# cd /lamp/mcrypt-2.6.8
[root@centos mcrypt-2.6.8]# export LD_LIBRARY_PATH=/usr/local/libmcrypt/lib:/usr/local/lib #变量:LD_LIBRARY_PATH 用于指定 libmcrypt 和 mhash 的库的位置
[root@centos mcrypt-2.6.8]# ./configure --with-libmcrypt-prefix=/usr/local/libmcrypt
[root@centos mcrypt-2.6.8]# make && make install
5、安装 zlib
zlib 是提供数据压缩用的函式库,由 Jean-loup Gailly 与 Mark Adler 所开发,初版 0.9 版在 1995 年 5 月 1 日发表。zlib 使用 DEFLATE 算法,最初是为 libpng 函式库所写的,后来普遍为许多软件所 使用。此函式库为自由软件,使用 zlib 授权
[root@centos mcrypt-2.6.8]#  cd /lamp/zlib-1.2.8
[root@centos zlib-1.2.8]# ./configure && make && make install
6、安装 libpng
libpng 软件包包含 libpng 库.这些库被其他程式用于解码 png 图片
[root@centos zlib-1.2.8]# cd /lamp/libpng-1.2.31
[root@centos libpng-1.2.31]# ./configure --prefix=/usr/local/libpng
[root@centos libpng-1.2.31]# make && make install
7、安装 jpeg6
jpeg6 提供用于解码.jpg 和.jpeg 图片的库文件
#创建目录
[root@centos libpng-1.2.31]# mkdir /usr/local/jpeg6
mkdir /usr/local/jpeg6/bin
mkdir /usr/local/jpeg6/lib
mkdir /usr/local/jpeg6/include
mkdir -p /usr/local/jpeg6/man/man1
[root@centos libpng-1.2.31]# yum -y install libtool*
[root@centos libpng-1.2.31]# cd /lamp/jpeg-6b
复制 libtool 中的文件,覆盖 jpeg-6b 中的文件(64 位中的问题)
[root@centos jpeg-6b]# cp -a /usr/share/libtool/config/config.sub ./
[root@centos jpeg-6b]# cp -a /usr/share/libtool/config/config.guess ./
[root@centos jpeg-6b]# ./configure --prefix=/usr/local/jpeg6/ --enable-shared --enable-static
[root@centos jpeg-6b]# make && make install
8、安装 freetype
FreeType 库是一个完全免费(开源)的、高质量的且可移植的字体引擎,它提供统一的接口来访问多种 字体格式文件,支持单色位图、反走样位图的渲染。
[root@centos jpeg-6b]#  cd /lamp/freetype-2.3.5
[root@centos freetype-2.3.5]# ./configure --prefix=/usr/local/freetype/
[root@centos freetype-2.3.5]# make && makre install
9、安装 Apache
1)、源码包 2.4.*版本中默认没有集成 apr 的依赖包,所以需要提前解决依赖问题
[root@centos freetype-2.3.5]# yum install expat-devel -y
[root@centos freetype-2.3.5]#  cp  -a  /lamp/apr-1.7.0 /lamp/httpd-2.4.41/srclib/apr
[root@centos freetype-2.3.5]#  cp  -a  /lamp/apr-util-1.6.1 /lamp/httpd-2.4.41/srclib/apr-util
2)、Apache 默认需要依赖 pcre 软件,但由于 Apache 软件版本较高,则系统预安装的 pcre 无法使用, 所以需要人为手动安装适合版本。
[root@centos freetype-2.3.5]# cd /lamp/pcre-8.43-RC1
[root@centos pcre-8.43-RC1]# ./configure && make && make install
3)、Apache 的加密传输模块 mod_ssl,需要安装此软件产生
[root@centos pcre-8.43-RC1]# yum install openssl-devel -y
4)、httpd 软件安装
[root@centos pcre-8.43-RC1]# cd /lamp/httpd-2.4.41
[root@centos httpd-2.4.41]# ./configure --prefix=/usr/local/apache2 --sysconfdir=/usr/local/apache2/etc --with-included-apr --enable-so --enable-deflate=shared --enable-expires=shared --enable-rewrite=shared --enable-ssl
[root@centos httpd-2.4.41]# make && make install
10、安装 ncurses
Ncurses 提供字符终端处理库,包括面板和菜单。它提供了一套控制光标,建立窗口,改变前 景背景颜色以及处理鼠标操作的函数。使用户在字符终端下编写应用程序时绕过了那些恼人的底层机制
[root@centos httpd-2.4.41]# yum -y install ncurses-devel
[root@centos httpd-2.4.41]# cd /lamp/ncurses-5.9
[root@centos ncurses-5.9]#  ./configure --with-shared --without-debug --without-ada --enable-overwrite
[root@centos ncurses-5.9]# make && make install
11、安装 cmake 和 bison
mysql 在 5.5 以后,不再使用./configure 工具,进行编译安装。而使用 cmake 工具替代了./configure 工具。bison 是一个自由软件,用于自动生成语法分析器程序,可用于所有常见的操作系统
[root@centos ncurses-5.9]# yum -y install cmake bison
12、安装 MySQL
1)、创建mysql用户
[root@centos ncurses-5.9]# useradd -r -s /sbin/nologin mysql
2)、安装mysql
[root@centos ncurses-5.9]# cd /lamp/mysql-5.5.48
[root@centos mysql-5.5.48]# cmake -DCMAKE_INSTALL_PREFIX=/usr/local/mysql -DMYSQL_UNIX_ADDR=/tmp/mysql.sock -DEXTRA_CHARSETS=all -DDEFAULT_CHARSET=utf8 -DDEFAULT_COLLATION=utf8_general_ci -DWITH_MYISAM_STORAGE_ENGINE=1 -DWITH_INNOBASE_STORAGE_ENGINE=1 -DWITH_MEMORY_STORAGE_ENGINE=1 -DWITH_READLINE=1 -DENABLED_LOCAL_INFILE=1 -DMYSQL_USER=mysql -DMYSQL_TCP_PORT=3306
[root@centos mysql-5.5.48]# make && make install
参数解释
-DCMAKE_INSTALL_PREFIX=/usr/local/mysql  安装位置
-DMYSQL_UNIX_ADDR=/tmp/mysql.sock   指定 socket(套接字)文件位置
-DEXTRA_CHARSETS=all      扩展字符支持
-DDEFAULT_CHARSET=utf8         默认字符集
-DDEFAULT_COLLATION=utf8_general_ci      默认字符校对
-DWITH_MYISAM_STORAGE_ENGINE=1      安装 myisam 存储引擎
-DWITH_INNOBASE_STORAGE_ENGINE=1      安装 innodb 存储引擎
-DWITH_MEMORY_STORAGE_ENGINE=1     安装 memory 存储引擎
-DWITH_READLINE=1          支持 readline 库
-DENABLED_LOCAL_INFILE=1        启用加载本地数据
-DMYSQL_USER=mysql        指定 mysql 运行用户
-DMYSQL_TCP_PORT=3306      指定 mysql 端口
3)、修改 MySQL 目录的用户归属
[root@centos mysql-5.5.48]# cd /usr/local/mysql/
[root@centos mysql]# chown -R root .
[root@centos mysql]# chown -R mysql data
4)、生成配置文件,并初始化授权表
[root@centos mysql]# cp -a /lamp/mysql-5.5.48/support-files/my-medium.cnf /etc/my.cnf
[root@centos mysql]#  cd /usr/local/mysql
[root@centos mysql]#  ./scripts/mysql_install_db --user=mysql
5)、启动服务
[root@centos mysql]# /usr/local/mysql/bin/mysqld_safe &
6)、设置密码
[root@centos mysql]# /usr/local/mysql/bin/mysqladmin -uroot password 123456
7)、登录mysql
[root@centos mysql]# /usr/local/mysql/bin/mysql -u root -p
13 、安装 PHP
[root@centos mysql]# cd /lamp/php-7.3.11
[root@centos php-7.3.11]# ./configure --prefix=/usr/local/php/ --with-config-file-path=/usr/local/php/etc/ --with-apxs2=/usr/local/apache2/bin/apxs --with-libxml-dir=/usr/local/libxml2/ --with-jpeg-dir=/usr/local/jpeg6/ --with-png-dir=/usr/local/libpng/ --with-freetype-dir=/usr/local/freetype/ --with-mcrypt=/usr/local/libmcrypt/ --with-mysqli=/usr/local/mysql/bin/mysql_config
[root@centos php-7.3.11]# make && make install
参数解释
--with-config-file-path=/usr/local/php/etc/  指定配置文件目录
--with-apxs2=/usr/local/apache2/bin/apxs  指定 apache 动态模块位置
--with-libxml-dir=/usr/local/libxml2/   指定 libxml 位置
--with-jpeg-dir=/usr/local/jpeg6/    指定 jpeg 位置
--with-png-dir=/usr/local/libpng/    指定 libpng 位置
--with-mcrypt=/usr/local/libmcrypt/       指定 libmcrypt 位置
--with-freetype-dir=/usr/local/freetype/  指定 freetype 位
--with-mysqli=/usr/local/mysql/bin/mysql_config 指定 mysqli 位置
--with-gd    启用 gd 库
--enable-soap       支持 soap 服务
--enable-mbstring=all     支持多字节,字符串
--enable-sockets      支持套接字
--with-pdo-mysql=/usr/local/mysql  启用 mysql 的 pdo 模块支持
--without-pear       不安装 pear(安装 pear 需要连接互联网)
1)、生成php配置文件
[root@centos php-7.3.11]# cp /lamp/php-7.3.11/php.ini-production /usr/local/php/etc/php.ini
2)、修改apache配置文件,使之识别php文件
[root@centos ~]# vim /usr/local/apache2/etc/httpd.conf
    AddType application/x-httpd-php .php .phtml
    AddType application/x-httpd-php-source .phps
3)、重启apache
[root@centos ~]# /usr/local/apache2/bin/apachectl restart
4)、测试是否可以连接
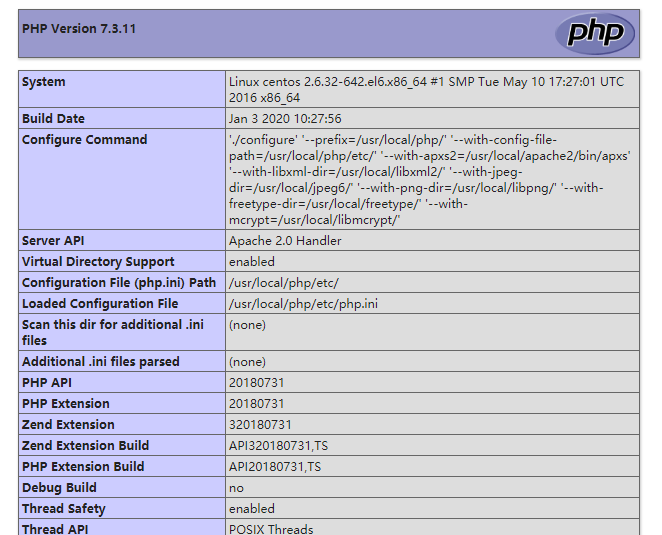
[root@centos ~]# vim /usr/local/apache2/htdocs/test.php
<?php
    phpinfo();
?>
访问测试,如下
http://20.20.20.21/test.php
14、安装 openssl 模块
OpenSSL 是一个强大的安全套接字层密码库,囊括主要的密码算法、常用的密钥和证书封装管理功能 及 SSL 协议,并提供丰富的应用程序供测试或其它目的使用。
#先卸载原来系统中自带的 Autoconf ,版本过低会报错
[root@centos openssl]# rpm -e --nodeps autoconf-2.63
[root@centos openssl]# cd /lamp/autoconf-2.69
[root@centos autoconf-2.69]# ./configure && make && make install
#安装 openssl
[root@centos ~]# cd /lamp/php-7.3.11/ext/openssl
[root@centos openssl]# mv config0.m4 config.m4
[root@centos openssl]# /usr/local/php/bin/phpize
[root@centos openssl]# ./configure --with-openssl --with-php-config=/usr/local/php/bin/php-config
[root@centos openssl]# make && make install
15、安装 memcache 模块
Memcache 是一个高性能的分布式的内存对象缓存系统,通过在内存里维护一个统一的巨大的 hash 表,它能够用来存储各种格式的数据,包括图像、视频、文件以及数据库检索的结果等。 简单的说就是将数据调用到内存中,然后从内存中读取,从而大大提高读取速度。
[root@centos lamp]# unzip  pecl-memcache-php7.zip
[root@centos pecl-memcache-php7]# cd  pecl-memcache-php7
[root@centos pecl-memcache-php7]# mv memcache.loT memcache.lo
[root@centos pecl-memcache-php7]# /usr/local/php/bin/phpize
[root@centos pecl-memcache-php7]# ./configure --with-php-config=/usr/local/php/bin/php-config
[root@centos pecl-memcache-php7]# make && make install
#记录下安装位置
/usr/local/php/lib/php/extensions/no-debug-zts-20180731/
16、修改 php 配置文件
使其识别并调用 openssl 和 memcache 两个模块
[root@centos pecl-memcache-php7]# vim /usr/local/php/etc/php.ini
    extension_dir = "/usr/local/php/lib/php/extensions/no-debug-zts-20180731/"
    extension="openssl.so";
    extension="memcache.so";
#重启apache,测试看是否多了两个模块
17、 安装 memcached 服务
[root@centos pecl-memcache-php7]# yum -y install libevent-devel
[root@centos pecl-memcache-php7]# cd /lamp/memcached-1.5.9
[root@centos memcached-1.5.9]# ./configure --prefix=/usr/local/memcache
[root@centos memcached-1.5.9]# make && make install
[root@centos memcached-1.5.9]#  useradd -r -s /sbin/nologin memcache
[root@centos memcached-1.5.9]# /usr/local/memcache/bin/memcached -umemcache &
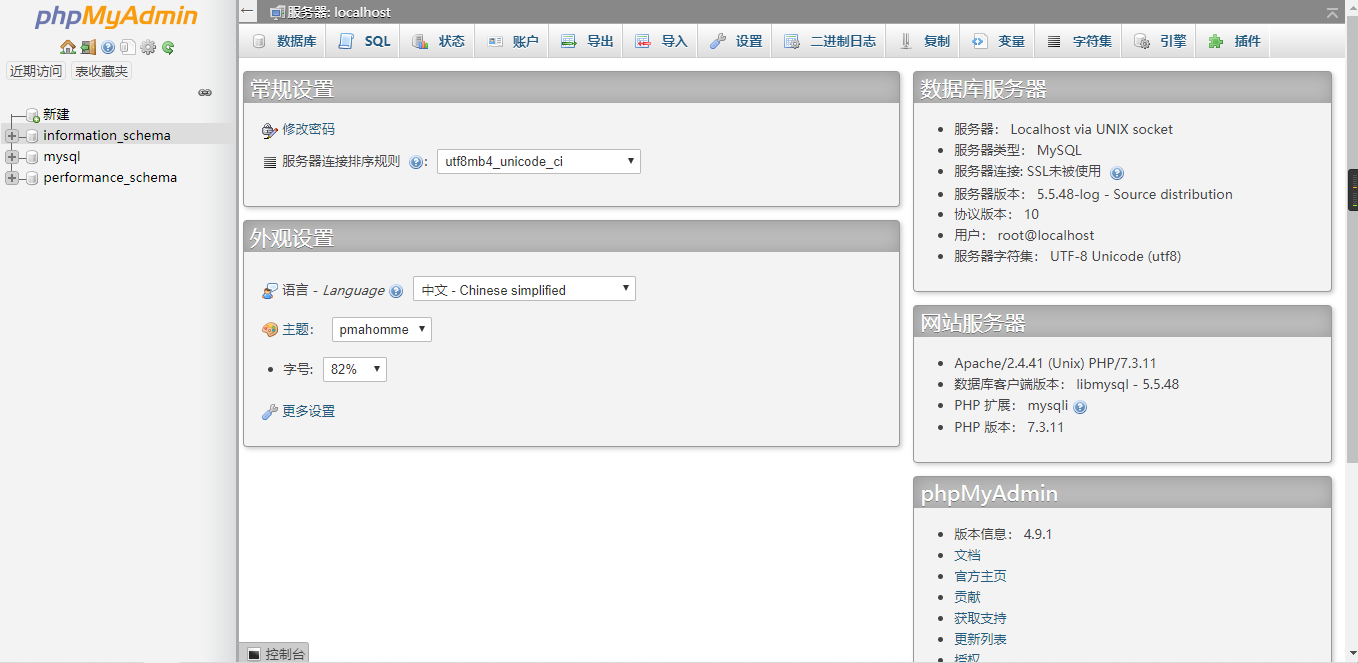
18、安装 phpMyAdmin
phpMyAdmin 是一个以 PHP 为基础,以 Web-Base 方式架构在网站主机上的 MySQL 的数据库管理工具, 让管理者可用 Web 接口管理 MySQL 数据库。
[root@centos lamp]#  cp -a /lamp/phpMyAdmin-4.9.1-all-languages  /usr/local/apache2/htdocs/phpmyadmin
[root@centos lamp]# cd /usr/local/apache2/htdocs/phpmyadmin
[root@centos phpmyadmin]# cp -a config.sample.inc.php config.inc.php
[root@centos phpmyadmin]# vim config.inc.php
#新增
    $cfg['Servers'][$i]['auth_type'] = 'http';
访问测试
http://20.20.20.21/phpmyadmin/index.php 用户名为 root ,密码为 MySQL 设置时指定的 root 密码 123456
如下
19、设置 Apache、MySQL、Memcache 开机自启
[root@centos phpmyadmin]# vim /etc/rc.local
    /usr/local/apache2/bin/apachectl start
    /usr/local/mysql/bin/mysqld_safe --user=mysql &
    /usr/local/memcache/bin/memcached -umemcache &