最近要配置一些项目管理工具,要用到MYSQL于是就想去下个最新版本。之前都是用PHPNOW一键安装,或者是MYSQL安装包来安装的。但这次我发现下载MYSQL的压缩包,然后通过windows的命令行窗口来安装也非常的简洁和干净,安装完毕后只要加个windows的服务就可以正常使用了,删除只需要删除文件和服务就OK,个人觉得非常的干净。
安装步骤记录:
1.下载MYSQL安装包
可以去官网下载ZIP包http://www.mysql.com/downloads/mysql/
我安装的是mysql-5.5.23-winx64
2.解压到本地目录
D:\mysql
3.添加系统环境变量
添加系统环境变量是为了在命令控制窗口里更方便点。
新建:MYSQL_HOME ==> D:\mysql
追加:PATH==>;%MYSQL_HOME%\bin
4. 修改MySQL5.5的配置文件,把my-small.ini改名为my.ini进行编辑
a)在[mysqld]下追加
-------
basedir = "d:\\mysql"
datadir = "d:\\mysql\\data"
character-set-server = utf8
-------
b) 在[client]下追加
-------
default-character-set = utf8
-------
5.启动服务
保存my.ini的配置, 然后打开命令行(开始菜单==>运行==>cmd )
输入: mysqld --console 然后回车将看到如下类似内容:
-------
C:\Windows\system32>mysqld --console
120410 14:25:22 [Note] Plugin 'FEDERATED' is disabled.
120410 14:25:22 InnoDB: The InnoDB memory heap is disabled
120410 14:25:22 InnoDB: Mutexes and rw_locks use Windows interlocked functions
120410 14:25:22 InnoDB: Compressed tables use zlib 1.2.3
120410 14:25:22 InnoDB: Initializing buffer pool, size = 128.0M
120410 14:25:22 InnoDB: Completed initialization of buffer pool
120410 14:25:22 InnoDB: highest supported file format is Barracuda.
120410 14:25:22 InnoDB: Waiting for the background threads to start
120410 14:25:23 InnoDB: 1.1.8 started; log sequence number 1595675
120410 14:25:23 [Note] Event Scheduler: Loaded 0 events
120410 14:25:23 [Note] mysqld: ready for connections.
Version: '5.5.22' socket: '' port: 3306 MySQL Community Server (GPL)
-------
==> 证明mysql服务已启动
6. 设置登陆mysql root帐号的的密码
打开新的命令行,输入 mysql -uroot 回车
-------
Welcome to the MySQL monitor. Commands end with ; or \g.
Your MySQL connection id is 1
Server version: 5.5.22 MySQL Community Server (GPL)
Copyright (c) 2000, 2011, Oracle and/or its affiliates. All rights reserved.
Oracle is a registered trademark of Oracle Corporation and/or its
affiliates. Other names may be trademarks of their respective
owners. www.2cto.com
Type 'help;' or '\h' for help. Type '\c' to clear the current input statement.
-------
==〉看到上面类似内容说明登陆成功,此时的root帐号是没有密码的
执行命令修改密码:
use mysql;
update user set password=PASSWORD("这里填写你要设置的密码") where user='root';
============================================================
5.7版本变更
先在mysql配置中
打开skip-grant-tables(将#号去除,或者加上这条,跳过密码检测)
版本后改为 update MySQL.user set authentication_string=password('root') where user='root' ;
=============================================================
执行完成后退出mysql操作,然后关闭mysql服务(ctrl+C 关闭另一个命令窗口),然后重启mysql服务
然后使用你的root帐号登录
mysqladmin -u root password 你的密码
网上是这么写的,但我这样出现了下面的错误
Error: Access denied for user 'root'@'localhost' (using password: YES)
原因是ROOT 的密码没设,或者有错误,网上搜了许多的方法都不行,最后这个成功了,不过必须是主机上执行。
直接运行命令行窗口输入下面的
mysqladmin -u root password 你的密码
这样就行了,然后再使用 mysqladmin -u root password 你的密码 就可以正常登录了。
7.安装WINDOWS服务
命令行窗口 CD 进入D:\MySql\bin
执行mysqld.exe --install MySQL5.5 --defaults-file="D:\MySql\my.ini"
net start mysql5.5
到服务器里把 MYSQL5.5改成自动,这样每次开机MYSQL服务就会自动启动了。
==2018/6/3==
好久没安装mysql了,这次一个项目有同样的需求,按以上配置完毕启动服务是报了1053的错误。
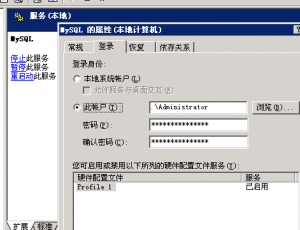
网上搜了下,右键服务属性,设置管理员账户就正常了。