回顾
上一篇说到:ZRender源码分析4:Painter(View层)-中,这次,来补充一下具体的shape
关于热区的边框
以圆形为例:
document.addEventListener('DOMContentLoaded', function () {
	var canvasDom = document.getElementById('canvasId'),
	        context = canvasDom.getContext('2d');

	context.lineWidth = 50;
	context.arc(100, 100, 50, 0, Math.PI * 2);
	context.stroke();

	context.lineWidth = 1;
	context.moveTo(0,100);
	context.lineTo(200,100);

	context.stroke();
});
得到的图形如下:
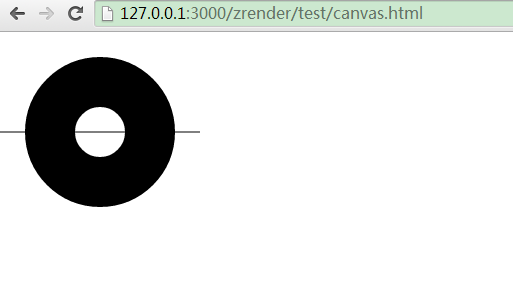
arc方法中,参数分别为x,y,r,startAngle,endAngle,但是经过测量,这个圆形的总宽度不是2r(100),而是150。迷惑了很久,才明白r是圆心到边框中央的长度,而lineWidth比较小的时候,是看不出这种差别的。 如果要获得热区的宽度,那就是2 * r+ lineWidth/2 + lineWidth / 2,也就是 2 * r + lineWidth。而热区的最左端就是 x-r-lineWidth / 2,最上端就是 y-r-lineWidth / 2。这就解释了在zrender.shape.Circle类中的getRect方法。
getRect : function (style) {
    if (style.__rect) {
        return style.__rect;
    }

    var lineWidth;
    if (style.brushType == 'stroke' || style.brushType == 'fill') {
        lineWidth = style.lineWidth || 1;
    }
    else {
        lineWidth = 0;
    }
    style.__rect = {
        x : Math.round(style.x - style.r - lineWidth / 2),
        y : Math.round(style.y - style.r - lineWidth / 2),
        width : style.r * 2 + lineWidth,
        height : style.r * 2 + lineWidth
    };

    return style.__rect;
}
先判断传入的style中是否有__rect这个属性,如果有直接返回,缓存,免得进行多次计算。如果brushType为stroke或者fill,确保有lineWidth,默认为1。最后根据上述算法计算出热点区域。其他图形关于lineWidth的计算都跟这个很相似,以后就不再赘述了。
关于矩形
主要看下圆角矩形的画法:
_buildRadiusPath: function(ctx, style) {
    //左上、右上、右下、左下角的半径依次为r1、r2、r3、r4
    //r缩写为1         相当于 [1, 1, 1, 1]
    //r缩写为[1]       相当于 [1, 1, 1, 1]
    //r缩写为[1, 2]    相当于 [1, 2, 1, 2]
    //r缩写为[1, 2, 3] 相当于 [1, 2, 3, 2]
    var x = style.x;
    var y = style.y;
    var width = style.width;
    var height = style.height;
    var r = style.radius;
    var r1;
    var r2;
    var r3;
    var r4;

    if(typeof r === 'number') {
        r1 = r2 = r3 = r4 = r;
    }
    else if(r instanceof Array) {
        if (r.length === 1) {
            r1 = r2 = r3 = r4 = r[0];
        }
        else if(r.length === 2) {
            r1 = r3 = r[0];
            r2 = r4 = r[1];
        }
        else if(r.length === 3) {
            r1 = r[0];
            r2 = r4 = r[1];
            r3 = r[2];
        } else {
            r1 = r[0];
            r2 = r[1];
            r3 = r[2];
            r4 = r[3];
        }
    } else {
        r1 = r2 = r3 = r4 = 0;
    }
    ctx.moveTo(x + r1, y);
    ctx.lineTo(x + width - r2, y);
    r2 !== 0 && ctx.quadraticCurveTo(
        x + width, y, x + width, y + r2
    );
    ctx.lineTo(x + width, y + height - r3);
    r3 !== 0 && ctx.quadraticCurveTo(
        x + width, y + height, x + width - r3, y + height
    );
    ctx.lineTo(x + r4, y + height);
    r4 !== 0 && ctx.quadraticCurveTo(
        x, y + height, x, y + height - r4
    );
    ctx.lineTo(x, y + r1);
    r1 !== 0 && ctx.quadraticCurveTo(x, y, x + r1, y);
},
- zrender中圆角矩形是用二次贝塞尔曲线画的,关于二次贝塞尔请看 HTML5 canvas quadraticCurveTo() 方法
- 还有一种是可以用arcTo方法,请看 html5 Canvas画图10:圆角矩形
- 确定各个边角上的圆角半径,顺序为左上,右上,右下,坐下,这样兼容比较灵活。
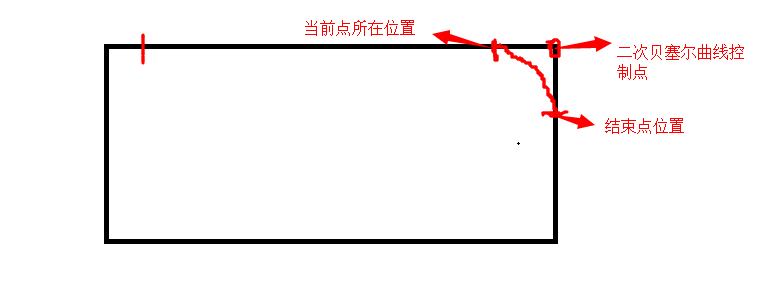
- 这里只举例说明前三句,其他都是同理。a.将当前点移动到左上角的右边(加上r1)。b.画出顶部的线 c.用二次贝塞尔曲线画出圆角,如下图所示
- 在API中,没有公布圆角矩形的功能(为什么呢)。但是我们可以这样用:
// 矩形
var RectangleShape = require('zrender/shape/Rectangle');
zr.addShape(new RectangleShape({
    style : {
        x : 100,
        y : 100,
        width : 100,
        height : 50,
        color : 'rgba(135, 206, 250, 0.8)',
        text:'rectangle',
        textPosition:'inside',
        radius: [1,2,3,4]
    },
    draggable : true
}));
zr.render();
关于椭圆
椭圆的画法有多种,请看这里 在HTML5的Canvas上绘制椭圆的几种方法,zrender用的是三次贝塞尔曲线法二
关于虚线
如果是实线(solid),直接moveTo,lineTo就搞定了,那虚线怎么画呢?看这里: HTML5 Canvas自定义圆角矩形与虚线(Rounded Rectangle and Dash Line)。zrender中将线的类型分为3种,solid(默认),dashed(虚线),dotted(点线)。 其实虚线和点线性质是一样的,只是线长不一样罢了。
// zrender.shape.Line
buildPath : function(ctx, style) {
    if (!style.lineType || style.lineType == 'solid') {
        //默认为实线
        ctx.moveTo(style.xStart, style.yStart);
        ctx.lineTo(style.xEnd, style.yEnd);
    }
    else if (style.lineType == 'dashed'
            || style.lineType == 'dotted'
    ) {
        var dashLength =(style.lineWidth || 1)
                         * (style.lineType == 'dashed' ? 5 : 1);
        dashedLineTo(
            ctx,
            style.xStart, style.yStart,
            style.xEnd, style.yEnd,
            dashLength
        );
    }
}

// zrender.util.dashedLineTo
/**
 * 虚线lineTo
 */
return function (ctx, x1, y1, x2, y2, dashLength) {
    dashLength = typeof dashLength != 'number'
                    ? 5
                    : dashLength;

    var deltaX = x2 - x1;
    var deltaY = y2 - y1;
    var numDashes = Math.floor(
        Math.sqrt(deltaX * deltaX + deltaY * deltaY) / dashLength
    );

    for (var i = 0; i < numDashes; ++i) {
        ctx[i % 2 ? 'lineTo' : 'moveTo'](
            x1 + (deltaX / numDashes) * i,
            y1 + (deltaY / numDashes) * i
        );
    }
    ctx.lineTo(x2, y2);
};
可以看到,dashed和dotted的区别就只有一个dashLength(5或者1,不太灵活吧,不能自定义哦),实现思路也很明确:先计算出线的长度(勾股定理),然后计算一共分为多少段,最后用moveTo和lineTo一直画,就行了。
关于图片
brush : function(ctx, isHighlight, refresh) {
    var style = this.style || {};

    if (isHighlight) {
        // 根据style扩展默认高亮样式
        style = this.getHighlightStyle(
            style, this.highlightStyle || {}
        );
    }

    var image = style.image;
    var me = this;

    if (typeof(image) === 'string') {
        var src = image;
        if (_cache[src]) {
            image = _cache[src];
        }
        else {
            image = new Image();//document.createElement('image');
            image.onload = function(){
                image.onload = null;
                clearTimeout( _refreshTimeout );
                _needsRefresh.push( me );
                // 防止因为缓存短时间内触发多次onload事件
                _refreshTimeout = setTimeout(function(){
                    refresh && refresh( _needsRefresh );
                    // 清空needsRefresh
                    _needsRefresh = [];
                }, 10);
            };
            _cache[ src ] = image;

            image.src = src;
        }
    }
    if (image) {
        //图片已经加载完成
        if (window.ActiveXObject) {
            if (image.readyState != 'complete') {
                return;
            }
        }
        else {
            if (!image.complete) {
                return;
            }
        }

        ctx.save();
        this.setContext(ctx, style);

        // 设置transform
        this.updateTransform(ctx);

        var width = style.width || image.width;
        var height = style.height || image.height;
        var x = style.x;
        var y = style.y;
        if (style.sWidth && style.sHeight) {
            var sx = style.sx || 0;
            var sy = style.sy || 0;
            ctx.drawImage(
                image,
                sx, sy, style.sWidth, style.sHeight,
                x, y, width, height
            );
        }
        else if (style.sx && style.sy) {
            var sx = style.sx;
            var sy = style.sy;
            var sWidth = width - sx;
            var sHeight = height - sy;
            ctx.drawImage(
                image,
                sx, sy, sWidth, sHeight,
                x, y, width, height
            );
        }
        else {
            ctx.drawImage(image, x, y, width, height);
        }
        // 如果没设置宽和高的话自动根据图片宽高设置
        style.width = width;
        style.height = height;
        this.style.width = width;
        this.style.height = height;


        if (style.text) {
            this.drawText(ctx, style, this.style);
        }

        ctx.restore();
    }
},

/**
 * 创建路径,用于判断hover时调用isPointInPath~
 * @param {Context2D} ctx Canvas 2D上下文
 * @param {Object} style 样式
 */
buildPath : function(ctx, style) {
    ctx.rect(style.x, style.y, style.width, style.height);
    return;
},
- ImageShape覆盖了父类的buildPath和brush方法,其中buildPath用于判断hover时调用isPointInPath,由于Image特殊,所以覆盖了brush方法
- ImageShape的style.image 可以配置一个string或者ImageElement对象,这就要分情况处理了,其中,_cache为缓存,提高效率
- 如果Image是个字符串,则new Image()注册onload事件,在onload回调中执行refresh方法(其实是执行了painter.update方法),update又会执行brush动作,再次进去该方法
- 判断图片是否已经加载完成,如果没完成,说明image传入的是字符串,并且为第一次进入方法,如果image是字符串第二次进入或者image传入的是DOM对象,继续向下执行
- 其他代码同Base.js,不同的是调用了drawImage的多重重载,如果没有设置图片的宽高,直接取真实的宽高。
关于文字
先看getRect:
/**
 * 返回矩形区域,用于局部刷新和文字定位
 * @param {Object} style
 */
getRect : function(style) {
    if (style.__rect) {
        return style.__rect;
    }

    var width = area.getTextWidth(style.text, style.textFont);
    var height = area.getTextHeight(style.text, style.textFont);

    var textX = style.x;                 //默认start == left
    if (style.textAlign == 'end' || style.textAlign == 'right') {
        textX -= width;
    }
    else if (style.textAlign == 'center') {
        textX -= (width / 2);
    }

    var textY;
    if (style.textBaseline == 'top') {
        textY = style.y;
    }
    else if (style.textBaseline == 'bottom') {
        textY = style.y - height;
    }
    else {
        // middle
        textY = style.y - height / 2;
    }

    style.__rect = {
        x : textX,
        y : textY,
        width : width,
        height : height
    };

    return style.__rect;
}
为了更好地理解,进行如下测试
zr.addShape(new LineShape(
{
	style:
	{
		xStart: 0,
		yStart: 100,
		xEnd: 300,
		yEnd: 100,
		strokeColor: 'black',
		lineWidth: 1
	}
}));

zr.addShape(new LineShape(
{
	style:
	{
		xStart: 100,
		yStart: 0,
		xEnd: 100,
		yEnd: 300,
		strokeColor: 'black',
		lineWidth: 1
	}
}));

zr.addShape(new TextShape(
{
	style:
	{
		x: 100,
		y: 100,
		color: 'red',
		text: 'Align:right;
Baseline:bottom',
		textAlign: 'right',
		textBaseline: 'bottom'
	},
	hoverable: true,
	zlevel: 2
}));

zr.addShape(new TextShape(
{
	style:
	{
		x: 100,
		y: 100,
		color: 'red',
		text: 'Align:right;
Baseline:top',
		textAlign: 'right',
		textBaseline: 'top'
	},
	hoverable: true,
	zlevel: 2
}));

zr.addShape(new TextShape(
{
	style:
	{
		x: 100,
		y: 100,
		color: 'red',
		text: 'Align:left;
Baseline:bottom',
		textAlign: 'left',
		textBaseline: 'bottom'
	},
	hoverable: true,
	zlevel: 2
}));

zr.addShape(new TextShape(
{
	style:
	{
		x: 100,
		y: 100,
		color: 'red',
		text: 'Align:left;
Baseline:top',
		textAlign: 'left',
		textBaseline: 'top'
	},
	hoverable: true,
	zlevel: 2
}));

zr.render();
效果如下: 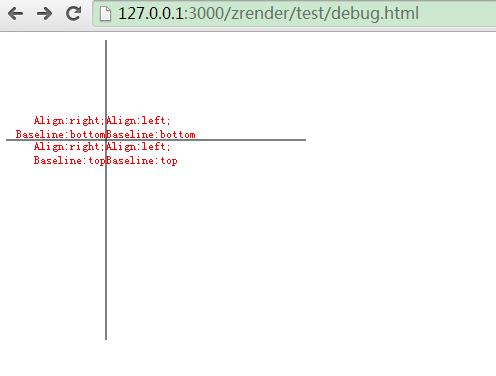
可见,x,y只是一个基准点,并不是左上角的点。所以在getRect中需要重新计算热区。
- 通过area.getTextWidth和area.getTextHeight得到文字所占的宽高,这两个方法在以前有讲解。
- 通过textAlign和textBaseline计算出文字左上角的x和y
- 返回x/y/width/height
TextShape依旧覆盖了Base类的brush方法,如下:
brush : function(ctx, isHighlight) {
    var style = this.style;
    if (isHighlight) {
        // 根据style扩展默认高亮样式
        style = this.getHighlightStyle(
            style, this.highlightStyle || {}
        );
    }

    if (typeof style.text == 'undefined') {
        return;
    }

    ctx.save();
    this.setContext(ctx, style);

    // 设置transform
    this.updateTransform(ctx);

    if (style.textFont) {
        ctx.font = style.textFont;
    }
    ctx.textAlign = style.textAlign || 'start';
    ctx.textBaseline = style.textBaseline || 'middle';

    var text = (style.text + '').split('
');
    var lineHeight = area.getTextHeight('国', style.textFont);
    var rect = this.getRect(style);
    var x = style.x;
    var y;
    if (style.textBaseline == 'top') {
        y = rect.y;
    }
    else if (style.textBaseline == 'bottom') {
        y = rect.y + lineHeight;
    }
    else {
        y = rect.y + lineHeight / 2;
    }

    for (var i = 0, l = text.length; i < l; i++) {
        if (style.maxWidth) {
            switch (style.brushType) {
                case 'fill':
                    ctx.fillText(
                        text[i],
                        x, y, style.maxWidth
                    );
                    break;
                case 'stroke':
                    ctx.strokeText(
                        text[i],
                        x, y, style.maxWidth
                    );
                    break;
                case 'both':
                    ctx.fillText(
                        text[i],
                        x, y, style.maxWidth
                    );
                    ctx.strokeText(
                        text[i],
                        x, y, style.maxWidth
                    );
                    break;
                default:
                    ctx.fillText(
                        text[i],
                        x, y, style.maxWidth
                    );
            }
        }
        else{
            switch (style.brushType) {
                case 'fill':
                    ctx.fillText(text[i], x, y);
                    break;
                case 'stroke':
                    ctx.strokeText(text[i], x, y);
                    break;
                case 'both':
                    ctx.fillText(text[i], x, y);
                    ctx.strokeText(text[i], x, y);
                    break;
                default:
                    ctx.fillText(text[i], x, y);
            }
        }
        y += lineHeight;
    }

    ctx.restore();
    return;
},
- brush方法与Base.brush方法大致相同,这里只说不同的。如果textAlign和textBaseline没有赋值,给予默认值
- 关于fillText和strokeText,请看 HTML5 canvas fillText() 方法 和 HTML5 canvas strokeText() 方法,注意:这两个方法是可以传入maxWidth的
- fillText或者strokeText时的x取得是style.x,因为text可能有多行,所以传入fillText中的y需要进行重新计算(根据textBaseline和rect.y和行高)
- 将text根据 (换行)分隔成数组,遍历进行绘图,每个遍历最后是将y加上lineHeight,以实现多行。
关于圆环
buildPath : function(ctx, style) {
    // 非零环绕填充优化
    ctx.arc(style.x, style.y, style.r, 0, Math.PI * 2, false);
    ctx.moveTo(style.x + style.r0, style.y);
    ctx.arc(style.x, style.y, style.r0, 0, Math.PI * 2, true);
    return;
},
- 关于非零环绕规则,请看 非零环绕数规则和奇-偶规则
- 想要画出圆环,两次arc的调用的最后一个参数一定不能相同,关于arc,请看 HTML5 canvas arc() 方法
关于贝塞尔曲线、心形、水滴
- 分为二次贝塞尔曲线和三次贝塞尔曲线 请看:HTML5 canvas quadraticCurveTo() 方法 和 HTML5 canvas bezierCurveTo() 方法
- zrender只是将二次和三次统一到一个图形里面做了封装,getRect也很简单,只是取这些个点的最大值与最小值进行计算,其他没什么特别之处,不贴代码了。
- 心形(Heart)和水滴(Droplet)都是贝塞尔曲线绘制而成,不分析了就。
关于玫瑰线
请参考如下3个链接,太不常用了,不细细分析了。
- http://xuxzmail.blog.163.com/blog/static/251319162009739563225/
- http://en.wikipedia.org/wiki/Rose_(mathematics)
- https://github.com/shimobayashi/rose-curve-canvas/blob/master/index.html
总结
剩余折线,多边形,正多边形,路径,扇形,五角星,内外旋轮曲线,下次再说。