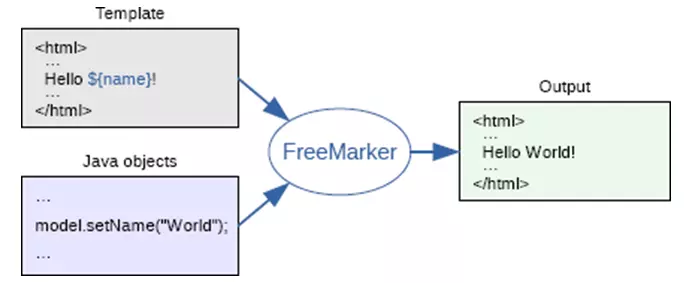
1. 什么是Freemarker
在java领域,表现层技术主要有三种:jsp、freemarker、velocity。
jsp
优点:
1、功能强大,可以写java代码
2、支持jsp标签(jsp tag)
3、支持表达式语言(el)
4、官方标准,用户群广,丰富的第三方jsp标签库
5、性能良好。jsp编译成class文件执行,有很好的性能表现
缺点:
jsp没有明显缺点,非要挑点骨头那就是,由于可以编写java代码,如使用不当容易破坏mvc结构。
velocity
是较早出现的用于代替jsp的模板语言
优点:
1、不能编写java代码,可以实现严格的mvc分离
2、性能良好,据说比jsp性能还要好些
3、使用表达式语言,据说jsp的表达式语言就是学velocity的
缺点:
1、不是官方标准
2、用户群体和第三方标签库没有jsp多。
3、对jsp标签支持不够好
freemarker
优点:
1、不能编写java代码,可以实现严格的mvc分离
2、性能非常不错
3、对jsp标签支持良好
4、内置大量常用功能,使用非常方便
5、宏定义(类似jsp标签)非常方便
6、使用表达式语言
缺点:
1、不是官方标准
2、用户群体和第三方标签库没有jsp多
选择freemarker的原因:
1、性能。velocity应该是最好的,其次是jsp,普通的页面freemarker性能最差(虽然只是几毫秒到十几毫秒的差距)。但是在复杂页面上(包含大量判断、日期金额格式化)的页面上,freemarker的性能比使用tag和el的jsp好。
2、宏定义比jsp tag方便
3、内置大量常用功能。比如html过滤,日期金额格式化等等,使用非常方便
4、支持jsp标签
5、可以实现严格的mvc分离
JSP页面前后端的代码写到了一起,耦合度很高,前端开发需要熟悉后台环境,需要去调试。而让后台开发去做不熟悉的界面设计。对两者而言,交替性的工作需要花费一定的学习成本,效率低下。 使用FreeMarker后,前后端完全分离,大家各干各的,互不影响。
JSP功能强大,可以写Java代码,但是页面会有大量业务逻辑,不利于维护和阅读,更不利于前后台分工,容易破坏MVC结构,所以舍弃JSP,选择使用FreeMarker是大势所趋。
众所周知,JSP在第一次执行的时候需要转换成Servlet类,之后的每次修改都要编译和转换。这样就造成了每次修改都需要等待编译的时间,开发效率低下。 而FreeMarker模板技术并不存在编译和转换的问题,所以就不会存在上述问题。相比而言,使用freeMark可以提高一定的开发效率
FreeMarker是一个用Java语言编写的模板引擎,它基于模板来生成文本输出。FreeMarker与Web容器无关,即在Web运行时,它并不知道Servlet或HTTP。它不仅可以用作表现层的实现技术,而且还可以用于生成XML,JSP或Java 等。
目前企业中:主要用Freemarker做静态页面或是页面展示
2.Freemarker的使用方法
在工程添加freemarker的Maven依赖
<dependency>
  <groupId>org.freemarker</groupId>
  <artifactId>freemarker</artifactId>
  <version>2.3.23</version>
</dependency>
使用步骤:
第一步:创建一个Configuration对象,直接new一个对象。构造方法的参数就是freemarker对应的版本号。
第二步:设置模板文件所在的路径。
第三步:设置模板文件使用的字符集。一般就是utf-8.
第四步:加载一个模板,创建一个模板对象。
第五步:创建一个模板使用的数据集,可以是pojo也可以是map。一般是Map。
第六步:创建一个Writer对象,一般创建一FileWriter对象,指定生成的文件名。
第七步:调用模板对象的process方法输出文件。
第八步:关闭流。
模板:
${hello}
@Test
    public void genFile() throws Exception {
        // 第一步:创建一个Configuration对象,直接new一个对象。构造方法的参数就是freemarker对于的版本号。
        Configuration configuration = new Configuration(Configuration.getVersion());
        // 第二步:设置模板文件所在的路径。
        configuration.setDirectoryForTemplateLoading(new File("D:/workspaces-itcast/term197/taotao-item-web/src/main/webapp/WEB-INF/ftl"));
        // 第三步:设置模板文件使用的字符集。一般就是utf-8.
        configuration.setDefaultEncoding("utf-8");
        // 第四步:加载一个模板,创建一个模板对象。
        Template template = configuration.getTemplate("hello.ftl");
        // 第五步:创建一个模板使用的数据集,可以是pojo也可以是map。一般是Map。
        Map dataModel = new HashMap<>();
        //向数据集中添加数据
        dataModel.put("hello", "this is my first freemarker test.");
        // 第六步:创建一个Writer对象,一般创建一FileWriter对象,指定生成的文件名。
        Writer out = new FileWriter(new File("D:/temp/term197/out/hello.html"));
        // 第七步:调用模板对象的process方法输出文件。
        template.process(dataModel, out);
        // 第八步:关闭流。
        out.close();
    }
3. 模板的语法
访问map中的key
${key}
访问pojo中的属性
Student对象。学号、姓名、年龄
${key.property}
取集合中的数据
<#list 集合 as 循环的变量>
<#list studentList as student>
${student.id}/${studnet.name}
</#list>
去循环中的下标
<#list studentList as student>
    ${student_index}
</#list>
判断
<#if student_index % 2 == 0>
<#else>
</#if>
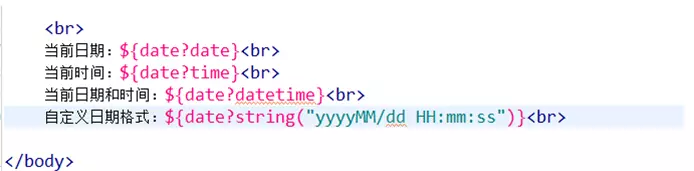
日期类型格式化
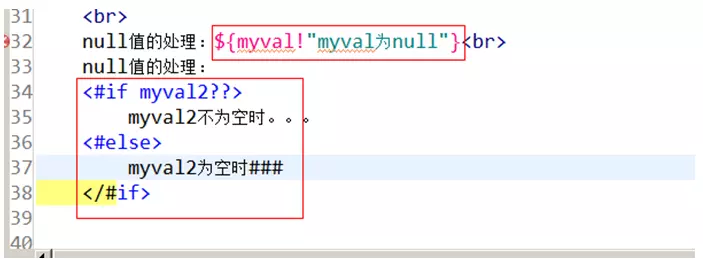
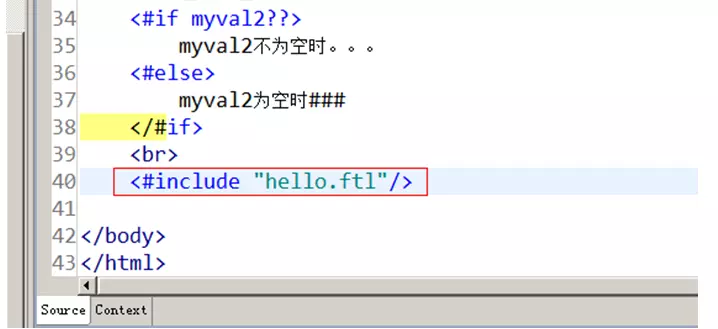
Null值的处理
Include标签
4.Freemarker整合spring
4.1. 创建整合spring的配置文件
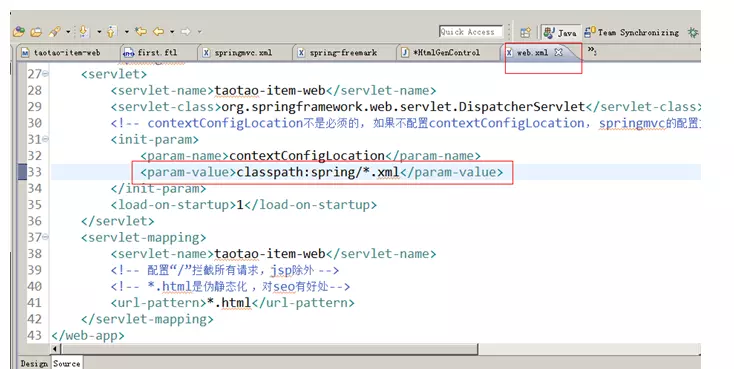
<?xml version="1.0" encoding="UTF-8"?> <beans xmlns="http://www.springframework.org/schema/beans" xmlns:xsi="http://www.w3.org/2001/XMLSchema-instance" xmlns:p="http://www.springframework.org/schema/p" xmlns:context="http://www.springframework.org/schema/context" xmlns:dubbo="http://code.alibabatech.com/schema/dubbo" xmlns:mvc="http://www.springframework.org/schema/mvc" xsi:schemaLocation="http://www.springframework.org/schema/beans http://www.springframework.org/schema/beans/spring-beans.xsd http://www.springframework.org/schema/mvc http://www.springframework.org/schema/mvc/spring-mvc-4.2.xsd http://code.alibabatech.com/schema/dubbo http://code.alibabatech.com/schema/dubbo/dubbo.xsd http://www.springframework.org/schema/context http://www.springframework.org/schema/context/spring-context.xsd">

<bean id="freemarkerConfig" class="org.springframework.web.servlet.view.freemarker.FreeMarkerConfigurer">
    <property name="templateLoaderPath" value="/WEB-INF/ftl/" />
    <!-- 设置默认的编码方式,原先是GBK,需要设置成utf-8 -->
    <property name="defaultEncoding" value="UTF-8" />
    <property name="freemarkerSettings">
    <props>
        <!--用于解决前端报空指针问题 不用再空值后面+ !号-->
        <prop key="classic_compatible">true</prop>
        <!-- <prop key="defaultEncoding">utf-8</prop>
        <prop key="template_exception_handler">rethrow</prop>
    </props>
    </property>
  </bean>
</beans>
编写Controller进行测试
4.2 Controller
请求的url:/genhtml
参数:无
返回值:ok (String, 需要使用@ResponseBody)
业务逻辑:
1、从spring容器中获得FreeMarkerConfigurer对象。
2、从FreeMarkerConfigurer对象中获得Configuration对象。
3、使用Configuration对象获得Template对象。
4、创建数据集
5、创建输出文件的Writer对象。
6、调用模板对象的process方法,生成文件。
7、关闭流。
加载配置文件:
@Controller
public class HtmlGenController {

    // 1、从spring容器中获得FreeMarkerConfigurer对象。
    @Autowired
    private FreeMarkerConfigurer freeMarkerConfigurer;

    @RequestMapping("/genhtml")
    @ResponseBody
    public String genHtml()throws Exception {
        // 2、从FreeMarkerConfigurer对象中获得Configuration对象。
        Configuration configuration = freeMarkerConfigurer.getConfiguration();
        // 3、使用Configuration对象获得Template对象。
        Template template = configuration.getTemplate("hello.ftl");
        // 4、创建数据集
        Map dataModel = new HashMap<>();
        dataModel.put("hello", "1000");
        // 5、创建输出文件的Writer对象。
        Writer out = new FileWriter(new File("D:/temp/term197/out/spring-freemarker.html"));
        // 6、调用模板对象的process方法,生成文件。
        template.process(dataModel, out);
        // 7、关闭流。
        out.close();
        return "OK";
    }
}
5.商品详情页面静态化
5.1 网页的静态化方案
输出文件的名称:商品id+“.html”
输出文件的路径:工程外部的任意目录。
网页访问:使用nginx访问网页。在此方案下tomcat只有一个作用就是生成静态页面。
工程部署:可以把taotao-item-web部署到多个服务器上。
生成静态页面的时机:商品添加后,生成静态页面。可以使用Activemq,订阅topic(商品添加)
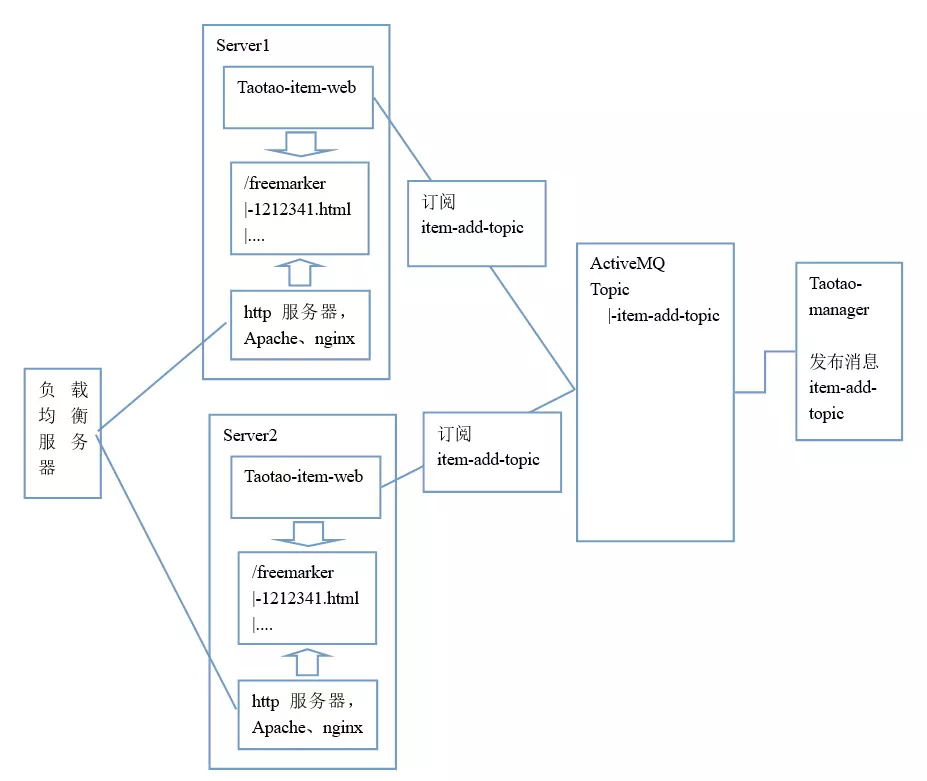
3.5.2. MessageListener
需要实现MessageListener,把Active的客户端jar包的依赖添加到工程中。
业务逻辑:
1、创建一个MessageListener接口的实现类
2、从message中取商品id
3、查询商品基本消息、商品描述。
4、创建商品详情页面的模板。
5、指定文件输出目录
6、生成静态文件。
安装http服务器。
public class HtmlGenListener implements MessageListener {

    @Autowired
    private ItemService itemService;
    @Autowired
    private FreeMarkerConfigurer freeMarkerConfigurer;
    @Value("${HTML_OUT_PATH}")
    private String HTML_OUT_PATH;

    @Override
    public void onMessage(Message message) {
        try {
            // 1、创建一个MessageListener接口的实现类
            // 2、从message中取商品id
            TextMessage textMessage = (TextMessage) message;
            String strItemId = textMessage.getText();
            Long itemId = new Long(strItemId);
            // 3、查询商品基本消息、商品描述。
            TbItem tbItem = itemService.getItemById(itemId);
            Item item = new Item(tbItem);
            TbItemDesc tbItemDesc = itemService.getItemDescById(itemId);
            //创建数据集
            Map data = new HashMap<>();
            data.put("item", item);
            data.put("itemDesc", tbItemDesc);
            // 4、创建商品详情页面的模板。
            // 5、指定文件输出目录
            Configuration configuration = freeMarkerConfigurer.getConfiguration();
            Template template = configuration.getTemplate("item.htm");
            FileWriter out = new FileWriter(new File(HTML_OUT_PATH + itemId + ".html"));
            // 6、生成静态文件。
            template.process(data, out);
            //关闭流
            out.close();
        } catch (Exception e) {
            e.printStackTrace();
        }
    }
}
3.5.3. Spring配置文件
<?xml version="1.0" encoding="UTF-8"?> <beans xmlns="http://www.springframework.org/schema/beans" xmlns:context="http://www.springframework.org/schema/context" xmlns:p="http://www.springframework.org/schema/p" xmlns:aop="http://www.springframework.org/schema/aop" xmlns:tx="http://www.springframework.org/schema/tx" xmlns:xsi="http://www.w3.org/2001/XMLSchema-instance" xsi:schemaLocation="http://www.springframework.org/schema/beans http://www.springframework.org/schema/beans/spring-beans-4.2.xsd http://www.springframework.org/schema/context http://www.springframework.org/schema/context/spring-context-4.2.xsd http://www.springframework.org/schema/aop http://www.springframework.org/schema/aop/spring-aop-4.2.xsd http://www.springframework.org/schema/tx http://www.springframework.org/schema/tx/spring-tx-4.2.xsd http://www.springframework.org/schema/util http://www.springframework.org/schema/util/spring-util-4.2.xsd">

  <!-- 真正可以产生Connection的ConnectionFactory,由对应的 JMS服务厂商提供 -->
  <bean id="targetConnectionFactory" class="org.apache.activemq.ActiveMQConnectionFactory">
     <property name="brokerURL" value="tcp://192.168.25.168:61616" />
  </bean>

  <!-- Spring用于管理真正的ConnectionFactory的ConnectionFactory -->
  <bean id="connectionFactory" class="org.springframework.jms.connection.SingleConnectionFactory">
    <!-- 目标ConnectionFactory对应真实的可以产生JMS Connection的ConnectionFactory -->
    <property name="targetConnectionFactory" ref="targetConnectionFactory" />
  </bean> <!--这个是主题目的地,一对多的 -->

  <bean id="topicDestination" class="org.apache.activemq.command.ActiveMQTopic">
    <constructor-arg value="item-add-topic" />
  </bean>

  <!-- 配置消息监听器 -->
  <bean id="htmlGenListener" class="com.taotao.item.listener.HtmlGenListener"/>
    <!-- 配置监听容器 -->
    <!-- 消息监听容器 -->
    <bean class="org.springframework.jms.listener.DefaultMessageListenerContainer">
    <property name="connectionFactory" ref="connectionFactory" />
    <property name="destination" ref="topicDestination" />
    <property name="messageListener" ref="htmlGenListener" />
  </bean>
</beans>
FreeMarker 快速入门:https://www.cnblogs.com/itdragon/p/7750903.html