由于生产环境使用的的tomcat,项目比较重要,所以要做进程守护,本来打算自己写脚本,但是效果不理想,想了下还是用supervisord了
由于很久不用,所以写下来部署步骤
第一:安装,安装的方法有yum和pip还有easy_install,不过还是推荐使用yum安装
yum的安装方法如下,前提是需要安装epel源,没有epel源的可以使用yum安装下yum install epel -y
然后
yum install -y supervisor
pip安装方法,来自于网络
cat  pip_an.sh
#!/bin/bash
wget http://pypi.python.org/packages/source/s/setuptools/setuptools-0.6c11.tar.gz
tar zxvf setuptools-0.6c11.tar.gz
cd setuptools-0.6c11
python setup.py build
python setup.py install
wget "https://pypi.python.org/packages/source/p/pip/pip-1.5.4.tar.gz#md5=834b2904f92d46aaa33326"
tar -xzvf pip-1.5.4.tar.gz
cd pip-1.5.4
python setup.py install
easy_install的安装方法如下
yum install python-setuptools
easy_install supervisor
不论那种方法,都可以,还是推荐使用yum。
第二:配置使用
由于我使用的yum安装,安装后配置文件在etc下面
位置是/etc/supervisord.conf
简单编辑下就可以用了,其实需要更改的只有2个地方就是
[inet_http_server] ###去掉前面冒号
port=0.0.0.0:9001
保存后,就可以启动了
systemctl start supervisord
这样就启动完成了,至于该怎么使用,接下来简单说下。
守护一个进程,比如tomcat
我们在/etc/supervisord.d/下创建一个子配置文件叫tomcat.ini
[program:tomcat]
command=/data/ifengsite/java/tomcat/bin/catalina.sh run
environment=JAVA_HOME="/usr/local/jdk",JAVA_BIN="/usr/local/jdk/bin"
stdout_logfile=/data/ifengsite/java/tomcat/logs/catalina.out
redirect_stderr=true
autostart=false
autorestart=true
startsecs=10
priority=1
stopasgroup=false
killasgroup=false
user=www
command启动命令,命令路径
enviroment环境变量,jdk环境配置
user 以那个用户来启动这个进程
stdout_logfile日志输出路径到那个文件,此文件最后提前创建,并且使用启动该进程的用户创建为好
autostart是否和supervisor一起启动,我这里选择否
autostart是否自动重启,肯定的
剩下的选项大家可以百度哈,很简单的
然后保存该文件。
重载下supervisor服务
systemctl restart supervisord
我们就可以看到有个项目叫tomcat了,可以在命令行看也可以在web页面看
命令行看的方法是
supervisorctl

web页面看的方法是打开ip:9001

我这里定义了2个项目,已经运行了
接下来怎么启动项目呢
可以在web页面里点start,也可以使用supervisorctl start 项目名
supervisorctl start tomcat
稍等会就启动起来了。
另外如果安装多台supervisor的话,批量管理很麻烦,需要一个个打开页面,我们这里使用官方推荐的supervisord-monitor来批量管理,部署方法如下
首先克隆下supervisord-monitor这个项目
git clone https://github.com/mlazarov/supervisord-monitor.git
克隆完之后,需要进入到该目录的config下
cd /home/supervisord-monitor/application/config
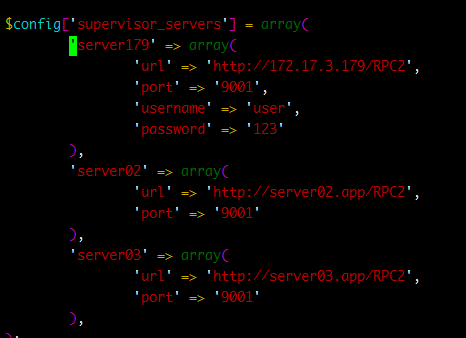
然后复制一份supervisor.php.example 为supervisor.php
这个文件里面定义了需要管理那些节点

然后这个项目是Php写的,需要安装nginx和php
直接Yum安装
yum install php-fpm nginx -y
安装完成后,需要把php-fpm的运行用户更改为和nginx配置中的一致
vim /etc/nginx/nginx.conf
默认是 user nginx;
更改下php-fpm的运行用户
vim /etc/php-fpm.d/www.conf

更改为和nginx一致即可
然后启动php-fpm
systemctl start php-fpm
增加一个nginx的supervisord-monitor配置文件
vim /etc/nginx/conf.d/supervisor.conf
server {
    listen       80 default_server;
    server_name  172.17.3.179;
    root         /home/supervisord-monitor/public_html;
    auth_basic "Please input password";
    auth_basic_user_file /home/supervisord-monitor/application/config/password;
    location / {
        index  index.php index.html;
     }
    location /control/ {
        index  index.php;
        rewrite  /(.*)$  /index.php?$1  last;
    }
    location ~ .php$ {
        try_files $uri =404;
        fastcgi_pass   127.0.0.1:9000;
        fastcgi_index  index.php;
        fastcgi_param  SCRIPT_FILENAME  $document_root$fastcgi_script_name;
        fastcgi_param  SCHEME $scheme;
        include        fastcgi_params;
    }
}
最后我们还需要给这个页面加个登陆认证,防止任何人都可以查看
yum -y install httpd-tools
htpasswd -c /home/supervisord-monitor/application/config/password admin
然后输入密码就可以
最后启动nginx
打开登陆页面IP
会让输入用户密码,输入后

可以看到目前就一个节点,我们可以很方便的管理各个节点的项目重启关闭等等。