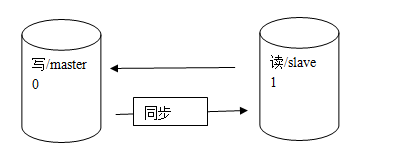
(1)数据库复制 replication 的实现原理
1:主服务器凡运行语句,都产生一个二进制日志 binlog
2:从服务器不断读取主服务器的binlog
3:从主服务读取到的binlog,转换为自身可执行的relaylog,
4:执行relaylog
大致图解如下:
(2)实现步骤:
1:首先确保主服务器打开二进制日志功能.
这样,主服务器一旦有数据变化,立即产生二进制日志.
2:从服务器也需要开启二进制日志和relay日志功能.
这样可以从主服务器读取binlog,并产生relaylog
3:在主服务器建立一个从服务器的账号,并授予数得上权限.
4: 指定从服务对应的主服务器,开启从服务器.
(3)具体步骤如下
(1)在Linux上新建2个两个mysql服务器,IP分别为192.168.109.121[主]192.168.109.113[从]
(2)配置主服务器[192.168.109.121]
1:编辑my.cnf配置: vim /etc/my.cnf
2:添加如下配置[备注:如果以下配置已经开启,则不需要配置]:
log-bin=mysql-bin #开启二进制
binlog_format=mixed #指定日志格式
server-id = 121 #制定一个唯一ID
3: 重启mysql: /etc/init.d/mysql start
4: 登录mysql: ./usr/local/msyql/bin/mysql -uroot -p密码
5:查看master状态:show master status; #记住File,Position 变量
+---------------------+----------+------------------+---------------------+
| File | Position | Binlog_Do_DB | Binlog_Ignore_DB |
+----------------------+----------+------------------+---------------------+
| mysql-bin.000004 | 1274 | | |
+----------------------+----------+------------------+----------------------+
(3)配置从服务器[192.168.109.113]
1:编辑my.cnf配置: vim /etc/my.cnf
2:添加如下配置:
# log-bin=mysql-bin #开启二进制 [关闭]
# binlog_format=mixed #指定日志格式 [关闭]
relay-log=mysql-relay #从服务器日志 [开启]
server-id = 122 #制定一个唯一ID [开启]
3:重启mysql: /etc/init.d/mysql start
4: 在主服务器中创建可复制的日志的账号
(1)grant replication slave ,replication client on *.* to 'repl'@'192.168.%.%' identified by 'repl' [必须先登录mysql在执行]
(2)刷新:flush privileges;
5: 在从服务器通过语句指定要复制的主服务器(注意,可以一主多从,不可一从多主)
(1)从服务器配置[必须先登录mysql在执行]
change master to
master_host='192.168.109.121' ,
master_user='repl' ,
master_password='repl' ,
master_log_file='mysql-bin.000004' ,
master_log_pos=1274;
(2)关闭主和从服务器的防火墙,因为会屏蔽掉3306端口
service iptables stop
(3)重启从服务器功能
start slave
(4)查看从服务器是否连接上主服务器
show slave status G;
如下所示:
Slave_IO_State: Waiting for master to send event #等待着主服务器
Master_Host: 192.168.109.121
Master_User: repl
Master_Port: 3306
Connect_Retry: 60
Master_Log_File: mysql-bin.000004
Read_Master_Log_Pos: 1274
Relay_Log_File: localhost-relay-bin.000002
Relay_Log_Pos: 351
Relay_Master_Log_File: mysql-bin.000004
Slave_IO_Running: Yes
Slave_SQL_Running: Yes
Replicate_Do_DB:
Replicate_Ignore_DB:
Replicate_Do_Table:
Replicate_Ignore_Table:
Replicate_Wild_Do_Table:
Replicate_Wild_Ignore_Table:
Last_Errno: 0
Last_Error:
Skip_Counter: 0
Exec_Master_Log_Pos: 1274
Relay_Log_Space: 511
Until_Condition: None
Until_Log_File:
Until_Log_Pos: 0
Master_SSL_Allowed: No
Master_SSL_CA_File:
Master_SSL_CA_Path:
Master_SSL_Cert:
Master_SSL_Cipher:
Master_SSL_Key:
Seconds_Behind_Master: 0
Master_SSL_Verify_Server_Cert: No
Last_IO_Errno: 0
Last_IO_Error:
Last_SQL_Errno: 0
Last_SQL_Error:
Replicate_Ignore_Server_Ids:
Master_Server_Id: 121
6:数据测试
(1)在主服务器新建一个数据库
create database hgj123 charset utf8;
(2)在从服务器查看是否存在新建的hgj123数据库
show databases;
如果存在表示已经OK拉,如果不存在表示出错了。可能是授权问题或者防火墙问题,请仔细检查。
常用语句:
show master status ; 查看master的状态, 尤其是当前的日志及位置
show slave stattus; 查看slave的状态.
reset slave ; 重置slave状态.
start slave ; 启动slave 状态(开始监听msater的变化)
stop slave; 暂停slave状态;
-----------------------------------------
7.安装mysql
[root@CentOS ~]# yum install mysql mysql-server mysql-devel
[root@CentOS ~]# service mysqld start
[root@CentOS ~]# chkconfig --levels 235 mysqld on
[root@CentOS ~]# mysqladmin -u root password "123456"
//为root用户设置密码
[root@CentOS ~]# service mysqld restart
//重启mysql