一、IdentityServer4简介
IdentityServer4 是一个基于OpenID Connect和OAuth 2.0的针对ASP.NET Core的框架。
用来干嘛:
1.访问受控的API=>为不同的客户提供访问API的令牌,比如:MVC网站、SPA、Mobile App等
2.单点登录/注销(SSO)
3. 其它
二、demo及其流程
demo地址:https://github.com/HePeng11/Hepeng.Study.IDServerTest
版本:.netcore 3
流程图:
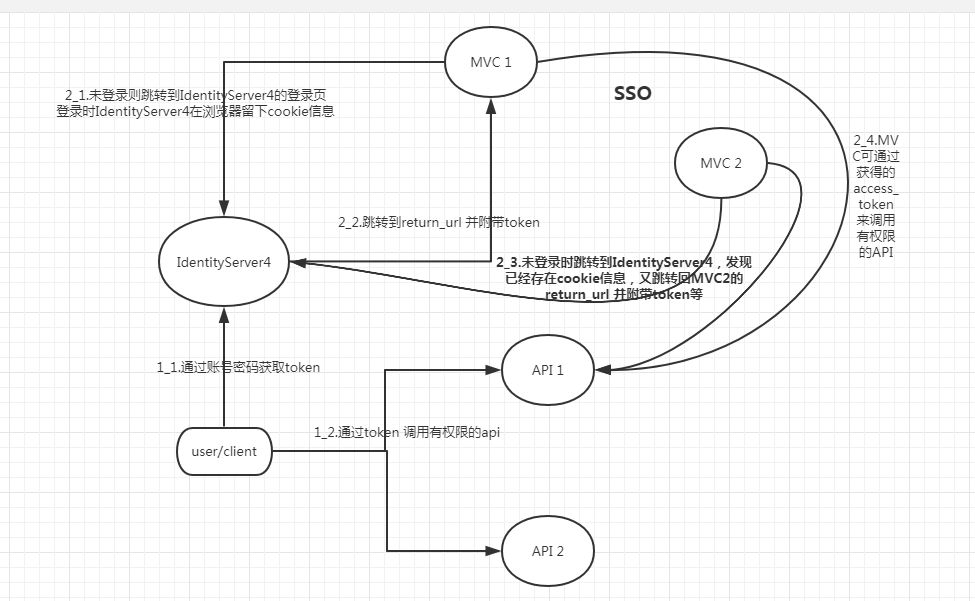
( 图一)
1.1 创建引用IdentityServer4的服务
一个.netcore web 空模板项目, 主要配置如下:
//为了要把IdentityServer注册到容器中,需要对其进行配置,而这个配置中要包含三个信息:
    //  (1)哪些API可以使用这个AuthorizationServer
    //  (2)哪些Client可以使用这个AuthorizationServer
    //  (3)哪些User可以被这个AuthrizationServer识别并授权
    //这里为了快速演示,我们写一个基于内存的静态类来快速填充上面这些信息(实际中,可以持久化在数据库中通过EF等ORM获取,也可以通过Redis获取)
    public class InMemoryConfiguration
    {/// <summary>
        /// Define which APIs will use this IdentityServer
        /// </summary>
        /// <returns></returns>
        public static IEnumerable<ApiResource> GetApiResources()
        {
            return new[]
            {
                new ApiResource("clientservice", "CAS Client Service"),
                new ApiResource("productservice", "CAS Product Service"),
                new ApiResource("agentservice", "CAS Agent Service")
            };
        }

        /// <summary>
        /// Define which Apps will use thie IdentityServer
        /// </summary>
        /// <returns></returns>
        public static IEnumerable<Client> GetClients()
        {
            return new[]
            {
                new Client
                {
                    ClientId = "client.api.service",
                    ClientSecrets = new [] { new Secret("clientsecret".Sha256()) },
                    AllowedGrantTypes = GrantTypes.ResourceOwnerPasswordAndClientCredentials,
                    AllowedScopes = new [] { "clientservice" }
                },
                new Client
                {
                    ClientId = "product.api.service",
                    ClientSecrets = new [] { new Secret("productsecret".Sha256()) },
                    AllowedGrantTypes = GrantTypes.ResourceOwnerPasswordAndClientCredentials,
                    AllowedScopes = new [] { "clientservice", "productservice" }
                },
                new Client
                {
                    ClientId = "agent.api.service",
                    ClientSecrets = new [] { new Secret("agentsecret".Sha256()) },
                    AllowedGrantTypes = GrantTypes.ResourceOwnerPasswordAndClientCredentials,
                    AllowedScopes = new [] { "agentservice", "clientservice", "productservice" }
                },
                 new Client
                {
                    ClientId = "cas.mvc.client.implicit",
                    ClientName = "CAS MVC Web App Client",
                    AllowedGrantTypes = GrantTypes.Implicit,
                    RedirectUris = { "http://localhost:5100/signin-oidc" },//$"http://localhost:5100/signin-oidc"
                    PostLogoutRedirectUris = { $"http://llocalhost:5100/signout-callback-oidc" },
                    AllowedScopes = new [] {
                        IdentityServerConstants.StandardScopes.OpenId,
                        IdentityServerConstants.StandardScopes.Profile,
                        "agentservice", "clientservice", "productservice"
                    },
                    AllowAccessTokensViaBrowser = true // can return access_token to this client
                },
                 new Client
                {
                    ClientId = "cas.mvc.client2.implicit",
                    ClientName = "CAS MVC Web App Client",
                    AllowedGrantTypes = GrantTypes.Implicit,
                    RedirectUris = { "http://localhost:5200/signin-oidc" },//$"http://localhost:5200/signin-oidc"
                    PostLogoutRedirectUris = { $"http://llocalhost:5200/signout-callback-oidc" },
                    AllowedScopes = new [] {
                        IdentityServerConstants.StandardScopes.OpenId,
                        IdentityServerConstants.StandardScopes.Profile,
                        "agentservice", "clientservice", "productservice"
                    },
                    AllowAccessTokensViaBrowser = true // can return access_token to this client
                }
            };
        }

        /// <summary>
        /// Define which uses will use this IdentityServer
        /// </summary>
        /// <returns></returns>
        public static IEnumerable<TestUser> GetUsers()
        {
            return new[]
            {
                new TestUser
                {
                    SubjectId = "10001",
                    Username = "edison@hotmail.com",
                    Password = "edisonpassword"
                },
                new TestUser
                {
                    SubjectId = "10002",
                    Username = "andy@hotmail.com",
                    Password = "andypassword"
                },
                new TestUser
                {
                    SubjectId = "10003",
                    Username = "leo@hotmail.com",
                    Password = "leopassword"
                }
            };
        }


        public static IEnumerable<IdentityResource> GetIdentityResources()
        {
            return new List<IdentityResource>
            {
                new IdentityResources.OpenId(),
                new IdentityResources.Profile(),
            };
        }
    }
1.2 创建两个APIService
主要代码:
 public void ConfigureServices(IServiceCollection services)
        {
            services.AddControllers();
            services.AddMvcCore().AddAuthorization();
            services.AddAuthentication(Configuration["Identity:Scheme"])
                .AddIdentityServerAuthentication(options =>
                {
                    options.RequireHttpsMetadata = false; // for dev env
                    options.Authority = $"http://{Configuration["Identity:IP"]}:{Configuration["Identity:Port"]}";
                    options.ApiName = Configuration["Service:Name"]; // match with configuration in IdentityServer
                });
        }
Service:Name分别为IdentityServer4中配置的 clientservice 和 productservice
1.3 启动identityserver和两个api
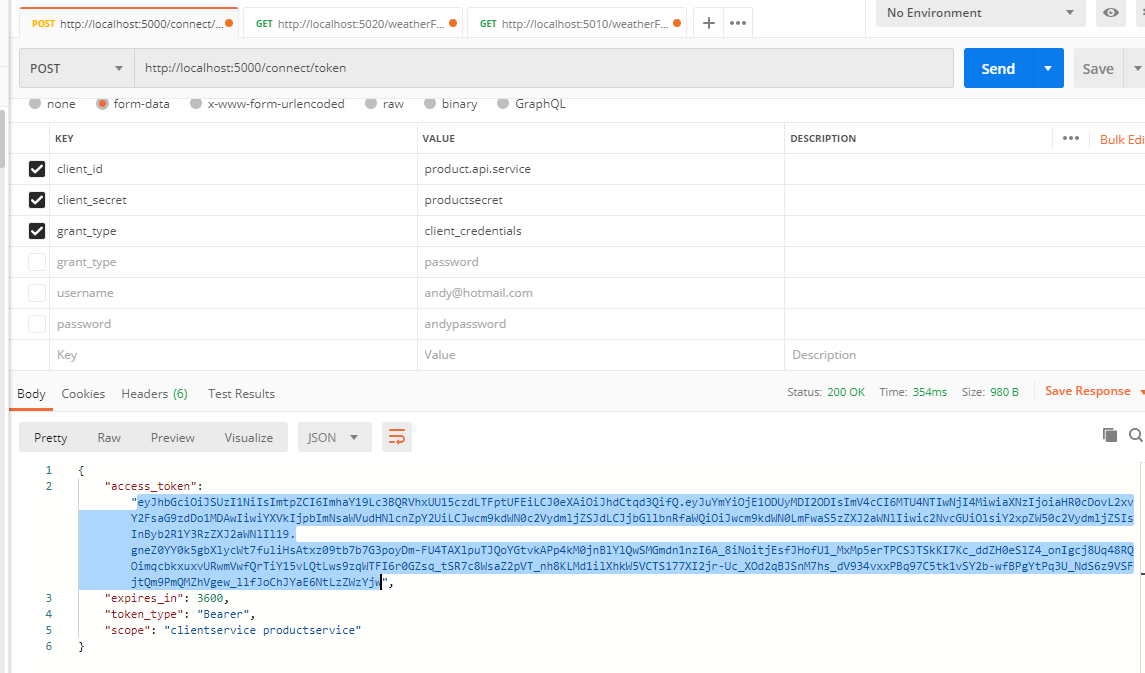
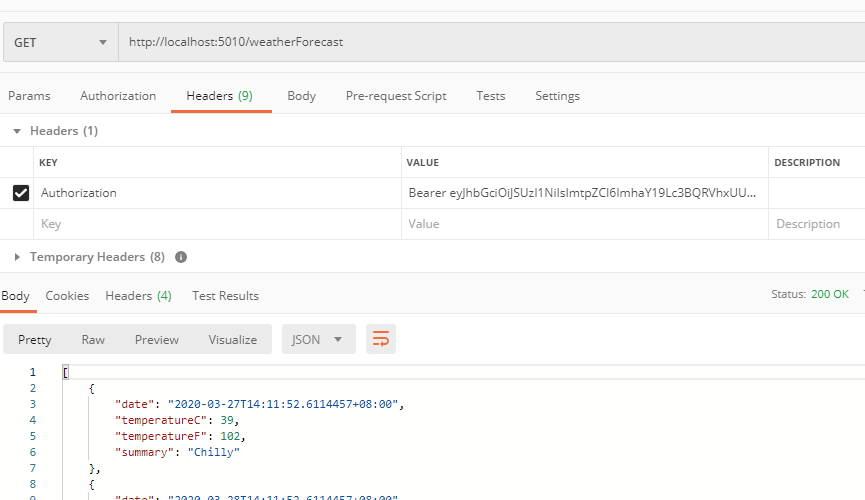
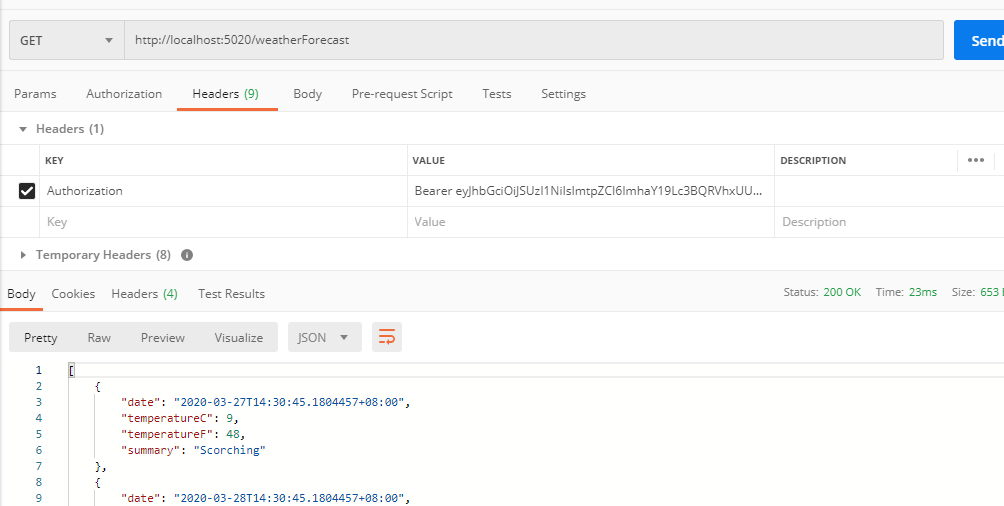
访问IdentityServer的api ,获取token
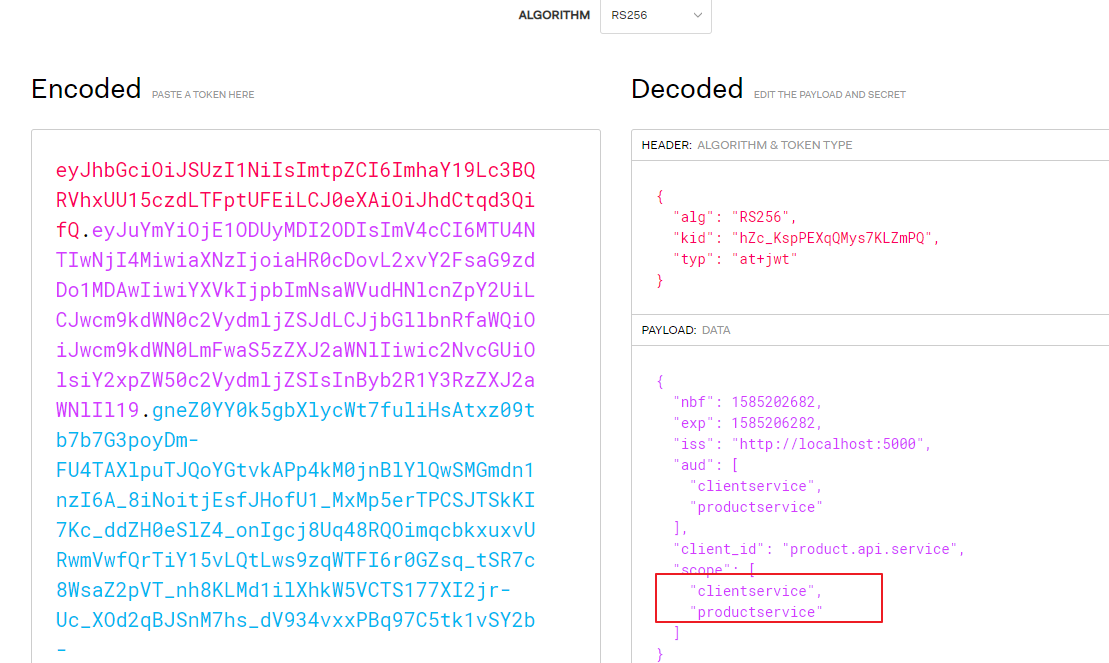
通过解析token可以发现scope中包含两个api,所以可以分别对两个api进行访问
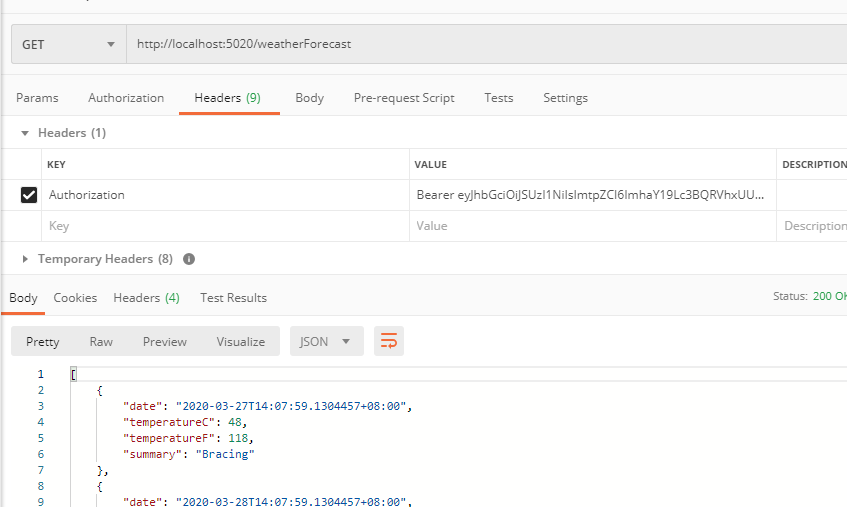
至此流程图一的流程1部分结束
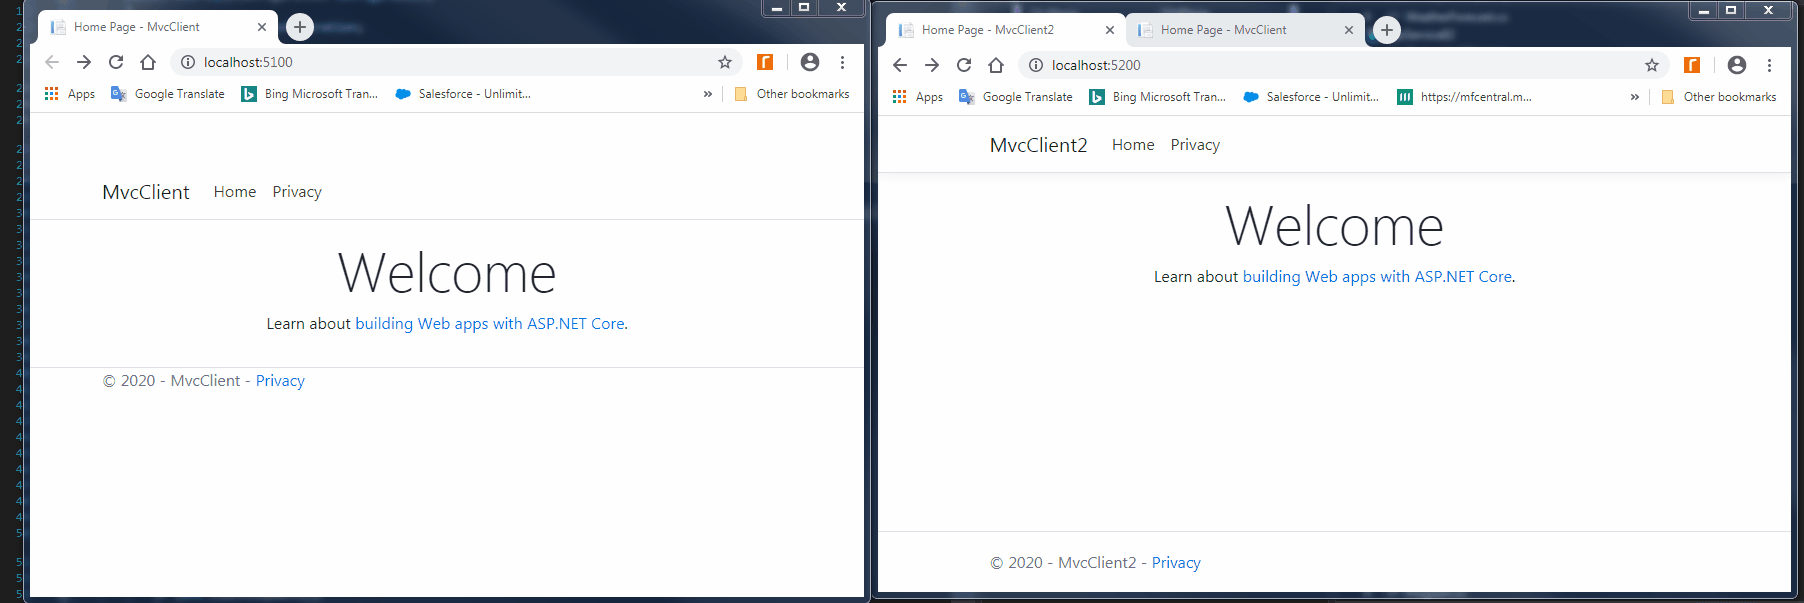
2.1 创建两个MVCClient
主要代码:
public void ConfigureServices(IServiceCollection services)
        {
            services.AddControllersWithViews();

            JwtSecurityTokenHandler.DefaultInboundClaimTypeMap.Clear(); // ensure not change any return Claims from Authorization Server
            services.AddAuthentication(options =>
            {
                options.DefaultScheme = "Cookies";
                options.DefaultChallengeScheme = "oidc"; // oidc => open ID connect
            })
            .AddCookie("Cookies")
            .AddOpenIdConnect("oidc", options =>
            {
                options.SignInScheme = "Cookies";
                options.Authority = $"http://localhost:5000";
                options.RequireHttpsMetadata = false; // please use https in production env
                options.ClientId = "cas.mvc.client.implicit";
                options.ClientSecret = "mvcsecret";
                options.ResponseType = "id_token token"; // allow to return access token
                options.SaveTokens = true;
                options.Scope.Add("clientservice");
            });
        }
其中options.ClientId 和 IdentityServer4 中配置的两个Client保持一致。
2.2 启动IdentityServer4和MVCClient
也就是流程图一的第二部分流程,
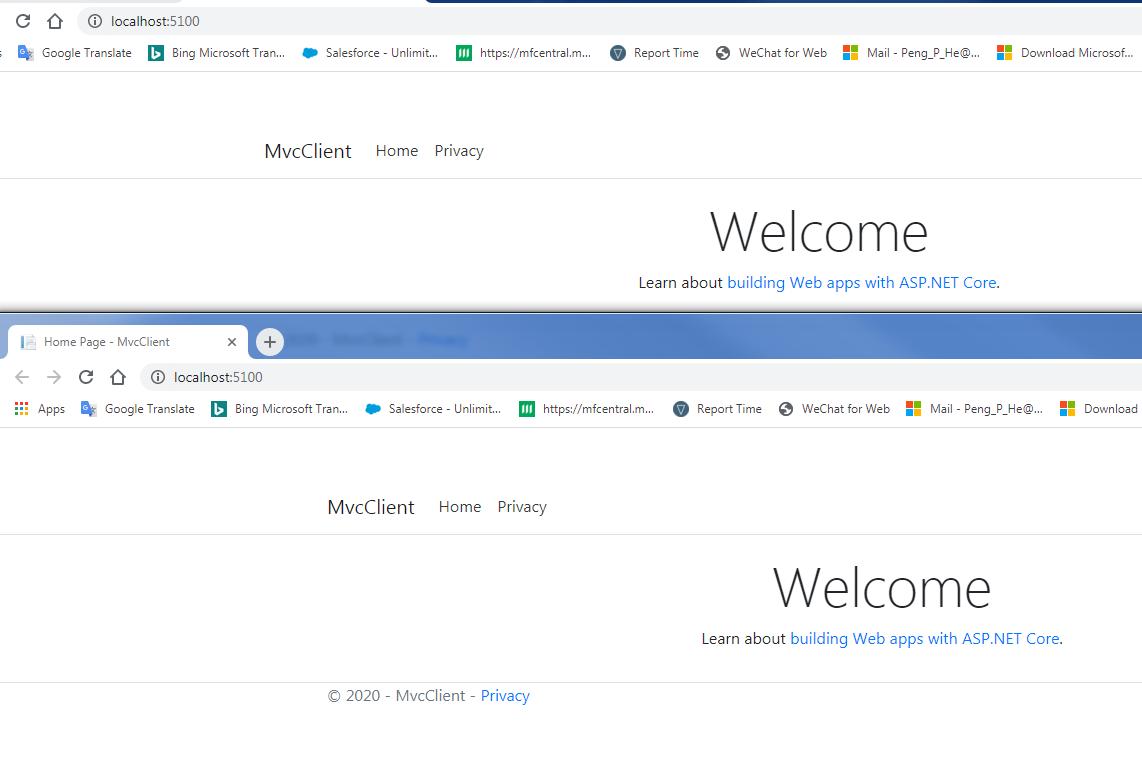
点击需要权限的Privacy页面时,会跳转到IdentityServer4去登录:
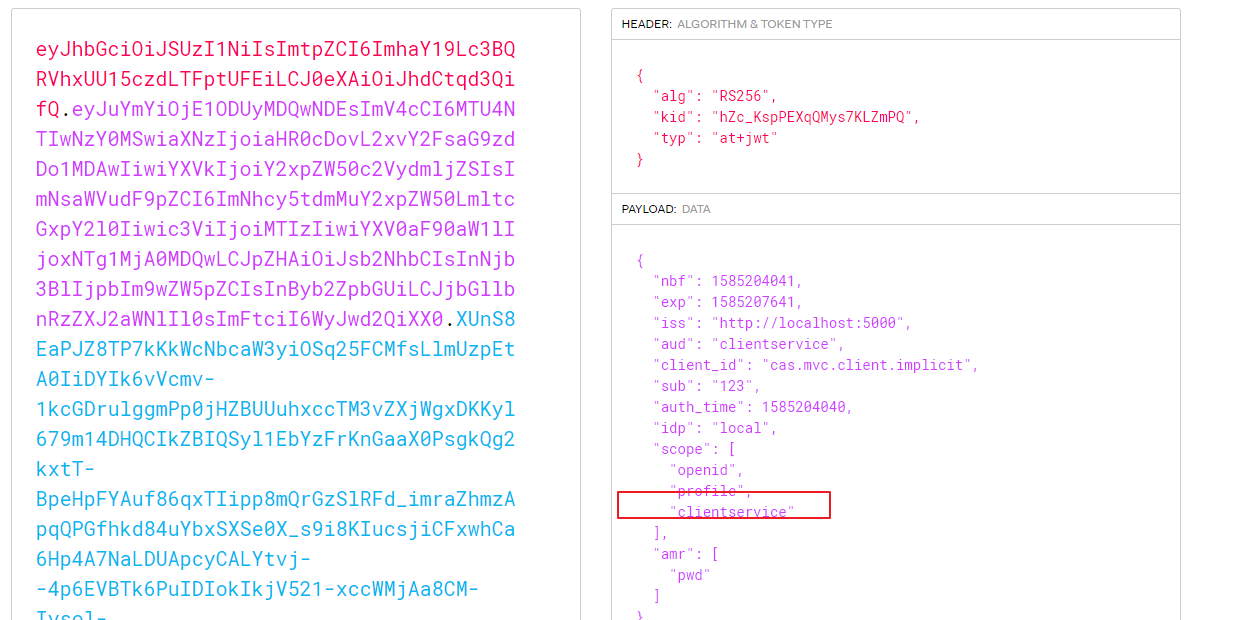
由于在MVCClient的配置中添加了options.Scope.Add("clientservice"),所以解析IdentityServer4返回的access_token,会包含该api,表示该acces_token可以用于访问该API
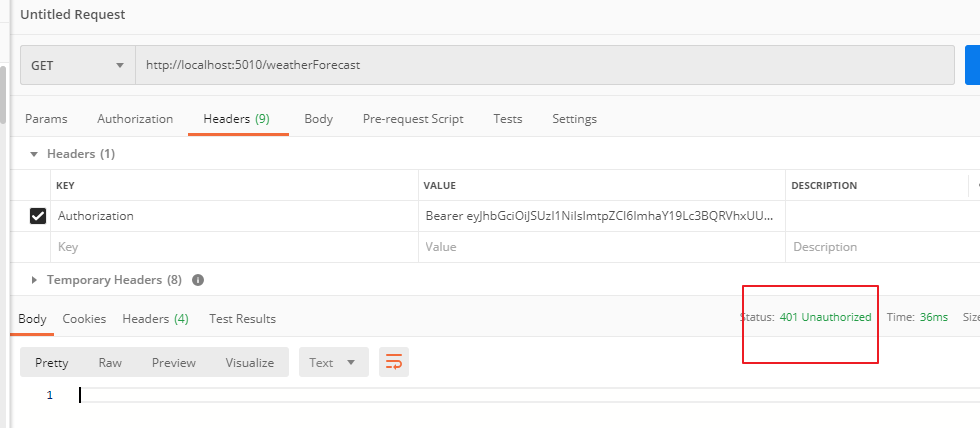
当访问productservice这个API则无权限:
至此流程图中第二部分也完成了,实现了SSO和MVC访问api的权限
流程图第二部分UML图:
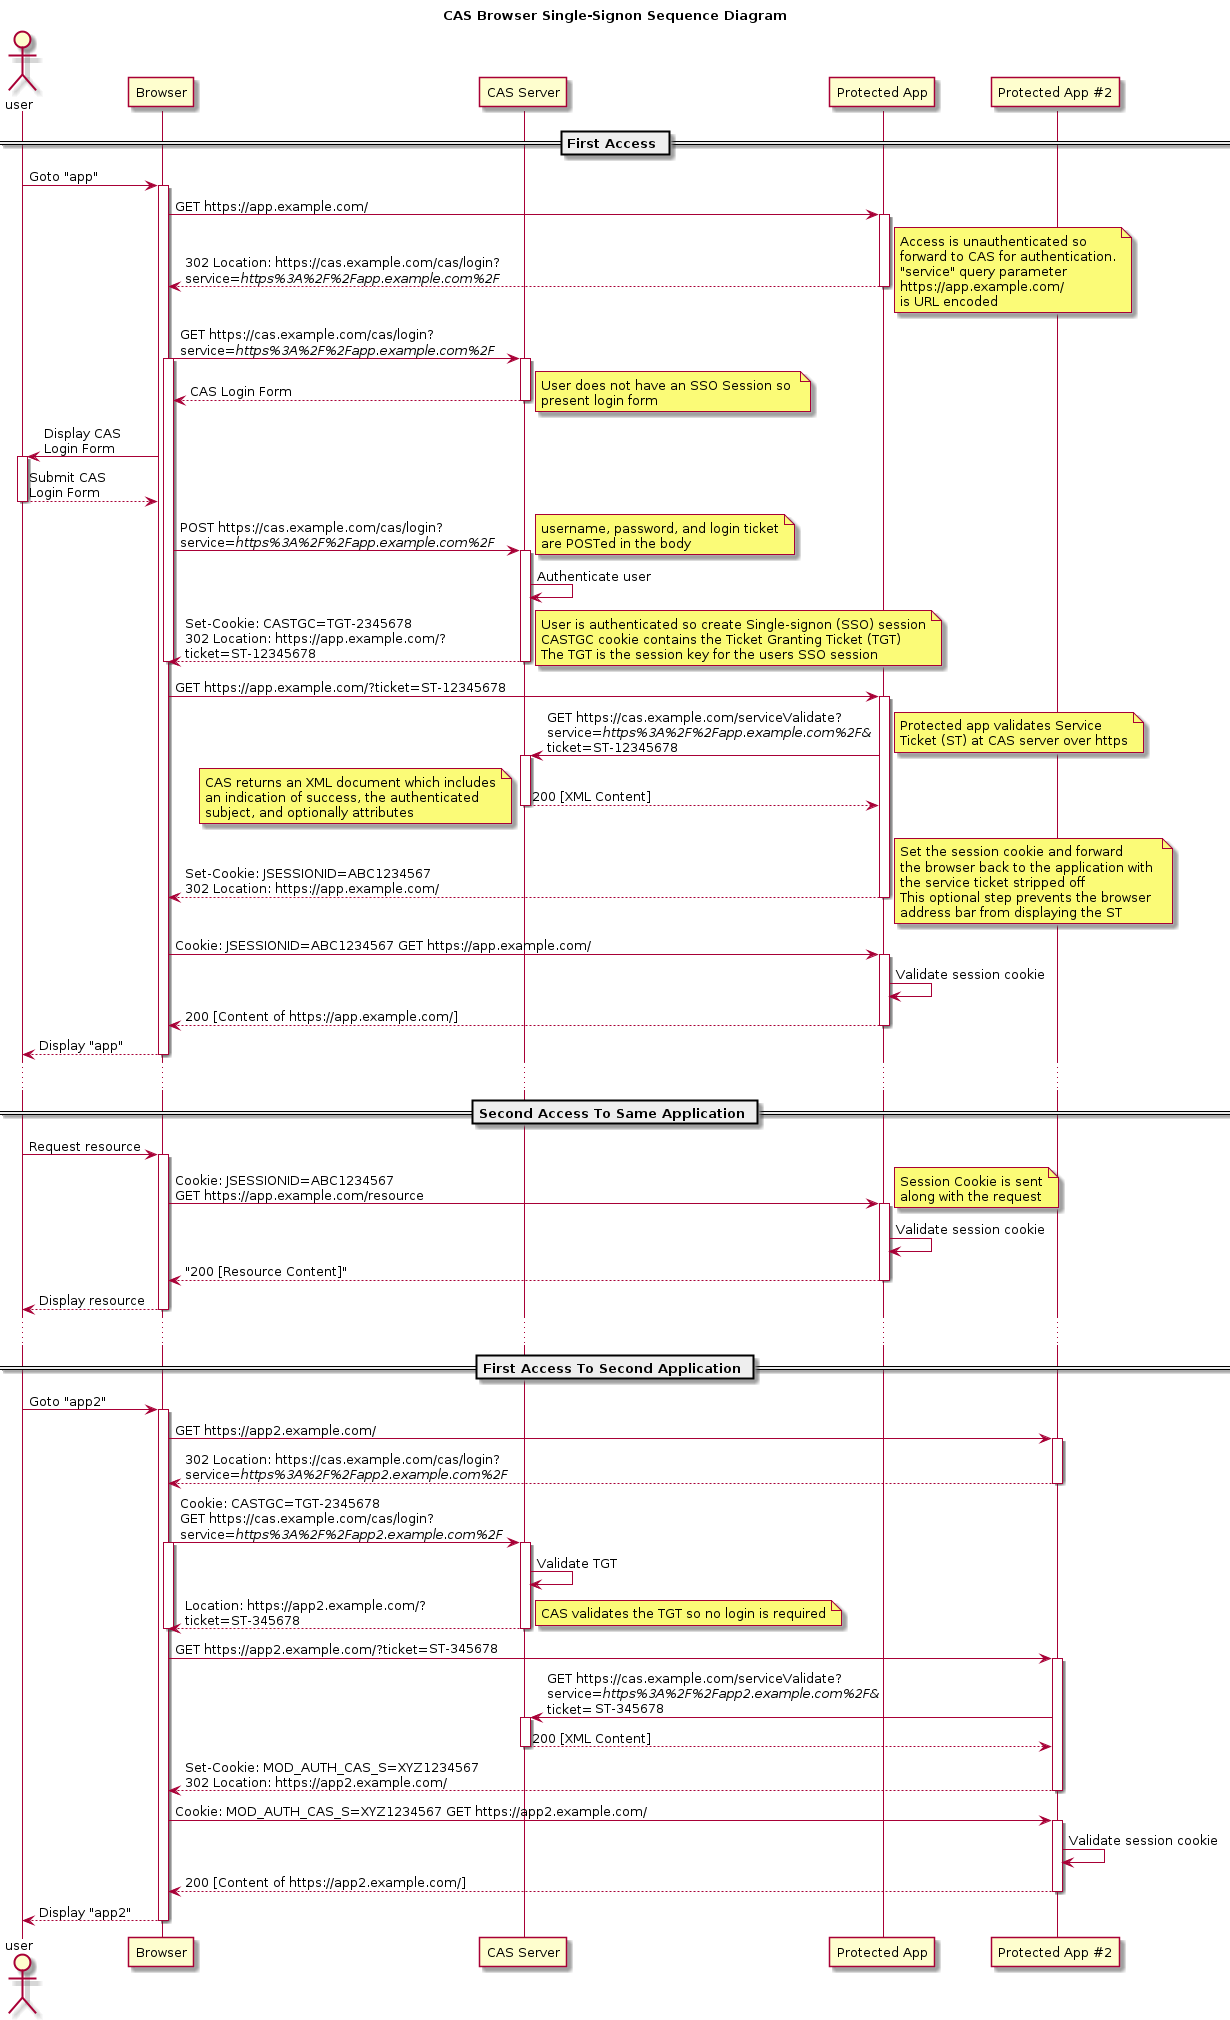
站点1:
1.用户首次访问web App1,App1发现用户未登录,携带目前访问地址302到CAS Server登录页。
2.CAS Server登录页检查登录Session不存在,返回一个登录页面。
3.填写账号,点击登录。
4.CAS Server验证账号信息成功,创建一个Ticket Granting Ticket(TGT),这个TGT就是当前登录用户的session key。同时,创建一个service ticket并携带service ticket key,st key 作为参数跳转回App1。
5.App1用get发送st key 去CAS Server验证,验证通过后返回登录用户信息。
6.App1使用返回的登录用户信息构建当前系统的登录状态,并用一个JSESSIONID标记(JSESSIONID是Apache的默认名),并携带这个JSESSIONID重新访问App1。
7.App1验证JSESSIONID,登录成功,展示登录成功页面。
8.第二次访问,验证JSESSIONID,直接访问。
站点2:
1.用户首次访问web App2,App2发现用户未登录,携带目前访问地址302到CAS Server登录页。
2.CAS Server登录页携带有App1生成的TGT,那么直接做TCT的验证,验证成功不需要登录,创建一个App2的st key,302回App2。
3.后续和以上的5,6,7,8 补逻辑相同,不赘述。
参考资料
edison zhou: https://www.cnblogs.com/edisonchou/p/identityserver4_foundation_and_quickstart_01.html
xiaoxiaolu: https://www.cnblogs.com/xiaxiaolu/p/11204548.html