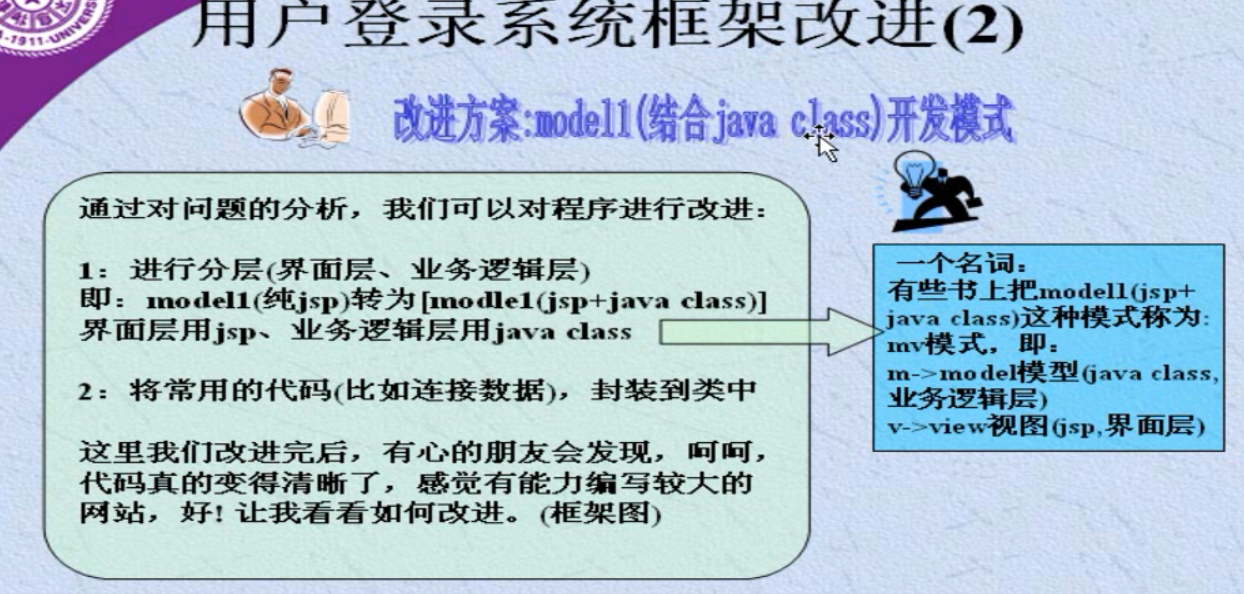
model1改进(jsp+jaav实现封装)
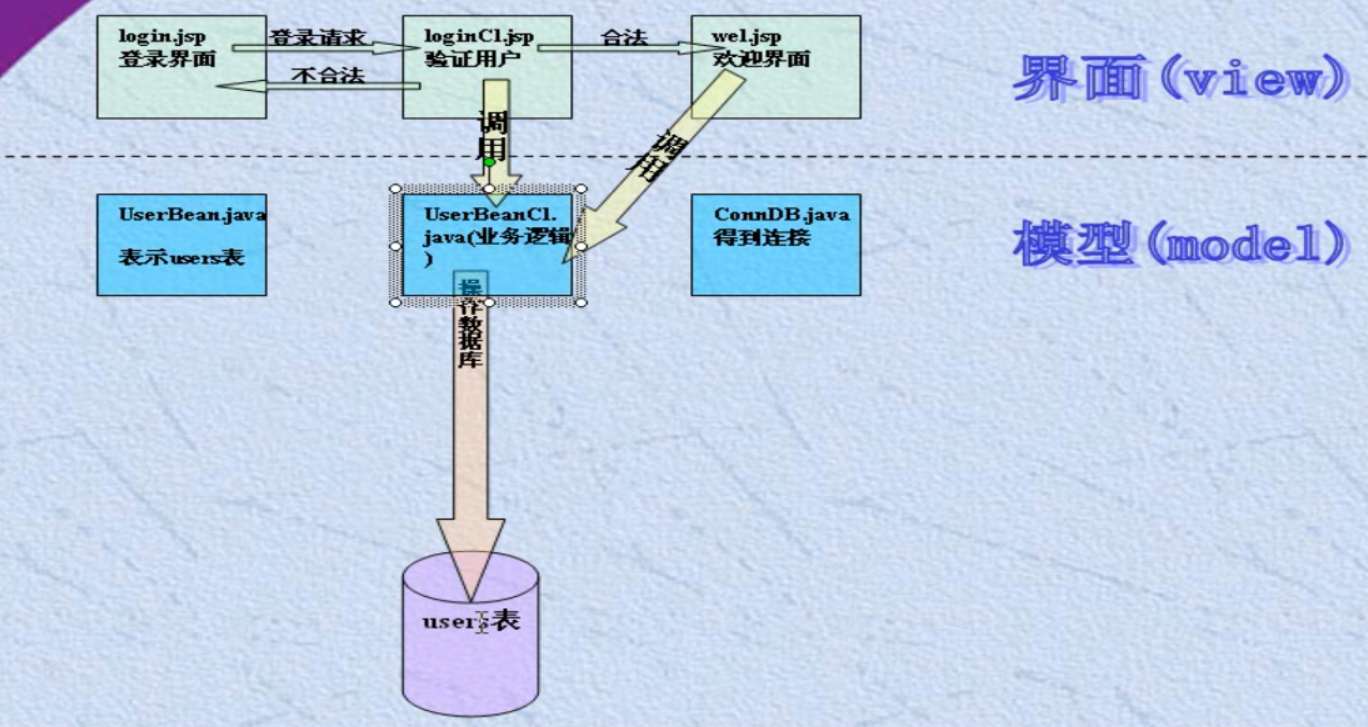
一张表对应两个类:javabean 与 beancl
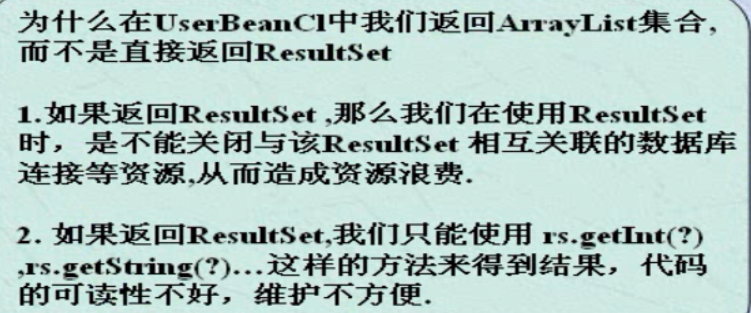
为什么不用Result来进行返回?
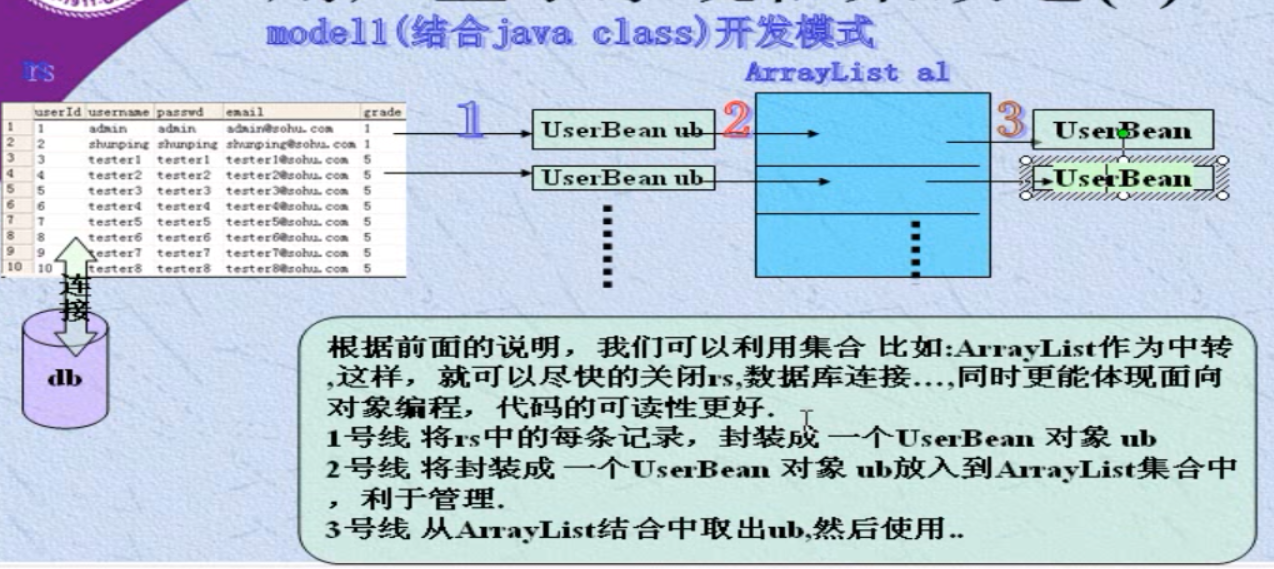
代码集合;
Login.jap


<%@ page language="java" contentType="text/html; charset=UTF-8"
    pageEncoding="UTF-8"%>
<!DOCTYPE html PUBLIC "-//W3C//DTD HTML 4.01 Transitional//EN" "http://www.w3.org/TR/html4/loose.dtd">
<html>
<head>
<meta http-equiv="Content-Type" content="text/html; charset=UTF-8">
<title>登录界面</title>
</head>
<body>
<form action="LoginCl.jsp" method="post">
<table >
                <tr><td>用户名</td><td><input type="text" name="username"/></td></tr>
                <tr><td>密    码</td><td><input type="text" name="password"/></td></tr>
                <tr><td><input type="submit" value="登录" /></td><td><input type="reset" value="清空"/></td></tr>
            </table>
</form>
</body>
</html>
LoginCl.jap
<%@ page language="java" contentType="text/html; charset=UTF-8"
    pageEncoding="UTF-8"
    import="java.sql.*,com.wz.model.*"
    %>

<!DOCTYPE html PUBLIC "-//W3C//DTD HTML 4.01 Transitional//EN" "http://www.w3.org/TR/html4/loose.dtd">
<html>
<head>
<meta http-equiv="Content-Type" content="text/html; charset=UTF-8">
<title>Insert title here</title>
</head>
<body>
<%
String name=request.getParameter("username");
String password=request.getParameter("password");
out.print(name+"  "+password);
//验证登录功能
//待会调用Userbean函数
UserbeanCL ubc=new UserbeanCL();
if(ubc.checkUser(name, password)){
      response.sendRedirect("http://localhost:8080/practice/Welcom.jsp?pageNow=1&&user="+name+"");
}else {
    response.sendRedirect("Login.jsp");
}
%>
</body>
</html>
Welcom.jsp
<%@page import="java.io.PrintWriter"%>
<%@ page language="java" contentType="text/html; charset=UTF-8"
    pageEncoding="UTF-8"
    import="java.sql.*,com.wz.model.*,java.util.*"
    %>
<!DOCTYPE html PUBLIC "-//W3C//DTD HTML 4.01 Transitional//EN" "http://www.w3.org/TR/html4/loose.dtd">
<html>
<head>
<meta http-equiv="Content-Type" content="text/html; charset=UTF-8">
<title>Insert title here</title>
</head>
<body>
欢迎来到新的页面! <a href="Login.jsp">返回主页面</a>
   <hr/>
<%
//定义分页可以用到的变量
int pageNow=1;
String page1=request.getParameter("pageNow");
if(page!=null){
    pageNow=Integer.parseInt(page1);
}
String name=request.getParameter("user");
out.print(name);
//调用Userbean的方法(创建实例),然后调用
UserbeanCL ubc=new UserbeanCL();
   int pageCount=ubc.pageCount();//!!!!!!!!!!!!!!顺序很重要先有pageCount才会先计算出来rowCount才可以sql查询
   out.print(pageCount);
ArrayList al=ubc.getUserBypage(pageNow);
out.print("size="+al.size());
   %>
   <table border="1px" >
  <tr><td>用户ID</td><td>用户名</td><td>邮箱</td><td>等级</td><td>密码</td></tr>
   <%
 for(int i=0;i<al.size();i++){
     Userbean ub=(Userbean) al.get(i);
      %>
      <tr><td><%=ub.getId()%></td><td><%=ub.getUsername()%></td><td><%=ub.getEmail()%></td><td><%=ub.getGrade()%></td><td><%=ub.getPassword()%></td></tr>
      <%
   }
   %>
   </table>
   <%
   if(pageNow!=1){
   out.print("<a href='Welcom.jsp?pageNow="+(pageNow-1)+"'>上一页</a>");}
   //显示超链接
   for(int i=1;i<=pageCount;i++){
       out.print("<a href='Welcom.jsp?pageNow="+i+"'>["+i+"]</a>");
   }
   if(pageNow!=pageCount){
   out.print("<a href='Welcom.jsp?pageNow="+(pageNow+1)+"'>下一页</a>");}
%>
<hr/>
</body>
</html>
UserBean.java
package com.wz.model;
//这是一个javabean对应一个User表,代表数据
public class Userbean {
private int id;
private String username;
private String email;
private int grade;
private String password;
/**
 * @return the id
 */
public int getId() {
    return id;
}
/**
 * @param id the id to set
 */
public void setId(int id) {
    this.id = id;
}
/**
 * @return the username
 */
public String getUsername() {
    return username;
}
/**
 * @param username the username to set
 */
public void setUsername(String username) {
    this.username = username;
}
/**
 * @return the email
 */
public String getEmail() {
    return email;
}
/**
 * @param email the email to set
 */
public void setEmail(String email) {
    this.email = email;
}
/**
 * @return the grade
 */
public int getGrade() {
    return grade;
}
/**
 * @param grade the grade to set
 */
public void setGrade(int grade) {
    this.grade = grade;
}
/**
 * @return the password
 */
public String getPassword() {
    return password;
}
/**
 * @param password the password to set
 */
public void setPassword(String password) {
    this.password = password;
}
}
UserbeanCLjava
package com.wz.model;
import java.sql.*;
import java.util.*;
//这是一个处理类,主要用于对User表的封装操作(增删改查)
//对应User表的一条记录
public class UserbeanCL {
//验证用户名是否存在
    boolean b=false;
     private Connection conn = null;
      private  PreparedStatement ps = null;
    private ResultSet rs = null;
    private int pageSize=3;
    private int rowCount=0;
    private int pageCount=0;
    public void close(){
        try {
            rs.close();
            ps.close();
            conn.close();
        } catch (SQLException e) {
            // TODO Auto-generated catch block
            e.printStackTrace();
        }
    }
    public  boolean checkUser(String u,String p){
        System.out.println("大家好");
        try{
//            Class.forName("com.mysql.jdbc.Driver");
//            conn = DriverManager.getConnection("jdbc:mysql://localhost:3306/user", "root", "123456");
            conn=new ConnDB().getConn();
            System.out.println(u);
            String sql = "select password from user where username=? ";
            ps = conn.prepareStatement(sql);
            ps.setString(1, u);
            System.out.println(sql);


            // 结果
            rs = ps.executeQuery();
            if (rs.next()) {
                if(rs.getString(1).equals(p))
                    {b=true;
                    }
            }
        }catch (Exception e) {
                e.printStackTrace();
            } finally {//关闭打开的资源
         this.close();
               }
        return b;
    }
    //返回页总数
    public int pageCount(){//没毛病
        try {
//得到连接
//计算Page
            conn=new ConnDB().getConn();
            String sql = "select count(*) from user";
            ps = conn.prepareStatement(sql);
            // 结果
            rs = ps.executeQuery();
            if (rs.next()) {//next不要忘了
                rowCount=rs.getInt(1);
            }
            //计算PageCount
            if(rowCount%pageSize==0){
                pageCount=rowCount/pageSize;
            }else {
                pageCount=rowCount/pageSize+1;
            }

        } catch (Exception e) {
            // TODO: handle exception
            e.printStackTrace();
        }finally{
            this.close();
        }
        return pageCount;
    }
//实现分页功能
    public ArrayList getUserBypage(int pageNow){
        String sql="";
        ArrayList al=new ArrayList();
        try{
            System.out.println("测试"+pageNow+pageCount+pageSize+rowCount);
            //查询出需要显示的页面
            conn=new ConnDB().getConn();

            if(rowCount>=pageNow*pageSize){
                sql="select *from user limit "+(pageNow-1)*this.pageSize+","+this.pageSize;
            }
            else{
                sql="select *from user limit "+(pageNow-1)*this.pageSize+","+(rowCount-(pageNow-1)*this.pageSize);
            }
                    ps = conn.prepareStatement(sql);
                    System.out.println(sql);
            // 结果
            rs = ps.executeQuery();
            while(rs.next()){
                Userbean ub=new Userbean();
                ub.setId(rs.getInt(1));
                ub.setUsername(rs.getString(2));
                ub.setEmail(rs.getString(3));
                ub.setGrade(rs.getInt(4));
                ub.setPassword(rs.getString(5));
                al.add(ub);
                }
    }catch(Exception e){
        e.printStackTrace();
    }finally{
        this.close();
    }
        return al;
}
    }
Conndb.java
package com.wz.model;
//得到数据库的连接
import java.sql.*;
public class ConnDB {
private Connection ct=null;
public Connection getConn(){
    try {
         Class.forName("com.mysql.jdbc.Driver");
            ct = DriverManager.getConnection("jdbc:mysql://localhost:3306/user", "root", "123456");
    } catch (Exception e) {
        // TODO: handle exception
        e.printStackTrace();
    }
    return ct;
}

}