往期回顾:
动态代理传送门(两篇比较好的文章,搬运过来):
上一篇文章梳理了Spring中用到的设计模式,其中就用代码演示了JDK和CGLIB两种动态代理的实现方式,本文会稍微跟一下这两种代理的源代码,为后面的AOP做准备。在介绍这两种代理之前先看一下下面这段代码:
 1 public class ShowReflect {
 2
 3     public static void main(String[] args) {
 4         Face faceInstance = getFaceInstance();
 5         faceInstance.setEye("hello");
 6         faceInstance.setSize(1);
 7         System.out.println(faceInstance);
 8     }
 9
10     public static Face getFaceInstance() {
11         Class<Face> faceClass = Face.class;
12         Constructor<?>[] constructors = faceClass.getConstructors();
13         Face face = null;
14         for (Constructor con : constructors) {
15             Parameter[] parameters = con.getParameters();
16             if (parameters == null || parameters.length == 0) {
17                 try {
18                     face = (Face) con.newInstance();
19                 } catch (InstantiationException e) {
20                     e.printStackTrace();
21                     System.out.println(e);
22                 } catch (IllegalAccessException e) {
23                     e.printStackTrace();
24                     System.out.println(e);
25                 } catch (InvocationTargetException e) {
26                     e.printStackTrace();
27                     System.out.println(e);
28                 }
29             }
30         }
31         return face;
32     }
33 }
猜猜最后会打印什么呢?没错,是Face{eye='hello',size='1'},其实getFaceIntance()方法的效果就等同于Face face = new Face();,下面来看下解析:
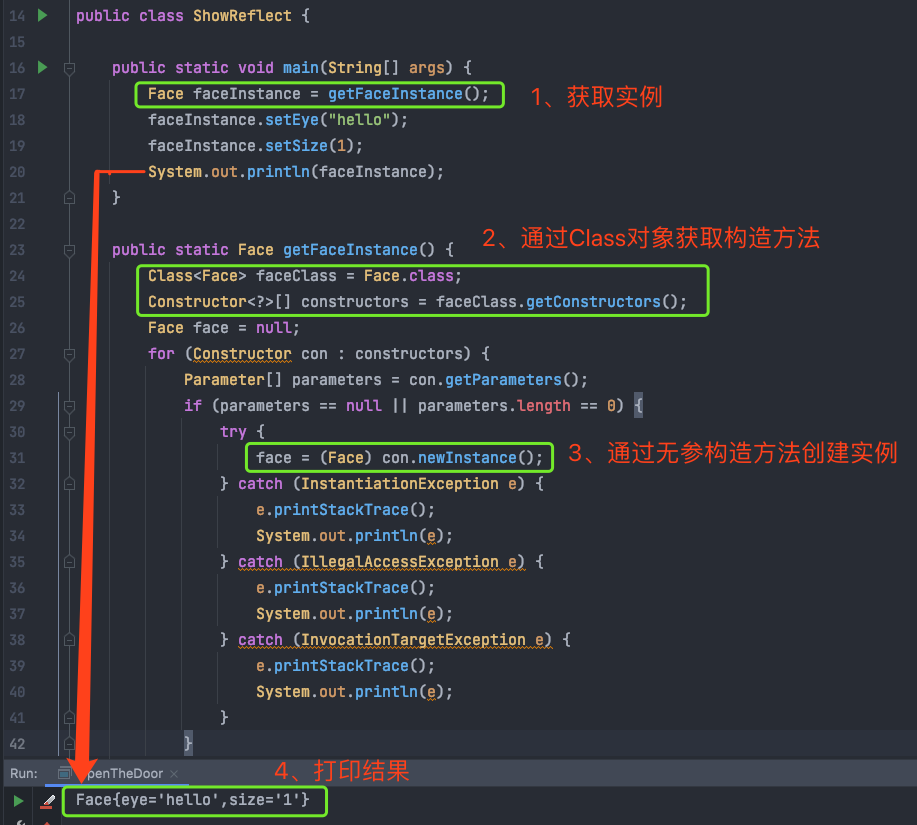
上面的例子其实就是通过反射的方式创建了一个Face类的实例,然后就可以对它进行各种操作了,为什么要先提反射呢?因为它是动态代理的底层实现原理,不管是JDK动态代理,还是CGLIB动态代理,在动态创建代理对象的过程中,都是通过反射机制实现。
上一篇文章已经通过两个demo实现了,下面来看看这两种实现方式的底层源码:
一、JDK动态代理
下面是创建代理对象的过程
1 Class[] interfaces = {UserService.class};
2 UserService userService = (UserService) Proxy.newProxyInstance(UserJdkProxy.class.getClassLoader(), interfaces, new UserJdkProxy(new UserServiceImpl()));
从上面第2行代码看出,jdk通过Proxy类的静态方法newProxyInstance创建了一个代理对象newProxyInstance一探究竟
 1 public static Object newProxyInstance(ClassLoader loader, Class<?>[] interfaces, InvocationHandler h) throws IllegalArgumentException {
 2         Objects.requireNonNull(h);
 3         //1.克隆一个目标接口的Class对象,该接口就是被代理对象的接口
 4         final Class<?>[] intfs = interfaces.clone();
 5         //2.检查并设置目标接口Class对象intfs的访问权限
 6         final SecurityManager sm = System.getSecurityManager();
 7         if (sm != null) {
 8             checkProxyAccess(Reflection.getCallerClass(), loader, intfs);
 9         }
10         /*
11          * Look up or generate the designated proxy class.
12          * 3.获取一个代理类Class对象,这个代理类就是要动态创建的目标,返回的是一个名称为com.sun.proxy.$Proxy0的Class对象
13          */
14         Class<?> cl = getProxyClass0(loader, intfs);
15
16         /*
17          * Invoke its constructor with the designated invocation handler.
18          * 4.用给定的invocation handler回调它的构造器
19          */
20         try {
21             //4.1 检查并设置代理类的Class对象cl的访问权限
22             if (sm != null) {
23                 checkNewProxyPermission(Reflection.getCallerClass(), cl);
24             }
25             //4.2 获取代理类的构造器
26             final Constructor<?> cons = cl.getConstructor(constructorParams);
27             final InvocationHandler ih = h;
28             if (!Modifier.isPublic(cl.getModifiers())) {
29                 AccessController.doPrivileged(new PrivilegedAction<Void>() {
30                     public Void run() {
31                         cons.setAccessible(true);
32                         return null;
33                     }
34                 });
35             }
36             //4.2 通过构造器创建一个实例
37             return cons.newInstance(new Object[]{h});
38         } catch (IllegalAccessException | InstantiationException e) {
39             throw new InternalError(e.toString(), e);
40         } catch (InvocationTargetException e) {
41             Throwable t = e.getCause();
42             if (t instanceof RuntimeException) {
43                 throw (RuntimeException) t;
44             } else {
45                 throw new InternalError(t.toString(), t);
46             }
47         } catch (NoSuchMethodException e) {
48             throw new InternalError(e.toString(), e);
49         }
50     }
这一切的一切就是创建一个代理对象的底层实现原理,其步骤总结下来就是:
1、克隆目标接口的Class对象intfs
2、以目标接口的Class对象intfs为参数获取代理类的Class对象cl(备注:这里要这样实现,我想是因为代理类中维护了被代理的目标对象,所以需要在其Class对象中定义这个字段,这个过程可以理解为动态地生成一个Class对象)
3、通过代理类的Class对象cl得到其构造器
4、通过构造器创建实例
上面的第三步和第四步有没有觉得眼熟呢?没错,它就是反射!
奔着既知其一又知其二的心态,接下来,我们逐步跟进,看一下上面的第14行,也就是第三步获取代理类的Class对象方法如下:
 1 /**
 2      * Generate a proxy class.  Must call the checkProxyAccess method
 3      * to perform permission checks before calling this.
 4      * 生成一个代理类。在调用该方法之前,必须调用checkProxyAccess方法执行权限检查
 5      */
 6     private static Class<?> getProxyClass0(ClassLoader loader, Class<?>... interfaces) {
 7         if (interfaces.length > 65535) {
 8             throw new IllegalArgumentException("interface limit exceeded");
 9         }
10         // If the proxy class defined by the given loader implementing the given interfaces exists, this will simply return the cached copy;
11         // otherwise, it will create the proxy class via the ProxyClassFactory
12         //如果一个代理类已经被实现了给定接口的给定类加载器所定义,那么久直接返回该缓存的副本,否则将会通过代理类工厂ProxyClassFactory创建一个代理对象
13         return proxyClassCache.get(loader, interfaces);
14     }
这个方法有趣的一点是,方法名上居然有个数字0,我们知道0在计算机中就是第一个的意思,再看源码注释第10行,说如果一个代理类已经存在,则返回其缓存,否则创建一个新的,我想这就能解释为什么方法名中要带0了吧,即永远取已经存在的,也就是第一个了。
下面继续跟踪第13行,因为调用链比较长,我摘出了下面这段精髓代码,来一睹代理类的Class对象创建诞生过程:
首先,会在Proxy的ProxyClassFactory方法中调用proxyClassCache.get方法
然后,在WeakCache类的get方法中调用subKeyFactory.apply(key, parameter),其中的subKeyFactory是一个类型为BiFunction的接口,该接口有一个实现类ProxyClassFactory,是Proxy的一个静态内部类
接着,在ProxyClassFactory中实现apply接口,其实get方法中最后调用的还是ProxyClassFactory.apply()方法
下面来看下这个神奇的匿名内部的源代码:
  1 /**
  2      * A factory function that generates, defines and returns the proxy class given
  3      * the ClassLoader and array of interfaces.
  4      * 这是Proxy的一个静态内部类,它是一个工厂,具备这些功能:生成、定义和返回给定类加载器和一组接口对应代理类
  5      */
  6     private static final class ProxyClassFactory
  7             implements BiFunction<ClassLoader, Class<?>[], Class<?>> {
  8         // prefix for all proxy class names
  9         //代理类的名称的前缀
 10         private static final String proxyClassNamePrefix = "$Proxy";
 11
 12         // next number to use for generation of unique proxy class names
 13         //生成下一个唯一代理类名称的数字
 14         private static final AtomicLong nextUniqueNumber = new AtomicLong();
 15
 16         @Override
 17         public Class<?> apply(ClassLoader loader, Class<?>[] interfaces) {
 18
 19             Map<Class<?>, Boolean> interfaceSet = new IdentityHashMap<>(interfaces.length);
 20             for (Class<?> intf : interfaces) {
 21                 /*
 22                  * Verify that the class loader resolves the name of this
 23                  * interface to the same Class object.
 24                  * 验证类加载器解析的与这个接口同名的Class对象:其实就是再校验被代理接口是否是该类加载器所加载的
 25                  */
 26                 Class<?> interfaceClass = null;
 27                 try {
 28                     interfaceClass = Class.forName(intf.getName(), false, loader);
 29                 } catch (ClassNotFoundException e) {
 30                 }
 31                 if (interfaceClass != intf) {
 32                     throw new IllegalArgumentException(
 33                             intf + " is not visible from class loader");
 34                 }
 35                 /*
 36                  * Verify that the Class object actually represents an
 37                  * interface.
 38                  * 验证Class对象的确是一个接口,这就是为什么jdk动态代理需要实现接口的原因!!!
 39                  */
 40                 if (!interfaceClass.isInterface()) {
 41                     throw new IllegalArgumentException(
 42                             interfaceClass.getName() + " is not an interface");
 43                 }
 44                 /*
 45                  * Verify that this interface is not a duplicate.
 46                  * //验证这个接口不是重复的
 47                  */
 48                 if (interfaceSet.put(interfaceClass, Boolean.TRUE) != null) {
 49                     throw new IllegalArgumentException(
 50                             "repeated interface: " + interfaceClass.getName());
 51                 }
 52             }
 53
 54             String proxyPkg = null;     // package to define proxy class in
 55             int accessFlags = Modifier.PUBLIC | Modifier.FINAL;
 56
 57             /*
 58              * Record the package of a non-public proxy interface so that the
 59              * proxy class will be defined in the same package.  Verify that
 60              * all non-public proxy interfaces are in the same package.
 61              * 定义一个包名,如果被代理类的接口是非公开的,则所有代理类都会生成到这个包下:反正这里就是生成一个存放含有非公开方法的代理类Class文件的包
 62              */
 63             for (Class<?> intf : interfaces) {
 64                 int flags = intf.getModifiers();
 65                 if (!Modifier.isPublic(flags)) {
 66                     accessFlags = Modifier.FINAL;
 67                     String name = intf.getName();
 68                     int n = name.lastIndexOf('.');
 69                     String pkg = ((n == -1) ? "" : name.substring(0, n + 1));
 70                     if (proxyPkg == null) {
 71                         proxyPkg = pkg;
 72                     } else if (!pkg.equals(proxyPkg)) {
 73                         throw new IllegalArgumentException(
 74                                 "non-public interfaces from different packages");
 75                     }
 76                 }
 77             }
 78
 79             if (proxyPkg == null) {
 80                 // if no non-public proxy interfaces, use com.sun.proxy package
 81                 //如果要代理的类中不包含非公开方法,则使用com.sun.proxy作为代理类的包名
 82                 proxyPkg = ReflectUtil.PROXY_PACKAGE + ".";
 83             }
 84
 85             /*
 86              * Choose a name for the proxy class to generate.
 87              * 为代理类Class生成一个名称:包名+$Proxy+数字(自动增长)
 88              */
 89             long num = nextUniqueNumber.getAndIncrement();
 90             String proxyName = proxyPkg + proxyClassNamePrefix + num;
 91
 92             /*
 93              * Generate the specified proxy class.
 94              * 生成指定的代理类:一个自己数组
 95              */
 96             byte[] proxyClassFile = ProxyGenerator.generateProxyClass(
 97                     proxyName, interfaces, accessFlags);
 98             try {
 99                 //通过生成的字节数组定义一个Class对象:最后会在com.sun.proxy包下生成一个名为$Proxy+num的Class文件,如:com.sun.proxy.$Proxy0.class
100                 return defineClass0(loader, proxyName,
101                         proxyClassFile, 0, proxyClassFile.length);
102             } catch (ClassFormatError e) {
103                 /*
104                  * A ClassFormatError here means that (barring bugs in the
105                  * proxy class generation code) there was some other
106                  * invalid aspect of the arguments supplied to the proxy
107                  * class creation (such as virtual machine limitations
108                  * exceeded).
109                  */
110                 throw new IllegalArgumentException(e.toString());
111             }
112         }
113     }
看了源代码,才知道通常所说的$Proxy0是这样来的,这个类其实就是一个工厂,它会定义并生成一个代理类的Class对象,生成过程会根据被代理接口中的方法是否是public,来确定包名,还会通过$Proxy+数字的形式给代理类命名。下面根据第96行,来看看这个代理类是怎么生成的?
 1 /**
 2      * Generate a proxy class given a name and a list of proxy interfaces.
 3      * 根据给定的名称和一组代理接口生成一个代理类
 4      *
 5      * @param name        the class name of the proxy class  代理类的名称
 6      * @param interfaces  proxy interfaces 代理接口
 7      * @param accessFlags access flags of the proxy class 代理类的访问标识
 8      */
 9     public static byte[] generateProxyClass(final String name, Class<?>[] interfaces, int accessFlags) {
10         //1、创建一个代理生成器对象实例gen
11         ProxyGenerator gen = new ProxyGenerator(name, interfaces, accessFlags);
12         /*2、调用实例gen的generateClassFile方法生成Class字节码数组,该方法内完成了如下事件:
13            第一步:添加hashCode、equals、toString等方法
14            第二步:添加代理接口中的方法,按照接口的顺序,先添加的接口优先
15            第三步:验证代理方法的返回类型
16            第四步:为该类中所有属性和方法转配FiledInfo和MethodInfo的结构体
17            第五步:开始写入DataOutputStream,即构建一个class对象
18            第六步:返回字节数组
19           */
20         final byte[] classFile = gen.generateClassFile();
21         //3、如果需要保存该文件,则在指定路径下生成.class的文件
22         if (saveGeneratedFiles) {
23             java.security.AccessController.doPrivileged(
24                     new java.security.PrivilegedAction<Void>() {
25                         public Void run() {
26                             try {
27                                 int i = name.lastIndexOf('.');
28                                 Path path;
29                                 if (i > 0) {
30                                     Path dir = Paths.get(name.substring(0, i).replace('.', File.separatorChar));
31                                     Files.createDirectories(dir);
32                                     path = dir.resolve(name.substring(i + 1, name.length()) + ".class");
33                                 } else {
34                                     path = Paths.get(name + ".class");
35                                 }
36                                 Files.write(path, classFile);
37                                 return null;
38                             } catch (IOException e) {
39                                 throw new InternalError(
40                                         "I/O exception saving generated file: " + e);
41                             }
42                         }
43                     });
44         }
45         //4、返回字节数组
46         return classFile;
47     }
上面代码中我都添加了注释,其实核心的代码还不在这里,而是第20行,返回一个final修饰的字节数组,它里面的主要步骤我已经添加到注释中,为了一探究竟,我还是决定把它的代码附上,保证看到它的你会直呼牛逼!!!
  1 /**
  2      * Generate a class file for the proxy class.  This method drives the
  3      * class file generation process.
  4      * 为代理对象生成一个class文件,这个方法会驱动class文件生成程序
  5      */
  6     private byte[] generateClassFile() {
  7
  8         /* ============================================================
  9          * Step 1: Assemble ProxyMethod objects for all methods to
 10          * generate proxy dispatching code for.
 11          */
 12
 13         /*
 14          * Record that proxy methods are needed for the hashCode, equals,
 15          * and toString methods of java.lang.Object.  This is done before
 16          * the methods from the proxy interfaces so that the methods from
 17          * java.lang.Object take precedence over duplicate methods in the
 18          * proxy interfaces.
 19          */
 20         //第一步:添加hashCode、equals、toString等方法
 21         //第二步:添加代理接口中的方法,按照接口的顺序,先添加的接口优先
 22         //第三步:验证代理方法的返回类型
 23         //第四步:为该类中所有属性和方法转配FiledInfo和MethodInfo的结构体
 24         //第五步:开始写入DataOutputStream,即构建一个class对象
 25         //第六步:返回字节数组
 26         addProxyMethod(hashCodeMethod, Object.class);
 27         addProxyMethod(equalsMethod, Object.class);
 28         addProxyMethod(toStringMethod, Object.class);
 29
 30         /*
 31          * Now record all of the methods from the proxy interfaces, giving
 32          * earlier interfaces precedence over later ones with duplicate
 33          * methods.
 34          */
 35         //第二步:添加代理接口中的方法,按照接口的顺序,先添加的接口优先
 36         // 这里其实就是将所有被代理接口中的方法都封装成一个ProxyMethod对象,该对象中定义了方法名、参数类型、返回类型、异常类型、方法来源、方法中的局部变量名等
 37         for (Class<?> intf : interfaces) {
 38             for (Method m : intf.getMethods()) {
 39                 addProxyMethod(m, intf);
 40             }
 41         }
 42
 43         /*
 44          * For each set of proxy methods with the same signature,
 45          * verify that the methods' return types are compatible.
 46          */
 47         //第三步:验证每一个方法中的返回类型
 48         for (List<ProxyMethod> sigmethods : proxyMethods.values()) {
 49             checkReturnTypes(sigmethods);
 50         }
 51
 52         /* ============================================================
 53          * Step 2: Assemble FieldInfo and MethodInfo structs for all of
 54          * fields and methods in the class we are generating.
 55          */
 56         //第四步:为该类中所有属性和方法转配FiledInfo和MethodInfo的结构体
 57         //这里会解析每一个代理方法生成的ProxyMethods对象,最后生成两个集合分别存放方法和参数
 58         try {
 59             methods.add(generateConstructor());
 60
 61             for (List<ProxyMethod> sigmethods : proxyMethods.values()) {
 62                 for (ProxyMethod pm : sigmethods) {
 63
 64                     // add static field for method's Method object
 65                     fields.add(new FieldInfo(pm.methodFieldName,
 66                             "Ljava/lang/reflect/Method;",
 67                             ACC_PRIVATE | ACC_STATIC));
 68
 69                     // generate code for proxy method and add it
 70                     methods.add(pm.generateMethod());
 71                 }
 72             }
 73
 74             methods.add(generateStaticInitializer());
 75
 76         } catch (IOException e) {
 77             throw new InternalError("unexpected I/O Exception", e);
 78         }
 79
 80         if (methods.size() > 65535) {
 81             throw new IllegalArgumentException("method limit exceeded");
 82         }
 83         if (fields.size() > 65535) {
 84             throw new IllegalArgumentException("field limit exceeded");
 85         }
 86
 87         /* ============================================================
 88          * Step 3: Write the final class file.
 89          */
 90
 91         /*
 92          * Make sure that constant pool indexes are reserved for the
 93          * following items before starting to write the final class file.
 94          */
 95         //第五步:确保在开始往final类型的Class文件中写之前,className、父类className和接口等有足够的常量池
 96         cp.getClass(dotToSlash(className));
 97         cp.getClass(superclassName);
 98         for (Class<?> intf : interfaces) {
 99             cp.getClass(dotToSlash(intf.getName()));
100         }
101
102         /*
103          * Disallow new constant pool additions beyond this point, since
104          * we are about to write the final constant pool table.
105          */
106         cp.setReadOnly();
107
108         //第五步:开始写入DataOutputStream,即构建一个class对象
109         ByteArrayOutputStream bout = new ByteArrayOutputStream();
110         DataOutputStream dout = new DataOutputStream(bout);
111
112         try {
113             /*
114              * Write all the items of the "ClassFile" structure.
115              * See JVMS section 4.1.
116              * 核心:0xCAFEBABE是不是很熟?没错,这就是动态生成一个class对象
117              */
118             // u4 magic;
119             dout.writeInt(0xCAFEBABE);
120             // u2 minor_version;
121             dout.writeShort(CLASSFILE_MINOR_VERSION);
122             // u2 major_version;
123             dout.writeShort(CLASSFILE_MAJOR_VERSION);
124
125             cp.write(dout);             // (write constant pool)
126
127             // u2 access_flags;
128             dout.writeShort(accessFlags);
129             // u2 this_class;
130             dout.writeShort(cp.getClass(dotToSlash(className)));
131             // u2 super_class;
132             dout.writeShort(cp.getClass(superclassName));
133
134             // u2 interfaces_count;
135             dout.writeShort(interfaces.length);
136             // u2 interfaces[interfaces_count];
137             for (Class<?> intf : interfaces) {
138                 dout.writeShort(cp.getClass(
139                         dotToSlash(intf.getName())));
140             }
141
142             // u2 fields_count;
143             dout.writeShort(fields.size());
144             // field_info fields[fields_count];
145             for (FieldInfo f : fields) {
146                 f.write(dout);
147             }
148
149             // u2 methods_count;
150             dout.writeShort(methods.size());
151             // method_info methods[methods_count];
152             for (MethodInfo m : methods) {
153                 m.write(dout);
154             }
155
156             // u2 attributes_count;
157             dout.writeShort(0); // (no ClassFile attributes for proxy classes)
158
159         } catch (IOException e) {
160             throw new InternalError("unexpected I/O Exception", e);
161         }
162         //第六步:返回字节数组
163         return bout.toByteArray();
164     }
上面的第26、27、28、39行的addProxyMethod方方法就是将一个方法封装成一个ProxyMethod的对象,这就体现了Java中一切皆对象的宗旨,这些还不够,再看第65~74行,由将ProxyMethod中的方法定义和方法参数定义封装成MthodInfo和FidleInfo对象,看到这里才能领悟到什么叫“一切皆对象”了。再来看119~157行代码,看到这里是不是满脸震惊,没错我也是!这是啥?这是在动态地生成字节码呀!看到魔数0xCAFEBABE就真相大白了,jdk动态代理的灵魂就是动态地生成一个class文件,该文件中包含了对被代理对象中方法的调用,这才是java的精髓所在啊!!!
至此,jdk动态代理的源码就跟完了,下面总结一下吧:
1、jdk动态代理是基于接口的代理,被代理的必须是个接口或实现了某个接口,因为底层会判断目标对象是否是接口类型
2、通过克隆的方式得到目标接口的class对象
3、通过动态生成字节码文件的方式生成代理对象的Class对象
4、通过反射获取代理对象的构造器,并通过构造器生成代理对象的实例
二、CGLIB动态代理
CGLIB是为一个类进行代理的,那么先看下它是如何生成一个代理类的,下面代码是创建一个代理类:
1  public T getProxy(Class<T> targetClass) {
2         Enhancer enhancer = new Enhancer();
3         return (T) enhancer.create(targetClass, this);
4     }
下面照例一步一步跟进,先跟new Enhancer()方法:
 1 /**
 2      * Create a new <code>Enhancer</code>. A new <code>Enhancer</code>
 3      * object should be used for each generated object, and should not
 4      * be shared across threads. To create additional instances of a
 5      * generated class, use the <code>Factory</code> interface.
 6      * 该方法用来创建一个Enhancer。必须保证每次生成对象时都会创建一个新的Enhancer,而且它不能被多个线程共享
 7      * 如果要创建一个额外的生成实例,需要使用Factory接口
 8      * @see Factory
 9      */
10     public Enhancer() {
11         super(SOURCE);
12     }
这个构造函数中调用了父类AbstractClassGenerator的构造函数,创建了一个Source对象,AbstractClassGenerator顾名思义就是抽象类生成器。下面再看下一步,enhancer.create(targetClass, this);
 1 /**
 2      * Generate a new class if necessary and uses the specified
 3      * callbacks (if any) to create a new object instance.
 4      * Uses the no-arg constructor of the superclass.
 5      * 如果必要的话生成一个新的class,并使用指定的回调函数(如果存在)创建一个新的实例,使用父类的无参构造函数
 6      * @return a new instance
 7      */
 8     public Object create() {
 9         classOnly = false;
10         argumentTypes = null;
11         return createHelper();
12     }
主要来看第11行中的createHelper方法:
 1 private Object createHelper() {
 2         //预检查:如果没有指定过滤器,且回调对象有多个,就抛异常
 3         preValidate();
 4         //生成一个key对象
 5         Object key = KEY_FACTORY.newInstance((superclass != null) ? superclass.getName() : null,
 6                 ReflectUtils.getNames(interfaces),
 7                 filter == ALL_ZERO ? null : new WeakCacheKey<CallbackFilter>(filter),
 8                 callbackTypes,
 9                 useFactory,
10                 interceptDuringConstruction,
11                 serialVersionUID);
12         this.currentKey = key;
13         //调用父类的创建create方法,根据key创建代理类
14         Object result = super.create(key);
15         return result;
16     }
通过debug发现,上面的测试代码会生成下面这样一串key:

里面最主要的就是被代理的类和当前代理类的类型,即MethodInterceptor接口
继续追踪super.create(key);这行代码的具体实现:
 1 //定义一个volatile修饰的缓存变量CACHE
 2     private static volatile Map<ClassLoader, ClassLoaderData> CACHE = new WeakHashMap<ClassLoader, ClassLoaderData>();
 3
 4     protected Object create(Object key) {
 5         try {
 6             //获取类加载器
 7             ClassLoader loader = getClassLoader();
 8             Map<ClassLoader, ClassLoaderData> cache = CACHE;
 9             //从缓存中获取类加载器的数据
10             ClassLoaderData data = cache.get(loader);
11             //如果类加载器不存在,则新创建
12             if (data == null) {
13                 //看到没?基于双重检查机制的单例模式啊!!!!
14                 synchronized (AbstractClassGenerator.class) {
15                     //注意注意:严谨的是这个地方又重新进行了一次set和get操作,保证CACHE没有被别的线程修改,这大概才是最好的Double Check吧!!!
16                     cache = CACHE;
17                     data = cache.get(loader);
18                     //进行第二次检查
19                     if (data == null) {
20                         //当第二次检查还不存在的时候才创建新的类加载器
21                         Map<ClassLoader, ClassLoaderData> newCache = new WeakHashMap<ClassLoader, ClassLoaderData>(cache);
22                         //该方法中使类加载器指向一个弱引用WeakReference
23                         data = new ClassLoaderData(loader);
24                         newCache.put(loader, data);
25                         CACHE = newCache;
26                     }
27                 }
28             }
29             this.key = key;
30             //判断是否开启缓存配置,即cglib.useCache=true
31             //如果开启缓存,就从缓存中获取,如果没有开启,就直接生成并返回
32             Object obj = data.get(this, getUseCache());
33             //如果返回的是一个Class,则调用firstInstance
34             if (obj instanceof Class) {
35                 //创建第一个实例:如果返回的是一个Class
36                 return firstInstance((Class) obj);
37             }
38             //否则调用nextInstance
39             return nextInstance(obj);
40         } catch (RuntimeException | Error ex) {
41             throw ex;
42         } catch (Exception ex) {
43             throw new CodeGenerationException(ex);
44         }
45     }
这里12~28行获取类加载器数据的地方使用了一个经典的基于双重检查的单例模式!平复一下心情,继续看两个return后面的方法,第一个是第一次执行,第二个是非第一次执行:
 1 protected Object firstInstance(Class type) throws Exception {
 2         //如果只是创建一个类,则直接返回
 3         if (classOnly) {
 4             return type;
 5         }
 6         else {
 7             //否则通过反射创建
 8             return createUsingReflection(type);
 9         }
10     }
11
12     //在实例已经存在的情况下创建
13     protected Object nextInstance(Object instance) {
14         EnhancerFactoryData data = (EnhancerFactoryData) instance;
15
16         //同样,如果只是返回Class对象,则调用实例的generatedClass返回
17         if (classOnly) {
18             return data.generatedClass;
19         }
20         //否则创建新的实例
21         Class[] argumentTypes = this.argumentTypes;
22         Object[] arguments = this.arguments;
23         if (argumentTypes == null) {
24             argumentTypes = Constants.EMPTY_CLASS_ARRAY;
25             arguments = null;
26         }
27         return data.newInstance(argumentTypes, arguments, callbacks);
28     }
其实debug会发现,每次都会执行到nextInstance方法中,因为我们是要获取一个代理对象的实例,firstInstance中是通过反射实现,那么再看nextInstance方法中是怎么实现的呢?
 1 public Object newInstance(Class[] argumentTypes, Object[] arguments, Callback[] callbacks) {
 2             setThreadCallbacks(callbacks);
 3             try {
 4                 // Explicit reference equality is added here just in case Arrays.equals does not have one
 5                 if (primaryConstructorArgTypes == argumentTypes ||
 6                         Arrays.equals(primaryConstructorArgTypes, argumentTypes)) {
 7                     // If we have relevant Constructor instance at hand, just call it
 8                     // This skips "get constructors" machinery
 9                     return ReflectUtils.newInstance(primaryConstructor, arguments);
10                 }
11                 // Take a slow path if observing unexpected argument types
12                 return ReflectUtils.newInstance(generatedClass, argumentTypes, arguments);
13             }
14             finally {
15                 // clear thread callbacks to allow them to be gc'd
16                 setThreadCallbacks(null);
17             }
18
19         }
看到没,底层还是通过反射获取到构造函数,再通过构造函数的newInstance来创建对象的。
至此,两种动态代理的源码分析就差不多了,从JDK源码到Spring源码,总会看到很多有意思的写法和最佳实践,这大概就是看源码不觉得枯燥的地方了吧,哈哈~~下面还是来总结一下本章的内容:
1、JDK动态代理是基于接口的代理,是java语言的特性,代理类需要实现InvocationHandler接口,被代理的是一个接口
2、CGLIB动态代理是基于类的代理,是Spring与第三方整合实现,代理类需要实现MethodInterceptor接口,被代理的是一个类
3、代理对象的生成,底层都使用了反射方式,先获取构造函数,在通过构造函数创建实例
以上就是本章全部内容~~