狂神说SpringBoot系列连载课程,通俗易懂,基于SpringBoot2.2.5版本,欢迎各位狂粉转发关注学习。
微信公众号:狂神说(首发) Bilibili:狂神说Java(视频)
未经作者授权,禁止转载
Thymeleaf
模板引擎
前端交给我们的页面,是html页面。如果是我们以前开发,我们需要把他们转成jsp页面,jsp好处就是当我们查出一些数据转发到JSP页面以后,我们可以用jsp轻松实现数据的显示,及交互等。
jsp支持非常强大的功能,包括能写Java代码,但是呢,我们现在的这种情况,SpringBoot这个项目首先是以jar的方式,不是war,像第二,我们用的还是嵌入式的Tomcat,所以呢,他现在默认是不支持jsp的。
那不支持jsp,如果我们直接用纯静态页面的方式,那给我们开发会带来非常大的麻烦,那怎么办呢?
SpringBoot推荐你可以来使用模板引擎:
模板引擎,我们其实大家听到很多,其实jsp就是一个模板引擎,还有用的比较多的freemarker,包括SpringBoot给我们推荐的Thymeleaf,模板引擎有非常多,但再多的模板引擎,他们的思想都是一样的,什么样一个思想呢我们来看一下这张图:
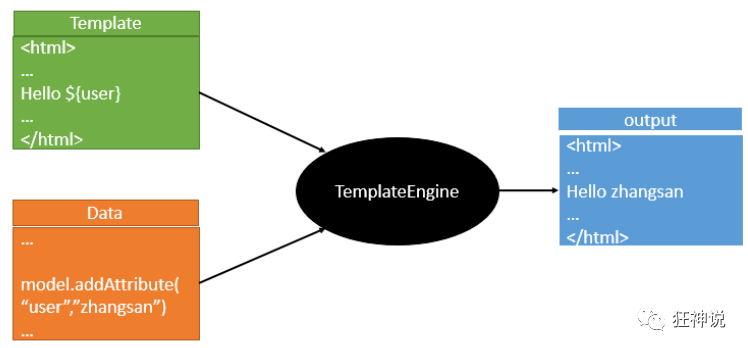
模板引擎的作用就是我们来写一个页面模板,比如有些值呢,是动态的,我们写一些表达式。而这些值,从哪来呢,就是我们在后台封装一些数据。然后把这个模板和这个数据交给我们模板引擎,模板引擎按照我们这个数据帮你把这表达式解析、填充到我们指定的位置,然后把这个数据最终生成一个我们想要的内容给我们写出去,这就是我们这个模板引擎,不管是jsp还是其他模板引擎,都是这个思想。只不过呢,就是说不同模板引擎之间,他们可能这个语法有点不一样。其他的我就不介绍了,我主要来介绍一下SpringBoot给我们推荐的Thymeleaf模板引擎,这模板引擎呢,是一个高级语言的模板引擎,他的这个语法更简单。而且呢,功能更强大。
我们呢,就来看一下这个模板引擎,那既然要看这个模板引擎。首先,我们来看SpringBoot里边怎么用。
引入Thymeleaf
怎么引入呢,对于springboot来说,什么事情不都是一个start的事情嘛,我们去在项目中引入一下。给大家三个网址:
Thymeleaf 官网:https://www.thymeleaf.org/
Thymeleaf 在Github 的主页:https://github.com/thymeleaf/thymeleaf
Spring官方文档:找到我们对应的版本
https://docs.spring.io/spring-boot/docs/2.2.5.RELEASE/reference/htmlsingle/#using-boot-starter
找到对应的pom依赖:可以适当点进源码看下本来的包!
<!--thymeleaf-->
<dependency>
    <groupId>org.springframework.boot</groupId>
    <artifactId>spring-boot-starter-thymeleaf</artifactId>
</dependency>
Maven会自动下载jar包,我们可以去看下下载的东西;

Thymeleaf分析
前面呢,我们已经引入了Thymeleaf,那这个要怎么使用呢?
我们首先得按照SpringBoot的自动配置原理看一下我们这个Thymeleaf的自动配置规则,在按照那个规则,我们进行使用。
我们去找一下Thymeleaf的自动配置类:ThymeleafProperties
@ConfigurationProperties(
    prefix = "spring.thymeleaf"
)
public class ThymeleafProperties {
    private static final Charset DEFAULT_ENCODING;
    public static final String DEFAULT_PREFIX = "classpath:/templates/";
    public static final String DEFAULT_SUFFIX = ".html";
    private boolean checkTemplate = true;
    private boolean checkTemplateLocation = true;
    private String prefix = "classpath:/templates/";
    private String suffix = ".html";
    private String mode = "HTML";
    private Charset encoding;
}
我们可以在其中看到默认的前缀和后缀!
我们只需要把我们的html页面放在类路径下的templates下,thymeleaf就可以帮我们自动渲染了。
使用thymeleaf什么都不需要配置,只需要将他放在指定的文件夹下即可!
测试
1、编写一个TestController
@Controller
public class TestController {

    @RequestMapping("/t1")
    public String test1(){
        //classpath:/templates/test.html
        return "test";
    }

}
2、编写一个测试页面 test.html 放在 templates 目录下
<!DOCTYPE html>
<html lang="en">
<head>
    <meta charset="UTF-8">
    <title>Title</title>
</head>
<body>
<h1>测试页面</h1>

</body>
</html>
3、启动项目请求测试
Thymeleaf 语法学习
要学习语法,还是参考官网文档最为准确,我们找到对应的版本看一下;
Thymeleaf 官网:https://www.thymeleaf.org/ , 简单看一下官网!我们去下载Thymeleaf的官方文档!
我们做个最简单的练习 :我们需要查出一些数据,在页面中展示
1、修改测试请求,增加数据传输;
@RequestMapping("/t1")
public String test1(Model model){
    //存入数据
    model.addAttribute("msg","Hello,Thymeleaf");
    //classpath:/templates/test.html
    return "test";
}
2、我们要使用thymeleaf,需要在html文件中导入命名空间的约束,方便提示。
我们可以去官方文档的#3中看一下命名空间拿来过来:
xmlns:th="http://www.thymeleaf.org"
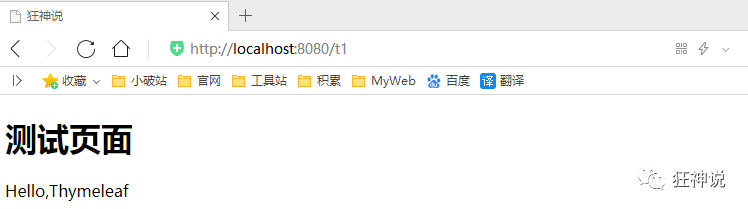
3、我们去编写下前端页面
<!DOCTYPE html>
<html lang="en" xmlns:th="http://www.thymeleaf.org">
<head>
    <meta charset="UTF-8">
    <title>狂神说</title>
</head>
<body>
<h1>测试页面</h1>

<!--th:text就是将div中的内容设置为它指定的值,和之前学习的Vue一样-->
<div th:text="${msg}"></div>
</body>
</html>
4、启动测试!
OK,入门搞定,我们来认真研习一下Thymeleaf的使用语法!
1、我们可以使用任意的 th:attr 来替换Html中原生属性的值!

2、我们能写哪些表达式呢?
Simple expressions:(表达式语法)
Variable Expressions: ${...}:获取变量值;OGNL;
    1)、获取对象的属性、调用方法
    2)、使用内置的基本对象:#18
         #ctx : the context object.
         #vars: the context variables.
         #locale : the context locale.
         #request : (only in Web Contexts) the HttpServletRequest object.
         #response : (only in Web Contexts) the HttpServletResponse object.
         #session : (only in Web Contexts) the HttpSession object.
         #servletContext : (only in Web Contexts) the ServletContext object.

    3)、内置的一些工具对象:
      #execInfo : information about the template being processed.
      #uris : methods for escaping parts of URLs/URIs
      #conversions : methods for executing the configured conversion service (if any).
      #dates : methods for java.util.Date objects: formatting, component extraction, etc.
      #calendars : analogous to #dates , but for java.util.Calendar objects.
      #numbers : methods for formatting numeric objects.
      #strings : methods for String objects: contains, startsWith, prepending/appending, etc.
      #objects : methods for objects in general.
      #bools : methods for boolean evaluation.
      #arrays : methods for arrays.
      #lists : methods for lists.
      #sets : methods for sets.
      #maps : methods for maps.
      #aggregates : methods for creating aggregates on arrays or collections.
==================================================================================

  Selection Variable Expressions: *{...}:选择表达式:和${}在功能上是一样;
  Message Expressions: #{...}:获取国际化内容
  Link URL Expressions: @{...}:定义URL;
  Fragment Expressions: ~{...}:片段引用表达式

Literals(字面量)
      Text literals: 'one text' , 'Another one!' ,…
      Number literals: 0 , 34 , 3.0 , 12.3 ,…
      Boolean literals: true , false
      Null literal: null
      Literal tokens: one , sometext , main ,…

Text operations:(文本操作)
    String concatenation: +
    Literal substitutions: |The name is ${name}|

Arithmetic operations:(数学运算)
    Binary operators: + , - , * , / , %
    Minus sign (unary operator): -

Boolean operations:(布尔运算)
    Binary operators: and , or
    Boolean negation (unary operator): ! , not

Comparisons and equality:(比较运算)
    Comparators: > , < , >= , <= ( gt , lt , ge , le )
    Equality operators: == , != ( eq , ne )

Conditional operators:条件运算(三元运算符)
    If-then: (if) ? (then)
    If-then-else: (if) ? (then) : (else)
    Default: (value) ?: (defaultvalue)

Special tokens:
    No-Operation: _
练习测试
1、 我们编写一个Controller,放一些数据
@RequestMapping("/t2")
public String test2(Map<String,Object> map){
    //存入数据
    map.put("msg","<h1>Hello</h1>");
    map.put("users", Arrays.asList("qinjiang","kuangshen"));
    //classpath:/templates/test.html
    return "test";
}
2、测试页面取出数据
<!DOCTYPE html>
<html lang="en" xmlns:th="http://www.thymeleaf.org">
<head>
    <meta charset="UTF-8">
    <title>狂神说</title>
</head>
<body>
<h1>测试页面</h1>

<div th:text="${msg}"></div>
<!--不转义-->
<div th:utext="${msg}"></div>

<!--遍历数据-->
<!--th:each每次遍历都会生成当前这个标签:官网#9-->
<h4 th:each="user :${users}" th:text="${user}"></h4>

<h4>
    <!--行内写法:官网#12-->
    <span th:each="user:${users}">[[${user}]]</span>
</h4>

</body>
</html>
3、启动项目测试!
我们看完语法,很多样式,我们即使现在学习了,也会忘记,所以我们在学习过程中,需要使用什么,根据官方文档来查询,才是最重要的,要熟练使用官方文档!
一定要关注分享支持一下哦~
