接上一篇文章,在了解Apache基本配置以及SELinux相关知识后,继续演示Apache提供的虚拟主机功能以及访问控制方式。
如果还没看上一篇的建议先查看后再来,上篇文章“linux入门系列18--web服务之apache服务1”。
三、Apache虚拟主机功能
如果早期你部署过网站,相信一定知道虚拟机主机、VPS等概念,尤其是2000年前后建站非常流行,甚至诞生了很多成功的草根站长,其中有一部分网站到现在仍然做的非常成功。
网站流量的增加是一个长期累积的过程,如果每台服务器上只能运行一个网站,那些人气低、流量小的草根站长就要被迫承担着高昂的服务器租赁费用,这显然也会造成硬件资源的浪费。
为此在虚拟专用服务器(VPS:Virtual Private Server)和云计算技术诞生以前,IDC服务供应商为了更充分利用服务器资源和减低草根站长的购买门槛,都启用了虚拟主机功能。利用虚拟主机功能,可以把一台处于运行状态的物理服务器分割成多个“虚拟的服务器”。
虚拟主机功能也有明显的缺点,它无法像目前的云主机技术那样实现硬件资源的隔离,这些虚拟主机共同使用物理服务器的硬件资源,IDC供应商只能限制硬盘的使用空间大小,因此同一台物理主机上的不同用户的虚拟主机可能会相互影响。但是出于成本考虑,目前还是有部分个人站长采用虚拟主机的方式来部署网站。
其示意图如下:
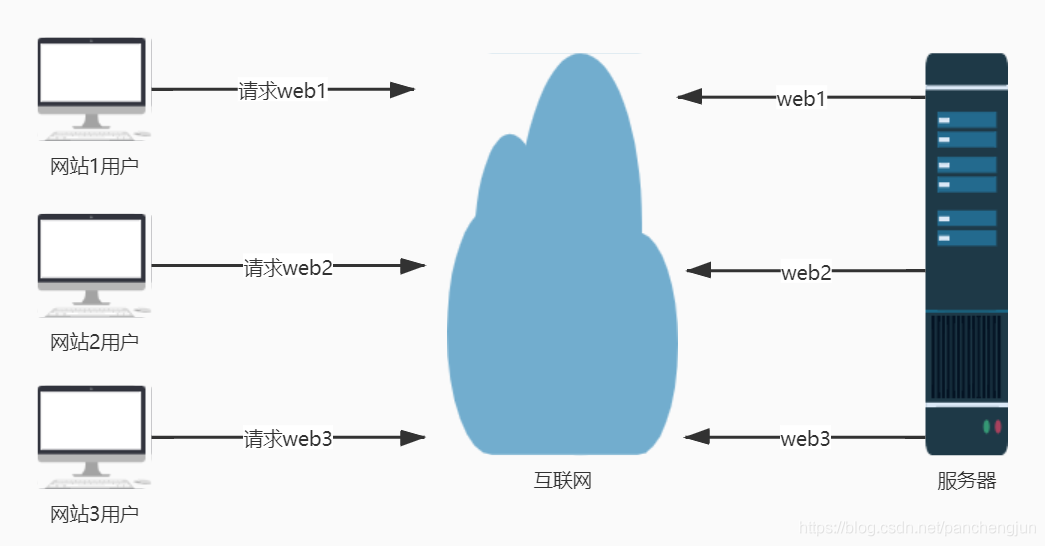
Apache的虚拟主机功能是服务器基于用户请求的不同IP地址、主机域名或端口号,实现提供多个网站同时为外部提供访问服务的技术。
3.1 基于IP
如果一台服务器有多个IP地址,每个IP与服务器上部署的每个网站一一对应, 这样当用户请求访问不同的IP地址时,会访问到不同网站的页面资源。
这种方式每个网站都有一个独立的IP地址,利于搜索引擎SEO优化,因此这种方式提供虚拟网站主机功能最常见且受草根站长的欢迎。
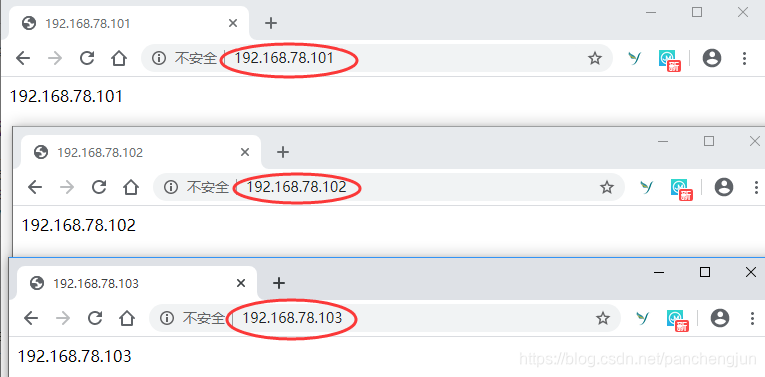
本示例IP的网站对应关系为:192.168.78.101、102、103分别对应网站1、2、3,过程如下:
3.1.1 配置多个IP
利用前面讲解的网络配置方法配置多IP,忘记的请返回查看“linux入门系列11--Centos7网络服务管理”。
[root@apache ~]# nmtui
中间操作过程省略,为主机配置三个IP地址,保存并退出
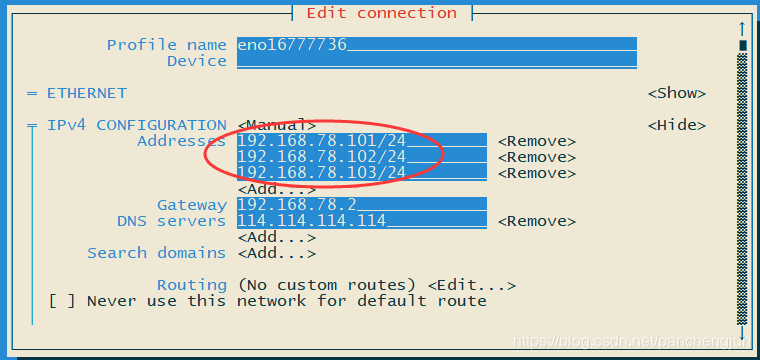
重启网络使其生效
[root@apache ~]# systemctl restart network
[root@apache ~]# ip addr
...省略部分内容
2: eno16777736: <BROADCAST,MULTICAST,UP,LOWER_UP> mtu 1500 qdisc pfifo_fast state UP qlen 1000
    link/ether 00:0c:29:2e:3a:65 brd ff:ff:ff:ff:ff:ff
    inet 192.168.78.101/24 brd 192.168.78.255 scope global eno16777736
       valid_lft forever preferred_lft forever
    inet 192.168.78.102/24 brd 192.168.78.255 scope global secondary eno16777736
       valid_lft forever preferred_lft forever
    inet 192.168.78.103/24 brd 192.168.78.255 scope global secondary eno16777736
       valid_lft forever preferred_lft forever
    inet6 fe80::20c:29ff:fe2e:3a65/64 scope link
       valid_lft forever preferred_lft forever
[root@apache ~]#
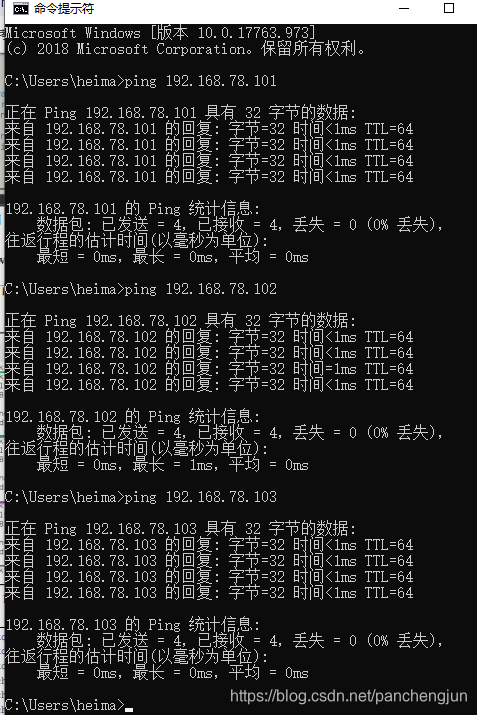
确保通过ip addr命令可以看到刚才配置的IP,并能在虚拟机或宿主机上能ping通刚才配置的每个IP。
3.1.2 准备多个网站
在系统根目录下的website目录下创建3个目录,并分别创建不同的页面文件。
[root@apache website]# mkdir -p /website/1
[root@apache website]# mkdir -p /website/2
[root@apache website]# mkdir -p /website/3
[root@apache website]# echo "192.168.78.101">/website/1/index.html
[root@apache website]# echo "192.168.78.102">/website/2/index.html
[root@apache website]# echo "192.168.78.103">/website/3/index.html
3.1.3 配置Apache
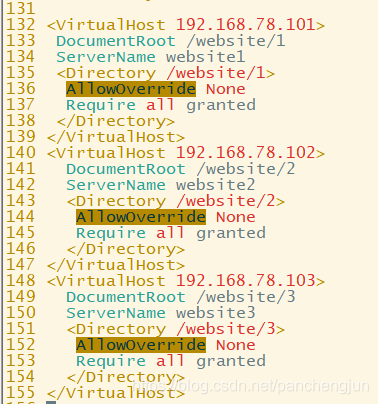
配置主配置文件/etc/httpd/conf/httpd.conf
[root@apache website]# vim /etc/httpd/conf/httpd.conf
...省略部分内容
<VirtualHost 192.168.78.101>
 DocumentRoot /website/1
 ServerName website1
 <Directory /website/1>
  AllowOverride None
  Require all granted
 </Directory>
</VirtualHost>
<VirtualHost 192.168.78.102>
  DocumentRoot /website/2
  ServerName website2
  <Directory /website/2>
   AllowOverride None
   Require all granted
  </Directory>
</VirtualHost>
<VirtualHost 192.168.78.103>
  DocumentRoot /website/3
  ServerName website3
  <Directory /website/3>
   AllowOverride None
   Require all granted
  </Directory>
</VirtualHost>
...省略部分内容
添加如下配置,并保存退出
重启httpd使其生效。
[root@apache website]# systemctl restart httpd
3.2.4 测试访问
由于是继续上前文的环境下实验,前文已经设置好了防火墙和SELinux,所以直接就可以访问了,如果你遇到不能访问的情况,请参考前文检查相关设置。
注意:
(1)前边已经把/website目录添加了SELinux的上下文,因此无需把刚刚创建的子目录/website/1等进行设置。
(2)前文实验中直接通过ip可以访问/website/index.html文件,本文实验并没有删除原来的配置,只是新加了虚拟主机相关配置,可以看到,再次访问192.168.78.101这个ip是指向新的虚拟主机网站,而非原来的网站。也就是会虚拟主机配置会覆盖原来设置,优先级更高。
3.2 基于域名
当服务器无法为每个网站都分配一个独立 IP 地址的时候,可以尝试让 Apache 自动识别 用户请求的域名,从而根据不同的域名请求来传输不同的内容。
基于域名的配置与基于IP的配置,方法基本一致,只是多了一个域名和IP的映射。
3.2.0 环境准备
还是继续使用上一步的环境,把之前设置的多余的IP删除,只保留一个IP:192.168.78.101;同时将上一步3.1.3中配置的多个IP与网站的映射删除。
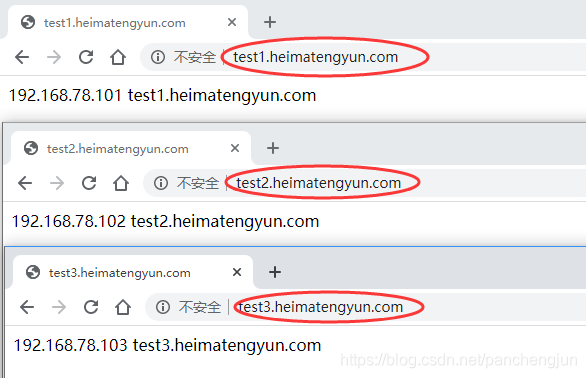
假设三个域名分别对应三个网站,域名分别为:test1、test2、test3.heimatengyun.com,分别对应之前的1、2、3三个网站。
3.2.1 配置域名与IP映射
可以通过DNS解析服务进行配置,本处直接修改/etc/hosts文件,在该文件中指定IP与域名之间的映射关系。/etc/hosts是Linux系统中用于强制把某个主机域名解析到指定IP地址的配置文件。
[root@apache website]# vim /etc/hosts
192.168.78.101 test1.heimatengyun.com test2.heimatengyun.com test3.heimatengyun.com
在文件末尾添加以上内容保存并退出。
在虚拟机中确保可以ping同以上各个域名。
[root@apache website]# ping -c 1 test1.heimatengyun.com
PING test1.heimatengyun.com (192.168.78.101) 56(84) bytes of data.
64 bytes from test1.heimatengyun.com (192.168.78.101): icmp_seq=1 ttl=64 time=0.033 ms
--- test1.heimatengyun.com ping statistics ---
1 packets transmitted, 1 received, 0% packet loss, time 0ms
rtt min/avg/max/mdev = 0.033/0.033/0.033/0.000 ms
[root@apache website]#
这样等后续操作完成后就可以在虚拟机内部通过域名进行访问。
但是如果想让宿主机也能进行访问的话,需要在宿主机中也要添加IP与域名的映射。由于我的宿主机为win10,因此将以上IP与域名的映射内容添加到C:WindowsSystem32driversetchosts文件即可。然后在宿主机就可以ping同前面的三个域名。
3.2.2 准备多个网站
由于是直接采用原来的三个网站,先修改下每个网页里边的内容,我们采用重定向往原来页面中追加对应的域名信息,方便后续验证效果。
[root@apache website]# echo "test1.heimatengyun.com">>/website/1/index.html
[root@apache website]# echo "test2.heimatengyun.com">>/website/2/index.html
[root@apache website]# echo "test3.heimatengyun.com">>/website/3/index.html
3.2.3 配置Apache
修改Apache主配置文件,/etc/httpd/conf/httpd.conf
[root@apache website]# vim /etc/httpd/conf/httpd.conf
...省略部分内容
<VirtualHost 192.168.78.101>
 DocumentRoot /website/1
 ServerName test1.heimatengyun.com
 <Directory /website/1>
  AllowOverride None
  Require all granted
 </Directory>
</VirtualHost>
<VirtualHost 192.168.78.101>
  DocumentRoot /website/2
  ServerName test2.heimatengyun.com
  <Directory /website/2>
   AllowOverride None
   Require all granted
  </Directory>
</VirtualHost>
<VirtualHost 192.168.78.101>
  DocumentRoot /website/3
  ServerName test3.heimatengyun.com
  <Directory /website/3>
   AllowOverride None
   Require all granted
  </Directory>
</VirtualHost>
...省略部分内容
在配置文件中添加上述内容并保存退出。
注意:此处可以对比之前的IP配置,配置参数都是基本一样的,唯一的不同是之前每个网站对应不同IP,现在是都写同一个IP。可以自行对比
修改完成后重启Apache,使其生效。
[root@apache website]# systemctl restart httpd
注意:修改Apache配置后,需要重启服务才会生效。
3.2.4 测试访问
在宿主机浏览器输入对应的域名即可访问对应的网站。
3.3 基于端口号
基于端口号的虚拟主机功能可以让用户通过指定的端口号来访问服务器上的网站资源。
相较于前二种方式,这种方式的配置要稍微复制一些,因为不仅要考虑httpd服务程序的配置,还要考虑SELinux服务对新开的端口的监控和限制。
通常情况下使用80、443、8080等端口提供网站访问服务,如果是其他端口就需要注意SELinux的现在。
3.3.0 环境准备
我们继续在上边的环境下实验,删除上一步3.2.3在配置文件中的配置。假设8111、8222、8333分别对应前面创建的1、2、3三个网站。
3.3.1 网站内准备
我们继续使用之前的三个网站,对网站内容进行修改
[root@apache website]# echo "8111">>/website/1/index.html
[root@apache website]# echo "8222">>/website/2/index.html
[root@apache website]# echo "8333">>/website/3/index.html
3.3.2 Apache配置
对/etc/httpd/conf/httpd.conf进行配置,使其支持多端口监听
(1)在大概43行左右,添加端口监听
[root@apache website]# vim /etc/httpd/conf/httpd.conf
...省略部分内容
Listen 8111
Listen 8222
Listen 8333
...省略部分内容
继续下边的修改
(2)在大概120行左右,追加基于端口号的虚拟主机参数配置
<VirtualHost 192.168.78.101:8111>
 DocumentRoot /website/1
 ServerName test1.heimatengyun.com
 <Directory /website/1>
  AllowOverride None
  Require all granted
 </Directory>
</VirtualHost>
<VirtualHost 192.168.78.101:8222>
  DocumentRoot /website/2
  ServerName test2.heimatengyun.com
  <Directory /website/2>
   AllowOverride None
   Require all granted
  </Directory>
</VirtualHost>
<VirtualHost 192.168.78.101:8333>
  DocumentRoot /website/3
  ServerName test3.heimatengyun.com
  <Directory /website/3>
   AllowOverride None
   Require all granted
  </Directory>
</VirtualHost>
...省略部分内容
保存退出
与3.2.3相对,没有太大变化,只是在IP后添加端口即可,几种配置方法都大同小异。
重启apache使其生效
[root@apache website]# systemctl restart httpd
Job for httpd.service failed. See 'systemctl status httpd.service' and 'journalctl -xn' for details.
[root@apache website]# journalctl -xn
...省略部分内容
*****  Plugin bind_ports (92.2 confidence) suggests
 If you want to allow /usr/sbin/httpd to bind to network port 8111
 Then you need to modify the port type.
 Do
 # semanage port -a -t PORT_TYPE -p tcp 8111
 ...省略部分内容
但是你会发现,重启失败。如果你查看日志,会发现这样的提示内容,别担心,这正是刚开始提到的SELinux在搞鬼。
3.3.3 设置SELinux域
查看目前默认的SELinux允许的与HTTP协议相关的端口
[root@apache website]# semanage port -l | grep http
http_cache_port_t              tcp      8080, 8118, 8123, 10001-10010
http_cache_port_t              udp      3130
http_port_t                    tcp      80, 81, 443, 488, 8008, 8009, 8443, 9000
pegasus_http_port_t            tcp      5988
pegasus_https_port_t           tcp      5989
[root@apache website]#
于是我们要把刚才新加的三个端口添加进入
[root@apache website]# semanage port -a -t http_port_t -p tcp 8111
[root@apache website]# semanage port -a -t http_port_t -p tcp 8222
[root@apache website]# semanage port -a -t http_port_t -p tcp 8333
添加完成重启apache
[root@apache website]# systemctl restart httpd
3.3.4 测试访问
经过以上的操作在虚拟机内容通过浏览器进行访问,可以正常通过各个端口去访问对应的网站。
但是如果在宿主机进行访问,你会发现访问不了。这无疑就是因为防火墙在搞鬼。
利于“linux入门系列10--firewalld防火墙管理”讲解的知识,将这3个对应的端口放行即可。
[root@apache website]# firewall-cmd --zone=public --list-ports
[root@apache website]# firewall-cmd --zone=public --add-port=8111/tcp
success
[root@apache website]# firewall-cmd --zone=public --add-port=8222/tcp
success
[root@apache website]# firewall-cmd --zone=public --add-port=8333/tcp
此时,再次在宿主机进行访问,就可以正常访问了。
细心的你可能会发现,如果是按照上边的步骤一路下来的话,你会发现现在其实是3种方式都开启的。分别通过不同的端口去访问,可以正常访问到对应的不同网站。
但是通过如果你通过ip或域名再去访问的话,你会发现统统都指向前一篇文章中案例1指向的网页。为什么会这样呢?那是因为之前案例没有显式指定端口,默认的端口为80。因此如果没显式指定端口,默认是去web的80端口的。
四、Apache访问控制
Apache可以基于源主机名、源IP地址或源主机上的浏览器特征等信息对网站上的资源进行访问控制。简单说就是能控制网站让指定用户才能看到。
主要是通过访问控制指令实现,常用指令有:Allow、Deny、Order
Allow:允许某个主机访问服务器上的网站资源
Deny:实现禁止访问
Order: 定义Allow或Deny指令起作用的顺序,其匹配原则是按照顺序进行匹配,若匹配成功则执行后面的默认指令。
举个例子:
Order Allow, Deny:表示先将源主机与允许规则进行匹配,若匹配成功则允许访 问请求,反之则拒绝访问请求。
4.1 通过IP控制
假设我们的需求是:让前面部署的1网站只允许虚拟机内部进行访问,禁止外部机器访问。
[root@apache website]# vim /etc/httpd/conf/httpd.conf
...省略部分内容
<VirtualHost 192.168.78.101:8111>
 DocumentRoot /website/1
 ServerName test1.heimatengyun.com
 <Directory /website/1>
  AllowOverride None
  Require all granted
Order allow,deny
Allow from 192.168.78.101
 </Directory>
</VirtualHost>
...省略部分内容
我们只需要打开主配置文件,在添加Order allow,deny和Allow from 192.168.78.101即可实现。配置之后,重启apache,发现在虚拟机里可以正常访问,但是在宿主机已经不能访问了此网站了(直接跳转到测试页面)。
除此之外还可以通过浏览器特征来限制指定浏览器进行访问,再此就不进行演示了。
下一篇文章将演示Mysql数据的兄弟-MariaDB的安装及基本用法。