最近公众号受邀获取了留言和赠送模板的权限,小开心(欢迎去公众号JackieZheng围观)。
我们大致的了解了Spring这个框架对于依赖注入的使用和诠释可谓是淋漓尽致。因为有了Spring的这个IOC也好DI也好,我们把上街买菜的事情变成了菜主动送上门的活,这样的“生活方式”大大的提高了我们对于Spring框架的用户体验。
今天主要说两件事,想必凡是稍稍接触过Spring框架开发的对于这些场景肯定都是眼熟透了——Spring如何使用多个外部属性文件以及基于注解方式配置Bean。
1. Spring使用多个外部属性文件

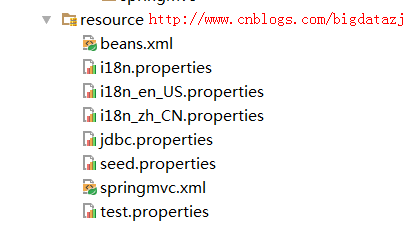
这个截图并不稀奇,甚至完全看不出什么逻辑,下面分别贴出各个配置文件的内容
beans.xml
|
1
2
3
4
5
6
7
8
|
...<bean id="dataSource" class="org.apache.commons.dbcp.BasicDataSource" destroy-method="close"> <property name="driverClassName" value="${jdbc.driver}"/> <property name="url" value="${jdbc.url}"/> <property name="username" value="${jdbc.username}"/> <property name="password" value="${jdbc.password}"/></bean>... |
jdbc.properites
|
1
2
3
4
|
jdbc.driver=com.mysql.jdbc.Driverjdbc.url=jdbc:mysql://localhost:3306/shake?useUnicode=true&characterEncoding=utf-8jdbc.username=rootjdbc.password=admin |
没错,这就是你绝对见过的,在Spring中最常见对于数据源的配置
- 你完全可以把jdbc.driver的值写在beans.xml文件中,但是对于大型项目,某一天你需要该其中的配置,那就必须从庞大而臃肿的beans.xml文件找到你要修改的位置,并且胆战心惊的确认是不是还有遗漏的地方。
- 你完全可以把这些针对性的配置提取到一个外部属性文件当中。写成jdbc.properties的模样,这样修改起来,省时省心省力。
- 光有以上的配置还是无法工作的,因为spring的beans.xml文件并不知道该去哪里查找相应的变量,并为变量赋值。所以还需要在beans.xml中添加如下标签<context:property-placeholder location="jdbc.properties"/>
测试代码
写上如下的测试方法,可以用来验证上述配置是否正确
|
1
2
3
4
5
6
|
@Testpublic void testJDBCConfiguration() throws SQLException { ApplicationContext act=new ClassPathXmlApplicationContext("beans.xml"); DataSource dataSource = (DataSource) act.getBean("dataSource"); System.out.println(dataSource.getConnection());} |

显然我们得到了理想的结果
那么问题来了,如果我们需要使用多个外部属性文件,怎么做?
直接按照上面的套路再拷贝一份试试
beans.xml
|
1
2
3
4
5
6
7
8
9
|
...<context:property-placeholder location="test.properties"/><bean id="dataSource1" class="org.apache.commons.dbcp.BasicDataSource" destroy-method="close"> <property name="driverClassName" value="${test.driver}"/> <property name="url" value="${test.url}"/> <property name="username" value="${test.username}"/> <property name="password" value="${test.password}"/></bean>... |
test.properties
|
1
2
3
4
|
test.driver = com.mysql.jdbc.Drivertest.url = jdbc:mysql://localhost:3306/shaketest.username=roottest.password=admin |
测试方法
|
1
2
3
4
5
6
|
@Testpublic void testJDBCConfiguration() throws SQLException { ApplicationContext act=new ClassPathXmlApplicationContext("beans.xml"); DataSource dataSource = (DataSource) act.getBean("dataSource1"); System.out.println(dataSource.getConnection());} |
以下是报错信息
|
1
2
3
4
5
6
7
8
9
10
11
12
13
14
15
16
17
18
19
20
21
22
23
24
25
26
27
28
29
30
31
32
33
34
|
org.springframework.beans.factory.BeanDefinitionStoreException: Invalid bean definition with name 'dataSource1' defined in class path resource [beans.xml]: Could not resolve placeholder 'test.driver' in string value "${test.driver}"; nested exception is java.lang.IllegalArgumentException: Could not resolve placeholder 'test.driver' in string value "${test.driver}" at org.springframework.beans.factory.config.PlaceholderConfigurerSupport.doProcessProperties(PlaceholderConfigurerSupport.java:211) at org.springframework.beans.factory.config.PropertyPlaceholderConfigurer.processProperties(PropertyPlaceholderConfigurer.java:223) at org.springframework.beans.factory.config.PropertyResourceConfigurer.postProcessBeanFactory(PropertyResourceConfigurer.java:86) at ...org.springframework.context.support.ClassPathXmlApplicationContext.<init>(ClassPathXmlApplicationContext.java:83) at com.jackie.springmvc.TestCollections.testJDBCConfiguration(TestCollections.java:186) at sun.reflect.NativeMethodAccessorImpl.invoke0(Native Method) at sun.reflect.NativeMethodAccessorImpl.invoke(NativeMethodAccessorImpl.java:62) at sun.reflect.DelegatingMethodAccessorImpl.invoke(DelegatingMethodAccessorImpl.java:43) at org.junit.runners.model.FrameworkMethod$1.runReflectiveCall(FrameworkMethod.java:47) at org.junit.internal.runners.model.ReflectiveCallable.run(ReflectiveCallable.java:12) at org.junit.runners.model.FrameworkMethod.invokeExplosively(FrameworkMethod.java:44) at org.junit.internal.runners.statements.InvokeMethod.evaluate(InvokeMethod.java:17) at org.junit.runners.ParentRunner.runLeaf(ParentRunner.java:271) at org.junit.runners.BlockJUnit4ClassRunner.runChild(BlockJUnit4ClassRunner.java:70) at org.junit.runners.BlockJUnit4ClassRunner.runChild(BlockJUnit4ClassRunner.java:50) at org.junit.runners.ParentRunner$3.run(ParentRunner.java:238) at org.junit.runners.ParentRunner$1.schedule(ParentRunner.java:63) at org.junit.runners.ParentRunner.runChildren(ParentRunner.java:236) at org.junit.runners.ParentRunner.access$000(ParentRunner.java:53) at org.junit.runners.ParentRunner$2.evaluate(ParentRunner.java:229) at org.junit.runners.ParentRunner.run(ParentRunner.java:309) at org.junit.runner.JUnitCore.run(JUnitCore.java:160) at com.intellij.junit4.JUnit4IdeaTestRunner.startRunnerWithArgs(JUnit4IdeaTestRunner.java:74) at com.intellij.rt.execution.junit.JUnitStarter.prepareStreamsAndStart(JUnitStarter.java:211) at com.intellij.rt.execution.junit.JUnitStarter.main(JUnitStarter.java:67) at sun.reflect.NativeMethodAccessorImpl.invoke0(Native Method) at sun.reflect.NativeMethodAccessorImpl.invoke(NativeMethodAccessorImpl.java:62) at com.intellij.rt.execution.application.AppMain.main(AppMain.java:134)Caused by: java.lang.IllegalArgumentException: Could not resolve placeholder 'test.driver' in string value "${test.driver}" at org.springframework.util.PropertyPlaceholderHelper.parseStringValue(PropertyPlaceholderHelper.java:174) at ... at org.springframework.beans.factory.config.PlaceholderConfigurerSupport.doProcessProperties(PlaceholderConfigurerSupport.java:208) ... 35 more |
报错的主要原因来源于不识别test.driver这个变量。
究其原因是因为beans.xml对于<context:property-placeholder location="jdbc.properties"/>这样的标签,如果有多个这样的定义,只会生效第一个,后面的都会忽略,这就造成了spring没有办法找到test.driver是在哪个文件中定义的。
解决方法
采用通配符的方式,只定义一次,但是可以匹配多个外部属性文件
|
1
|
<context:property-placeholder location="classpath*:*.properties"/> |
这样就能够正常运行上面的测试方法。
2.基于注解的方式配置Bean
与之经常同时出场的还有基于XML的方式配置Bean,我想大家都见过或了解autowired=byName和autowired=byType。这两种都是基于XML方式对于Bean采用基于名字和基于类型进行匹配的。
但是这种方式有他的不足之处,所以在实际的项目中应用的不多。
- 在 Bean 配置文件里设置 autowire 属性进行自动装配将会装配 Bean 的所有属性. 然而, 若只希望装配个别属性时, autowire 属性就不够灵活了.
- autowire 属性要么根据类型自动装配, 要么根据名称自动装配, 不能两者兼而有之.
- 一般情况下,在实际的项目中很少使用自动装配功能,因为和自动装配功能所带来的好处比起来,明确清晰的配置文档更有说服力一些
所以你看到以及用到比较多的应该是基于注解的方式配置Bean
beans.xml
|
1
2
3
4
5
6
7
8
9
10
|
<?xml version="1.0" encoding="UTF-8"?><beans xmlns="http://www.springframework.org/schema/beans" xmlns:xsi="http://www.w3.org/2001/XMLSchema-instance" xmlns:context="http://www.springframework.org/schema/context" xsi:schemaLocation="http://www.springframework.org/schema/beans http://www.springframework.org/schema/beans/spring-beans.xsd http://www.springframework.org/schema/context http://www.springframework.org/schema/context/spring-context-4.0.xsd"> <context:component-scan base-package="com.jackie.spring.annotation.generic"></context:component-scan></beans> |
该spring配置文件及其简洁,我们甚至看不到声明bean,只有Context:component-scang该标签意为spring会扫描com.jackie.spring.annotation.generic包下面的所有相关类。相关类是指具有以下字样的注解:
@Component: 基本注解, 标识了一个受 Spring 管理的组件
@Respository: 标识持久层组件
@Service: 标识服务层(业务层)组件
@Controller: 标识表现层组件
标注了如上注解的类都是受Spring管辖的。
同时我们还需要如下几个类
BaseBao.java
|
1
2
3
4
5
6
7
|
public class BaseDao<T> { public void save(T entity){ System.out.println("Save:" + entity); } } |
BaseService.java
|
1
2
3
4
5
6
7
8
9
10
|
public class BaseService<T> { private BaseDao<T> dao; public void addNew(T entity){ System.out.println("addNew by " + dao); dao.save(entity); } } |
UserBao.java
|
1
2
3
4
|
@Repositorypublic class UserDao extends BaseDao<User>{} |
UserService.java
|
1
2
3
4
|
@Servicepublic class UserService extends BaseService<User>{} |
Main.java
|
1
2
3
4
5
6
7
8
9
10
11
|
public class Main { public static void main(String[] args) { ApplicationContext ctx = new ClassPathXmlApplicationContext("beans.xml"); UserService userService = (UserService) ctx.getBean("userService"); userService.addNew(new User()); } } |
1. 这里BaseBao和UserBao以及BaseService和UserService有一个简单的继承关系。
2. UserBao类上加上了注解@Repository表示其为持久层的bean,UserService类上加上了注解@Service表示其为业务层的bean
3. 这时候执行main方法,会报错
Exception in thread "main" addNew by null
java.lang.NullPointerException
at com.jackie.spring.annotation.generic.BaseService.addNew(BaseService.java:12)
at com.jackie.spring.annotation.generic.Main.main(Main.java:13)
原因很简单,BaseService中不识别BaseBao这个bean,因为我们并没有声明过这个类,也没有注入,这时候需要在该类前加上注解
|
1
2
3
|
@Autowiredprivate BaseDao<T> dao; |
加上@Autowired表示Spring装配了该bean,从而就不会报空指针异常了。最终执行结果:
|
1
2
3
|
addNew by com.jackie.spring.annotation.generic.UserDao@32d2fa64Save:com.jackie.spring.annotation.generic.User@1d8d30f7 |
4. Spring 还支持 @Resource 和 @Inject 注解,这两个注解和 @Autowired 注解的功用类似
至此,我们熟悉了不能再熟悉的两大场景
- Spring如何调用外部属性文件
- Spring如何调用多个外部属性文件
- Spring基于注解的方式注入bean的使用场景(反正我是一直在用,你们呢???)