mxnet的训练过程——从python到C++
mxnet(github-mxnet)的python接口相当完善,我们可以完全不看C++的代码就能直接训练模型,如果我们要学习它的C++的代码,从python训练与预测的模型中可以看到C++的代码是怎么被调用的。上一篇博客中,我已经说明了mshadow的工作原理——mshadow的原理--MXNet;在这一篇中,来说明一下mxnet的训练过程,看python是调用发哪些C++的接口,但对C++接口的更进一步解释并没有很详细,具体可以自己看源码,后面也可能会有新的博客解释。
实验代码
下面是mxnet训练的简单样例代码,python调试所用的工具是Wing Pro,C++的调试工具推荐使用Qt Creator,Qt Creator要求有Cmakelist,然后要打开Debug编译相关的so文件才能调试。
# -*- coding: utf-8 -*-
import mxnet as mx
import numpy as np
import logging
logging.getLogger().setLevel(logging.DEBUG)

# product data
def productData(Dim, half_len):
    '''
    product data for training or eval

    Dim : dimension
    half_len : 2*half_len is the number of training data
    '''

    data = np.append(np.random.uniform(-1, 0, [half_len, Dim]),
                           np.random.uniform(0, 1, [half_len, Dim]), axis = 0)
    label = np.append(np.zeros(half_len), np.ones(half_len))

    return data, label

#get the data
np.random.seed(1)
Dim = 3
train_data,train_label = productData(Dim, 1)
eval_data, eval_label = productData(Dim, 1)

#data iter
batch_size = 1
train_iter = mx.io.NDArrayIter(train_data,train_label, batch_size, shuffle=True)
eval_iter = mx.io.NDArrayIter(eval_data, eval_label, batch_size, shuffle=False)

#input variable
X = mx.sym.Variable('data')
Y = mx.symbol.Variable('softmax_label')

#netword config
fc_1  = mx.sym.FullyConnected(data=X, name='fc1', num_hidden = 2)
fc_2  = mx.sym.FullyConnected(data=fc_1, name='fc2', num_hidden = 3)
fc_3  = mx.sym.FullyConnected(data=fc_2, name='fc3', num_hidden = 4)
lro = mx.sym.SoftmaxOutput(data=fc_3, label=Y, name="softmax")

#build the model
model = mx.mod.Module(
    symbol = lro ,
    data_names=['data'],
    label_names = ['softmax_label']# network structure
)

#train the model
model.fit(train_iter, eval_iter,
            optimizer_params={'learning_rate':0.5, 'momentum': 0.9},
            num_epoch=1,
            eval_metric='mse',
            batch_end_callback = mx.callback.Speedometer(batch_size, 1))

#predict the result
pre = model.predict(eval_iter).asnumpy()
print np.argmax(pre, axis = 1)
上面的代码十分简单,对于mxnet python训练的人都很容易看明白第一点,在这里不展开讲这些python代码的具体意义,而讲这些代码是怎么与mxnet底层的C++代码交互的,python与C++交互的python库ctypes,本人用的mxnet版本是0.7,其它版本的代码结构不会差别太大。
Create Variable
mx.io.NDArrayIter没有引用到C++的函数,当创建一个变量符号(Symbol Variable)时,会引用到MXSymbolCreateVariable函数。要注意的是调用的python函数如果是mxnet包内的,就会引用包的相应函数,调用的C++函数都会封装在C_api.h中,对应的函数在./src/c_api下。调用过程以下:Variable()_python --> MXSymbolCreateVariable()_C++ --> CreateVariable()_C++。我们来看一下C++中Symbol类及其与之相关的结构体:
/*!
 * rief Symbol is used to represent dynamically generated symbolic computation graph.
 *
 *   This class is used as a tool to generate computation graphs(aka. configuration) of the network.
 *   Symbol is always composite, the head Node is the output node of the symbol.
 *   An atomic symbol can be seen as a special case of the composite symbol with only the head node.
 */
class Symbol {
 public:
 ...
 protected:
  // Declare node, internal data structure.
  struct Node;
  /*! rief an entry that represents output data from a node */
  struct DataEntry {
    /*! rief the source node of this data */
    std::shared_ptr<Node> source;
    /*! rief index of output from the source. */
    uint32_t index;
    /*! rief enabled default copy constructor */
    DataEntry() {}
    /*! rief constructor from index */
    DataEntry(std::shared_ptr<Node> source, uint32_t index)
        : source(source), index(index) {}
  };
  /*!
   * rief the head nodes of Symbols
   * This head is only effective when
   */
  std::vector<DataEntry> heads_;
 ...
}

/*!
 * rief Node is represents node of an operator in the symbolic graph.
 *
 * It stores connection to the inputs to function represented by OperatorProperty
 * NOTE on data structure: there are three types of node:
 * - Normal node: contains all the necessary elements of a graph.
 * - OperatorProperty: the inputs_ is empty, represents an OperatorProperty that has not been applied.
 * - Variable: the sym_ is nullptr, represents an named Variable of tensors that can be composed.
 */
struct Symbol::Node {
  /*! rief Operator of this node */
  std::unique_ptr<OperatorProperty> op;
  /*! rief name of the node */
  std::string name;
  /*! rief inputs to this node */
  std::vector<DataEntry> inputs;
  /*! rief source node of the current node */
  std::shared_ptr<Symbol::Node> backward_source_node;
  /*!
   * rief additional attributes about the node,
   *  Use pointer to save space, as attr can be accessed in a slow way,
   *  not every node will have attributes.
   */
  std::unique_ptr<std::map<std::string, std::string> > attr;
  /*!
    *rief constructor
    *param op the OperatorProperty to construct the Node
    *param name the name of the symbol
   */
  explicit Node(OperatorProperty *op,
                const std::string& name)
      : op(op), name(name) {}
  /*!
    *rief copy constructor constructor
   */
  explicit Node(const Node& other)
      : name(other.name) {
    if (other.op != nullptr) {
      op.reset(other.op->Copy());
    }
    if (other.attr.get() != nullptr) {
      attr.reset(new std::map<std::string, std::string>(*(other.attr)));
    }
  }
  ~Node() {
   ...
  }
  /*!
eturn Whether the symbol is atomic */
  inline bool is_atomic() const {
    return inputs.size() == 0 && op != nullptr;
  }
  /*!
eturn Whether it is unit variable */
  inline bool is_variable() const {
    return op == nullptr && !backward_source_node;
  }
  /*!
eturn Whether it is backward op */
  inline bool is_backward() const {
    return backward_source_node.get() != nullptr;
  }
};

/*!
eturn whwther the symbol is atomic */
inline bool Symbol::is_atomic() const {
  return heads_[0].source->is_atomic();
}
通过上面的inline bool is_variable()函数可以看到variable的特点,创建一个variable也特别简单,直接创建一个Symbol的并把初始数据压入到heads_容器中就能创建,如下:
Symbol Symbol::CreateVariable(const std::string &name) {
  Symbol s;
  s.heads_.push_back(DataEntry(std::make_shared<Node>(nullptr, name), 0));
  return s;
}
在mxnet中层(mx.sym.FullyConnectedmx.sym.SoftmaxOutput等)和变量都是Symbol。
python动态加载函数
mxnet中的层的种类可能是会发生变化的,当用C++写一个新的层时,都要先注册到mxnet内核dlmc中,python在载入Symbol模块时,会动态加载所有的层。下面先来简单地说明python是如何动态加载的,再来看下mxnet中的python是如何动态加载的。
import sys

def fib(n):
	a, b = 0, 1
    result = []
    while(b<n):
		result.append(b)
		a, b = b, a+b
	print(result)

print("load function in here")
setattr(sys.modules[__name__], "FIBC", fib)
假如上面的代码放在load_test.py中,当import load_test时会先运行脚本中第一行和最后两行代码,最后一行代码将FIBC定位到fib上,所以相当于可以引用FIBC函数,结果如下:
>>> import load_test
load function in here
>>> load_test.fib(16)
[1, 1, 2, 3, 5, 8, 13]
>>> load_test.FIBC(16)
[1, 1, 2, 3, 5, 8, 13]
那么在mxnet的python中是怎么实现的呢?在导入Symbol模块时会运行_init_symbol_module(),这个函数能加载注册在mxnet内核中的所有Symbol,来看下面两个函数:
def _init_symbol_module():
    """List and add all the atomic symbol functions to current module."""
    plist = ctypes.POINTER(ctypes.c_void_p)()
    size = ctypes.c_uint()

    check_call(_LIB.MXSymbolListAtomicSymbolCreators(ctypes.byref(size),
                                                     ctypes.byref(plist)))
    module_obj = sys.modules[__name__]
    module_internal = sys.modules["mxnet._symbol_internal"]
    for i in range(size.value):
        hdl = SymbolHandle(plist[i])
        function = _make_atomic_symbol_function(hdl)
        if function.__name__.startswith('_'):
            setattr(module_internal, function.__name__, function)
        else:
            setattr(module_obj, function.__name__, function)


def _make_atomic_symbol_function(handle):
    """Create an atomic symbol function by handle and funciton name."""
    name = ctypes.c_char_p()
    desc = ctypes.c_char_p()
    key_var_num_args = ctypes.c_char_p()
    num_args = mx_uint()
    arg_names = ctypes.POINTER(ctypes.c_char_p)()
    arg_types = ctypes.POINTER(ctypes.c_char_p)()
    arg_descs = ctypes.POINTER(ctypes.c_char_p)()
    ret_type = ctypes.c_char_p()

    check_call(_LIB.MXSymbolGetAtomicSymbolInfo(
        handle, ctypes.byref(name), ctypes.byref(desc),
        ctypes.byref(num_args),
        ctypes.byref(arg_names),
        ctypes.byref(arg_types),
        ctypes.byref(arg_descs),
        ctypes.byref(key_var_num_args),
        ctypes.byref(ret_type)))
    param_str = ctypes2docstring(num_args, arg_names, arg_types, arg_descs)
    key_var_num_args = py_str(key_var_num_args.value)
    func_name = py_str(name.value)
    desc = py_str(desc.value)
    if key_var_num_args:
        desc += '
This function support variable length of positional input.'
    doc_str = ('%s

' +
               '%s
' +
               'name : string, optional.
' +
               '    Name of the resulting symbol.

' +
               'Returns
' +
               '-------
' +
               'symbol: Symbol
' +
               '    The result symbol.')
    doc_str = doc_str % (desc, param_str)
    extra_doc = "
" + '
'.join([x.__doc__ for x in type.__subclasses__(SymbolDoc)
                                  if x.__name__ == '%sDoc' % func_name])
    doc_str += re.sub(re.compile("    "), "", extra_doc)

    def creator(*args, **kwargs):
        """Activation Operator of Neural Net.
        The parameters listed below can be passed in as keyword arguments.

        Parameters
        ----------
        name : string, required.
            Name of the resulting symbol.

        Returns
        -------
        symbol: Symbol
            the resulting symbol
        """
        param_keys = []
        param_vals = []
        symbol_kwargs = {}
        name = kwargs.pop('name', None)
        attr = kwargs.pop('attr', None)

        if key_var_num_args and key_var_num_args not in kwargs:
            param_keys.append(c_str(key_var_num_args))
            param_vals.append(c_str(str(len(args))))

        for k, v in kwargs.items():
            if isinstance(v, Symbol):
                symbol_kwargs[k] = v
            else:
                param_keys.append(c_str(k))
                param_vals.append(c_str(str(v)))
        # create atomic symbol
        param_keys = c_array(ctypes.c_char_p, param_keys)
        param_vals = c_array(ctypes.c_char_p, param_vals)
        sym_handle = SymbolHandle()
        check_call(_LIB.MXSymbolCreateAtomicSymbol(
            handle,
            mx_uint(len(param_keys)),
            param_keys, param_vals,
            ctypes.byref(sym_handle)))

        if len(args) != 0 and len(symbol_kwargs) != 0:
            raise TypeError(
                '%s can only accept input'
                'Symbols either as positional or keyword arguments, not both' % func_name)
        if key_var_num_args and len(symbol_kwargs) != 0:
            raise ValueError('This function supports variable length of Symbol arguments.
' +
                             'Please pass all the input Symbols via positional arguments' +
                             ' instead of keyword arguments.')
        s = Symbol(sym_handle)
        attr = AttrScope.current.get(attr)
        if attr:
            s._set_attr(**attr)
        hint = func_name.lower()
        name = NameManager.current.get(name, hint)
        s._compose(*args, name=name, **symbol_kwargs)
        return s

    creator.__name__ = func_name
    creator.__doc__ = doc_str
    return creator
- 先从
MXSymbolListAtomicSymbolCreators中获取以注册在内核中的OperatorPropertyReg对象数组。 _make_atomic_symbol_function这个函数用获取相应Symbol的信息,以及返回一个creator的对象,可以看到creator.__name__是以Symbol的名字来命名的。setattr(module_obj, function.__name__, function)将刚才返回的creator写入到这个模板中,当导入这个模板后,可以直接引用creator.__name__来调用相应的creator(*args, **kwargs)函数。
至于如何向mxnet内核注册,可以看下全连接层的样例:
DMLC_REGISTER_PARAMETER(FullyConnectedParam);

MXNET_REGISTER_OP_PROPERTY(FullyConnected, FullyConnectedProp)
.describe("Apply matrix multiplication to input then add a bias.")
.add_argument("data", "Symbol", "Input data to the FullyConnectedOp.")
.add_argument("weight", "Symbol", "Weight matrix.")
.add_argument("bias", "Symbol", "Bias parameter.")
.add_arguments(FullyConnectedParam::__FIELDS__());

struct FullyConnectedParam : public dmlc::Parameter<FullyConnectedParam> {
  int num_hidden;
  bool no_bias;
  DMLC_DECLARE_PARAMETER(FullyConnectedParam) {
    // TODO(bing) add support for boolean
    DMLC_DECLARE_FIELD(num_hidden).set_lower_bound(1)
    .describe("Number of hidden nodes of the output.");
    DMLC_DECLARE_FIELD(no_bias).set_default(false)
    .describe("Whether to disable bias parameter.");
  }
};
Create OperatorSymbol
这一段的题目我也不知道叫什么名字好,其实就是创建一个层的Symbol,但这个Symbol内有Node是与层有关的操作(operator)。下面这几个层是过程都是一样的,对于每一个层都创建一个相应的Symbol,从上面可以看到调用这些函数时,实际上是调用一个Creator对象,所以单卡调试python代码会直接入到creator(*args, **kwargs)中,我们继续看下在这个函数中的操作,我们以fc_3 = mx.sym.FullyConnected(data=fc_2, name='fc3', num_hidden = 4)为例。
#netword config
fc_1  = mx.sym.FullyConnected(data=X, name='fc1', num_hidden = 2)
fc_2  = mx.sym.FullyConnected(data=fc_1, name='fc2', num_hidden = 3)
fc_3  = mx.sym.FullyConnected(data=fc_2, name='fc3', num_hidden = 4)
lro = mx.sym.SoftmaxOutput(data=fc_3, label=Y, name="softmax")
有creator(*args, **kwargs)中先是将参数中的Symbol对象(在这里是fc_2)与非Symbol对象分开(定义在FullyConnectedParam的num_hidden),将非Symbol对象的参数传入到C++函数中MXSymbolCreateAtomicSymbol中创建Symbol,并挂在这个Symbol的heads_[0].source。
创建了Symbol后,还要装前一层的Symbol挂在这一层上面,这里调用s._compose(*args, name=name, **symbol_kwargs)。这个函数调用了C++中的MXSymbolCompose --> Compose,Compose会将是上层的Symbol对象挂在heads_[0].source->inputs相应位置上,heads_[0].source->inputs的位置有这个Symbol的heads_[0].source->op->ListArguments决定的。有这例子中,fc3.heads_[0].source->inputs[0] = fc2,FullyConnectedProp.ListArguments如下,其它的空位用NULL(从上面的is_variable()可以看出这里填充的是variable)填充,最后返回这个操作Symbol。
  std::vector<std::string> ListArguments() const override {
    if (!param_.no_bias) {
      return {"data", "weight", "bias"};
    } else {
      return {"data", "weight"};
    }
  }
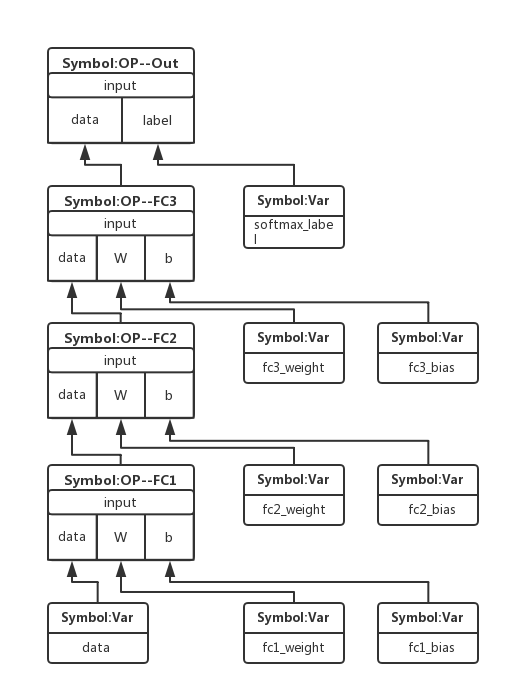
到运行完lro = mx.sym.SoftmaxOutput(data=fc_3, label=Y, name="softmax"),我们可以得到一个如下的网络结构图,但这还不是计算图,这里我将Symbol分为两类,一类是层,即是Symbol:OP;一类是变量,即是Symbol:Var。
Bind构建计算图
#build the model
model = mx.mod.Module(
    symbol = lro ,
    data_names=['data'],
    label_names = ['softmax_label']# network structure
)
这个是构建一个模型,这个初始化函数我想讲的是arg_names = symbol.list_arguments(),这个涉及到图的深度优先搜索,调用的是C++内的MXSymbolListArguments,C++中主要是如下三个函数做了深度优先搜索然后返回变量的列表。
std::vector<std::string> Symbol::ListArguments() const {
  std::vector<std::string> ret;
  if (this->is_atomic()) {
    return heads_[0].source->op->ListArguments();
  } else {
    this->DFSVisit([&ret](const std::shared_ptr<Node> &node) {
        if (node->is_variable()) {
          ret.push_back(node->name);
        }
      });
    return ret;
  }
}

template<typename FVisit>
inline void Symbol::DFSVisit(FVisit fvisit) const {
  typedef const std::shared_ptr<Node>* GNode;
  std::vector<GNode> head_nodes(heads_.size());
  std::transform(heads_.begin(), heads_.end(), head_nodes.begin(),
                 [](const DataEntry& e)->GNode {
                   return &e.source;
                 });
  graph::PostOrderDFSVisit<GNode, Node*>(
      head_nodes,
      [fvisit](GNode n) { fvisit(*n); },  // FVisit
      [](GNode n)->Node* { return n->get(); },  // HashFunc
      [](GNode n)->uint32_t { return (*n)->inputs.size() +
            static_cast<int>((*n)->is_backward()); },  // InDegree
      [](GNode n, uint32_t index)->GNode {  // GetInput
        if (index < (*n)->inputs.size()) {
          return &(*n)->inputs.at(index).source;
        } else {
          return &(*n)->backward_source_node;
        }
      });
}

template <typename GNode, typename HashType, typename FVisit,
          typename HashFunc, typename InDegree, typename GetInput>
void PostOrderDFSVisit(const std::vector<GNode>& heads, FVisit fvisit,
                       HashFunc hash, InDegree indegree, GetInput getinput) {
  std::vector<std::pair<GNode, uint32_t> > stack;
  std::unordered_set<HashType> visited;
  for (auto& head : heads) {
    HashType head_hash = hash(head);
    if (visited.count(head_hash) == 0) {
      stack.push_back(std::make_pair(head, 0));
      visited.insert(head_hash);
    }
    while (!stack.empty()) {
      std::pair<GNode, uint32_t>& back = stack.back();
      if (back.second == indegree(back.first)) {
        fvisit(back.first);
        stack.pop_back();
      } else {
        const GNode& input = getinput(back.first, back.second++);
        HashType input_hash = hash(input);
        if (visited.count(input_hash) == 0) {
          stack.push_back(std::make_pair(input, 0));
          visited.insert(input_hash);
        }
      }
    }
  }
}
从第一个函数ListArguments()可以看到,如果Symbol是variable,则放到输出结果ret中。第二个函数DFSVisit(FVisit fvisit)是帮第三个函数PostOrderDFSVisit(...)构建一些匿名函数。关键是看第三个函数,我们在初始化模型时挂上去的lro,也图1中的Symbol:OP--Out。这里这里深度优先搜索(DFS)的步骤如下:
- 将在初始化模型时挂上去的Symbol放到容器中(可以看成一个队列)
- 如果容器为空,则结束,否则将容器中最老的元素赋给
back。 back.second的值是访问的次数- 如果访问次数等于入度数,将
back从容器中拿掉,且如果back.first是变量则放到输出结果ret中。 - 如果访问次数不等于入度数,将
back.first中的输入input[back.second]拿出放入到容器的最后,且back.second的值增加一。 - 转到步骤2。
从图1的顶层开始的DFS,按以上步骤可以得到的结果如下(要注意的是下面的顺序是唯一的):
['data', 'fc1_weight', 'fc1_bias', 'fc2_weight', 'fc2_bias', 'fc3_weight', 'fc3_bias', 'softmax_label']
从这个顺序也可以看到为什么用DFS,因为遍历的顺序刚好是前向传播计算的顺序。
训练fit
绑定执行器与初始化计算图
在训练之前会根据设备来绑定执行器(Bind Executor),没有明确指出执行器时,默认为cpu(0),一般来说一个Executor对应该硬件的一个设备,比如一个cpu、一个gpu。python的函数调用过程如下:
base_module.py : model.fit -->
module.py : bind -->
excutor_group.py : DataParallelExecutorGroup.__init__ --> bind_exec --> _bind_ith_exec -->
symbol.py : bind -->
C++ : MXExecutorBindEX
_bind_ith_exec是python代码中最关键的一个,它是不仅绑定执行器,还分配了前向(arg_arrays)和后向(grad_arrays)传播所需要的内存空间、Symbol是否要后向传播(grad_req)、矩形形状的推断(infer shape)。其中infer shape也是引用了C++的代码,里面用到了迭代器生成TShape、拓朴排序等知识。
C++的调用关系以下:
MXExecutorBindEX() --> Executor::Bind() --> GraphExecutor::init()
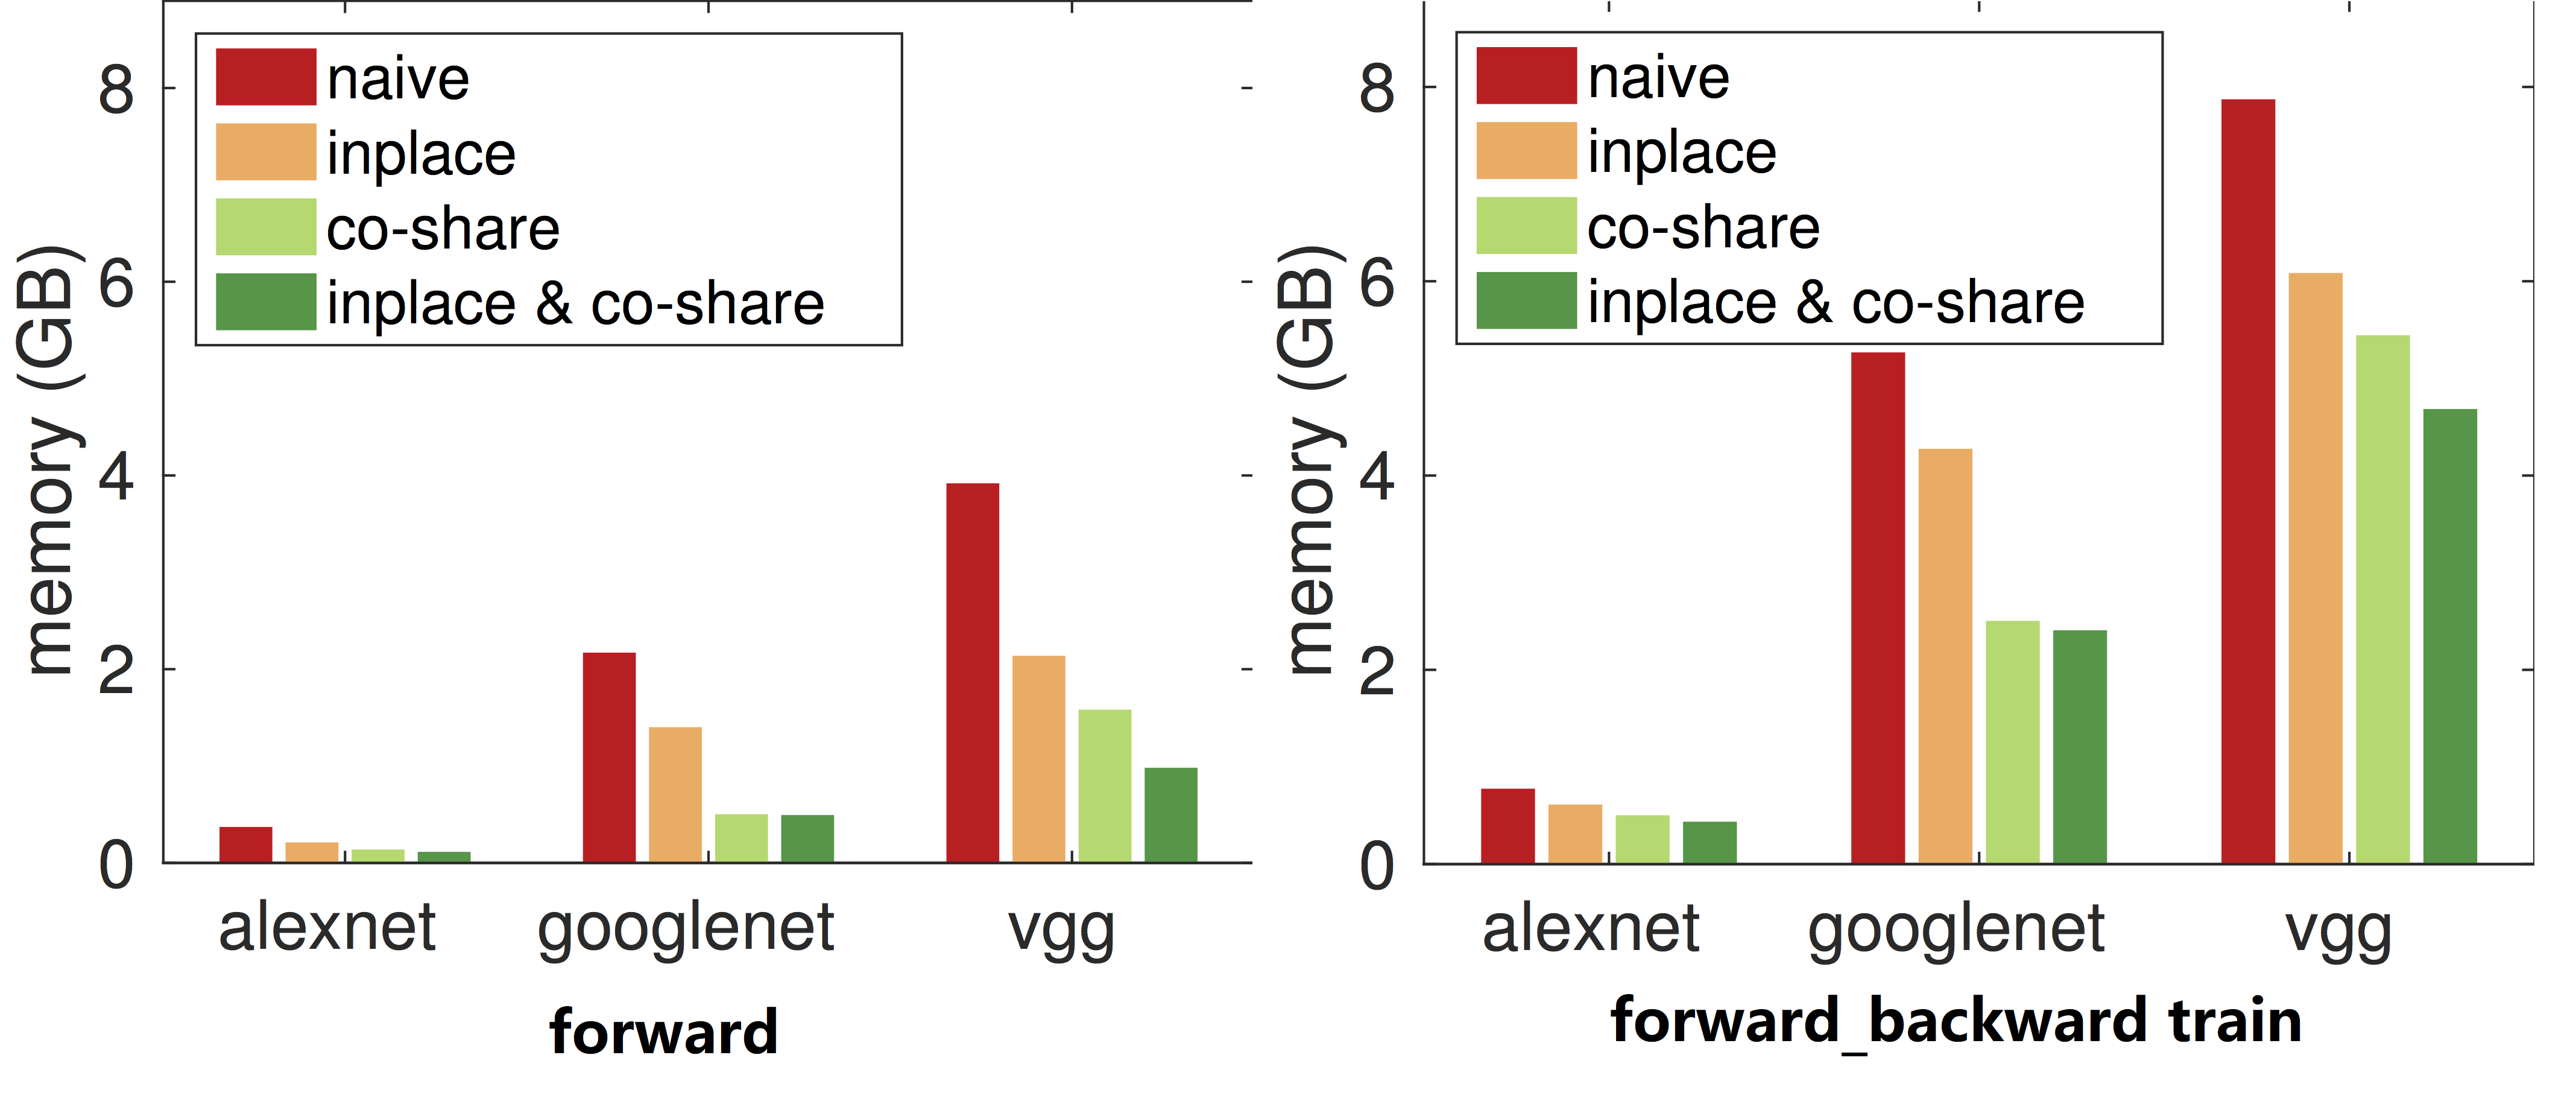
看下GraphExecutor::init()具体做了什么,InitGraph初始化了计算图,这个计算图包括了前向和后向的,InitDataEntryInfo初始化一些传入来的变量,InitDataEntryMemory这个是为中间的一些输出分配内存空间,这里涉及到两个省内存的策略:
- inplace。在这个策略里,我们模拟图的遍历过程,并为每个变量维护一个还有多少其他变量需要它的计数。当我们发现某个变量的计数变成0时,我们便回收其内存空间:这个要求在写操作层时有对应的
ForwardInplaceOption与BackwardInplaceOption - co-share:我们允许两个变量使用同一段内存空间。这么做当然会使得这两个变量不能同时在写这段空间。所以我们只考虑对不能并行的变量进行co-share。每一次我们考虑图中的一条路(path),路上所有变量都有依赖关系所以不能被并行,然后我们对其进行内存分配并将它们从图中删掉。这个可以由算法得到,但要设计一个内存池
GraphStoragePool。
其实还有一个省内存的策略,不过与计算图无关,就是我在上篇博客所说的——mshadow的原理--MXNet。
inline void Init(Symbol symbol,
                   const Context& default_ctx,
                   const std::map<std::string, Context>& ctx_map,
                   const std::vector<NDArray> &in_args,
                   const std::vector<NDArray> &arg_grad_store,
                   const std::vector<OpReqType> &grad_req_type,
                   const std::vector<NDArray> &aux_states,
                   Executor* shared_exec = nullptr) {
    enable_inplace_allocation_ = dmlc::GetEnv("MXNET_EXEC_ENABLE_INPLACE", true);
    prefer_bulk_execution_ = dmlc::GetEnv("MXNET_EXEC_PREFER_BULK_EXEC", true);
    if (shared_exec != NULL) {
      GraphExecutor* gexec = dynamic_cast<GraphExecutor*>(shared_exec);
      CHECK(gexec) << "Input executor for sharing memory must have GraphExecutor type.";
      shared_mem_ = gexec->shared_mem_;
    } else {
      shared_mem_ = std::make_shared<GraphStoragePool>();
    }

    CHECK_EQ(grad_req_type.size(), arg_grad_store.size());
    bool need_backward = false;
    for (auto req : grad_req_type) {
      if (req != kNullOp) need_backward = true;
    }
    this->InitGraph(symbol, default_ctx, ctx_map,
                    in_args, arg_grad_store, grad_req_type,
                    need_backward);
    this->InitDataEntryInfo(in_args, arg_grad_store, grad_req_type, aux_states);
    this->InitOperators();
    this->InitDataEntryMemory();
    this->InitResources();
    this->InitCachedOps();
    this->InitOpSegs();
  }
如图2所示,这是mxnet省内存策略的效果:
训练
训练之前,先初始化除了输入数的所有变量,初始化训练的算法,这个在base_module.py:
self.init_params(initializer=initializer, arg_params=arg_params, aux_params=aux_params,
                 allow_missing=allow_missing, force_init=force_init)
self.init_optimizer(kvstore=kvstore, optimizer=optimizer,
                    optimizer_params=optimizer_params)
训练的步骤主要是forward_backward与update,代码如下:
		################################################################################
		# training loop
		################################################################################
	    for epoch in range(begin_epoch, num_epoch):
            tic = time.time()
            eval_metric.reset()
            for nbatch, data_batch in enumerate(train_data):
                if monitor is not None:
                    monitor.tic()
                self.forward_backward(data_batch)
                self.update()
                self.update_metric(eval_metric, data_batch.label)

                if monitor is not None:
                    monitor.toc_print()

                if batch_end_callback is not None:
                    batch_end_params = BatchEndParam(epoch=epoch, nbatch=nbatch,
                                                     eval_metric=eval_metric,
                                                     locals=locals())
                    for callback in _as_list(batch_end_callback):
                        callback(batch_end_params)

            # one epoch of training is finished
            for name, val in eval_metric.get_name_value():
                self.logger.info('Epoch[%d] Train-%s=%f', epoch, name, val)
            toc = time.time()
            self.logger.info('Epoch[%d] Time cost=%.3f', epoch, (toc-tic))

            if epoch_end_callback is not None:
                arg_params, aux_params = self.get_params()
                for callback in _as_list(epoch_end_callback):
                    callback(epoch, self.symbol, arg_params, aux_params)

            #----------------------------------------
            # evaluation on validation set
            if eval_data:
                res = self.score(eval_data, validation_metric,
                                 batch_end_callback=eval_batch_end_callback, epoch=epoch)
                for name, val in res:
                    self.logger.info('Epoch[%d] Validation-%s=%f', epoch, name, val)

            # end of 1 epoch, reset the data-iter for another epoch
            train_data.reset()
forward与backward最后都调用了void RunOps(bool is_train, size_t topo_start, size_t topo_end),估计这个函数才是整个训练的核心,但个函数涉及到的同步、异步处理的parameter server(PS),PS很复杂,在这里就不再展开讨论了。
【防止爬虫转载而导致的格式问题——链接】:
http://www.cnblogs.com/heguanyou/p/7604326.html