在使用这个 SDK 提供的功能前,必须先添加类库的引用到你的工程里。参考: Download and add the libraries to the
project.
定义你的 XAML 的 UI
Ui 非常的简单,只有两个 Image 控件和两个按钮。一个 Image 用来显示原图,另一个显示经过滤镜处理过
的图片。类似的,一个按钮用来选择图片,另一个保存经过滤镜处理的图片到图片库中。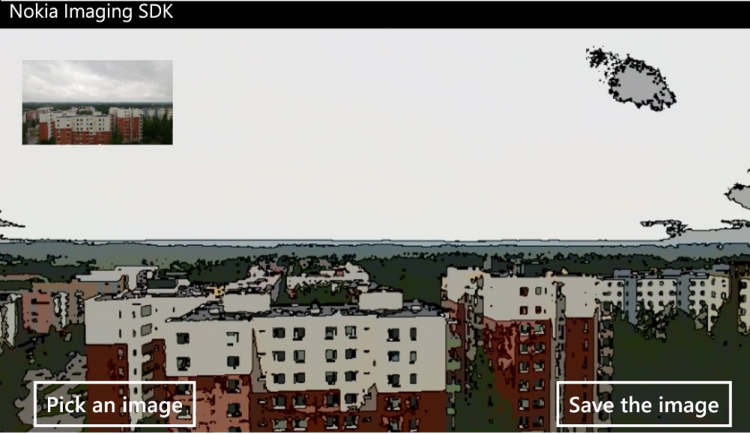
下面是实现的步骤:
1、在 VS 中打开 MainPage.xaml
2、定义 UI 为 landscape orientation
SupportedOrientations="Landscape" Orientation="Landscape"
3、添加控件:
<!--LayoutRoot is the root grid where all page content is placed-->
<Canvas x:Name="LayoutRoot" Background="Transparent">

    <TextBlock Text="Nokia Imaging SDK" Style="{StaticResource PhoneTextNormalStyle}" />
    <Image x:Name="CartoonImage" Height="480" Width="800" Stretch="UniformToFill" />
    <Image x:Name="OriginalImage" Height="100" Width="157" Stretch="UniformToFill"
                 Canvas.Left="24" Canvas.Top="70" Canvas.ZIndex="0"/>
    <Button Content="Pick an image" Click="PickAnImageButton_Click" Canvas.Left="24" Canvas.Top="398" />
    <Button Content="Save the image" Click="SaveImage_Click" x:Name="SaveButton" Canvas.Left="569" Canvas.Top="398" />

</Canvas>
上面的 Image 控件一个用来显示原图,另一个显示 CartoonImage。
从图片库中选择图片:
private void PickAnImageButton_Click(object sender, RoutedEventArgs e)
{
    PhotoChooserTask chooser = new PhotoChooserTask();
    chooser.Completed += PickImageCallback;
    chooser.Show();
}

private async void PickImageCallback(object sender, PhotoResult e)
 {
    if (e.TaskResult != TaskResult.OK)
    {
        return;
    }
}
当在回调函数中提供给我们 System.IO.Stream 对象时,我们获取到了图片的内容,这时我们就开始
使用 Nokia Imaging SDK 了。
1、添加下面的命名空间
using Nokia.Graphics.Imaging;
using Nokia.InteropServices.WindowsRuntime;
using System.IO;
using System.Windows.Media.Imaging;
using System.Runtime.InteropServices.WindowsRuntime;
2、下面的命名空间是从图片库中选择图片和保存图片到图片库
using Microsoft.Phone.Tasks;
using Windows.Storage.Streams;
using Microsoft.Xna.Framework.Media;
3、在 MainPage.xaml.cs 中初始化 EditingSession 对象的实例:
public partial class MainPage : PhoneApplicationPage

{
    private EditingSession _session;
    ....
    ....
4、在图片选择的回调函数中我们对图片添加滤镜。这部分我们使用 卡通滤镜,并且把它显示在 xaml 页面的 CartoonImage
上:
  private async void PickImageCallback(Object sender, PhotoResult e)
  {
       if (e.TaskResult != TaskResult.OK)
       {
          return;
       }
       _session = await EditingSessionFactory.CreateEditingSessionAsync(e.ChosenPhoto);
       try
       {
          // Decode the jpeg for showing the original image
          await _session.RenderToImageAsync(OriginalImage, OutputOption.PreserveAspectRatio);
          // Apply the filter and decode into the bitmap.
          _session.AddFilter(FilterFactory.CreateCartoonFilter(true));
          await _session.RenderToImageAsync(CartoonImage, OutputOption.PreserveAspectRatio);
       }
       catch (Exception exception)
       {
          MessageBox.Show("Exception:" + exception.Message);
          return;
       }
       SaveButton.IsEnabled = true;
}
我们首先使用 input stream(e.ChosenPhoto)初始化 session,是 JPEG 文件格式的数据。然后我们把原图
作为缩略图显示到 originalImage 上,然后把使用了 cartoon filter 的 session 产生的图片显示到 CartoonImage
上。渲染的过程是异步的。RenderToImageAsync 方法用 EditingSesion 中的图片替换了之前的图片。然后我们使
SaveButton 按钮可用,经过滤镜处理的图片就可以被保存了。
因为dmeo 中使用了图片库中的图片,所以需要在清单文件中添加 ID_CAP_MEDIALIB_PHOTO
渲染和编码全分辨率的 JPEG 图片
当我们初始化了 session 后 渲染一个全分辨率的输出 JPEG 是非常容易的。原始图片的每一个像素
都不被类库处理的,然后保存成一个 JPEG。然后把 SDK 生成的 data buffer 作为一个 JPEG 图片保存到
媒体库中。
下面的代码演示了如何保存经过滤镜处理过的图片为一张全像素的 JPEG
private async void SaveImage_Click(object sender, RoutedEventArgs e)
{
    if (_session == null)
    {
        return;
    }
    // The image has been already filtered.
    // We only need to render the output as a jpeg
    IBuffer jpegOut = await _session.RenderToJpegAsync();

    // Save the image as a jpeg to the camera roll
    MediaLibrary library = new MediaLibrary();
    string filename = "SavedPicture_" + DateTime.Now.ToString("G");
    Picture pic = library.SavePicture(filename, jpegOut.AsStream());

    MessageBox.Show("Image saved");
}
Nokia WiKi 原文链接:http://developer.nokia.com/Resources/Library/Lumia/#!nokia-imaging-sdk/quick-start.html