在上一篇文章中,使用 FluidMoveBehavior 结合 FluidMoveSetTagBehavior 可以使数据从 ListBox 中的
数据显示时,产生缓慢的动画,从而更加生动。其实 FluidMoveBehavior 这个行为在单独使用时,也可以把元素
的移动产生动画效果。
Silverlight中控件可以随着界面大小的调整而重新布局,这是通过控件的MeasureOverride和ArrangeOverride方法来实现。
一般情况下,到界面重新布局时,控件瞬间被安排到新的位置,然而有时候我们希望看到这个重新排列的过程,于是
Blend 小组开发了这个可重用的 Behavior,来使元素在重新布局时,把布局的过程通过动画进行放慢,从而提升
用户体验,达到生动的效果。
之前 Blend 小组演示了 WrapPanel 子元素重新排序时产生流动的效果:

设置很简单, FluidMoveBehavior 位于Asset面板中的Behaviors部分,拖动FluidMoveBehavior到 WarpPanel控件上,
配置的属性即可:

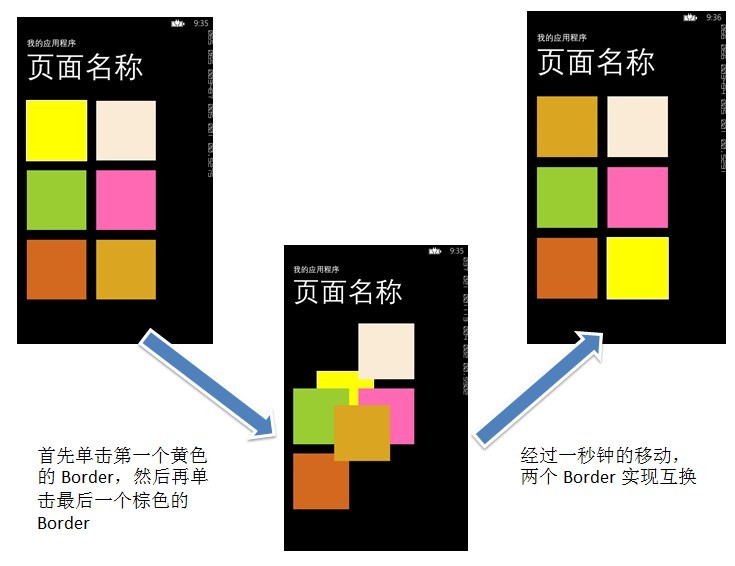
模仿该行为,这次我使用 Grid ,并且在其中添加6个 Border 子元素,实现的效果是当单击
其中的一个 Border 时,即为选中它,给它一个白色的边框,再单击其它的 Border 元素,从而
实现两个 Border 互换,同时产生动画效果。

步骤:
第一步:在 MainPage 的 XAML 页面中设置 Name 为 “ContentPanel” 的 Grid 的子元素 ,设置为两列、三行,共六个border,
并且给每个 Border 设置一个颜色用于区分,添加 Border 的 Tap 属性:
<Grid x:Name="ContentPanel" Grid.Row="1" Margin="12,0,12,0">
            <Grid.Resources>
                <Style TargetType="Border">
                    <Setter Property="Width" Value="150"/>
                    <Setter Property="Height" Value="150"/>
                    <Setter Property="Margin" Value="10"/>
                    <Setter Property="BorderThickness" Value="2"/>
                    <Setter Property="BorderBrush" Value="Transparent"/>
                </Style>
            </Grid.Resources>
            <Grid.RowDefinitions>
                <RowDefinition Height="auto"/>
                <RowDefinition Height="auto"/>
                <RowDefinition Height="auto"/>
            </Grid.RowDefinitions>
            <Grid.ColumnDefinitions>
                <ColumnDefinition Width="auto"/>
                <ColumnDefinition Width="auto"/>
            </Grid.ColumnDefinitions>            <Border Background="Yellow" Tap="Border_Tap"/>
            <Border Background="AntiqueWhite" Grid.Column="1" Tap="Border_Tap"/>
            <Border Background="YellowGreen" Grid.Row="1" Tap="Border_Tap"/>
            <Border Background="HotPink" Grid.Row="1" Grid.Column="1" Tap="Border_Tap"/>
            <Border Background="Chocolate" Grid.Row="2" Grid.Column="0" Tap="Border_Tap"/>
            <Border Background="Goldenrod" Grid.Row="2" Grid.Column="1" Tap="Border_Tap"/>
        </Grid>
第二步,在 CodeBehind 页面中,实现单击两个 Border ,通过 Grid.SetColumn(element, value) 和
Grid.SetRow(element, value) 交换两个 Border 的行和列属性:
        Border borderTemp;
        private void Border_Tap(object sender, System.Windows.Input.GestureEventArgs e)
        {
            Border border = sender as Border;

            if (border == borderTemp)
            {
                border.BorderBrush = new SolidColorBrush(Colors.Transparent);
                borderTemp = null;
                return;
            }

            if (borderTemp != null)
            {
                SwapBorder(borderTemp, border);
            }
            else
            {
                borderTemp = sender as Border;
                borderTemp.BorderBrush = new SolidColorBrush(Color.FromArgb(0xff,0xff, 0xff, 0xff));  // 设置边框的颜色为白色,用于区分
            }
        }

        //交换两个 Border
        void SwapBorder(Border border1, Border border2)
        {
            int colNum1 = Grid.GetColumn(border1);
            int rowNum1 = Grid.GetRow(border1);

            int colNum2 = Grid.GetColumn(border2);
            int rowNum2 = Grid.GetRow(border2);

            Grid.SetColumn(border1, colNum2);
            Grid.SetRow(border1, rowNum2);

            Grid.SetColumn(border2, colNum1);
            Grid.SetRow(border2, rowNum1);
        }
经过以上两步,就可以实现单击两个 Border 后,实现互换的效果,不过比较生涩,没有动画效果。
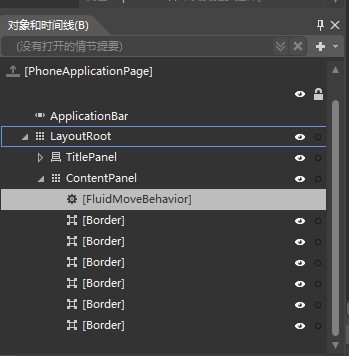
第三步,打开 Blend,给容器 Grid 添加 FluidMoveBehavior 行为。首先在“行为”面板中,拖动FluidMoveBehavior
到 “对象和时间线” 面板上的 Grid 上:

设置 FluidMoveBehavior 的属性 AppliesTo="Children"。
MainPage 中的最终 XAML :
        <Grid x:Name="ContentPanel" Grid.Row="1" Margin="12,0,12,0">
            <Grid.Resources>
                <Style TargetType="Border">
                    <Setter Property="Width" Value="150"/>
                    <Setter Property="Height" Value="150"/>
                    <Setter Property="Margin" Value="10"/>
                    <Setter Property="BorderThickness" Value="2"/>
                    <Setter Property="BorderBrush" Value="Transparent"/>
                    <!--<Setter Property="Opacity" Value="0.5"/>-->
                </Style>
            </Grid.Resources>
            <Grid.RowDefinitions>
                <RowDefinition Height="auto"/>
                <RowDefinition Height="auto"/>
                <RowDefinition Height="auto"/>
            </Grid.RowDefinitions>
            <Grid.ColumnDefinitions>
                <ColumnDefinition Width="auto"/>
                <ColumnDefinition Width="auto"/>
            </Grid.ColumnDefinitions>
            <i:Interaction.Behaviors>
                <el:FluidMoveBehavior AppliesTo="Children" Duration="00:00:1">
                    <el:FluidMoveBehavior.EaseY>
                        <QuinticEase EasingMode="EaseOut"/>
                    </el:FluidMoveBehavior.EaseY>
                    <el:FluidMoveBehavior.EaseX>
                        <QuinticEase EasingMode="EaseOut"/>
                    </el:FluidMoveBehavior.EaseX>
                </el:FluidMoveBehavior>
            </i:Interaction.Behaviors>
            <Border Background="Yellow" Tap="Border_Tap"/>
            <Border Background="AntiqueWhite" Grid.Column="1" Tap="Border_Tap"/>
            <Border Background="YellowGreen" Grid.Row="1" Tap="Border_Tap"/>
            <Border Background="HotPink" Grid.Row="1" Grid.Column="1" Tap="Border_Tap"/>
            <Border Background="Chocolate" Grid.Row="2" Grid.Column="0" Tap="Border_Tap"/>
            <Border Background="Goldenrod" Grid.Row="2" Grid.Column="1" Tap="Border_Tap"/>
        </Grid>
经过以上三步,就可以实现上面的动画效果。
附上 Expression Blend 小组的博客地址:http://blogs.msdn.com/b/expression/