Ansible介绍
Ansible是一个开源部署工具,由Python开发,不需要安装客户端,通过SSH协议通信,全平台,模块化部署管理。
各个部署工具比较
Chef
    Ruby开发,C/S架构,配置需要Git依赖,
    Recipe脚本编写规范,需要编程经验

Saltstack
    Python开发,C/S架构,模块化配置管理,
    TAML脚本编写规范,适合大规模集群部署

Ansible
    Python开发,无Client,模块化配置管理,
    Playbook脚本编写规范,易于上手,适合中小规模快速部署
ansible的优势:
1. 轻量级,无客户端(agentless)

2. 开源免费,学习成本低,快速上手

3. 使用Playbook作为核心配置架构,统一的脚本格式

4. 完善的模块化扩展,支持目前主流的开发场景

5. 强大的稳定性和兼容性
环境准备
3台机器需要做环境准备。
机器角色
Jenkins + Ansible   192.168.52.130

test host   192.168.52.129

gitlab  192.168.52.129
关闭防火墙和selinux
# systemctl stop firewalld && systemctl disable firewalld

# setenforce 0 && sed -i 's/=enforcing/=disabled/g' /etc/selinux/config
添加本地dns:
192.168.52.130 jenkins.example.com
192.168.52.129 test.example.com
192.168.52.129 gitlab.example.com
在Windows电脑hosts文件中添加本地dns
192.168.52.130 jenkins.example.com
192.168.52.129 test.example.com
192.168.52.129 gitlab.example.com
Ansible安装
ansible有两种安装方式。
第一种是yum安装
# yum install -y ansible
第二种是git安装
# yum install -y git nss curl zlib* libffi-devel openssl openssl-devel

# cd /software

# wget https://www.python.org/ftp/python/3.7.3/Python-3.7.3.tgz

# tar zxf Python-3.7.3.tgz

# cd Python-3.7.3

# ./configure --prefix=/usr/local --with-ensurepip=install --enable-shared LDFLAGS="-Wl,-rpath /usr/local/lib"

# make && make altinstall

# ln -s /usr/local/bin/pip3.7 /usr/local/bin/pip
# pip install --upgrade pip

# pip install virtualenv

# useradd deploy                #创建ansible部署用户deploy

# su - deploy

$ virtualenv -p /usr/local/bin/python3.7 .py3-a2.8-env

$ cd /home/deploy/.py3-a2.8-env

$ git clone https://github.com/ansible/ansible.git

$ source /home/deploy/.py3-a2.8-env/bin/activate

$ pip install paramiko PyYAML jinja2

$ cd ansible/

$ git checkout stable-2.8

$ source /home/deploy/.py3-a2.8-env/ansible/hacking/env-setup -q

$ ansible --version

ansible 2.8.5.post0
  config file = None
  configured module search path = ['/home/deploy/.ansible/plugins/modules', '/usr/share/ansible/plugins/modules']
  ansible python module location = /home/deploy/.py3-a2.8-env/ansible/lib/ansible
  executable location = /home/deploy/.py3-a2.8-env/ansible/bin/ansible
  python version = 3.7.3 (default, Oct  9 2019, 18:19:25) [GCC 4.8.5 20150623 (Red Hat 4.8.5-39)]
通过这种方式安装的ansible隔离于宿主机的python环境。
Test Playbooks

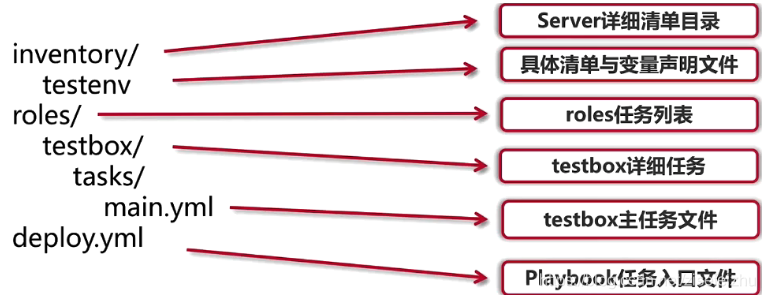
详细目录testenv

主任务文件main.yml

任务入口文件deploy.yml

写剧本
加载python 环境和ansible环境

su - deploy

source .py3-a2.5-env/bin/activate

source .py3-a2.5-env/ansible/hacking/env-setup -q

验证是否开启ansible服务

ansible-playbook --version

创建相关文件

mkdir test_playbooks

cd test_playbooks/

mkdir inventory

mkdir roles

cd inventory/

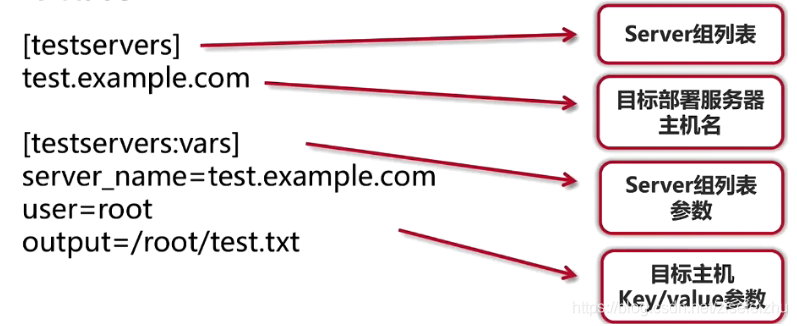
vim testenv
[testservers]
test.example.com

[testservers:vars]
server_name=test.example.com
user=root
output=/root/test.txt

cd ..
cd  roles/
mkdir testbox
cd testbox
mkdir tasks
cd tasks/

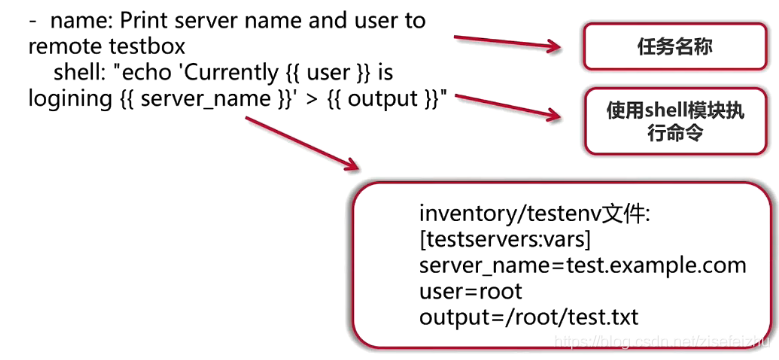
vim main.yml
- name: Print server name and user to remote testbox
  shell: "echo 'Currently {{ user }} is logining {{ server_name}}' > {{ output}}"

输入一条数据到目标主机

回到test_playbooks

pwd
home/deploy/test_playbooks/roles/testbox/tasks
cd ../../..
pwd
/home/deploy/test_playbooks

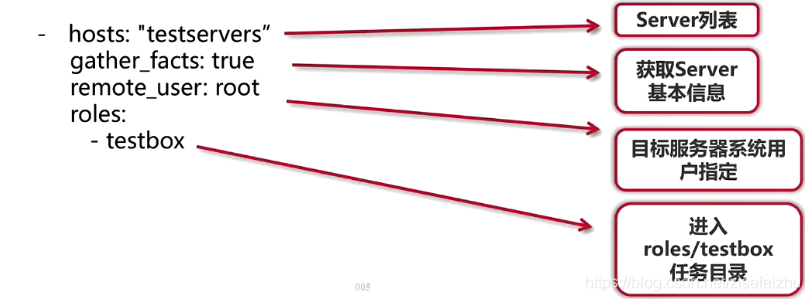
vim deploy.yml (入口文件)
 - hosts: "testservers"
   gather_facts: true
   remote_user: root
   roles:
    - testbox

tree .

切换用户为root
su - root

vim /etc/hosts
192.168.177.153 test.example.com

退出root,切换回原来的环境
exit

ssh-keygen -t rsa

ssh-copy-id -i /home/deploy/.ssh/id_rsa.pub root@test.example.com

ssh 'root@test.example.com'

测试执行
ansible-playbook -i inventory/testenv ./deploy.yml

登录到test.example.com查看root下有test.txt