过滤器简介
WEB过滤器是一个服务器端的组件,它可以截取用户端的请求与相应信息,并对这些信息过滤。
过滤器的工作原理和生命周期
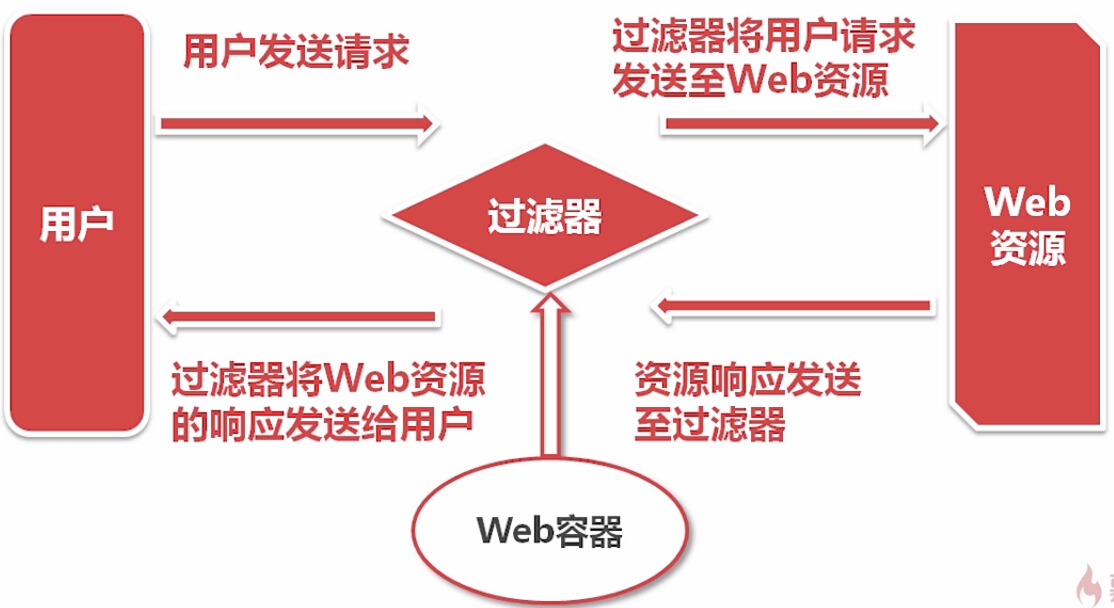
在没有Web过滤器的情况下,用户直接访问服务器上的Web资源。但是如果存在过滤器,用户就不可以直接访问过滤器了。
Web容器启动的时候过滤器就已经启动了,用户的请求到达过滤器,过滤器判断用户的请求是否符合过滤规则,如果符合规则则将用户的请求发送给Web资源,Web资源将响应信息发送给过滤器,过滤器将Web资源的响应发送给用户。工作原理如下图所示:
过滤器的生命周期:

其中实例化方法在Web容器开始装载的时候就执行,初始化方法配置一些初始化参数,Web容器卸载(服务器关闭)的时候执行销毁方法。过滤方法会执行多次,其他方法只会执行一次。
第一个过滤器
1.创建一个类实现javax.servlet.Filter接口。需要实现该接口中的3个方法。


 1 package filter;
 2
 3 import java.io.IOException;
 4
 5 import javax.servlet.Filter;
 6 import javax.servlet.FilterChain;
 7 import javax.servlet.FilterConfig;
 8 import javax.servlet.ServletException;
 9 import javax.servlet.ServletRequest;
10 import javax.servlet.ServletResponse;
11
12 public class FirstFilter implements Filter {
13
14     public void destroy() {
15         System.out.println("*********执行过滤器的销毁方法*******");
16
17     }
18
19     public void doFilter(ServletRequest request, ServletResponse response,
20             FilterChain filterChain) throws IOException, ServletException {
21         System.out.println("*******开始执行过滤器的doFilter方法*********");
22         filterChain.doFilter(request, response);
23         System.out.println("*******结束执行过滤器的doFilter方法**********");
24     }
25
26     public void init(FilterConfig arg0) throws ServletException {
27         System.out.println("*******执行过滤器的初始化方法***********");
28
29     }
30
31 }
- init(FilterConfig ):过滤器的初始化方法,Web容器创建过滤器之后将调用这个方法,在这个方法中可以读取web.xml中的过滤器参数。
- doFilter(ServletRequest,ServletResponse,FilterChain):完成实际的过滤操作,是过滤器的核心方法。当用户请求访问与过滤器相关联的URL的时候,Web容器将先调用过滤器的doFilter方法。FilterChain参数可以调用chain.doFilter方法【放行方法】,将请求传送给下一个过滤器(或者目标资源),或利用转发、重定向将请求转发给其他资源。
- destroy():Web容器在销毁过滤器实例前调用该方法,在这个方法中可以释放过滤器占用的资源。【大多数情况下用不到】
2.在web.xml中配置过滤器(和再web.xml中注册servlet类似)

在MyEclipse中提供了可视化的配置web.xml,如下图:

 1 <?xml version="1.0" encoding="UTF-8"?>
 2 <web-app version="2.5"
 3     xmlns="http://java.sun.com/xml/ns/javaee"
 4     xmlns:xsi="http://www.w3.org/2001/XMLSchema-instance"
 5     xsi:schemaLocation="http://java.sun.com/xml/ns/javaee
 6     http://java.sun.com/xml/ns/javaee/web-app_2_5.xsd">
 7   <display-name></display-name>
 8   <welcome-file-list>
 9     <welcome-file>index.jsp</welcome-file>
10   </welcome-file-list>
11
12       <!-- 配置过滤器开始 -->
13     <filter>
14         <filter-name>FirstFilter</filter-name>
15         <filter-class>filter.FirstFilter</filter-class>
16     </filter>
17     <filter-mapping>
18         <filter-name>FirstFilter</filter-name>
19         <url-pattern>/*</url-pattern>
20     </filter-mapping>
21     <!-- 配置过滤器结束 -->
22
23 </web-app>
在index.jsp中我们在控制台打印一行信息:"**********这是index.jsp*********";
将项目部署到服务器,启动服务器:

在Servlet容器装载的时候,执行过滤器的init方法,当用户请求页面的时候首先执行doFilter()方法,当Servlet容器卸载的时候执行过滤器的销毁方法。【注意:用户的请求先是到达过滤器并不是直接访问的Web资源】
还有一点需要注意:用户虽然能够改变用户请求的资源(例如:网上购物的时候点击“立即购买”,这个请求先要到达过滤器,如果过滤器检测到用户没有登录,就会将页面重定向到登陆页),但是过滤器不能直接处理用户的请求(过滤器不是Servlet),不能直接返回数据。
过滤器链
针对同一个用户请求(url-pattern),与之匹配的过滤器有多个,这个时候用户请求就会依次通过各个过滤器到达web资源。


新建2个过滤器:
 1 package filter;
 2
 3 import java.io.IOException;
 4
 5 import javax.servlet.Filter;
 6 import javax.servlet.FilterChain;
 7 import javax.servlet.FilterConfig;
 8 import javax.servlet.ServletException;
 9 import javax.servlet.ServletRequest;
10 import javax.servlet.ServletResponse;
11
12 public class FirstFilter implements Filter {
13
14     public void destroy() {
15         System.out.println("*********过滤器1----->销毁方法*******");
16
17     }
18
19     public void doFilter(ServletRequest request, ServletResponse response,
20             FilterChain filterChain) throws IOException, ServletException {
21         System.out.println("*******开始执行过滤器1----->doFilter方法*********");
22         filterChain.doFilter(request, response);
23         System.out.println("*******结束执行过滤器1----->doFilter方法**********");
24     }
25
26     public void init(FilterConfig arg0) throws ServletException {
27         System.out.println("*******执行过滤器1------>初始化方法***********");
28
29     }
30
31 }
 1 package filter;
 2
 3 import java.io.IOException;
 4
 5 import javax.servlet.Filter;
 6 import javax.servlet.FilterChain;
 7 import javax.servlet.FilterConfig;
 8 import javax.servlet.ServletException;
 9 import javax.servlet.ServletRequest;
10 import javax.servlet.ServletResponse;
11
12 public class SecondFilter implements Filter {
13
14     public void destroy() {
15         System.out.println("*********过滤器2----->销毁方法*******");
16     }
17
18     public void doFilter(ServletRequest request, ServletResponse response,
19             FilterChain filterChain) throws IOException, ServletException {
20         System.out.println("*******开始执行过滤器2----->doFilter方法*********");
21         filterChain.doFilter(request, response);
22         System.out.println("*******结束执行过滤器2----->doFilter方法**********");
23     }
24
25     public void init(FilterConfig arg0) throws ServletException {
26         System.out.println("*******执行过滤器2------>初始化方法***********");
27     }
28
29 }
在web.xml中配置两个过滤器(第一个过滤器在前面,两个过滤器都匹配index.jsp)
 1 <?xml version="1.0" encoding="UTF-8"?>
 2 <web-app version="2.5"
 3     xmlns="http://java.sun.com/xml/ns/javaee"
 4     xmlns:xsi="http://www.w3.org/2001/XMLSchema-instance"
 5     xsi:schemaLocation="http://java.sun.com/xml/ns/javaee
 6     http://java.sun.com/xml/ns/javaee/web-app_2_5.xsd">
 7   <display-name></display-name>
 8   <welcome-file-list>
 9     <welcome-file>index.jsp</welcome-file>
10   </welcome-file-list>
11
12       <!-- 配置过滤器开始 -->
13       <!-- 过滤器1 -->
14     <filter>
15         <filter-name>FirstFilter</filter-name>
16         <filter-class>filter.FirstFilter</filter-class>
17     </filter>
18     <filter-mapping>
19         <filter-name>FirstFilter</filter-name>
20         <url-pattern>/index.jsp</url-pattern>
21     </filter-mapping>
22     <!-- 过滤器2 -->
23     <filter>
24         <filter-name>SecondFilter</filter-name>
25         <filter-class>filter.SecondFilter</filter-class>
26     </filter>
27     <filter-mapping>
28         <filter-name>SecondFilter</filter-name>
29         <url-pattern>/index.jsp</url-pattern>
30     </filter-mapping>
31    <!-- 配置过滤器结束 -->
32
33 </web-app>
在index.jsp中我们打印如下的一句话: System.out.println("******** 这是index.jsp,处理过程完成 *********");
运行结果:

过滤器的分类:
Servlet 2.5中将过滤器分为4种,如下图所示:

1.REQUEST过滤器
新建一个过滤器FirstFilter(在web.xml中配置两个过滤地址index.jsp和main.jsp):
 1 <?xml version="1.0" encoding="UTF-8"?>
 2 <web-app version="2.5"
 3     xmlns="http://java.sun.com/xml/ns/javaee"
 4     xmlns:xsi="http://www.w3.org/2001/XMLSchema-instance"
 5     xsi:schemaLocation="http://java.sun.com/xml/ns/javaee
 6     http://java.sun.com/xml/ns/javaee/web-app_2_5.xsd">
 7   <display-name></display-name>
 8   <welcome-file-list>
 9     <welcome-file>index.jsp</welcome-file>
10   </welcome-file-list>
11
12       <!-- 配置过滤器开始 -->
13     <filter>
14         <filter-name>FirstFilter</filter-name>
15         <filter-class>filter.FirstFilter</filter-class>
16     </filter>
17     <filter-mapping>
18         <filter-name>FirstFilter</filter-name>
19         <url-pattern>/index.jsp</url-pattern>
20         <dispatcher>REQUEST</dispatcher>
21     </filter-mapping>
22     <filter-mapping>
23         <filter-name>FirstFilter</filter-name>
24         <url-pattern>/main.jsp</url-pattern>
25         <dispatcher>REQUEST</dispatcher>
26     </filter-mapping>
27    <!-- 配置过滤器结束 -->
28
29 </web-app>
在FirstFilter的doFilter方法中将页面重定向到main.jsp
 1 package filter;
 2
 3 import java.io.IOException;
 4
 5 import javax.servlet.Filter;
 6 import javax.servlet.FilterChain;
 7 import javax.servlet.FilterConfig;
 8 import javax.servlet.ServletException;
 9 import javax.servlet.ServletRequest;
10 import javax.servlet.ServletResponse;
11 import javax.servlet.http.HttpServletRequest;
12 import javax.servlet.http.HttpServletResponse;
13
14 public class FirstFilter implements Filter {
15
16     public void destroy() {
17         System.out.println("*********过滤器1----->销毁方法*******");
18
19     }
20
21     public void doFilter(ServletRequest request, ServletResponse response,
22             FilterChain filterChain) throws IOException, ServletException {
23
24         HttpServletRequest req = (HttpServletRequest) request;
25         HttpServletResponse res = (HttpServletResponse) response;
26
27         System.out.println("*******开始执行过滤器1----->doFilter方法*********");
28         res.sendRedirect(req.getContextPath() + "/main.jsp");//重定向
29         System.out.println("*******结束执行过滤器1----->doFilter方法**********");
30     }
31
32     public void init(FilterConfig arg0) throws ServletException {
33         System.out.println("*******执行过滤器1------>初始化方法***********");
34
35     }
36
37 }
启动服务器:


当我们访问index.jsp的时候,过滤器将页面重定向到main.jsp——相当于我们又重新请求了main.jsp,main.jsp又会遇到过滤器,如此页面不停重定向到main.jsp,产生了死循环不会输出任何内容!
换一种方式,我们在过滤器中使用服务器内部转发的方式将页面转发到main.jsp(main.jsp向页面打印"这是main.jsp")。
 1 package filter;
 2
 3 import java.io.IOException;
 4
 5 import javax.servlet.Filter;
 6 import javax.servlet.FilterChain;
 7 import javax.servlet.FilterConfig;
 8 import javax.servlet.ServletException;
 9 import javax.servlet.ServletRequest;
10 import javax.servlet.ServletResponse;
11 import javax.servlet.http.HttpServletRequest;
12 import javax.servlet.http.HttpServletResponse;
13
14 public class FirstFilter implements Filter {
15
16   public void destroy() {
17     System.out.println("*********过滤器1----->销毁方法*******");
18
19   }
20
21   public void doFilter(ServletRequest request, ServletResponse response,
22       FilterChain filterChain) throws IOException, ServletException {
23
24     HttpServletRequest req = (HttpServletRequest) request;
25     HttpServletResponse res = (HttpServletResponse) response;
26
27     System.out.println("*******开始执行过滤器1----->doFilter方法*********");
28     req.getRequestDispatcher("main.jsp").forward(request, response);//使用服务器内部转发
29     System.out.println("*******结束执行过滤器1----->doFilter方法**********");
30   }
31
32   public void init(FilterConfig arg0) throws ServletException {
33     System.out.println("*******执行过滤器1------>初始化方法***********");
34
35   }
36
37 }
运行结果:

2.FORWARD过滤器
将main.jsp的过滤规则改为FORWARD。
1 ……
2 <filter-mapping>
3         <filter-name>FirstFilter</filter-name>
4         <url-pattern>/main.jsp</url-pattern>
5         <dispatcher>FORWARD</dispatcher>
6  </filter-mapping>
7 ……
重新访问index.jsp

3.INCLUDE过滤器
INCLUDE和FORWARD过滤器的使用类似,对应的jsp动作是include。
4.ERROR过滤器
例如我们访问一个错误的页面时,系统会给出一个错误,用户看不懂这个错误是什么概念——我们需要给出一些人性化的提示。
以下是没有在web.xml中配置错误页,用户访问一个不存在的页面:

在web.xml中配置错误页:
 1 <?xml version="1.0" encoding="UTF-8"?>
 2 <web-app version="2.5"
 3   xmlns="http://java.sun.com/xml/ns/javaee"
 4   xmlns:xsi="http://www.w3.org/2001/XMLSchema-instance"
 5   xsi:schemaLocation="http://java.sun.com/xml/ns/javaee
 6   http://java.sun.com/xml/ns/javaee/web-app_2_5.xsd">
 7   <display-name></display-name>
 8   <welcome-file-list>
 9     <welcome-file>index.jsp</welcome-file>
10   </welcome-file-list>
11
12   <!-- 配置错误页面 -->
13   <error-page>
14     <error-code>404</error-code>
15     <location>/error.jsp</location>
16   </error-page>
17
18 </web-app>
在web.xml中配置404错误的页面为error.jsp则当用户访问一个不存在的页面时将会将error.jsp中的内容输出(以人性化的方式提示用户):

当页面出现错误或者异常的时候,ERROR过滤器可以将错误或者异常捕捉到,系统会记录下错误的信息,程序员就可以查找错误的来源。
新建一个ErrorFilter,并在web.xml中进行如下配置:
 1 <!-- 配置错误页面 -->
 2   <error-page>
 3     <error-code>404</error-code>
 4     <location>/error.jsp</location>
 5   </error-page>
 6 ……
 7 <filter>
 8     <filter-name>ErrorFilter</filter-name>
 9     <filter-class>filter.ErrorFilter</filter-class>
10 </filter>
11 <filter-mapping>
12     <filter-name>ErrorFilter</filter-name>
13     <url-pattern>/error.jsp</url-pattern>
14     <dispatcher>ERROR</dispatcher>
15 </filter-mapping>
16 ……
错误过滤器ErrorFilter
 1 package filter;
 2
 3 import java.io.IOException;
 4
 5 import javax.servlet.Filter;
 6 import javax.servlet.FilterChain;
 7 import javax.servlet.FilterConfig;
 8 import javax.servlet.ServletException;
 9 import javax.servlet.ServletRequest;
10 import javax.servlet.ServletResponse;
11
12 public class ErrorFilter implements Filter {
13
14     public void destroy() {
15
16     }
17
18     public void doFilter(ServletRequest request, ServletResponse response,
19             FilterChain filterChain) throws IOException, ServletException {
20         System.out.println("检测到错误信息!");
21         filterChain.doFilter(request, response);//注意打印错误后要放行,不然页面不会显示
22     }
23
24     public void init(FilterConfig filterConfig) throws ServletException {
25
26     }
27
28 }

J2EE5默认的web.xml是Servlet 2.5,J2EE6默认的web.xml是Servlet 3.0【支持异步处理】。
异步处理:如果在过滤器的doFilter()方法中页面跳转到了一个Servlet用于业务的处理,加入Servlet处理的业务时间花费很多,这时过滤器就会一直等待Servlet执行完成。这样用户体验就会非常差。Servlet 3.0支持异步处理。
在Servlet中新加入了@WebFilter Annotation。该Annotation用于将一个类声明为过滤器,该注解将会在部署时被容器处理,容器将根据具体的属性配置相应的类,将响应的类部署为过滤器。——因此我们不需要在web.xml中配置过滤器,只需要用注解的方式。@WebFilter的常用属性如下:

下面使用J2EE6.0创建一个Web项目,创建一个过滤器名称为AsyncFilter,使用@WebFilter Annotation配置该过滤器(PS:可以不再web.xml中注册该过滤器):
 1 package filter;
 2
 3 import java.io.IOException;
 4
 5 import javax.servlet.DispatcherType;
 6 import javax.servlet.Filter;
 7 import javax.servlet.FilterChain;
 8 import javax.servlet.FilterConfig;
 9 import javax.servlet.ServletException;
10 import javax.servlet.ServletRequest;
11 import javax.servlet.ServletResponse;
12 import javax.servlet.annotation.WebFilter;
13
14 @WebFilter(filterName = "AsyncFilter", value = { "/servlet/AsyncServlet" }, asyncSupported = true, dispatcherTypes = {
15         DispatcherType.ASYNC, DispatcherType.REQUEST })
16 public class AsyncFilter implements Filter {
17
18     @Override
19     public void destroy() {
20         System.out.println("***** 销毁AsyncFilter *****");
21     }
22
23     @Override
24     public void doFilter(ServletRequest request, ServletResponse response,
25             FilterChain filterChain) throws IOException, ServletException {
26         System.out.println("***** 开始AsyncFilter *****");
27         filterChain.doFilter(request, response);//放行
28         System.out.println("***** 结束AsyncFilter *****");
29     }
30
31     @Override
32     public void init(FilterConfig filterConfig) throws ServletException {
33         System.out.println("***** 初始化AsyncFilter *****");
34     }
35
36 }
创建一个处理业务的Servlet(该Servlet在doGet方法中使用了线程的休眠方法休眠了10s模拟业务的花费时间)
 1 package servlet;
 2
 3 import java.io.IOException;
 4 import java.util.Date;
 5
 6 import javax.servlet.AsyncContext;
 7 import javax.servlet.ServletException;
 8 import javax.servlet.http.HttpServlet;
 9 import javax.servlet.http.HttpServletRequest;
10 import javax.servlet.http.HttpServletResponse;
11
12 public class AsyncServlet extends HttpServlet {
13
14     public class Excutor implements Runnable{
15         private AsyncContext context;
16         public Excutor(AsyncContext context) {
17             this.context = context;
18         }
19
20         @Override
21         public void run() {
22             // 执行相关的复杂业务
23             try {
24                 Thread.sleep(1000*10);//休眠10s
25 //                context.getRequest();
26 //                context.getResponse();
27                 System.out.println("业务完成执行时间:"+new Date());
28             } catch (InterruptedException e) {
29                 e.printStackTrace();
30             }
31         }
32
33     }
34
35     public AsyncServlet() {
36         super();
37     }
38
39     public void destroy() {
40         super.destroy(); // Just puts "destroy" string in log
41     }
42
43     public void doGet(HttpServletRequest request, HttpServletResponse response)
44             throws ServletException, IOException {
45
46         AsyncContext context = request.startAsync(); //HttpServletRequest对象开始异步方法
47 //        context.getRequest();
48 //        context.getResponse();
49
50         System.out.println("Servlet执行开始时间:"+new Date());
51         new Thread(new Excutor(context)).start();
52         request.getRequestDispatcher("/index.jsp").forward(request, response);
53         System.out.println("Servlet执行结束时间:"+new Date());
54     }
55
56     public void doPost(HttpServletRequest request, HttpServletResponse response)
57             throws ServletException, IOException {
58
59         doGet(request, response);
60     }
61
62     public void init() throws ServletException {
63
64     }
65
66 }
编写好异步处理业务的Servlet类之后一定要在web.xml中配置该Servlet启用异步,如下图所示:

在index.jsp中有一个链接指向AsyncServlet:
<a href="<%=request.getContextPath() %>/servlet/AsyncServlet">点击跳转到AsyncServlet处理业务</a>
运行结果:

过滤器在实际项目中的应用场景

用户身份的验证
例如现在有一个web项目,登陆页login.jsp将用户名和密码提交给LoginServlet处理,Servlet使用request.getParameter方法获得表单中的用户名和密码,将用户名和密码进行验证,验证成功则页面重定向到success.jsp,显示登陆成功和登录的用户名【保存在session中再从session中取出】;如果登录失败则重定向到failure.jsp。
在不使用过滤器的情况下,即使用户不进行登录也可以访问到success.jsp——任何人都可以访问到success.jsp,这显然来说不安全。
验证用户身份的Servlet(验证用户名和密码都是admin):
 1 package servlet;
 2
 3 import java.io.IOException;
 4
 5 import javax.servlet.ServletException;
 6 import javax.servlet.http.HttpServlet;
 7 import javax.servlet.http.HttpServletRequest;
 8 import javax.servlet.http.HttpServletResponse;
 9 import javax.servlet.http.HttpSession;
10
11 public class LoginServlet extends HttpServlet {
12
13     public LoginServlet() {
14         super();
15     }
16
17     public void destroy() {
18         super.destroy(); // Just puts "destroy" string in log
19     }
20
21     public void doPost(HttpServletRequest request, HttpServletResponse response)
22             throws ServletException, IOException {
23         String username = request.getParameter("username");
24         String password = request.getParameter("password");
25
26         if ("admin".equals(username)&&"admin".equals(password)) {
27             // 验证通过
28             HttpSession session = request.getSession();
29             session.setAttribute("username", username);//把用户名放入session中
30             response.sendRedirect(request.getContextPath()+"/success.jsp");
31         }else {
32             // 验证失败
33             response.sendRedirect(request.getContextPath()+"/failure.jsp");
34         }
35     }
36
37     public void init() throws ServletException {
38
39     }
40
41 }
如下图所示:

现在我们要做这样一件事:只有用户登录成功才可以访问到success.jsp,反之跳转到登录界面。即:不允许未登录用户访问success.jsp。
创建一个登录校验的过滤器LoginFilter并在web.xml中配置该过滤器的url为success.jsp
 1 package servlet;
 2
 3 import java.io.IOException;
 4
 5 import javax.servlet.ServletException;
 6 import javax.servlet.http.HttpServlet;
 7 import javax.servlet.http.HttpServletRequest;
 8 import javax.servlet.http.HttpServletResponse;
 9 import javax.servlet.http.HttpSession;
10
11 public class LoginServlet extends HttpServlet {
12
13     public LoginServlet() {
14         super();
15     }
16
17     public void destroy() {
18         super.destroy(); // Just puts "destroy" string in log
19     }
20
21     public void doPost(HttpServletRequest request, HttpServletResponse response)
22             throws ServletException, IOException {
23         String username = request.getParameter("username");
24         String password = request.getParameter("password");
25
26         if ("admin".equals(username)&&"admin".equals(password)) {
27             // 验证通过
28             HttpSession session = request.getSession();
29             session.setAttribute("username", username);//把用户名放入session中
30             response.sendRedirect(request.getContextPath()+"/success.jsp");
31         }else {
32             // 验证失败
33             response.sendRedirect(request.getContextPath()+"/failure.jsp");
34         }
35     }
36
37     public void init() throws ServletException {
38
39     }
40
41 }
 1 <?xml version="1.0" encoding="UTF-8"?>
 2 <web-app version="2.5"
 3     xmlns="http://java.sun.com/xml/ns/javaee"
 4     xmlns:xsi="http://www.w3.org/2001/XMLSchema-instance"
 5     xsi:schemaLocation="http://java.sun.com/xml/ns/javaee
 6     http://java.sun.com/xml/ns/javaee/web-app_2_5.xsd">
 7   <display-name></display-name>
 8   <servlet>
 9     <description>This is the description of my J2EE component</description>
10     <display-name>This is the display name of my J2EE component</display-name>
11     <servlet-name>LoginServlet</servlet-name>
12     <servlet-class>servlet.LoginServlet</servlet-class>
13   </servlet>
14
15   <servlet-mapping>
16     <servlet-name>LoginServlet</servlet-name>
17     <url-pattern>/servlet/LoginServlet</url-pattern>
18   </servlet-mapping>
19   <welcome-file-list>
20     <welcome-file>index.jsp</welcome-file>
21   </welcome-file-list>
22     <filter>
23         <filter-name>LoginFilter</filter-name>
24         <filter-class>filter.LoginFilter</filter-class>
25     </filter>
26     <filter-mapping>
27         <filter-name>LoginFilter</filter-name>
28         <url-pattern>/success.jsp</url-pattern>
29     </filter-mapping>
30 </web-app>
加入过滤器之后(只有成功登录的用户【session中保存了该用户的用户名】才可以访问index.jsp):

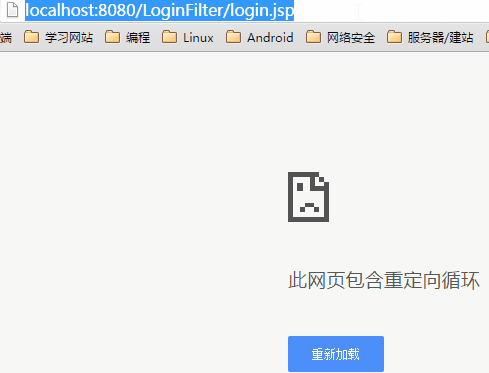
在实际的开发中一个网站的页面成百上千,这时我们可以使用通配符"/*"来匹配所有的url。但是这样带来一个问题:
当我们新建立一个session的时候,访问任何页面都会被重定向到login.jsp,login.jsp自己也重定向到login.jsp,这样就形成了重定向循环
这时就需要在过滤器中判断页面是否是login.jsp,如果是login.jsp或者请求的是LoginServlet就直接放行。在LoginFilter的doFilter方法中添加这样几行代码:
1 if (req.getRequestURI().indexOf("login.jsp")!=-1||req.getRequestURI().indexOf("LoginServlet")!=-1) {
2     filterChain.doFilter(request, response); // 如果用户请求的是login.jsp直接放行
3     return; // 这一行代码一定要加上啊!
4 }
运行结果:

上述程序看似已经没有问题,但是还存在一个小bug,当我们在登陆页输入一个错误的用户名和密码页面并不会重定向到failure.jsp而是重定向到了login.jsp。如下图所示:

这是因为虽然我们在Servlet验证失败的时候将页面重定向到了failure.jsp,failure.jsp又被过滤器重定向到了login.jsp【因为过滤规则为所有的页面,并且session中没有用户名】
这时我们就会发现我们在doFilter中需要例外的页面越来越多(登陆页面、成功页面、失败页面、错误页面……)。为了减轻工作的复杂度,我们可以使用过滤器的init方法中的FilterConfig对象。
1. 在web.xml中配置不过滤页面的初始化参数:

2. 在过滤方法中使用以上初始化参数。
 1 public class LoginFilter implements Filter{
 2
 3     private FilterConfig filterConfig;// 声明一个FilterConfig对象
 4
 5     public void init(FilterConfig filterConfig) throws ServletException {
 6         this.filterConfig = filterConfig; // 初始化方法的时候给filterConfig赋值
 7     }
 8
 9     public void destroy() {
10
11     }
12
13     public void doFilter(ServletRequest request, ServletResponse response,
14             FilterChain filterChain) throws IOException, ServletException {
15         // 代码省略
16     }
17
18 }
3. 在doFilter方法中使用FilterConfig对象获得初始化参数。
 1 public void doFilter(ServletRequest request, ServletResponse response,
 2         FilterChain filterChain) throws IOException, ServletException {
 3     HttpServletRequest req = (HttpServletRequest) request;
 4     HttpServletResponse res = (HttpServletResponse) response;
 5     HttpSession session = req.getSession();
 6
 7     String noLoginPaths = filterConfig.getInitParameter("noLoginPaths");
 8     if (noLoginPaths!=null&&noLoginPaths.length()>0) {
 9         String[]temp = noLoginPaths.split(";");
10         for (String string : temp) {
11             if (string==null||"".equals(string)) {
12                 continue;
13             }
14             // 例外的URL,如果符合这些URL就直接放行
15             if (req.getRequestURI().indexOf(string)!=-1) {
16                 filterChain.doFilter(request, response); // 如果用户请求的是login.jsp直接放行
17                 return; // 这一行代码一定要加上啊!
18             }
19         }
20     }
21
22     if (session.getAttribute("username")!=null) {
23         filterChain.doFilter(request, response); // 如果用户已经登录则放行
24     }else {
25         res.sendRedirect("login.jsp");
26     }
27 }
这样就完成了一个比较完整的登录验证。
编码转换
以上面的登录页面为例,在处理登录页的LoginServlet中我们将用户提交的用户名打印出来:
1 public void doPost(HttpServletRequest request, HttpServletResponse response)
2             throws ServletException, IOException {
3     String username = request.getParameter("username");
4     System.out.println("用户提交的用户名是:" + username);
5
6 }

后台的输出出现了乱码!
已知的2种处理乱码的方式:
1 String username = request.getParameter("username");
2
3 request.setCharacterEncoding("utf-8");                // 【方式1】修改请求的编码方式
4 new String(username.getBytes("iso-8859-1"),"utf-8")   // 【方式2】使用特定编码重新构建字符串
除此之外,还可以使用过滤器解决以上问题。
在过滤器的doFilter方法的第一行代码加上以下代码:
request.setCharacterEncoding("utf-8");
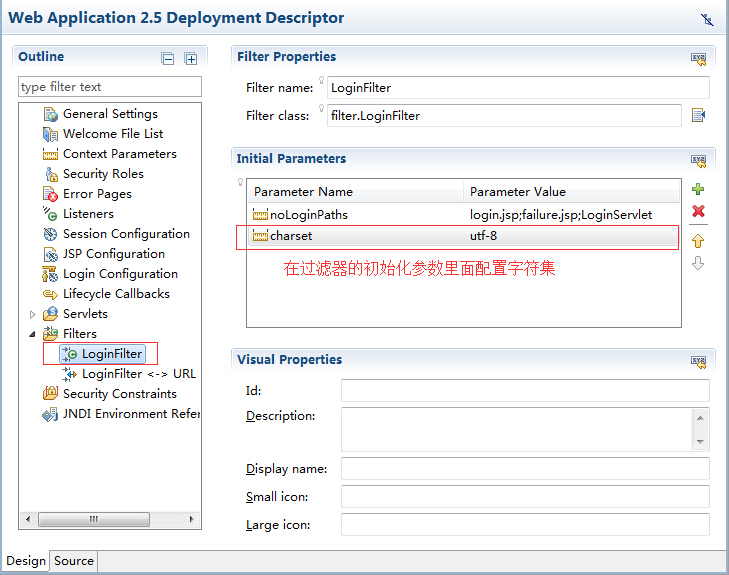
这样一次设置就可以让该网站的所有页面都不会乱码(因为请求总是先到达过滤器)。但是为了更好地完成服务器的配置,我们一般在过滤器的初始化参数里配置字符集:
然后在doFilter方法中这样调用:
 1 public class LoginFilter implements Filter{
 2
 3     private FilterConfig filterConfig;// 声明一个FilterConfig对象
 4
 5     public void destroy() {
 6
 7     }
 8
 9     public void doFilter(ServletRequest request, ServletResponse response,
10             FilterChain filterChain) throws IOException, ServletException {
11
12         String charset = filterConfig.getInitParameter("charset");
13         if (charset == null) {
14             charset = "utf-8"; // 如果没有指定字符集,默认是utf-8
15         }
16         request.setCharacterEncoding(charset); // 从初始化参数里面获得字符集
17
18         // 代码省略
19
20     }
21
22     public void init(FilterConfig filterConfig) throws ServletException {
23         this.filterConfig = filterConfig; // 初始化方法的时候给filterConfig赋值
24     }
25
26 }