.Net Core 3.0 IdentityServer4 快速入门
一、简介
IdentityServer4是用于ASP.NET Core的OpenID Connect和OAuth 2.0框架。
将IdentityServer4部署到您的应用中具备如下特点:
1)、认证服务
2)、单点登陆
3)、API访问控制
4)、联合网关
5)、专注于定制
6)、成熟的开源系统
7)、免费和商业支持
二、整体部署
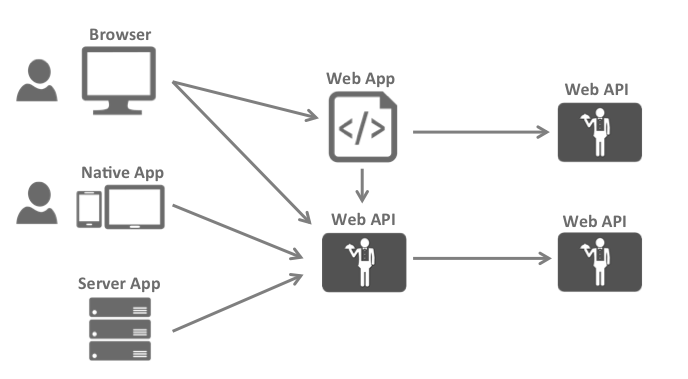
目前大多数的应用程序或多或少看起来是上图所示这样的,最常见的交互场景有(浏览器与Web应用程序、Web应用程序与WebApi通讯、本地应用程序狱WebApi通讯、基于浏览器的应用程序与WebApi 通讯、基本服务器的应用程序与WebApi通讯、WebApi与WebApi通讯)
前端、中间层、后端各个层级为了保护资源经常要针对相同的用户仓储区实现身份认证和授权,但是如果我们把这些基本的安全功能统一颁发给一个安全令牌服务,就可以不必再让这些应用和端点之间重复实现这些基础安全功能,重组应用程序以支持安全令牌服务将会引导出以下体系结构和协议
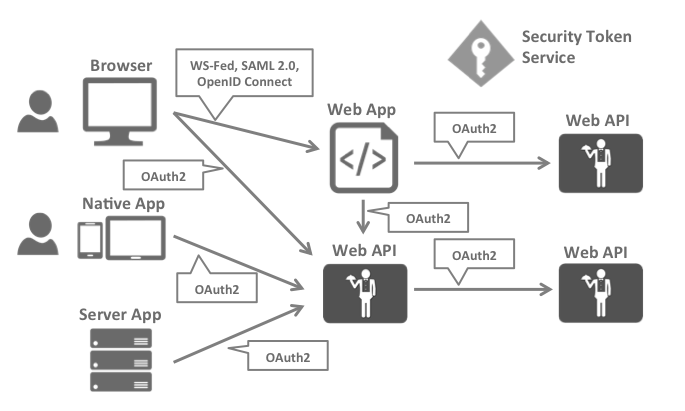
这样的设计将会把安全问题分为两个部分:(身份验证和API访问)
三、IdentityServer4如何提供帮助
IdentityServer是将规范兼容的OpenID Connect和OAuth 2.0端点添加到任意ASP.NET Core应用程序的中间件。通常,您构建(或重新使用)包含登录和注销页面的应用程序,IdentityServer中间件会向其添加必要的协议头,以便客户端应用程序可以与其对话 使用这些标准协议。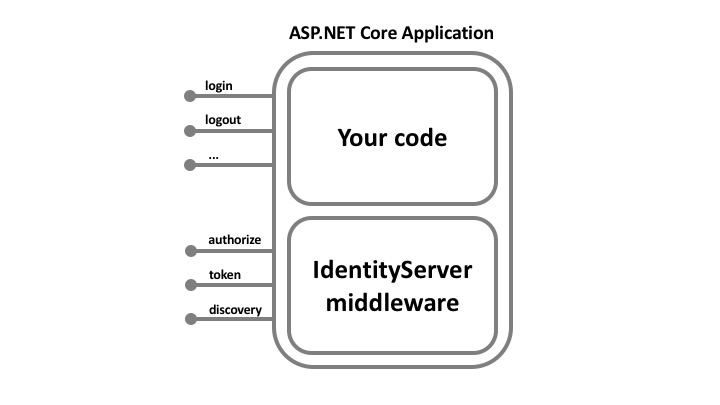
四、术语

1)、Users(用户):用户是使用已注册的客户端访问资源的人
2)、Clients(客户端):客户端就是从identityserver请求令牌的软件(你可以理解为一个app即可),既可以通过身份认证令牌来验证识别用户身份,又可以通过授权令牌来访问服务端的资源。但是客户端首先必须在申请令牌前已经在identityserver服务中注册过。实际客户端不仅可以是Web应用程序,app或桌面应用程序(你就理解为pc端的软件即可),SPA,服务器进程等
3)、Resources(资源):
资源就是你想用identityserver保护的东东,可以是用户的身份数据或者api资源。
每一个资源都有一个唯一的名称,客户端使用这个唯一的名称来确定想访问哪一个资源(在访问之前,实际identityserver服务端已经配置好了哪个客户端可以访问哪个资源,所以你不必理解为客户端只要指定名称他们就可以随便访问任何一个资源)。
用户的身份信息实际由一组claim组成,例如姓名或者邮件都会包含在身份信息中(将来通过identityserver校验后都会返回给被调用的客户端)。
API资源就是客户端想要调用的功能(通常以json或xml的格式返回给客户端,例如webapi,wcf,webservice),通常通过webapi来建立模型,但是不一定是webapi,我刚才已经强调可以使其他类型的格式,这个要看具体的使用场景了。
4)、Identity Token(身份令牌):
一个身份令牌指的就是对认证过程的描述。它至少要标识某个用户(Called the sub aka subject claim)的主身份信息,和该用户的认证时间和认证方式。但是身份令牌可以包含额外的身份数据,具体开发者可以自行设定,但是一般情况为了确保数据传输的效率,开发者一般不做过多额外的设置,大家也可以根据使用场景自行决定。
5)、Access Token(访问令牌):
访问令牌允许客户端访问某个 API 资源。客户端请求到访问令牌,然后使用这个令牌来访问 API资源。访问令牌包含了客户端和用户(如果有的话,这取决于业务是否需要,但通常不必要)的相关信息,API通过这些令牌信息来授予客户端的数据访问权限。
五、代码快速入门 (使用客户端凭据保护)
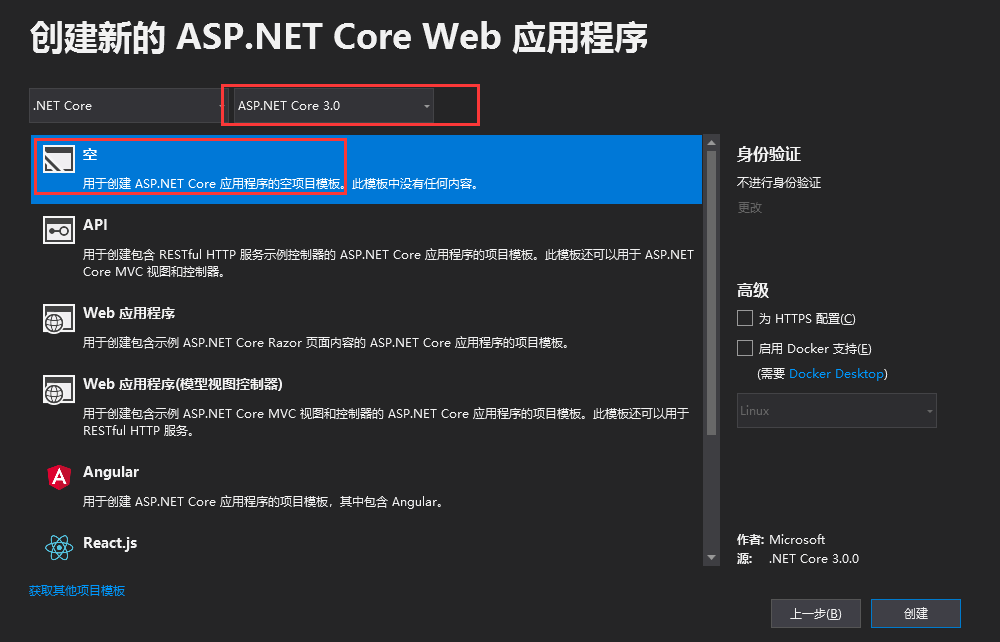
1)、IdentityServer
a)、定义Api资源和客户端
Api 是您系统中要保护的资源,资源的定义可以通过多种方式
客户端代码中的ClientId和ClientSecret你可以视为应用程序本身的登录名和密码,它将您的应用程序标识到IdentityServer 服务器,以便它知道哪个应用程序正在尝试与其连接


using IdentityServer4.Models;
using System.Collections.Generic;

namespace IdentityServer
{
    public static class Config
    {
        public static IEnumerable<ApiResource> Apis
            => new List<ApiResource>
        {
            new ApiResource("api1","My API")
        };

        public static IEnumerable<Client> Clients =>
            new List<Client>
            {
                new Client
                {
                    ClientId="client",
                    AllowedGrantTypes =GrantTypes.ClientCredentials,
                    ClientSecrets={
                    new Secret("aju".Sha256())
                    },
                    AllowedScopes={ "api1"}
                }
            };
    }
}
b)、配置IdentityServer
using Microsoft.AspNetCore.Builder;
using Microsoft.AspNetCore.Hosting;
using Microsoft.Extensions.DependencyInjection;
using Microsoft.Extensions.Hosting;

namespace IdentityServer
{
    public class Startup
    {
        // This method gets called by the runtime. Use this method to add services to the container.
        // For more information on how to configure your application, visit https://go.microsoft.com/fwlink/?LinkID=398940
        public void ConfigureServices(IServiceCollection services)
        {
            var builder = services.AddIdentityServer()
                .AddInMemoryApiResources(Config.Apis)
                .AddInMemoryClients(Config.Clients);
            builder.AddDeveloperSigningCredential();
        }

        // This method gets called by the runtime. Use this method to configure the HTTP request pipeline.
        public void Configure(IApplicationBuilder app, IWebHostEnvironment env)
        {
            if (env.IsDevelopment())
            {
                app.UseDeveloperExceptionPage();
            }

            app.UseIdentityServer();

            //app.UseRouting();

            //app.UseEndpoints(endpoints =>
            //{
            //    endpoints.MapGet("/", async context =>
            //    {
            //        await context.Response.WriteAsync("Hello World!");
            //    });
            //});
        }
    }
}
c)、测试(如果配置合适,在浏览器访问 http://localhost:5000/.well-known/openid-configuration 出现如下表示配置OK)
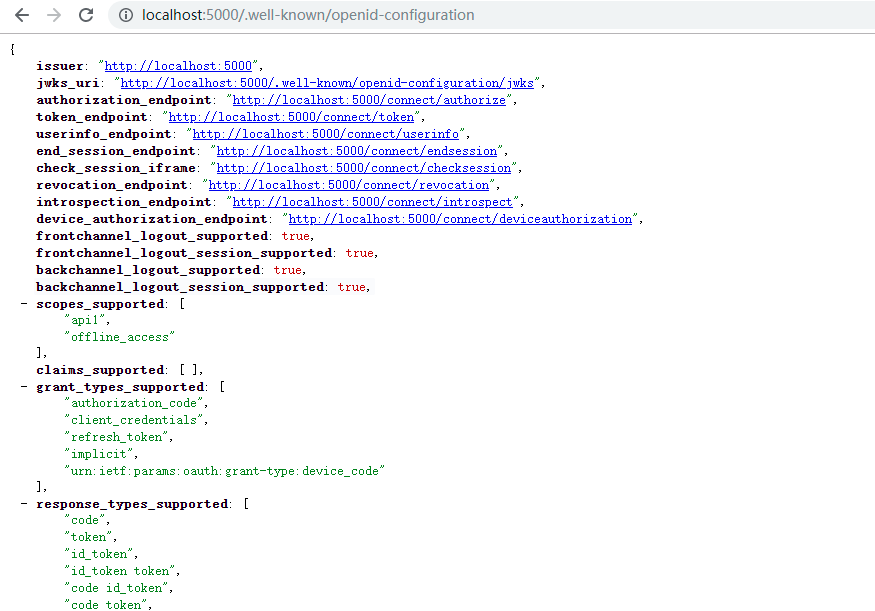
首次启动时,IdentityServer将为您创建一个开发人员签名密钥,该文件名为tempkey.rsa。您无需将该文件签入源代码管理中,如果不存在该文件将被重新创建。
d)、所需的包

2)、添加Api资源
a)、添加一个名为IdentityController的控制器
using Microsoft.AspNetCore.Authorization;
using Microsoft.AspNetCore.Mvc;
using System.Linq;

namespace Api.Controllers
{
    [Route("identity")]
    [Authorize]
    public class IdentityController : ControllerBase
    {
        public IActionResult Get()
        {
            return new JsonResult(from c in User.Claims select new { c.Type, c.Value });
        }
    }
}
b)、配置(将身份认证服务添加到DI,并将身份验证中间件添加到管道)
using Microsoft.AspNetCore.Builder;
using Microsoft.AspNetCore.Hosting;
using Microsoft.Extensions.Configuration;
using Microsoft.Extensions.DependencyInjection;
using Microsoft.Extensions.Hosting;

namespace Api
{
    public class Startup
    {
        public Startup(IConfiguration configuration)
        {
            Configuration = configuration;
        }

        public IConfiguration Configuration { get; }

        // This method gets called by the runtime. Use this method to add services to the container.
        public void ConfigureServices(IServiceCollection services)
        {
            services.AddControllers();
            services.AddAuthentication("Bearer").AddJwtBearer("Bearer", options =>
            {
                options.Authority = "http://localhost:5000";
                options.RequireHttpsMetadata = false;
                options.Audience = "api1";
            });
        }

        // This method gets called by the runtime. Use this method to configure the HTTP request pipeline.
        public void Configure(IApplicationBuilder app, IWebHostEnvironment env)
        {
            if (env.IsDevelopment())
            {
                app.UseDeveloperExceptionPage();
            }

            app.UseRouting();

            app.UseAuthentication();//认证
            app.UseAuthorization();//授权


            app.UseEndpoints(endpoints =>
            {
                endpoints.MapControllers();
            });
        }
    }
}
AddAuthentication:将身份认证服务添加到DI比配置Bearer为默认
AddAuthentication:将身份认证服务添加到管道中,以便对主机的每次调用都将自动执行身份验证
AddAuthentication:添加授权中间件,以确保匿名客户端无法访问我们的API资源
http://localhost:5001/identity 在浏览器上访问应返回401状态代码。这意味着您的API需要凭据,并且现在受IdentityServer保护。
c)、所需的包

3)、创建客户端(已控制台的形式)
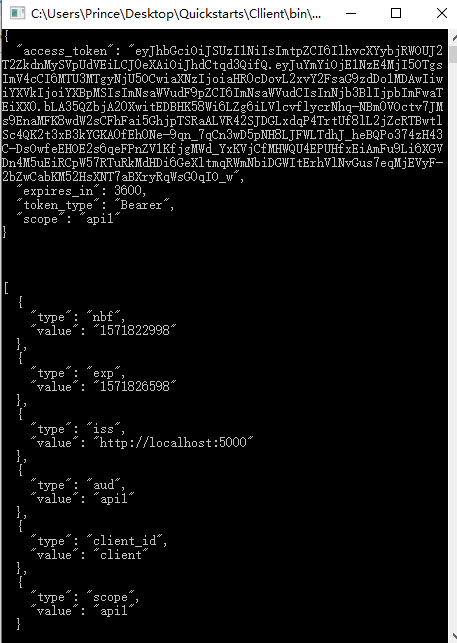
using IdentityModel.Client;
using Newtonsoft.Json.Linq;
using System;
using System.Net.Http;
using System.Threading.Tasks;

namespace Client
{
    class Program
    {
        static async Task Main(string[] args)
        {
            // Console.WriteLine("Hello World!");
            var client = new HttpClient();
            var disco = await client.GetDiscoveryDocumentAsync("http://localhost:5000");
            if (disco.IsError)
            {
                Console.WriteLine(disco.Error);
                return;
            }
            var tokenResponse = await client.RequestClientCredentialsTokenAsync(new ClientCredentialsTokenRequest
            {
                Address = disco.TokenEndpoint,
                ClientId = "client",
                ClientSecret = "aju",
                Scope = "api1"
            });
            if (tokenResponse.IsError)
            {
                Console.WriteLine(tokenResponse.Error);
                return;
            }
            Console.WriteLine(tokenResponse.Json);
            Console.WriteLine("

");
            //call api

            var apiClient = new HttpClient();
            apiClient.SetBearerToken(tokenResponse.AccessToken);
            var response = await apiClient.GetAsync("http://localhost:5001/identity");
            if (!response.IsSuccessStatusCode)
            {
                Console.WriteLine(response.StatusCode);
            }
            else
            {
                var content = await response.Content.ReadAsStringAsync();
                Console.WriteLine(JArray.Parse(content));
            }
            Console.ReadLine();
        }
    }
}
a)、所需的包

4)、使用客户端访问Api资源
六、参考文献
http://docs.identityserver.io/en/latest/index.html
如果对您有帮助,请点个推荐(让更多需要的人看到哦)