- Harbor 简介
- 使用 DNSMASQ 快速搭建简单 DNS 服务
- 为 Harbor 签发域名证书
- 信任自签发的域名证书
- Harbor 1.8 版本配置与安装
- 镜像管理与安全: 漏洞扫描和镜像签名
- 镜像复制与同步
- Harbor HA: 环境与准备
- Harbor HA: 修改配置
- Harbor HA: 启动 Harbor
- Harbor HA: keepalived 安装配置与测试
- OpenLDAP 安装与配置
- OpenLDAP 创建组织架构与用户 和 Harbor 配置
Harbor 简介
- 简介
- VMware 的开源项目 https://github.com/vmware/harbor
- Harbor 可帮助用户迅速搭建企业级的 Registry 服务, 它提供了管理图形界面, 基于角色的访问控制 ( Role Based Access Control), 镜像远程复制 (同步), AD/LDAP 集成, 以及审计日志等企业用户需求的功能, 同时还原生支持中文, 深受中国用户的喜爱;
- 该项目自退出以来, 在 GitHub 获得了超过 3300 多个 star 和 900 多个 forks (截至 2017-12-25)
- 主要功能
- 基于角色的访问控制: 用户与 Docker 镜像仓库通过 "项目" 进行组织管理, 一个用户可以对多个镜像仓库在同一命名空间(project)里有不同的权限
- 图形化用户界面: 用户可以通过浏览器来浏览, 检索当前 Docker 镜像仓库, 管理项目和命名空间
- 审计管理: 所有针对镜像仓库的操作都可以被记录追溯, 用于审计管理
- 国际化: 基于英文与中文语言进行了本地化, 可以增加更多的语言信息
- RESTful API: 提供给管理员对于 Harbor 更多的操控, 使得与其它管理软件集成变得更容易
- LDAP 认证
- 基于策略的 Docker 镜像复制功能, 可在不同的数据中心, 不同的运行环境之间同步镜像, 并提供友好的管理界面, 大大简化了实际运维中的镜像管理工作
- 与 Clair 集成, 添加漏洞扫描功能(可以设置漏洞级别, 当漏洞级别达到一定程度时, 限制镜像的拉取) . Clair 是 coreos 开源的容器漏洞扫描工具, 在容器逐渐普及的几天, 容器镜像安全问题日益严重, Clair 是目前少数的开源安全扫描工具
- Notary 是 Docker 镜像的签名工具, 用来保证镜像在 pull , push 和传输过程中的一致性和完整性, 避免中间人攻击, 避免非法的镜像更新和运行
使用 DNSMASQ 快速搭建简单 DNS 服务
- 环境 DNS Server(DNS服务器) / Demo Server (测试DNS服务器);
CPU 1核↑ CPU 1核↑
内存 512M↑ 内存 512M↑
磁盘 10G↑ 磁盘 10G↑
IP:192.168.9.28(自定义) IP: 192.168.9.30(自定义)
- 目标
- 快速安装本地 DNS 服务器;
- 使用 DNS 来自动设置主机名;
- 步骤
- 安装 dnsmasq
- 修改配置
- 启动 DNS 服务
- 测试
// DNS 服务器安装 dnsmasq
[root@localhost ~]# yum -y install dnsmasq

// 修改配置文件, 添加一行指定文件(存放dns地址)位置
[root@localhost ~]# vim /etc/dnsmasq.conf
... ...
110 #addn-hosts=/etc/banner_add_hosts
111 addn-hosts=/etc/domains
... ...

// 修改 /etc/domains 文件, 格式同 hosts 文件相同, IP 地址对应主机域名
[root@localhost ~]# vim /etc/domains
192.168.9.30    test-dns.mine.com

// 启动 dnsmasq 服务, 并设置开机启动
[root@localhost ~]# /etc/init.d/dnsmasq start
Starting dnsmasq:                                          [  OK  ]
[root@localhost ~]# chkconfig --level 35 dnsmasq on
// 修改测试机的 dns
[root@tian ~]# vim /etc/resolv.conf
nameserver 192.168.9.28

// 确定测试机可以ping 通, 及防火墙
[root@rong ~]# vim /etc/sysctl.conf net.ipv4.icmp_echo_ignore_all = 0
[root@rong ~]# sysctl -p
[root@rong ~]# echo 0 > /proc/sys/net/ipv4/icmp_echo_ignore_all          // 临时开启
[root@rong ~]# ping test-dns.mine.com
PING test-dns.mine.com (192.168.9.30) 56(84) bytes of data.
64 bytes from test-dns.mine.com (192.168.9.30): icmp_seq=1 ttl=64 time=0.016 ms

// 使用 dig 或者 nslookup 跟踪 test-dns.mine.com; dig中可看到 A 记录 test-dns.mine.com 解析192.168.9.30
[root@rong ~]# dig test-dns.mine.com

; <<>> DiG 9.9.4-RedHat-9.9.4-74.el7_6.1 <<>> test-dns.mine.com
;; global options: +cmd
;; Got answer:
;; ->>HEADER<<- opcode: QUERY, status: NOERROR, id: 20131
;; flags: qr aa rd ra ad; QUERY: 1, ANSWER: 1, AUTHORITY: 0, ADDITIONAL: 0

;; QUESTION SECTION:
;test-dns.mine.com.        IN    A

;; ANSWER SECTION:
test-dns.mine.com.    0    IN    A    192.168.9.30

;; Query time: 0 msec
;; SERVER: 192.168.9.28#53(192.168.9.28)
;; WHEN: Sun Jun 30 23:41:14 EDT 2019
;; MSG SIZE  rcvd: 51

[root@rong ~]# nslookup test-dns.mine.com
Server:        192.168.9.28
Address:    192.168.9.28#53

Name:    test-dns.mine.com
Address: 192.168.9.30
为 Harbor 签发域名证书
// Linux中自己手动签发 ssl 证书
// 创建一个存放 证书 的目录
mkdir -p /data/ssl && cd /data/ssl

// 使用 RSA 方式加密, 生成 ca.key , 长度为 3072
[root@localhost ssl]# openssl genrsa -out ca.key 3072
Generating RSA private key, 3072 bit long modulus
...............................................................................++
.........................................................................................................................++
e is 65537 (0x10001)

// 通过 key 生成证书, 有效期为 1095 = 三年
[root@localhost ssl]# openssl req -new -x509 -days 1095 -key ca.key -out ca.pem
You are about to be asked to enter information that will be incorporated
into your certificate request.
What you are about to enter is what is called a Distinguished Name or a DN.
There are quite a few fields but you can leave some blank
For some fields there will be a default value,
If you enter '.', the field will be left blank.
-----
Country Name (2 letter code) [XX]:CN                 // 国家
State or Province Name (full name) []:BJ             // 州或者省名
Locality Name (eg, city) [Default City]:BJ           // 城市名称
Organization Name (eg, company) [Default Company Ltd]:zxjr      // 组织名称
Organizational Unit Name (eg, section) []:           // 组织单位名称(空)
Common Name (eg, your name or your server's hostname) []:       // 你的名称或服务器主机名
Email Address []:                                               // 邮箱

// 生成域名的证书
[root@localhost ssl]# openssl genrsa -out wap.zxjr.com.key 3072
Generating RSA private key, 3072 bit long modulus
........++
.......++
e is 65537 (0x10001)

// 生成证书请求,, 是后面签发证书时所需要的
[root@localhost ssl]# openssl req -new -key wap.zxjr.com.key -out wap.zxjr.com.csr
You are about to be asked to enter information that will be incorporated
into your certificate request.
What you are about to enter is what is called a Distinguished Name or a DN.
There are quite a few fields but you can leave some blank
For some fields there will be a default value,
If you enter '.', the field will be left blank.
-----
Country Name (2 letter code) [XX]:CN
State or Province Name (full name) []:BJ
Locality Name (eg, city) [Default City]:BJ
Organization Name (eg, company) [Default Company Ltd]:zxjr
Organizational Unit Name (eg, section) []:
Common Name (eg, your name or your server's hostname) []:wap.zxjr.com              // 填写域名,
Email Address []:

Please enter the following 'extra' attributes
to be sent with your certificate request
A challenge password []:
An optional company name []:

// 生成域名证书
[root@localhost ssl]# openssl x509 -req -in wap.zxjr.com.csr -CA ca.pem -CAkey ca.key -CAcreateserial -out wap.zxjr.com.pem -days 1095
Signature ok
subject=/C=CN/ST=BJ/L=BJ/O=zxjr/CN=wap.zxjr.com
Getting CA Private Key

// 查看生成的证书
[root@localhost ssl]# ll
total 24
-rw-r--r-- 1 root root 2455 Jul  1 02:06 ca.key
-rw-r--r-- 1 root root 1533 Jul  1 02:09 ca.pem
-rw-r--r-- 1 root root   17 Jul  1 02:26 ca.srl
-rw-r--r-- 1 root root 1314 Jul  1 02:21 wap.zxjr.com.csr
-rw-r--r-- 1 root root 2455 Jul  1 02:15 wap.zxjr.com.key
-rw-r--r-- 1 root root 1448 Jul  1 02:26 wap.zxjr.com.pem

// 确认一下 wap.zxjr.com.pem 证书
[root@localhost ssl]# openssl x509 -noout -text -in wap.zxjr.com.pem
Certificate:
    Data:
        Version: 1 (0x0)
        Serial Number:
            c8:19:22:49:3d:f8:f1:b3
    Signature Algorithm: sha256WithRSAEncryption
        Issuer: C=CN, ST=BJ, L=BJ, O=zxjr
        Validity           // 有效期从 2019年7月1号到 2022年6月30号.
            Not Before: Jul  1 06:26:03 2019 GMT
            Not After : Jun 30 06:26:03 2022 GMT
        Subject: C=CN, ST=BJ, L=BJ, O=zxjr, CN=wap.zxjr.com
        Subject Public Key Info:
            Public Key Algorithm: rsaEncryption
                Public-Key: (3072 bit)
                Modulus:
                    00:ac:11:ce:8e:e6:f9:a4:18:2a:24:f2:e3:d8:af:
                    60:8d:8f:ef:b1:ef:47:de:07:29:7c:3e:cd:f1:b2:
                    80:1c:d6:11:2c:41:1d:35:13:9b:8a:8b:c6:9b:ac:
                    44:34:fa:fd:c0:24:f9:7f:b1:77:d7:bb:59:2b:99:
                    64:6a:25:8e:0f:77:f1:38:eb:bd:dc:da:a9:70:40:
                    bd:6a:ca:0e:bc:3d:0a:08:d2:77:55:fa:06:31:df:
                    eb:26:23:fe:fd:ba:5f:d2:4c:41:3f:f8:bd:b9:36:
                    ab:64:51:63:e4:5b:a8:ed:1c:da:8c:a6:6f:93:9b:
                    57:dd:fc:03:b5:62:67:ce:f5:a9:39:a3:da:0a:03:
                    7b:18:f7:95:aa:1b:f9:6e:80:88:f8:44:8b:58:91:
                    47:66:ff:a0:af:d7:b8:6d:d7:fa:23:e3:7a:54:4d:
                    61:2c:8c:26:5f:d4:d4:14:71:75:69:a7:68:f9:7b:
                    e8:08:96:6a:5c:6f:f2:8f:0f:b1:88:b2:fc:db:67:
                    2f:2f:c7:30:05:ba:ed:b0:a5:de:77:55:45:5d:7f:
                    36:b0:93:a8:06:f3:96:86:ee:b6:db:ef:8e:54:b0:
                    ee:97:85:5f:45:29:e9:c7:a5:9a:ce:a9:ef:3a:b0:
                    f5:31:9e:b5:d8:3d:87:f1:d0:18:92:d9:74:a4:29:
                    d2:6a:ab:63:d6:17:d1:b2:2f:ec:04:6c:d0:cc:de:
                    6b:54:ab:b4:56:5c:71:36:43:6e:37:03:2b:db:de:
                    ab:fe:5c:0c:de:fd:c9:60:cd:58:f1:86:1b:fe:39:
                    df:f7:06:2e:d3:5a:26:13:78:fa:7d:33:61:8d:59:
                    5d:ee:32:9d:74:9c:94:1e:a1:c3:22:61:05:6b:20:
                    a7:87:28:fb:7f:55:04:9d:c2:00:b4:30:59:32:89:
                    3a:4b:7e:27:df:5f:f7:ed:a5:23:32:ec:b6:7f:e0:
                    3c:3b:b4:a0:ae:cf:4a:89:8f:b9:41:d3:d9:78:4f:
                    df:ce:ed:82:b0:cd:1d:86:e7:11
                Exponent: 65537 (0x10001)
    Signature Algorithm: sha256WithRSAEncryption
         23:90:b7:cc:cf:a5:ee:10:f2:37:a0:42:42:50:cf:30:59:71:
         46:e5:53:1e:13:9b:a5:5e:95:7c:ea:c5:44:0c:6d:71:55:e1:
         53:ac:ae:f2:66:2d:4e:76:ea:00:7d:7b:f7:93:6d:77:e6:0e:
         59:3c:33:7e:91:17:75:c8:49:e3:14:65:07:51:f2:69:cd:7f:
         ee:34:a3:97:5f:4e:1b:27:f6:93:7b:95:7f:2f:30:83:58:35:
         c6:74:86:f8:86:05:c9:53:38:e3:71:06:07:a4:8b:57:6c:b4:
         69:19:30:93:3a:82:04:d6:93:fd:64:3c:5c:23:56:61:73:8d:
         d1:93:7b:2c:ab:69:60:72:32:20:82:33:f7:af:71:fb:7e:48:
         aa:df:e0:dc:14:f1:e8:9d:64:b8:89:92:e4:f2:5b:ed:f8:ca:
         a6:1b:ce:ea:20:8a:73:9e:5d:73:fa:e5:4f:fe:c6:60:43:ff:
         23:c2:5b:79:db:61:a1:f9:47:48:a5:cf:e5:ee:cc:bb:6c:f8:
         3f:31:bd:70:a3:55:22:2b:c1:f9:9d:29:67:89:74:bd:d5:af:
         2f:4c:df:72:87:20:d4:9c:2b:1f:f9:33:f2:04:d2:06:56:9b:
         63:74:01:16:6f:66:32:e1:f3:56:d1:51:94:ad:09:6c:a5:a5:
         40:17:2f:42:a4:31:28:a4:cb:07:05:86:ca:6d:e5:02:84:57:
         ac:75:06:78:11:96:3c:b2:e1:76:a1:91:c7:7a:ce:eb:84:cc:
         55:e8:5b:f5:2e:fa:da:af:38:8d:63:9e:74:e0:79:56:7c:e9:
         de:c7:96:c2:44:91:9e:95:4c:dd:2d:d5:3d:bf:99:6a:61:22:
         21:78:8b:a1:49:8b:d7:74:3c:69:57:88:f1:f0:3a:81:16:62:
         c3:29:22:e8:0c:16:55:5c:cd:81:63:71:40:0c:11:a4:28:e4:
         9b:6c:d2:a5:2e:6d:99:59:24:34:9c:83:9f:e9:1e:71:27:ca:
         40:bd:e1:5b:25:0c
信任自签发的域名证书
// 证书是我们在服务器上自签发的, 服务器不信任, 需要添加信任
[root@localhost ssl]# cp ca.pem /etc/pki/ca-trust/source/anchors/
[root@localhost ssl]# update-ca-trust enable
[root@localhost ssl]# update-ca-trust extract   // 更新版本
Harbor 1.8 版本配置与安装
// Harbor 对文件系统, 分区没有什么要求, 首先创建目录,并进入 [root@localhost ~]# mkdir -p /data/harbor [root@localhost ~]# cd /data/harbor // 安装 docker , 前面有安装部署docker-ce , 并启动 https://www.cnblogs.com/haorong/p/11008652.html // 将证书文件放置到 /etc/ssl/harbor 目录下 [root@localhost harbor]# ll /etc/ssl/harbor/ total 8 -rw-r--r-- 1 root root 2455 Jul 1 03:11 wap.zxjr.com.key -rw-r--r-- 1 root root 1448 Jul 1 03:11 wap.zxjr.com.pem // 使用最新的稳定版本 Latest release, 使用离线版本, 若是下载慢的话, 有一个镜像网站 http://harbor.orientsoft.cn/; 可下载对应版本的包; // 搜索地址: https://github.com/goharbor/harbor/releases [root@localhost harbor]# curl -LO https://storage.googleapis.com/harbor-releases/release-1.8.0/harbor-offline-installer-v1.8.0.tgz // 解压 tar xf harbor-offline-installer-v1.8.0.tgz // harbor的配置文件从1.8.0 以后, 由 harbor.cfg 改为 harbor.yml; 修改配置文件 [root@localhost harbor]# vim harbor.yml 1 # Configuration file of Harbor 2 3 # The IP address or hostname to access admin UI and registry service. 4 # DO NOT use localhost or 127.0.0.1, because Harbor needs to be accessed by external clients. 5 hostname: wap.zxjr.com 6 7 # http related config 8 # http: 9 # port for http, default is 80. If https enabled, this port will redirect to https port 10 # port: 80 11 12 # https related config 13 https: // 使用 https 14 # # https port for harbor, default is 443 15 port: 443 16 # # The path of cert and key files for nginx 17 # certificate: /your/certificate/path 18 # private_key: /your/private/key/path 19 certificate: /etc/ssl/harbor/wap.zxjr.com.pem // ssl证书 20 private_key: /etc/ssl/harbor/wap.zxjr.com.key ... ... // 安装docker-compose, 需要epel源; [root@localhost yum.repos.d]# yum -y install epel-release
[root@localhost yum.repos.d]# yum -y install python-pip
[root@localhost yum.repos.d]# pip install docker-compose
若有报错'''
You are using pip version 8.1.2, however version 19.2.2 is available.
You should consider upgrading via the 'pip install --upgrade pip' command
''' 需要先升级pip
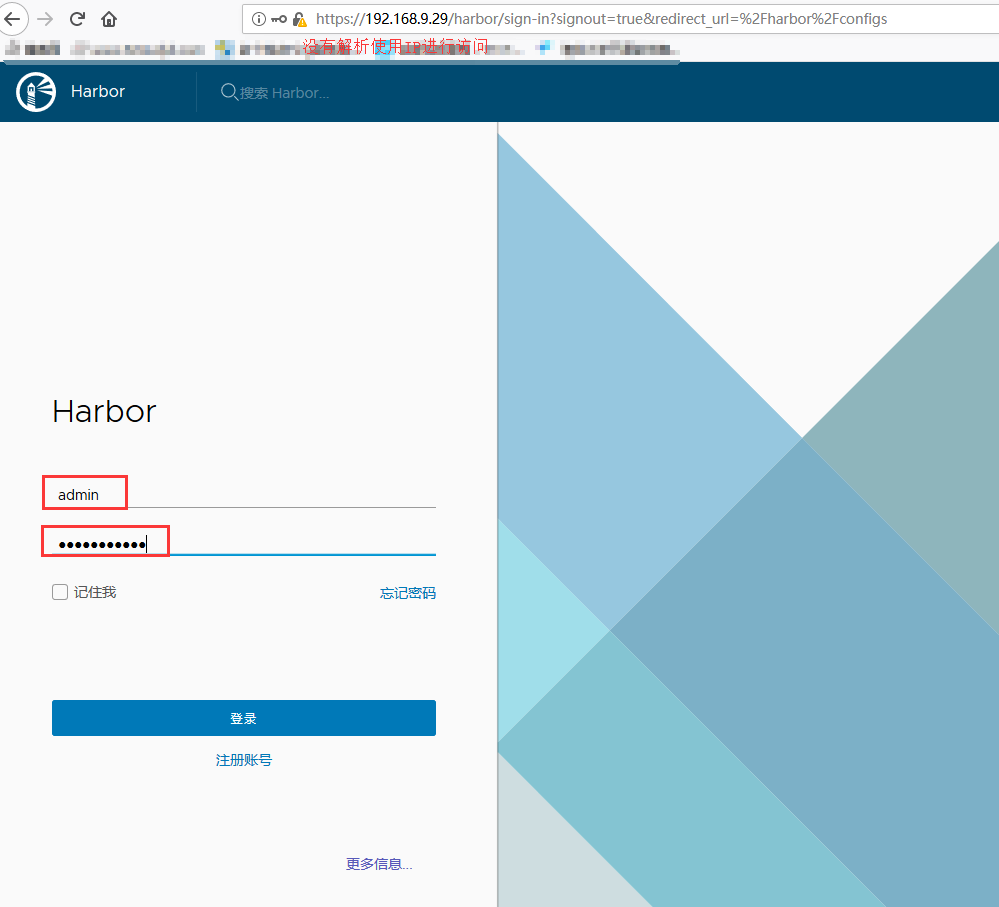
[root@localhost yum.repos.d]# pip install --upgrade pip [root@localhost yum.repos.d]# yum -y install docker-compose // 执行install.sh, 启动镜像签名 --with-notary , 启动漏洞扫描 --with-clair; 若是有docker容器,需要清空后再运行下面命令; [root@localhost harbor]# ./install.sh --with-notary --with-clair // 查看运行的容器 [root@wap harbor]# docker ps -a CONTAINER ID IMAGE COMMAND CREATED STATUS PORTS NAMES e3ea64a9c609 goharbor/nginx-photon:v1.8.0 "nginx -g 'daemon of…" 51 seconds ago Up 49 seconds (healthy) 0.0.0.0:80->80/tcp, 0.0.0.0:443->443/tcp, 0.0.0.0:4443->4443/tcp nginx dd989d38885b goharbor/notary-server-photon:v0.6.1-v1.8.0 "/bin/server-start.sh" 52 seconds ago Up 50 seconds notary-server 3a8b664a60bb goharbor/harbor-jobservice:v1.8.0 "/harbor/start.sh" 53 seconds ago Up 51 seconds harbor-jobservice 26e23dd78065 goharbor/harbor-portal:v1.8.0 "nginx -g 'daemon of…" 53 seconds ago Up 51 seconds (healthy) 80/tcp harbor-portal ... ... // 下面使用浏览器访问,需要在本机上对 hosts文件中 wap.zxjr.com 做解析
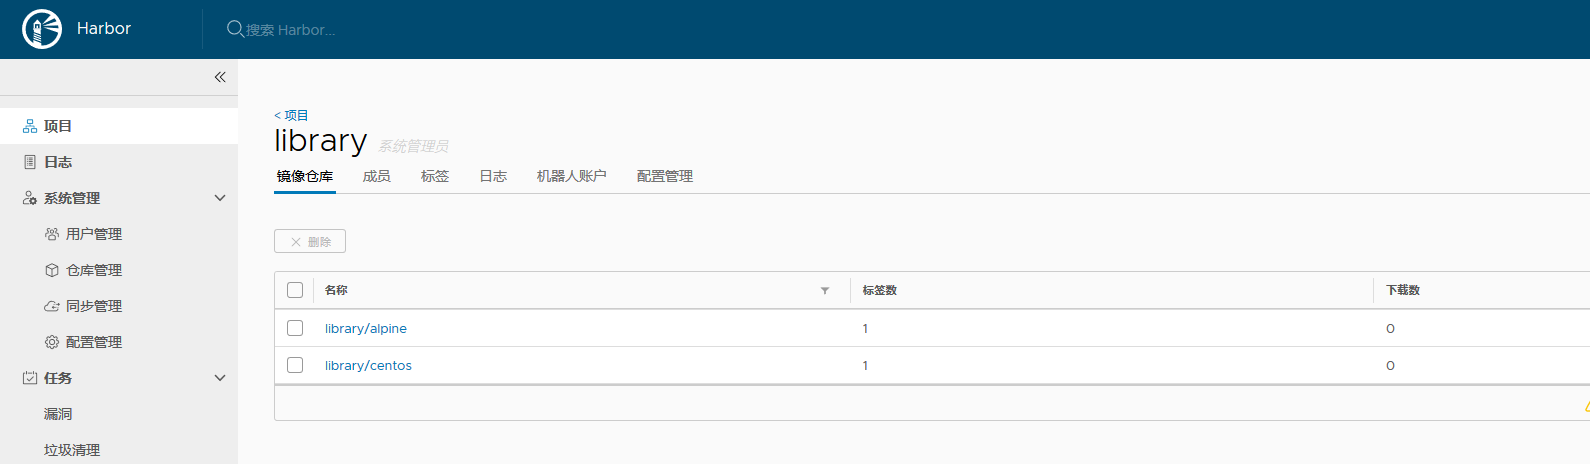
镜像管理与安全: 漏洞扫描和镜像签名
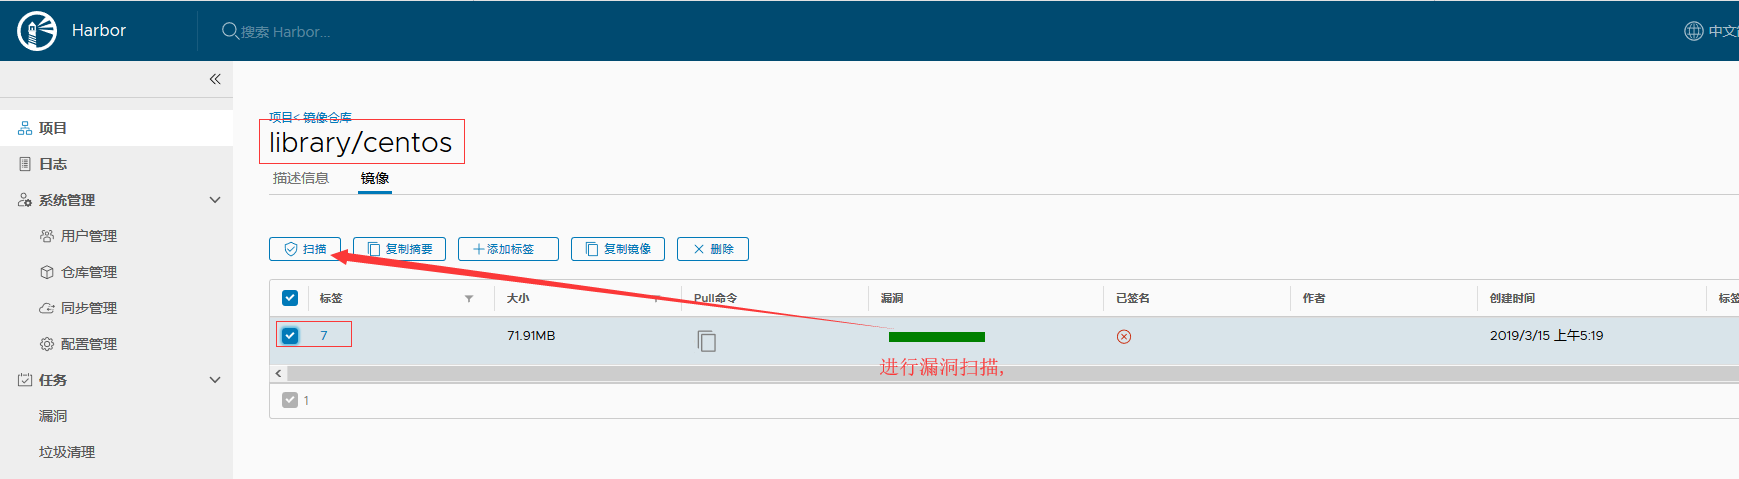
- 上传镜像 --> 镜像扫描

// 仓库的使用, 首先将镜像重新打标签
[root@wap ~]# docker images |grep centos
centos                          7                          9f38484d220f        3 months ago        202MB
[root@wap ~]# docker tag centos:7 wap.zxjr.com/library/centos:7

// 需要在本机中的hosts文件添加解析
192.168.9.29     wap.zxjr.com

// 推送之前, 需要提前登录, 否则requested access to the resource is denied
[root@wap ~]# docker login -u admin wap.zxjr.com
Password:
WARNING! Your password will be stored unencrypted in /root/.docker/config.json.
Configure a credential helper to remove this warning. See
https://docs.docker.com/engine/reference/commandline/login/#credentials-store

Login Succeeded

[root@wap ~]# docker push wap.zxjr.com/library/centos:7
The push refers to repository [wap.zxjr.com/library/centos]
d69483a6face: Pushed
7: digest: sha256:ca58fe458b8d94bc6e3072f1cfbd334855858e05e1fd633aa07cf7f82b048e66 size: 529
// 刷新 harbor 仓库, centos:7 镜像已经上传, 进行漏洞扫描;
// 再上传一个镜像
[root@wap ~]# docker tag alpine wap.zxjr.com/library/alpine:latest
[root@wap ~]# docker push wap.zxjr.com/library/alpine:latest
The push refers to repository [wap.zxjr.com/library/alpine]
256a7af3acb1: Pushed
latest: digest: sha256:97a042bf09f1bf78c8cf3dcebef94614f2b95fa2f988a5c07314031bc2570c7a size: 528

// 再次查看 harbor 仓库; 扫描那还是需要手动扫描...
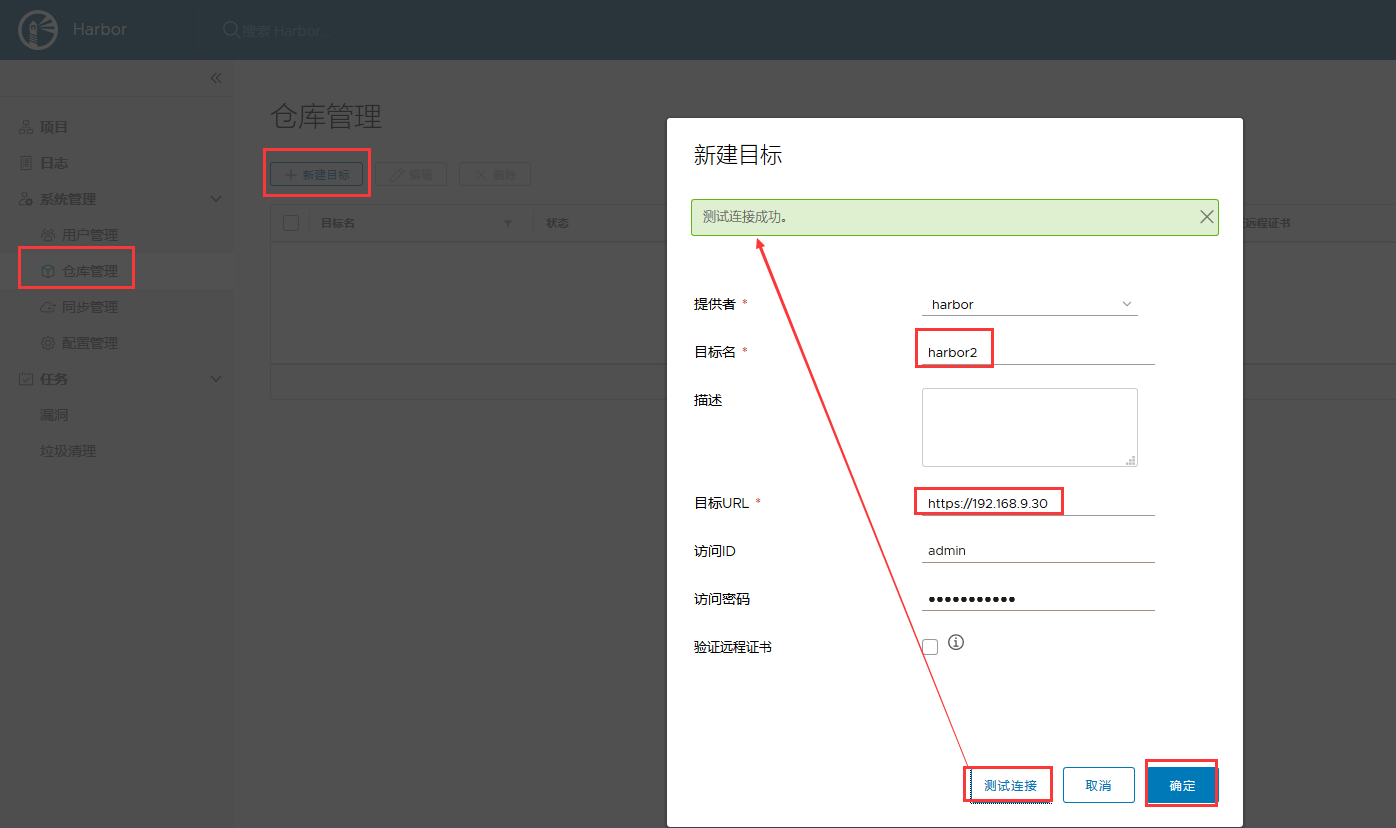
镜像复制与同步
- Harbor的主从复制, 一对多.
- 再起一个 Harbor; 按上面步骤走, 签发并信任域名证书, 安装 Harbor
- 应用场景: 公司存在多个机房, 跨机房harbor下载镜像慢, 多个机房存在多个 Harbor
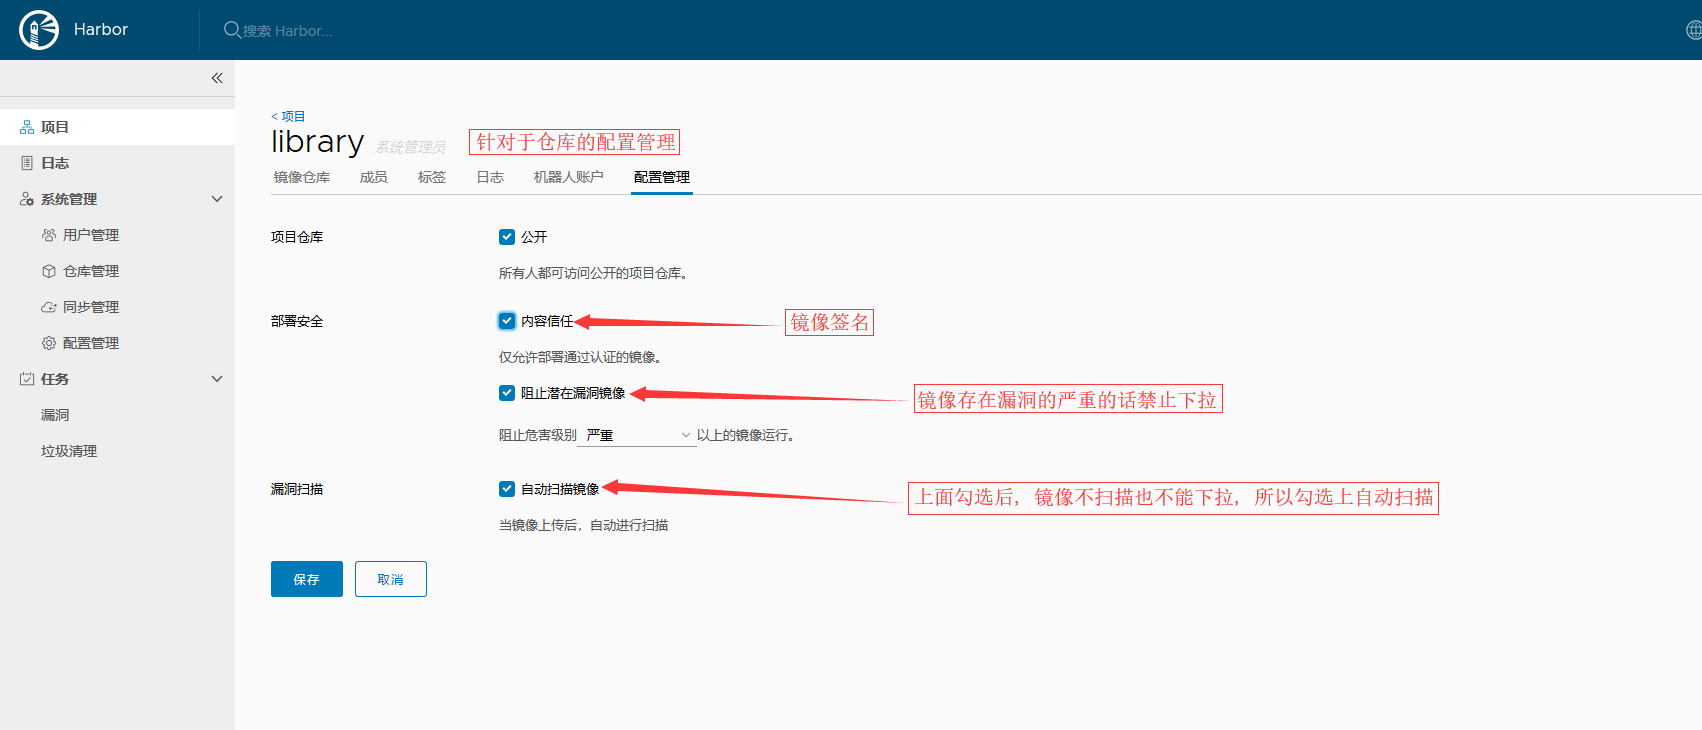
- 上面仓库配置时勾选 "阻止潜在漏洞镜像" 后, 镜像存在漏洞, 匹配到 严重/中等/较低(自己设置的) 后, 不会将此镜像同步到 harbor2 中;
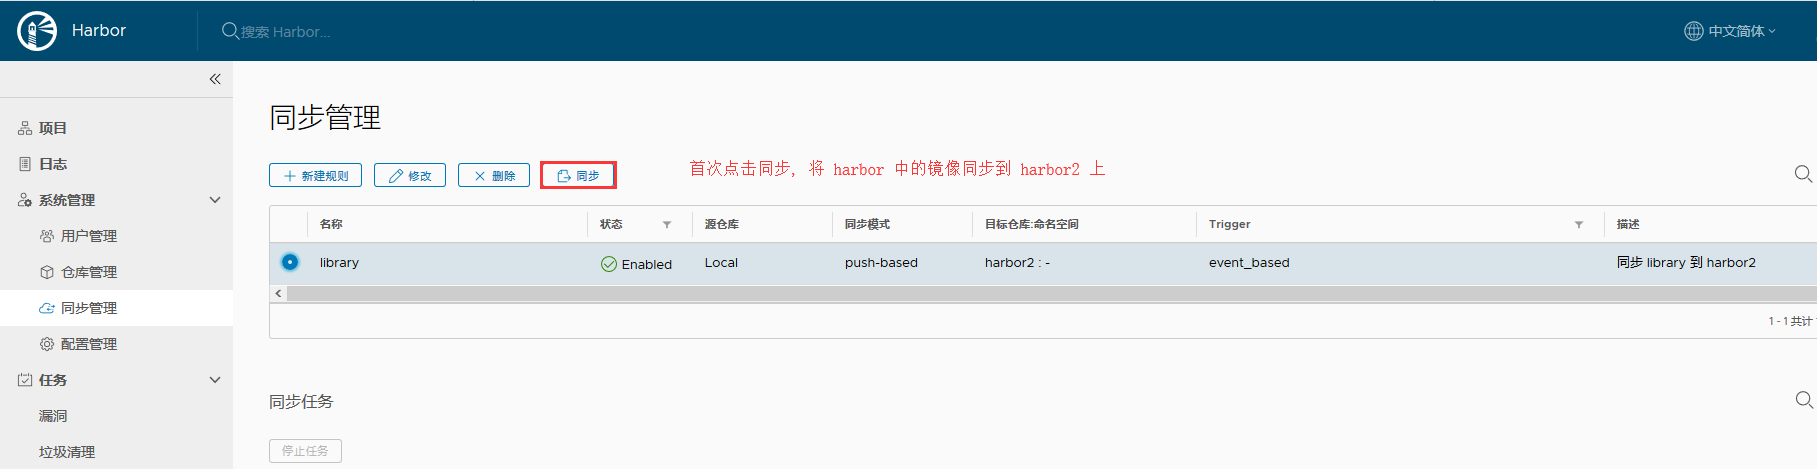
- 随后再生成 镜像后,推送到harbor上, 就会自动同步到 harbor2上
Harbor HA: 环境与准备
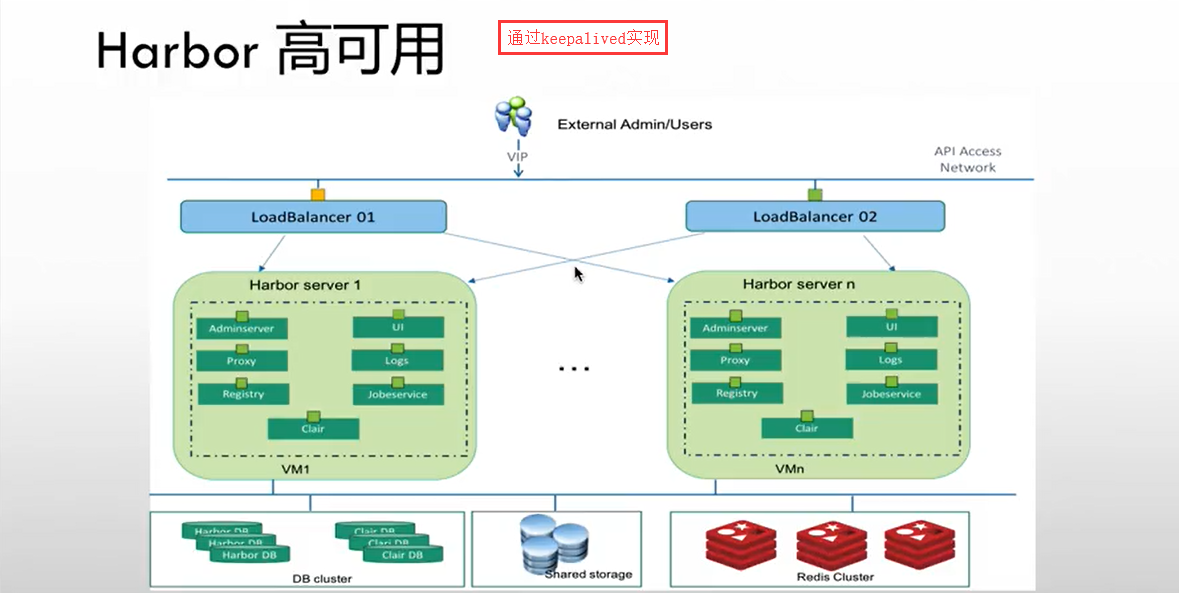
- Harbor Server 2 台 -- 9.29 9.30
- 运行组件: (无状态的组件, 它们的数据都保存在数据库中的)
- AdminServer
- Proxy
- Registry
- UI
- Logs
- Clair
- JobService
- Harbor HA: 文件存储(尽量也使用高可用, NFS是便于使用, 生产中不要用 NFS)
- 共享存储使用 NFS
- 192.168.9.31:/data/nfs
- 支持: (可以使用下面标示的文件系统, 可高可用)
- Swift
- NFS
- S3
- Azure
- GCS
- ClusterFS
- Ceph
- OSS
- 共享存储使用 NFS
- Harbor HA: 数据库
- Harbor 数据库( MySQL ) 192.168.9.32:3306
- Clair 数据库 ( PostgreSQL ) 192.168.9.32:5432
- Session ( Redis ) 192.168.9.32:6379
- Harbor HA: Keepalived
- VIP: 192.168.9.33
- Harbor1: 192.168.9.29
- Harbor2: 192.168.9.30
- VIP: 192.168.9.33
// 9.31 上安装 nfs
mkdir /data/nfs                                   // 创建储存目录
yum -y install nfs-utils                          // 安装nfs
vim /etc/exports                                  // 编辑配置文件, 将目录发不出去;9网段可读可写,
/data/nfs       192.168.9.0/24(rw,no_root_squash)
    // (1) Ro 该主机对该共享目录有只读权限
    // (2) Rw 该主机对该共享目录有读写权限
    // (3) Root_squash 客户机用root用户访问该共享文件夹时,将root用户映射成匿名用户
    // (4) No_root_squash 客户机用root访问该共享文件夹时,不映射root用户
    // (5) All_squash 客户机上的任何用户访问该共享目录时都映射成匿名用户
    // (6) Anonuid 将客户机上的用户映射成指定的本地用户ID的用户
    // (7) Anongid 将客户机上的用户映射成属于指定的本地用户组ID
    // (8) Sync 资料同步写入到内存与硬盘中
    // (9) Async 资料会先暂存于内存中,而非直接写入硬盘
    // (10) Insecure 允许从这台机器过来的非授权访问
    // (11) subtree_check           如果共享/usr/bin之类的子目录时,强制NFS检查父目录的权限(默认)
    // (12) no_subtree_check        和上面相对,不检查父目录权限
    // (13) wdelay                  如果多个用户要写入NFS目录,则归组写入(默认)
    // (14 )no_wdelay               如果多个用户要写入NFS目录,则立即写入,当使用async时,无需此设置。
    // (15) hide                       在NFS共享目录中不共享其子目录
    // (16) no_hide                 共享NFS目录的子目录
    // (17) secure                  NFS通过1024以下的安全TCP/IP端口发送
    // (18) insecure                NFS通过1024以上的端口发送

// 启动 nfs 并设置开机启动
systemctl start nfs
systemctl enable nfs

// 两个 harbor 节点挂载目录; 挂载的客户端上也需要安装 nfs
yum -y install nfs-utils
mkdir /data/public
mount -t nfs 192.168.9.31:/data/nfs /data/public

// 查看挂载
df -hT |grep 192
192.168.9.31:/data/nfs nfs4       10G   32M   10G   1% /data/public

// 测试, harbor1 上创建测试文件, 在harbor2和nfs上查看, 存在...
echo "12345 test nfs" > /data/public/test
cat /data/public/test                          // harbor2 上
12345 test nfs
cat /data/nfs/test                             // nfs 上
12345 test nfs
// 9.32 上安装 docker, 并使用docker启动 redis
yum -y install yum-utils device-mapper-persistent-data lvm2
yum-config-manager --add-repo=http://download.docker.com/linux/centos/docker-ce.repo
yum -y install docker-ce
systemctl start docker
systemctl enable docker
docker run -d -p 6379:6379 redis:alpine
[root@localhost ~]# docker ps
CONTAINER ID        IMAGE               COMMAND                  CREATED             STATUS              PORTS                    NAMES
99e7f00fddb6        redis:alpine        "docker-entrypoint.s…"   16 minutes ago      Up 16 minutes       0.0.0.0:6379->6379/tcp   elegant_bartik
[root@localhost ~]# docker inspect -f {{.NetworkSettings.Networks.bridge.IPAddress}} 99e
172.17.0.2
// 9.32 上使用 docker 启动 PostgreSQL 数据库; -e 参数后面这里指定的是数据库的密码
docker run -d -p 5432:5432 -e POSTGRES_PASSWORD=harborp postgres
[root@localhost ~]# docker ps
CONTAINER ID        IMAGE               COMMAND                  CREATED             STATUS              PORTS                    NAMES
0d94c22fd68d        postgres            "docker-entrypoint.s…"   11 minutes ago      Up 11 minutes       0.0.0.0:5432->5432/tcp   loving_morse
99e7f00fddb6        redis:alpine        "docker-entrypoint.s…"   About an hour ago   Up About an hour    0.0.0.0:6379->6379/tcp   elegant_bartik
[root@localhost ~]# docker inspect -f {{.NetworkSettings.Networks.bridge.IPAddress}} 0d9
172.17.0.3
// 使用 docker 运行 mysql
docker run -d -e MYSQL_ROOT_PASSWORD=harbor -p 3306:3306 mysql:5.6
[root@localhost ~]# docker ps
CONTAINER ID        IMAGE               COMMAND                  CREATED             STATUS              PORTS                    NAMES
d2c1db976e0a        mysql:5.6           "docker-entrypoint.s…"   5 minutes ago       Up 5 minutes        0.0.0.0:3306->3306/tcp   affectionate_tesla
0d94c22fd68d        postgres            "docker-entrypoint.s…"   2 hours ago         Up 2 hours          0.0.0.0:5432->5432/tcp   loving_morse
99e7f00fddb6        redis:alpine        "docker-entrypoint.s…"   2 hours ago         Up 2 hours          0.0.0.0:6379->6379/tcp   elegant_bartik
// 为三个容器更改名称
[root@localhost ~]# docker rename d2c mysql
[root@localhost ~]# docker rename 0d9 clair
[root@localhost ~]# docker rename 99e session
[root@localhost ~]# docker ps
CONTAINER ID        IMAGE               COMMAND                  CREATED             STATUS              PORTS                    NAMES
d2c1db976e0a        mysql:5.6           "docker-entrypoint.s…"   6 minutes ago       Up 6 minutes        0.0.0.0:3306->3306/tcp   mysql
0d94c22fd68d        postgres            "docker-entrypoint.s…"   2 hours ago         Up 2 hours          0.0.0.0:5432->5432/tcp   clair
99e7f00fddb6        redis:alpine        "docker-entrypoint.s…"   2 hours ago         Up 2 hours          0.0.0.0:6379->6379/tcp   session
Harbor HA: 修改配置
// 此处操作的是 harbor 1.4 版本的操作, /usr/local/harbor/ 目录下有 ha/ 目录;
cd /usr/local/harbor
ll ha/
total 24
-rw-r--r-- 1 root root  603 Feb  6  2018 docker-compose.clair.tpl
-rw-r--r-- 1 root root  599 Feb  6  2018 docker-compose.clair.yml
-rw-r--r-- 1 root root 2959 Feb  6  2018 docker-compose.tpl
-rw-r--r-- 1 root root 2926 Feb  6  2018 docker-compose.yml
-rw-r--r-- 1 root root 7630 Feb  6  2018 registry.sql
drwxr-xr-x 4 root root   49 Feb  6  2018 sample

// 连接 mysql ; 并将 registry.sql 导入, 没有 registry 数据库的话, 直接导入就行; 药是存在 registry 数据库的话, 先将库里的数据导出来, 再导入新的;
mysql -uroot -pharbor -h 192.168.9.32 -P 3306
MySQL [(none)]> source ha/registry.sql
MySQL [registry]> show databases;                                    // 查看数据库, registry已创建好;
+--------------------+
| Database           |
+--------------------+
| information_schema |
| mysql              |
| performance_schema |
| registry           |
+--------------------+
4 rows in set (0.00 sec)
MySQL [registry]> use registry;                                      // 进入 registry 库
Database changed
MySQL [registry]> show tables;                                       // 查看库中的表
+-------------------------------+
| Tables_in_registry            |
+-------------------------------+
| access                        |
| access_log                    |
| alembic_version               |
| clair_vuln_timestamp          |
| img_scan_job                  |
| img_scan_overview             |
| project                       |
| project_member                |
| project_metadata              |
| properties                    |
| replication_immediate_trigger |
| replication_job               |
| replication_policy            |
| replication_target            |
| repository                    |
| role                          |
| user                          |
+-------------------------------+
17 rows in set (0.00 sec)

// 修改 docker-compose.yml 配置文件中数据存放的路径, /data/public 为挂载目录;
vim ha/docker-compose.yml
  1 version: '2'
  2 services:
  3   log:
  4     image: vmware/harbor-log:v1.4.0
  5     container_name: harbor-log
  6     restart: always
  7     volumes:
  8       - /data/public/:/var/log/docker/:z
  ... ...

// 修改 harbor.cfg; 数据库 redis Postgres 连接信息
vim harbor.cfg
  1 ## Configuration file of Harbor
  2
  3 #The IP address or hostname to access admin UI and registry service.
  4 #DO NOT use localhost or 127.0.0.1, because Harbor needs to be accessed by external clients.
  5 hostname = wap.zxjr.com                    // 修改为harbor服务器的域名;
  6
  7 #The protocol for accessing the UI and token/notification service, by default it is http.
  8 #It can be set to https if ssl is enabled on nginx.
  9 ui_url_protocol = https                    // 使用https;
 10
 11 #Maximum number of job workers in job service
 12 max_job_workers = 3
 13
 14 #Determine whether or not to generate certificate for the registry's token.
 15 #If the value is on, the prepare script creates new root cert and private key
 16 #for generating token to access the registry. If the value is off the default key/cert will b    e used.
 17 #This flag also controls the creation of the notary signer's cert.
 18 customize_crt = on
 19
 20 #The path of cert and key files for nginx, they are applied only the protocol is set to https
 21 ssl_cert = /etc/ssl/harbor/wap.zxjr.com.pem                    // 使用生成的签名证书;
 22 ssl_cert_key = /etc/ssl/harbor/wap.zxjr.com.key
 ... ...
 110 #######Harbor DB configuration section#######
111
112 #The address of the Harbor database. Only need to change when using external db.
113 db_host = 192.168.9.32               // 配置数据库的ip地址;
114
115 #The password for the root user of Harbor DB. Change this before any production use.
116 db_password = harbor                 // 更改为docker启动时使用的密码;
117
118 #The port of Harbor database host
119 db_port = 3306
120
121 #The user name of Harbor database
122 db_user = root
123
124 ##### End of Harbor DB configuration#######
125
126 #The redis server address. Only needed in HA installation.
127 redis_url = 192.168.9.32:6379        // 配置 redis 的ip + 端口
128
129 ##########Clair DB configuration############
130
131 #Clair DB host address. Only change it when using an exteral DB.
132 clair_db_host = 192.168.9.32         // postgres 数据库的地址;
133
134 #The password of the Clair's postgres database. Only effective when Harbor is deployed with C    lair.
135 #Please update it before deployment. Subsequent update will cause Clair's API server and Harb    or unable to access Clair's database.
136 clair_db_password = harborp
137
138 #Clair DB connect port
139 clair_db_port = 5432
140
141 #Clair DB username
142 clair_db_username = postgres
143
144 #Clair default database
145 clair_db = postgres

// 修改common/templates/registry/config_ha.yml
vim common/templates/registry/config_ha.yml
version: 0.1
log:
  level: debug
  fields:
    service: registry
storage:
  cache:
    layerinfo: redis                      // 缓存使用 redis
  $storage_provider_info
  maintenance:
    uploadpurging:
      enabled: false
  delete:
    enabled: true
redis:
  addr: $redis_url                        // redis地址
  db: 0
Harbor HA: 启动 Harbor
// 启动 harbor
cd /usr/local/harbor
./install.sh --with-clair --ha

// 第一台启动成功后, 配置第二台harbor, 相同的配置, 可以将第一台的harbor目录直接拷贝到第二台上, 并将生成的证书也拷贝
cd /usr/local
scp -r harbor/ 192.168.9.30:/usr/local/
cd /etc/ssl/harbor
scp wap.zxjr.com.* 192.168.9.30:$PWD            // $PWD表示当前目录

// 在第二台 harbor 服务器上查看,harbor目录及证书都存在后, 启动 harbor
cd /usr/local/harbor
./install.sh --with-clair --ha
Harbor HA: keepalived 安装配置与测试
// 第一台harbor安装 keepalived
yum -y install keepalived

// 修改keepalived配置文件; 可参考 https://github.com/goharbor/harbor/blob/release-1.4.0/make/ha/sample/active_active/keepalived_active_active.conf
cd /etc/keepalived
cp keepalived.conf keepalived.conf.original                // 备份原配置文件
vim keepalived.conf
! Configuration File for keepalived

vrrp_instance VI_1 {
    state MASTER
    interface eth0
    virtual_router_id 55
    priority 100
    advert_int 1
    authentication {
        auth_type PASS
        auth_pass 1111
    }
    virtual_ipaddress {
        192.168.9.33
    }
}

virtual_server 192.168.9.33 80 {
    delay_loop 6
    lb_algo rr
    lb_kind NAT
    persistence_timeout 50
    protocol TCP

    real_server 192.168.9.29 80 {
        weight 1
    }
}

// 配置健康检查脚本 check.sh ; 官方文档中 https://github.com/goharbor/harbor/blob/release-1.4.0/make/ha/sample/active_active/check.sh
vim /usr/local/bin/check.sh
#!/bin/bash

set -e
#get protocol

#LOG=/var/log/keepalived_check.log
nodeip=$1
nodeaddress="http://${nodeip}"
http_code=`curl -s -o /dev/null -w "%{http_code}" ${nodeaddress}`

if [ $http_code == 200 ] ; then
  protocol="http"
elif [ $http_code == 301 ]
then
  protocol="https"
else
#  echo "`date +"%Y-%m-%d %H:%M:%S"` $1, CHECK_CODE=$http_code" >> $LOG
  exit 1
fi

systeminfo=`curl -k -o - -s ${protocol}://${nodeip}/api/systeminfo`

echo $systeminfo | grep "registry_url"
if [ $? != 0 ] ; then
  exit 1
fi
#TODO need to check Clair, but currently Clair status api is unreachable from LB.
# echo $systeminfo | grep "with_clair" | grep "true"
# if [ $? == 0 ] ; then
# clair is enabled
# do some clair check
# else
# clair is disabled
# fi

#check top api

http_code=`curl -k -s -o /dev/null -w "%{http_code}
" ${protocol}://${nodeip}/api/repositories/top`
set +e
if [ $http_code == 200 ] ; then
  exit 0
else
  exit 1
fi

// 添加可执行权限
chmod +x /usr/local/bin/check.sh

// 启动 keepalived ; 并查看ip
systemctl start keepalived
ip a |grep eth0
2: eth0: <BROADCAST,MULTICAST,UP,LOWER_UP> mtu 1500 qdisc mq state UP qlen 1000
    inet 192.168.9.29/24 brd 192.168.9.255 scope global eth0
    inet 192.168.9.33/32 scope global eth0

// 在第二台 harbor 上安装 keepalived; 并从第一台harbor 上拷贝 keepalived配置文件及check.sh 到第二台harbor 服务器上;
yum -y install keepalived
scp keepalived.conf 192.168.9.30:/etc/keepalived/
scp /usr/local/bin/check.sh 192.168.9.30:/usr/local/bin/

// 修改 keepalived.conf 文件
vim keepalived.conf

! Configuration File for keepalived

vrrp_instance VI_1 {
    state BACKUP
    interface eth0
    virtual_router_id 55
    priority 90
    advert_int 1
    authentication {
        auth_type PASS
        auth_pass 1111
    }
    virtual_ipaddress {
        192.168.9.33
    }
}

virtual_server 192.168.9.33 80 {
    delay_loop 6
    lb_algo rr
    lb_kind NAT
    persistence_timeout 50
    protocol TCP

    real_server 192.168.9.30 80 {
        weight 1
    }
}

// 启动 keepalived
systemctl start keepalived

// 访问第二台的IP地址, 若是报连接超时, 可以尝试重启 docker;
// 然后使用 vip 访问; 192.168.9.33
    // 正常访问, 将第一台harbor停掉keepalived或者停掉nginx; 再使用 vip 访问, 还是能访问到 harbor, vip飘到第二台上; 再启动第一台上关掉的服务, vip又飘到第一台上; 都正常访问;
    // 向第一台harbor中, 上传镜像, 在第二台上查看存在;
OpenLDAP 安装与配置
环境
Centos 7 x86_64 minimal
安装:
使用 yum 安装 OpenLDAP :
yum -y install openldap-servers openldap openldap-clients openldap-devel
SSL 证书
- 生成 ca 证书及 KEY
openssl genrsa -out ca.key 3072
openssl req -new -x509 -days 1095 -key ca.key -out ca.pem
- 为域名 ldap.linge.io 生成长度为 3072bit 的 KEY :
openssl genrsa -out ldap.linge.io.key 3072
- 为域名 ldap.linge.io 生成证书请求
openssl req -new -key ldap.linge.io.key -out ldap.linge.io.csr -subj "/CN=ldap.linge.io/OU=LDAP/C=CN/ST=Shanghai/L=Shanghai"
- 为域名 ldap.linge.io 签发证书
openssl x509 -req -in ldap.linge.io.csr -CA ca.pem -CAkey ca.key -CAcreateserial -out ldap.linge.io.pem -days 1095
配置
以下文档使用 ldap.linge.io 作为域名, 实际使用时请注意自行替换;
- 修改 slapd.conf, 使用 slapd-without-ssl.conf
- rootpw 加密的密码生成使用 : slappasswd 生成 DN 密码, 并将输出的密码字符串复制到 rootpw 字段后 , 保存退出即可
- 注意: 配置文件中不要有多余的空格, 尤其是空行的时候( 5b003ece /etc/openldap/slapd.conf: line 9: bad config line.)
// 编辑ldap配置文件
vim /etc/openldap/slapd.conf
// 加载不同的 schema, 属性;
include    /etc/openldap/schema/core.schema
include    /etc/openldap/schema/cosine.schema
include    /etc/openldap/schema/inetorgperson.schema
include    /etc/openldap/schema/openldap.schema
include    /etc/openldap/schema/nis.schema
include    /etc/openldap/schema/dyngroup.schema
include    /etc/openldap/schema/misc.schema
include    /etc/openldap/schema/ppolicy.schema

pidfile    /run/openldap/slapd.pid            // pid 文件;
argsfile   /run/openldap/slapd.args            // 参数;

TLSCACertificateFile    /etc/ssl/ca.pem                // 配置 CA 证书;
TLSCertificateFile      /etc/ssl/ldap.linge.io.pem        // 配置域名证书;
TLSCertificateKeyFile   /etc/ssl/ldap.linge.io.key        // 配置域名证书的 KEY;

// 配置证书使用的算法,版本;
TLSCipherSuite    EECDH:EDH:CAMELLIA:ECDH:RSA:!eNULL:!SSLv2:!RC4:!DES:!EXP:!SEED:!IDEA:!3DES
TLSProtocolMin    3.2
TLSVerifyClient   allow

database    bdb                    // 使用 Berkeley DB;
cachesize   10000                // 缓存大小;
suffix      "dc=ldap,dc=linge,dc=io"                // 根据自己的域名替换;
rootdn      "cn=Manager,dc=ldap,dc=linge,dc=io"        // 同上
rootpw      {SSHA}EGUgLpu5rFOzbLKMij83pphTKppxv94v    // 指定用来管理的密码, 使用 slappasswd 生成;
directory   /var/lib/ldap

# access control policy:
# Restrict password access to change by owner and authentication.
# Allow read access by everyone to all other attributes.

access to attrs=shadowLastChange,userPassword        // 配置哪些人可以修改用户密码;
    by self write                    // 可以修改自己的密码;
    by anonymous auth                // 匿名用户可以登录;

access to *                            // 提供给客户端使用(jenkins,harbor,zabbix等),需要ldap认证的时候使用;
    by dn.exact="cn=admin,ou=Users,dc=ldap,dc=linge,dc=io" read        // Users下面的admin用户可以读取;
    by * none                        // 其他用户没有权限

# Indicees to maintain for this database
index objectClass                     eq,pres
index ou,cn,mail,surname,givenname    eq,pres,sub
index uidNumber,gidNumber,loginShell  eq,pres
index uid,memberUid                   eq,pres,sub
index nisMapName,nisMapEntry          eq,pres,sub
生成数据
- 清空 /etc/openldap/slapd.d 目录 (根据默认的配置生成的一些内容, 与我们的配置文件生成的不相同, 所以先清空)
rm -rf /etc/openldap/slapd.d/*
- 复制 db2 配置文件至 /var/lib/ldap/DB_CONFIG
cp -rf /usr/share/openldap-servers/DB_CONFIG.example /var/lib/ldap/DB_CONFIG
- 重新生成数据
// 文件没找到的报错可以忽略, 因为我们还没有启动
slaptest -f /etc/openldap/slapd.conf -F /etc/openldap/slapd.d/
5d3569b3 bdb_db_open: database "dc=ldap,dc=linge,dc=io": db_open(/var/lib/ldap/id2entry.bdb) failed: No such file or directory (2).
5d3569b3 backend_startup_one (type=bdb, suffix="dc=ldap,dc=linge,dc=io"): bi_db_open failed! (2)
slap_startup failed (test would succeed using the -u switch)
- 更改文件权限
chown -R ldap.ldap /etc/openldap/slapd.d/ /var/lib/ldap/
- 查看新生成的内容
ls /etc/openldap/slapd.d/
cn=config  cn=config.ldif
启动 ldap 服务
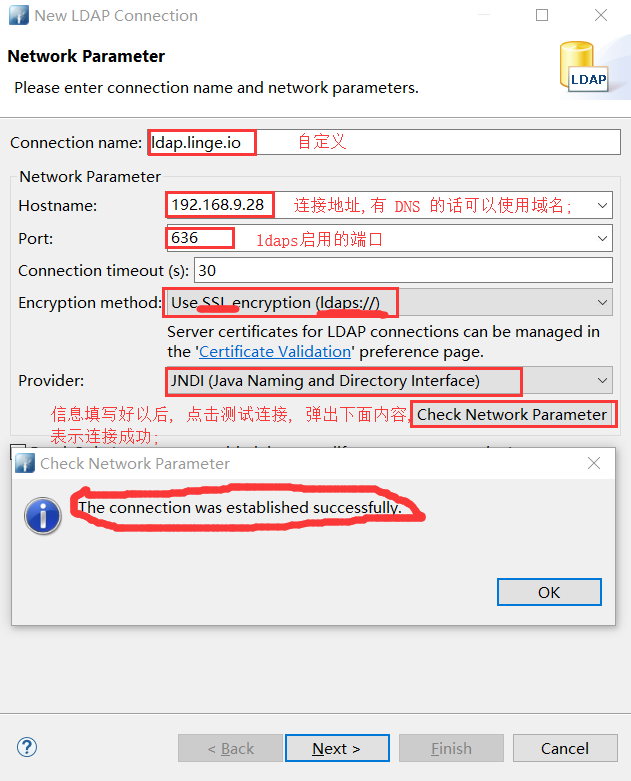
// 启动 slapd 服务,设置开机启动, 并查看进程
systemctl start slapd
systemctl enable slapd
ps -ef |grep slapd
ldap      8354     1  0 04:53 ?        00:00:00 /usr/sbin/slapd -u ldap -h ldapi:/// ldap:///
root      8492  5816  0 04:56 pts/1    00:00:00 grep --color=auto slapd

// 查看进程时,可看到 ldap:/// , 可添加 ldaps:///; 或者直接将 ldap:/// 替换成 ldaps:///; ldap:///开启的 389 端口; ldaps启用的 636 端口;
vim /etc/sysconfig/slapd
# SLAPD_URLS="ldapi:/// ldap:///"          // 注释此行;
SLAPD_URLS="ldapi:/// ldaps:///"           // 改为 ldaps,;

// 重启 slapd
systemctl restart slapd

// 查看服务端口号
ss -tnl |grep 636
LISTEN     0      128          *:636                      *:*
LISTEN     0      128         :::636                     :::*

// 服务器开启防火墙的情况下,添加防火墙规则; 自行替换 192.168.0.0/16
iptables -I INPUT -m conntrack --ctstate NEW -p tcp -s 192.168.0.0/16 --dport 636 -j ACCEPT
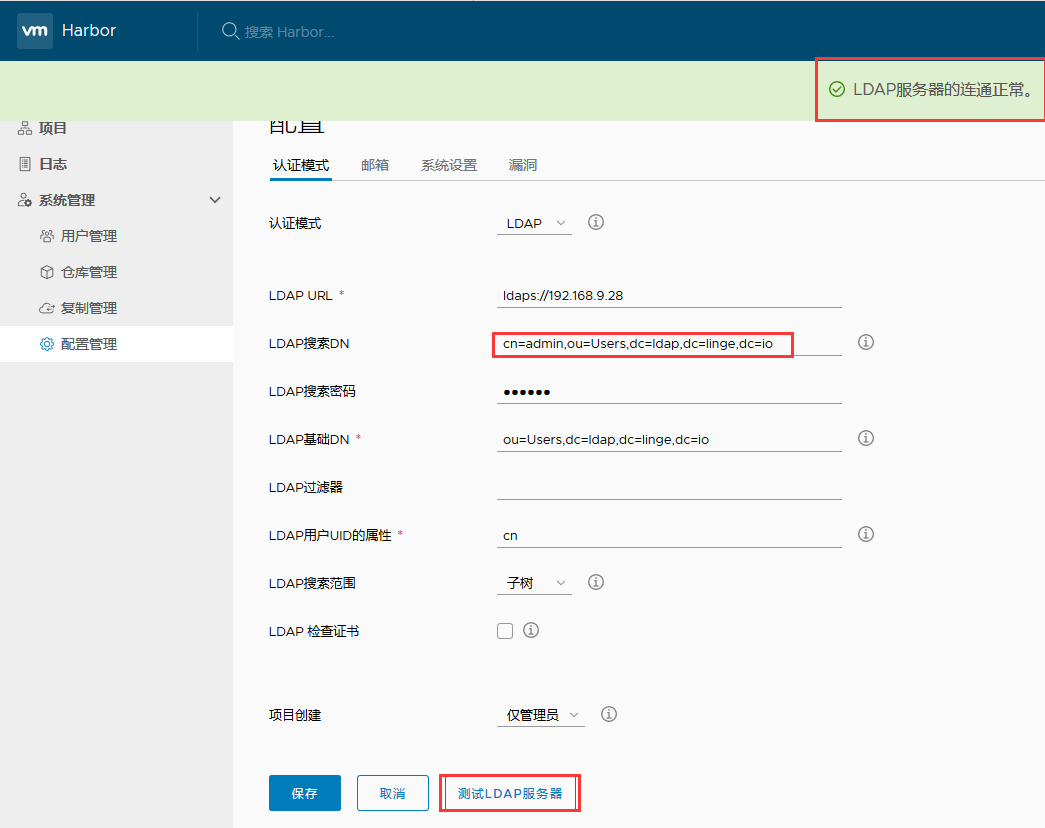
OpenLDAP 创建组织架构与用户 和 Harbor 配置
连接工具的下载及使用
- 下载地址:http://directory.apache.org/studio
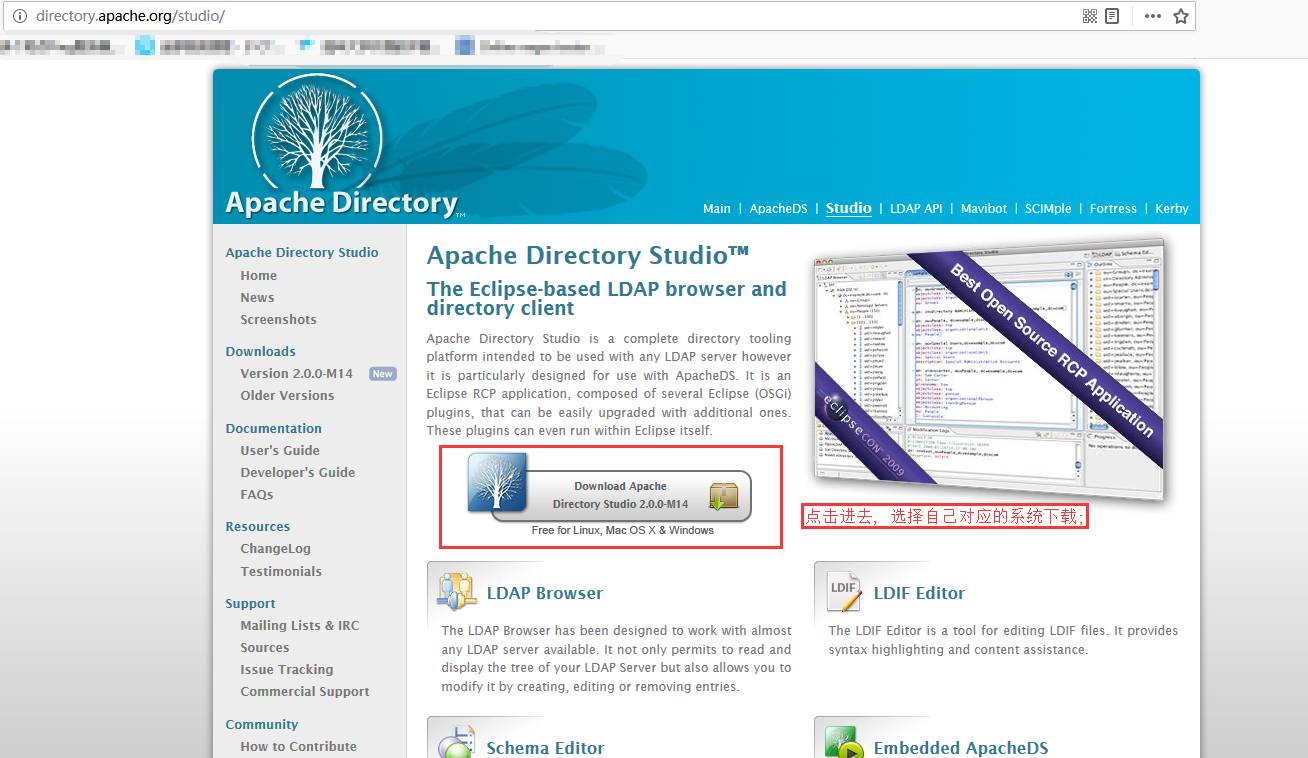
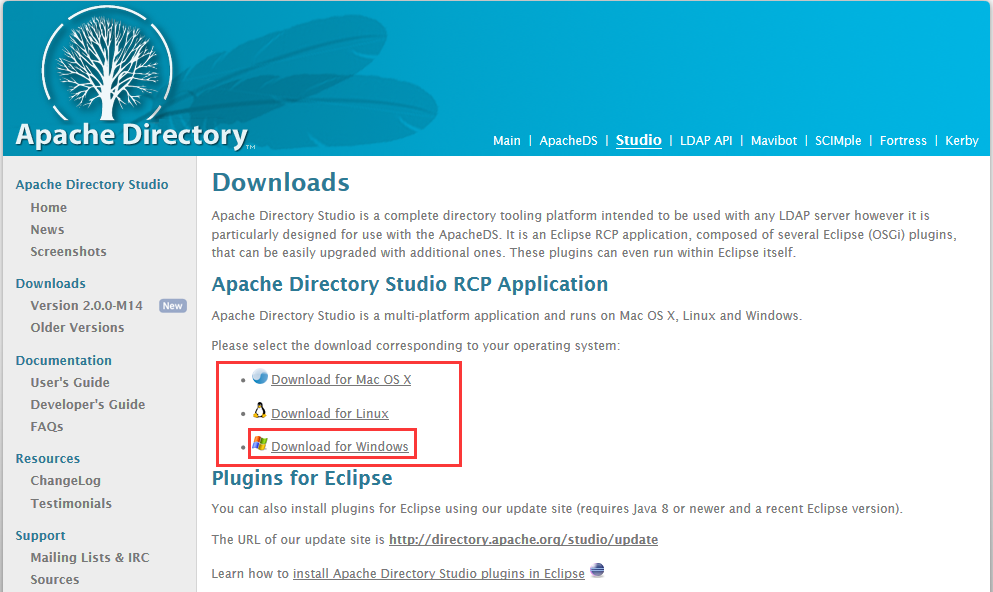
- 下载完成后, 进行安装;
- 依赖 1.8 版本以上的 java
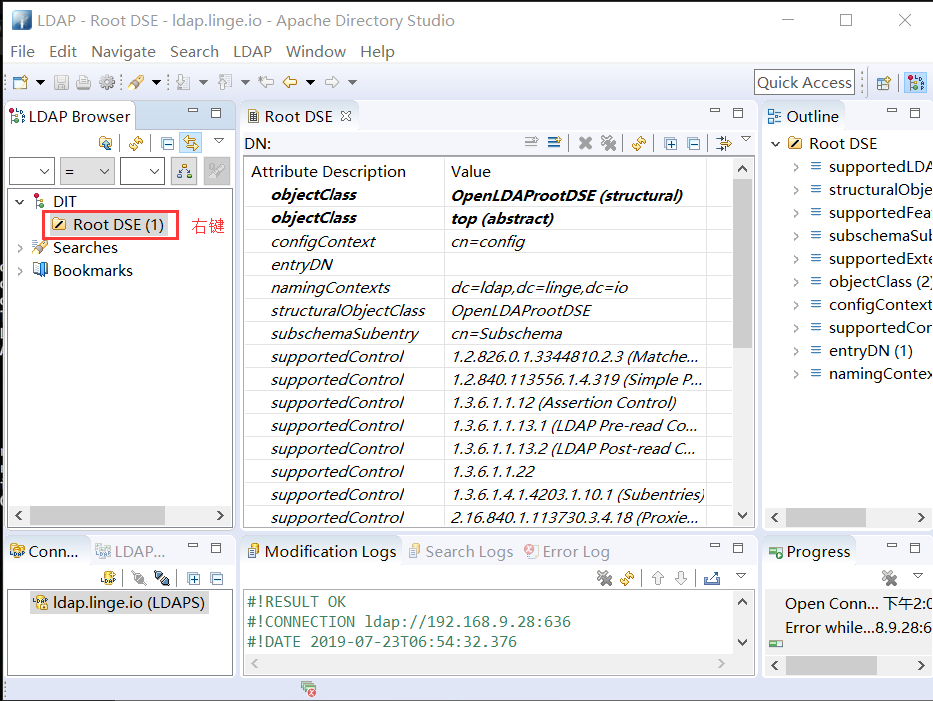
- apache directory studio 的使用
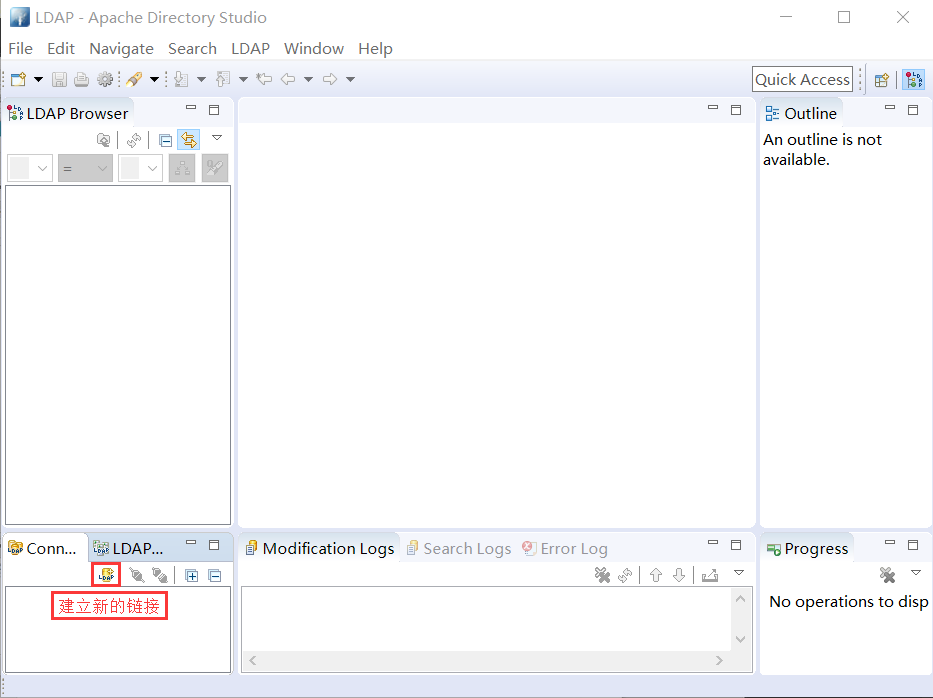

在 Apache directory Studio 中创建新条目
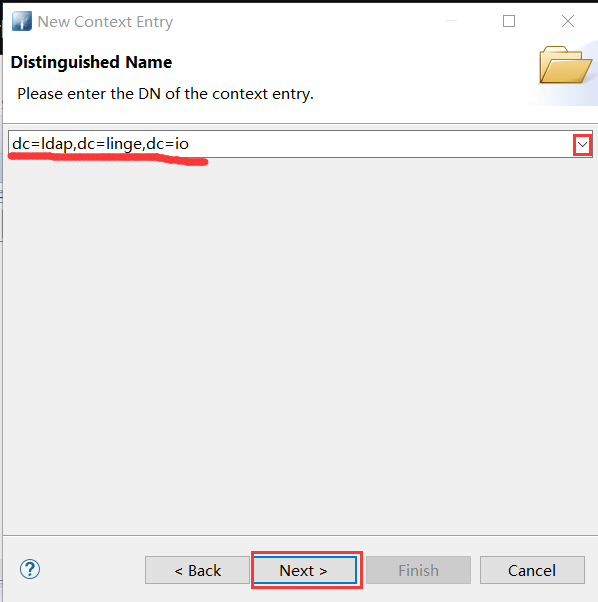
- 右键 → New → New Context Entry
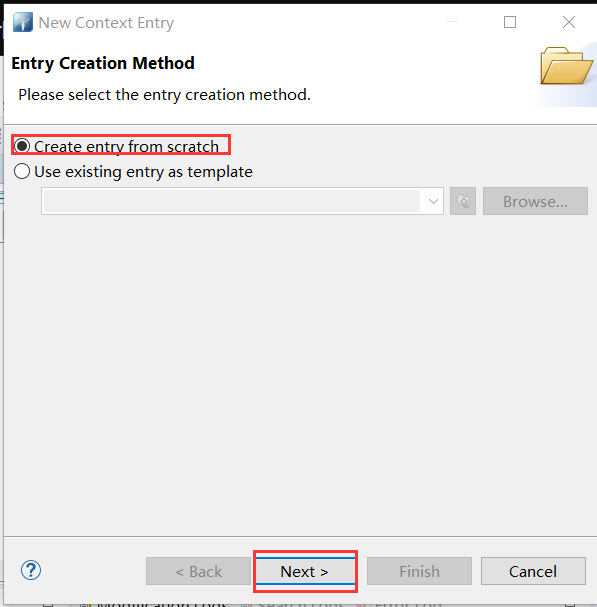
- 选择 Create entry from scratch → Next
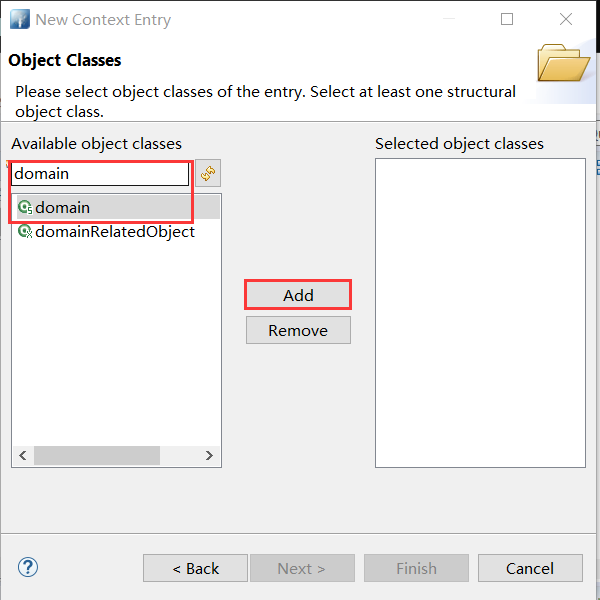
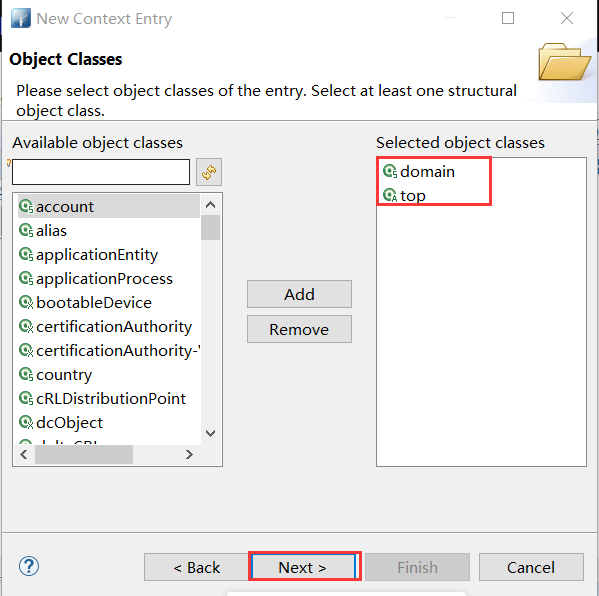
- 搜索 domain → Add

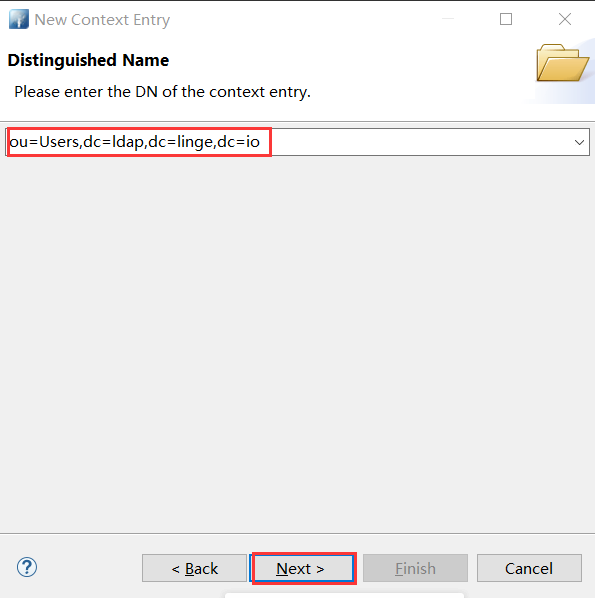
- 新创建好的条目 → 右键 New → New Context Entry → 同上操作搜索 or → 选择 organizationalUnit → 补充ou=Users,

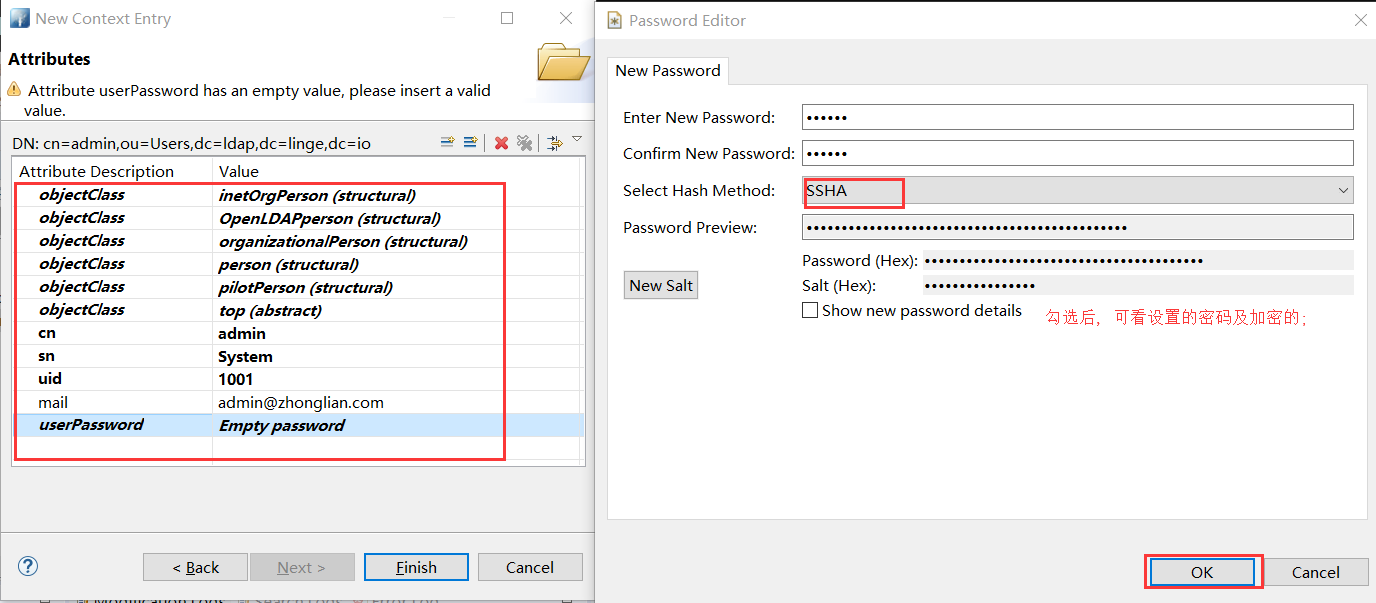
- 创建的ou=Users条目右键 → New → New Context Entry → Create entry from scratch → 搜索 openldap 选择 OpenLDAPperson → 按以下填写

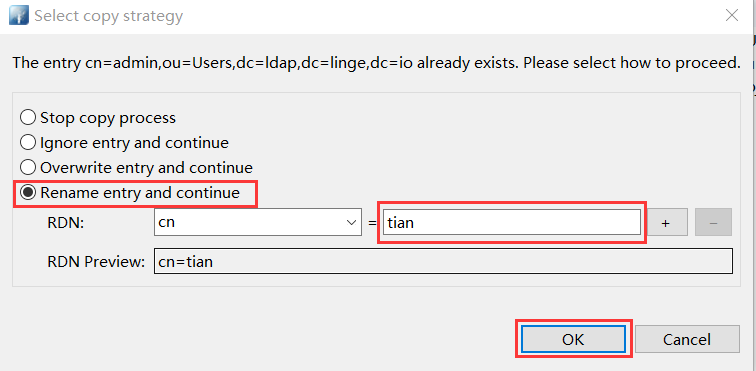
- 若是同样创建用户条目的时候, 可以点击 cn = admin 右键, 复制; 然后在 ou=Users 上右键粘贴, 粘贴的时候提示 cn=admin 条目已经存在, 选择 Rename entry and continue; 最后手动修改相关内容[ sn/uid/mail/userPasswd ];
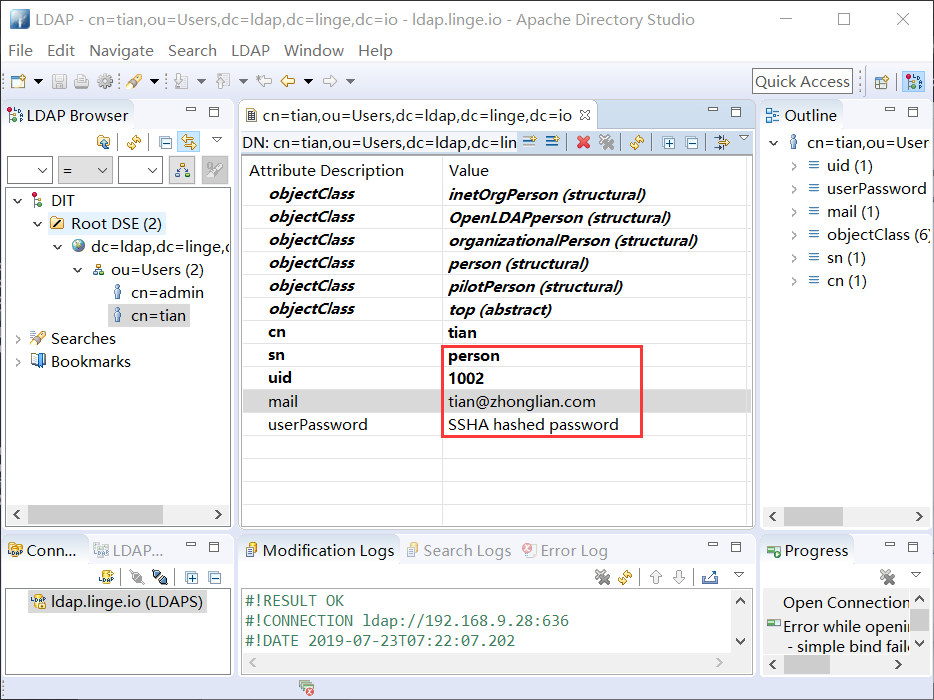
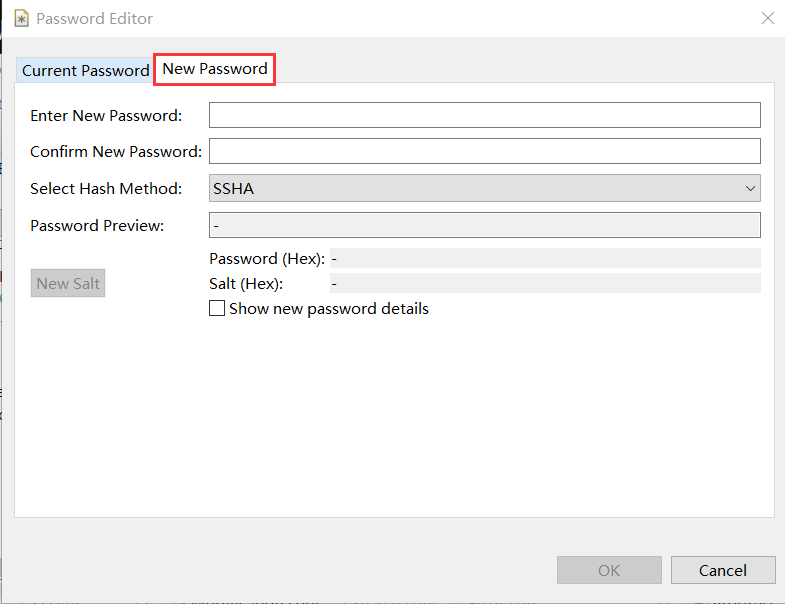
- 密码修改,双击 SSHA hashed password 框,选择 New Password 进行设置;
Harbor 配置及认证测试 [admin 及 tian 用户连接 LDAP 服务器正常 ]