https://blog.csdn.net/qq_36748248/article/details/120932954
https://blog.csdn.net/weixin_41207479/article/details/118292566
https://baijiahao.baidu.com/s?id=1674779816702031880&wfr=spider&for=pc
1、什么是springsecurity:
spring security 的核心功能主要包括:
认证 (你是谁)
授权 (你能干什么)
攻击防护 (防止伪造身份)
其核心就是一组过滤器链,项目启动后将会自动配置。最核心的就是 Basic Authentication Filter 用来认证用户的身份,一个在spring security中一种过滤器处理一种认证方式。
2、创建一个简单的springboot+springsecurity项目
a、使用idea编辑器创建一个springboot(过程简单,这里不做讲解,如果不会,自己找度娘)
b、在项目pom.xml中添加springsecurity的依赖,代码如下:
<dependency>
<groupId>org.springframework.boot</groupId>
<artifactId>spring-boot-starter-security</artifactId>
</dependency>
c、启动项目,在项目启动日志中会有个springsecurity生成的密码记录下来,一会访问接口有用,示例如下。

d、在项目中创建一个测试接口,进行访问测试,示例如下

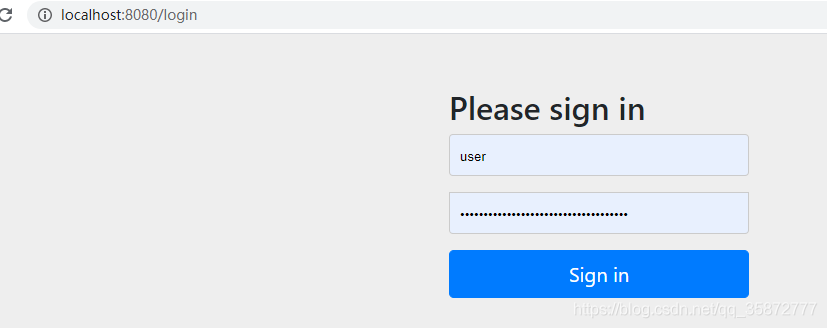
e、在浏览器地址栏输入:localhost:8080/hello/sayHello进行接口访问,springsecurity框架会通过aop自动校验有没有登录,如果没有登录,会充重定向到登录页面,让你登录,默认用户名为user,密码为springsecurity框架自动生成的uuid密码,在项目启动日志中可以看到,也是步骤c中粘贴出来的密码串,输入登录,页面如下:
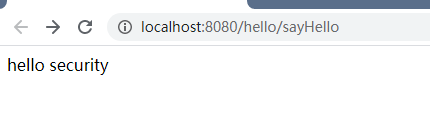
d、登录成功之后就能访问定义的接口了

3、自定义用户名密码,在项目resource路径下添加一个application.yml文件,在yml文件中配置用户名和密码相关信息(配置用户名和密码之后springsecurity框架将不会再生成密码),配置之后重新启动项目,再次输入我们配置文件中自己定义的用户名密码便可以访问测试接口,yml配置如下
spring:
  security:
    user:
      name: test
      password: test
4、排除security安全验证:
在项目启动类springbootApplication注解上添加排除security框架的代码,便可去掉安全校验,项目重启之后,清楚浏览器缓存,然后再次访问测试接口发现不用登陆即可访问测试接口
@SpringBootApplication(exclude = {SecurityAutoConfiguration.class}) // 排除security安全验证
5、基于内存的用户名和密码配置,在项目中创建一个config包,在config包下创建一个security的配置类并且继承 WebSecurityConfigurerAdapter类,重写此类中的configure()方法,代码如下:
@Configuration
@EnableWebSecurity   //启用security安全框架的安全校验
public class MyWebSecurity extends WebSecurityConfigurerAdapter {
    //在方法中配置用户名和密码,作为用户登录的数据
    @Override
    protected void configure(AuthenticationManagerBuilder auth) throws Exception {
        auth.inMemoryAuthentication().withUser("zhangsan").password("123").roles();
        auth.inMemoryAuthentication().withUser("lisi").password("lisi").roles();
        auth.inMemoryAuthentication().withUser("王五").password("123").roles();
    }
}
6、重启项目,用我们配置的用户名密码访问登陆访问测试接口发现会报如下错误,报错原为security5版本之后要求密码必须是密文加密,不然会报错。
java.lang.IllegalArgumentException: There is no PasswordEncoder mapped for the id "null"
7、解决因明文密码引起的登陆报错问题:
a、创建一个密码加密的实现类
//创建密码的加密类,算法多种,自行选择合适的算法
    @Bean
    public PasswordEncoder passwordEncoder(){
        // 通过passwordEncoder的实现类,实现加密算法
        return new BCryptPasswordEncoder();
    }
b、对密码进行加密,加密之后重启项目便可以使用配置的用户密码访问测试接口

8、使用springsecurity添加方法级别的角色控制,@EnableGlobalMethodSecurity(prePostEnabled = true)启动角色认证,roles("admin","normal")示例角色
@EnableGlobalMethodSecurity(prePostEnabled = true)  //启动角色认证
@Configuration
@EnableWebSecurity   //启用security安全框架的安全校验
public class MyWebSecurity extends WebSecurityConfigurerAdapter {
    //在方法中配置用户名和密码,作为用户登录的数据
    @Override
    protected void configure(AuthenticationManagerBuilder auth) throws Exception {
        // 给用户添加角色
        PasswordEncoder pe = passwordEncoder();
        auth.inMemoryAuthentication()
                .withUser("zhangsan")
                .password(pe.encode("123"))
                .roles("admin","normal");
        auth.inMemoryAuthentication()
                .withUser("lisi")
                .password(pe.encode("lisi"))// 对密码进行加密
                .roles("normal");
        auth.inMemoryAuthentication()
                .withUser("王五")
                .password(pe.encode("123"))
                .roles("admin");
    }
a、添加带有角色认证的接口

b、分别访问helloUser接口和helloAdmin接口会发现,只有拥有此接口权限的用户才能访问对应的接口,否则会报404
9、使用jdbc访问数据库获取用户数据
a、创建一个entity包,在此包下创建user_info类
@Entity
public class UserInfo {
    @Id
    @GeneratedValue(strategy = GenerationType.IDENTITY)
    private Long id;
    // 用户名称
    private String username;
    // 密码
    private String password;
    // 角色
    private String role;

    public Long getId() {
        return id;
    }

    public void setId(Long id) {
        this.id = id;
    }

    public String getUsername() {
        return username;
    }

    public void setUsername(String username) {
        this.username = username;
    }

    public String getPassword() {
        return password;
    }

    public void setPassword(String password) {
        this.password = password;
    }

    public String getRole() {
        return role;
    }

    public void setRole(String role) {
        this.role = role;
    }
}
b、创建dao包,在此包下创建一个UserInfoDao接口并且继承JpaRepository类
public interface UserInfoDao extends JpaRepository<UserInfo,Long> {

    UserInfo findByUsername(String username);
}
c、创建service包,在包下创建UserInfoService接口,并且添加一个方法

public interface UserInfoService {
    UserInfo findByUsername(String username);
}
d、在service包下创建一个impl包,在impl包下创建一个userInfoServiceImpl实现UserInfoService接口

public class UserInfoServiceImpl implements UserInfoService {
    @Autowired
    private UserInfoDao userInfoDao;
    @Override
    public UserInfo findByUsername(String username) {
        return userInfoDao.findByUsername(username);
    }
}
e、在resources下创建一个application.yml文件,在此文件中添加数据库配置信息,如下:
spring:
  datasource:
    url: jdbc:mysql://localhost:3306/db2020?characterEncoding=UTF-8&useUnicode=true&useSSL=false
    username: root
    password: 123456
    driver-class-name: com.mysql.jdbc.Driver
  jpa:
    generate-ddl: true
    show-sql: true
    database: mysql
f、启动项目,会发现在数据库中会自动创建一张user_info的表,如果数据库中多了这张表,说明项目成功连接数据库
g、创建一个init包,在此包下创建一个JdbcInit类,此类用于向数据库中添加测试数据,重启项目,如果发现数据库中多了两条数据,则说明数据添加成功,数据添加完之后,一定要将@Component,@PostConstruct注解注释掉,否则项目重启的时候,会向数据库在添加两条一模一样的数据,如下:
@Component
public class JdbcInit {

    @Autowired
    private UserInfoDao userInfoDao;
    @PostConstruct
    public void init(){
        PasswordEncoder encoder = new BCryptPasswordEncoder();

        UserInfo userInfo = new UserInfo();
        userInfo.setPassword(encoder.encode("123"));
        userInfo.setUsername("张三");
        userInfo.setRole("normal");
        userInfoDao.save(userInfo);

        userInfo = new UserInfo();
        userInfo.setUsername("admin");
        userInfo.setPassword(encoder.encode("admin"));
        userInfo.setRole("admin");
        userInfoDao.save(userInfo);
    }
}
h、通过UserDetailsService完成身份认证
Spring Security中进行身份验证的是AuthenticationManager接口,ProviderManager是它的一个默认实现,但它并不用来处理身份认证,而是委托给配置好的AuthenticationProvider,每个AuthenticationProvider会轮流检查身份认证。检查后或者返回Authentication对象或者抛出异常。
验证身份就是加载响应的UserDetails,看看是否和用户输入的账号、密码、权限等信息匹配。此步骤由实现AuthenticationProvider的DaoAuthenticationProvider(它利用UserDetailsService验证用户名、密码和授权)处理。包含 GrantedAuthority 的 UserDetails对象在构建 Authentication对象时填入数据。
下面我们自定义一个UserDetailsService来完成项目的身份认证,创建一个包provider,在此包下创建一个MyUserDetailService类并且实现UserDetailsService接口,代码如下:
@Component
@Qualifier("myUserDetailService")
public class MyUserDetailService implements UserDetailsService {
    @Autowired
    private UserInfoDao userInfoDao;
    @Override
    public UserDetails loadUserByUsername(String s) throws UsernameNotFoundException {
        UserInfo userInfo = null;
        User user = null;
        if(s != null ){
             userInfo = userInfoDao.findByUsername(s);
        }
        if(userInfo != null ){
            List<GrantedAuthority> list = new ArrayList<>();
            GrantedAuthority grantedAuthority = new SimpleGrantedAuthority("ROLE_"+userInfo.getRole());
            list.add(grantedAuthority);
            //创建user对象
            user = new User(userInfo.getUsername(),userInfo.getPassword(),list);
        }

        return user;
    }
}
i、修改MyWebSecurity配置
@EnableGlobalMethodSecurity(prePostEnabled = true)  //启动角色认证
@Configuration
@EnableWebSecurity   //启用security安全框架的安全校验
public class MyWebSecurity extends WebSecurityConfigurerAdapter {
    //在方法中配置用户名和密码,作为用户登录的数据
    @Autowired
    @Qualifier("myUserDetailService")
    private UserDetailsService userDetailsService;
    @Override
    protected void configure(AuthenticationManagerBuilder auth) throws Exception {
        //使用自己定义的userService
        auth.userDetailsService(userDetailsService).passwordEncoder(new BCryptPasswordEncoder());


    }
}
g、重启项目,进行8-b步骤操作,进行试验。
9、基于springsecurity的RBAC的权限管理,RBAC是Role Based Access Control的缩写,是基于角色的访问控制。一般都是分为用户(user)-即用户登录表,用来做用户认证, 角色(role),权限(permission)三个实体,角色(role)和权限(permission)是多对多的 关系,用户(user)和角色(role)也是多对多的关系。用户(user)和权限(permission) 之间没有直接的关系,都是通过角色作为代理,才能获取到用户(user)拥有的权限。一般情况下, 使用5张表就够了,3个实体表,2个关系表,项目中以实际项目情况为准。
10、springsecurity中认证接口和类
UserDetails:接口,表示用户信息的
Collection<? extends GrantedAuthority> getAuthorities();   //权限集合
boolean isAccountNonExpired();  //账户是否过期
boolean isAccountNonLocked();  //账户是否锁定
boolean isCredentialsNonExpired();  //证书是否过期
boolean isEnabled();           // 账户是否启用
User实现类:
org.springframework.security.core.userdetails.User
也可以自定类实现UserDetails接口
UserDetailsService接口:
主要作用:获取用户信息,得到的是UserDetails对象,一般项目都会自定义类实现这个接口,从数据库中获取数据,只有一个方法,
UserDetails loadUserByUsername(String var1) throws UsernameNotFoundException;此方法用于根据用户名称,获取用户信息(用户名称,用户密码,用户角色,是否可用等信息)
UserDetailsService实现类:
1、InMemoryUserDetailsManager(在内存中维护用户信息)
优点:使用方便,直接用
确定:数据不会持久化,系统重启数据恢复原样
2、JdbcUserDetailsManager(从数据库中维护用户信息),使用jdbcTemplate来操作数据库,可以调用这个实现类的方法对User用户信息进行管理
11、通过自建的用户表sys_user,角色表sys_role,用户角色关联表sys_user_role,通过UserDetailsService实现springsecurity认证,
a、首先创建sys_user表
DROP TABLE IF EXISTS `sys_user`;
CREATE TABLE `sys_user` (
  `id` int(11) NOT NULL AUTO_INCREMENT,
  `username` varchar(255) DEFAULT NULL,
  `password` varchar(255) DEFAULT NULL,
  `realname` varchar(255) DEFAULT NULL,
  `isenable` int(255) DEFAULT NULL COMMENT '是否删除',
  `islock` int(255) DEFAULT NULL COMMENT '是否锁定',
  `iscredentials` int(255) DEFAULT NULL COMMENT '是否有效',
  `isexprie` int(11) DEFAULT NULL COMMENT '是否过期',
  `createtime` datetime DEFAULT NULL,
  `logintime` datetime DEFAULT NULL,
  PRIMARY KEY (`id`)
) ENGINE=InnoDB AUTO_INCREMENT=4 DEFAULT CHARSET=utf8;
————————————————
创建sys_role表
DROP TABLE IF EXISTS `sys_user_role`;
CREATE TABLE `sys_user_role` (
  `userid` int(11) DEFAULT NULL,
  `roleid` int(11) DEFAULT NULL
) ENGINE=InnoDB DEFAULT CHARSET=utf8;
————————————————
b、创建一个springboot项目,如有问题,创建过程请百度,下面主要展示pom.xml中需要添加的依赖(重点)
<dependency>
            <groupId>org.springframework.boot</groupId>
            <artifactId>spring-boot-starter-security</artifactId>
        </dependency>
        <dependency>
            <groupId>org.springframework.boot</groupId>
            <artifactId>spring-boot-starter-web</artifactId>
        </dependency>

        <dependency>
            <groupId>org.springframework.boot</groupId>
            <artifactId>spring-boot-starter-jdbc</artifactId>
        </dependency>

        <dependency>
            <groupId>mysql</groupId>
            <artifactId>mysql-connector-java</artifactId>
        </dependency>

        <dependency>
            <groupId>org.mybatis.spring.boot</groupId>
            <artifactId>mybatis-spring-boot-starter</artifactId>
            <version>2.0.1</version>
        </dependency>
c、定义用户信息类SysUser实现spring security框架中的UserDetails
public class SysUser implements UserDetails {

    private Integer id;
    private String username;
    private String password;
    private String realname;

    private boolean isExpired;
    private boolean isLocked;
    private boolean isCredentials;
    private boolean isEnabled;

    private Date createTime;
    private Date loginTime;

    private List<GrantedAuthority> authorities;


    public SysUser(Integer id,String username, String password, String realname,
                   boolean isExpired, boolean isLocked, boolean isCredentials,
                   boolean isEnabled, Date createTime, Date loginTime) {
        this.id = id;
        this.username = username;
        this.password = password;
        this.realname = realname;
        this.isExpired = isExpired;
        this.isLocked = isLocked;
        this.isCredentials = isCredentials;
        this.isEnabled = isEnabled;
        this.createTime = createTime;
        this.loginTime = loginTime;
    }

    @Override
    public Collection<? extends GrantedAuthority> getAuthorities() {
        return authorities;
    }

    @Override
    public String getPassword() {
        return password;
    }

    @Override
    public String getUsername() {
        return username;
    }

    @Override
    public boolean isAccountNonExpired() {
        return isExpired;
    }

    @Override
    public boolean isAccountNonLocked() {
        return isLocked;
    }

    @Override
    public boolean isCredentialsNonExpired() {
        return isCredentials;
    }

    @Override
    public boolean isEnabled() {
        return isEnabled;
    }

    public Integer getId() {
        return id;
    }

    public void setId(Integer id) {
        this.id = id;
    }

    public void setUsername(String username) {
        this.username = username;
    }

    public void setPassword(String password) {
        this.password = password;
    }

    public String getRealname() {
        return realname;
    }

    public void setRealname(String realname) {
        this.realname = realname;
    }

    public boolean isExpired() {
        return isExpired;
    }

    public void setExpired(boolean expired) {
        isExpired = expired;
    }

    public boolean isLocked() {
        return isLocked;
    }

    public void setLocked(boolean locked) {
        isLocked = locked;
    }

    public boolean isCredentials() {
        return isCredentials;
    }

    public void setCredentials(boolean credentials) {
        isCredentials = credentials;
    }

    public void setEnabled(boolean enabled) {
        isEnabled = enabled;
    }

    public Date getCreateTime() {
        return createTime;
    }

    public void setCreateTime(Date createTime) {
        this.createTime = createTime;
    }

    public Date getLoginTime() {
        return loginTime;
    }

    public void setLoginTime(Date loginTime) {
        this.loginTime = loginTime;
    }

    public void setAuthorities(List<GrantedAuthority> authorities) {
        this.authorities = authorities;
    }

    @Override
    public String toString() {
        return "SysUser{" +
                "id=" + id +
                ", username='" + username + '\'' +
                ", password='" + password + '\'' +
                ", realname='" + realname + '\'' +
                ", isExpired=" + isExpired +
                ", isLocked=" + isLocked +
                ", isCredentials=" + isCredentials +
                ", isEnabled=" + isEnabled +
                ", createTime=" + createTime +
                ", loginTime=" + loginTime +
                ", authorities=" + authorities +
                '}';
    }
}
SysRole实体类
public class SysRole {
    private Integer id;
    private String rolename;
    private String rolememo;

    public Integer getId() {
        return id;
    }

    public void setId(Integer id) {
        this.id = id;
    }

    public String getRolename() {
        return rolename;
    }

    public void setRolename(String rolename) {
        this.rolename = rolename;
    }

    public String getRolememo() {
        return rolememo;
    }

    public void setRolememo(String rolememo) {
        this.rolememo = rolememo;
    }

    @Override
    public String toString() {
        return "SysRole{" +
                "id=" + id +
                ", rolename='" + rolename + '\'' +
                ", rolememo='" + rolememo + '\'' +
                '}';
    }
}
d、编写mapper类,SysUserMapper,SysRoleMapper
@Repository
public interface SysUserMapper {
    int insertSysUser(SysUser sysUser);

    SysUser selectSysUser(@Param("username") String username);
}


//SysRoleMapper 接口
@Repository
public interface SysRoleMapper {
    List<SysRole> selectSysRoleByUserId(Integer userId);

}
创建UserDetailsService接口的实现类,根据用户名称查询用户信息,根据用户id查询用户角色
@Service
public class JdbcUserDetailsService implements UserDetailsService {
    @Autowired
    private SysRoleMapper sysRoleMapper;
    @Autowired
    private SysUserMapper sysUserMapper;
    @Override
    public UserDetails loadUserByUsername(String s) throws UsernameNotFoundException {
        // 1,根据username获取user账户信息
        SysUser sysUser = sysUserMapper.selectSysUser(s);
        if(sysUser != null ){
            System.out.println("查询到用户信息"+sysUser.toString());
            // 2.根据用户id获取角色信息
            List<SysRole> sysRoles = sysRoleMapper.selectSysRoleByUserId(sysUser.getId());
            System.out.println(sysRoles.toString());
            List<GrantedAuthority> authorities = new ArrayList<>();
            sysRoles.stream().forEach((e)->{
                GrantedAuthority authority = new SimpleGrantedAuthority("ROLE_"+e.getRolename());
                authorities.add(authority);
            });
            sysUser.setAuthorities(authorities);
            return sysUser;
        }else{
            System.out.println("没有用户相关的信息");
        }
        return sysUser;
    }
}
创建controller,转发到index.html,创建index.html测试页面,创建不同角色测试controller
@Controller
public class IndexController {
    @GetMapping("/index")
    public String toIndexHtml(){
        return "forward:/index.html";
    }
}
————————————————
在resources下创建一个static文件夹,在此文件夹下创建index.html文件
<!DOCTYPE html>
<html lang="en">
<head>
    <meta charset="UTF-8">
    <title>Title</title>
</head>
<body>
    <p>验证访问</p>
    <a href="/access/user">验证user</a>  <br>
    <a href="/access/admin">验证admin</a> <br>
    <a href="/access/read">验证read</a>   <br>
</body>
</html>
————————————————

@RestController
public class Mycontroller {
    @GetMapping(value = "/access/user")
    public String sayUser(){
        return "user角色";
    }

    @GetMapping(value = "/access/admin")
    public String sayAdmin(){
        return "admin角色";
    }

    @GetMapping(value = "/access/read")
    public String sayRead(){
        return "read角色";
    }
}
————————————————
e、继承WebSecurityConfigurerAdapter
@Configuration
@EnableWebSecurity
public class CustomSecurityConfig extends WebSecurityConfigurerAdapter {
    @Autowired
    private UserDetailsService userDetailsService;
    @Override
    protected void configure(AuthenticationManagerBuilder auth) throws Exception {
        //super.configure(auth);   //此行代码如果不注释掉,登录的时候会报密码错误
        auth.userDetailsService(userDetailsService).passwordEncoder(new BCryptPasswordEncoder());
    }

    @Override
    protected void configure(HttpSecurity http) throws Exception {
        //super.configure(http);
        System.out.println("-=========httpSecurity----------");
        http.authorizeRequests()
                .antMatchers("/index").permitAll()   //这个请求放行,不进行认证
                .antMatchers("/access/user").hasRole("USER")
                .antMatchers("/access/admin").hasRole("ADMIN")
                .antMatchers("/access/read").hasRole("READ")
                .anyRequest().authenticated()   //其他请求需要认证
                .and()
                .formLogin();
    }


}
f、主启动类配置
@MapperScan(value = "com.atguigu.springcloud.mapper")   //扫描mapper文件
@SpringBootApplication
public class App
{
    @Autowired
    SysUserMapper userMapper;
    public static void main( String[] args )
    {
        SpringApplication.run(App.class,args);

    }

    //@PostConstruct     //在项目第一次正常启动的时候,向数据库中添加用户信息,当用户信息添加完成之后,可以将此注解注释掉,让这段代码不生效。
//    public void jdbcInit(){
//        Date curDate = new Date();
//        List<GrantedAuthority> list = new ArrayList<>();
//        GrantedAuthority authority = new SimpleGrantedAuthority("ROLE_"+"USER");
//        list.add(authority);
//
//        PasswordEncoder encoder = new BCryptPasswordEncoder();
//        SysUser sysUser = new SysUser(
//                "lisi",encoder.encode("456"),"李四",
//                true,true,true,true,curDate,curDate,list);
//        userMapper.insertSysUser(sysUser);
//
//
//        List<GrantedAuthority> list1 = new ArrayList<>();
//        GrantedAuthority authority1 = new SimpleGrantedAuthority("ROLE_"+"ADMIN");
//        list1.add(authority1);
//
//        SysUser sysUser1 = new SysUser(
//                "admin",encoder.encode("admin"),"管理员",
//                true,true,true,true,curDate,curDate,list1);
//        userMapper.insertSysUser(sysUser1);
//
//
//        List<GrantedAuthority> list2 = new ArrayList<>();
//        GrantedAuthority authority2 = new SimpleGrantedAuthority("ROLE_"+"READ");
//        list2.add(authority2);
//
//        SysUser sysUser2 = new SysUser(
//                "zhangsan",encoder.encode("123"),"张三",
//                true,true,true,true,curDate,curDate,list2);
//        userMapper.insertSysUser(sysUser2);


//    }


}
g、在项目resources目录下创建一个mapper文件夹,在mapper文件下创建SysUserMapper.xml,SysRoleMapper.xml两个mapper文件
<?xml version="1.0" encoding="utf-8" ?>
<!DOCTYPE mapper PUBLIC "-//mybatis.org//DTD Mapper 3.0//EN" "http://mybatis.org/dtd/mybatis-3-mapper.dtd" >
<mapper namespace="com.atguigu.springcloud.mapper.SysRoleMapper">
    <resultMap id="ResultMap" type="com.atguigu.springcloud.entity.SysRole">
        <id column="id" property="id"/>
        <result column="rolename" property="rolename"/>
        <result column="rolememo" property="rolememo"/>
    </resultMap>

    <select id="selectSysRoleByUserId" resultMap="ResultMap">
        select ur.userid,r.id,r.rolememo,r.rolename from sys_user_role ur, sys_role r
        where ur.roleid = r.id and ur.userid = #{userId};
    </select>

</mapper>
<?xml version="1.0" encoding="utf-8" ?>
<!DOCTYPE mapper PUBLIC "-//mybatis.org//DTD Mapper 3.0//EN" "http://mybatis.org/dtd/mybatis-3-mapper.dtd" >
<mapper namespace="com.atguigu.springcloud.mapper.SysUserMapper">

    <resultMap id="ResultMap" type="com.atguigu.springcloud.entity.SysUser">
        <id column="id" property="id"/>
        <result column="username" property="username"/>
        <result column="password" property="password"/>
        <result column="realname" property="realname"/>
        <result column="isexprie" property="isExpired"/>
        <result column="isenable" property="isEnabled"/>
        <result column="islock" property="isLocked"/>
        <result column="iscredentials" property="isCredentials"/>
        <result column="createtime" property="createTime" jdbcType="DATE"/>
        <result column="logintime" property="loginTime" jdbcType="DATE"/>
    </resultMap>


    <insert id="insertSysUser">
        insert  into sys_user(username,password,realname,isenable,islock,iscredentials,createtime,logintime)
        values (#{username},#{password},#{realname},#{isEnabled},#{isLocked},#{isCredentials},#{createTime},#{loginTime});
    </insert>

    <select id="selectSysUser" resultMap="ResultMap" parameterType="java.lang.String">
        select id,username,password,realname,isexprie,isenable,islock,iscredentials,createtime,logintime from sys_user where username = #{username}

    </select>

</mapper>
h、在application.yml文件中添加数据库连接配置和mybatis配置
spring:
  datasource:
    driver-class-name: com.mysql.jdbc.Driver
    url: jdbc:mysql://localhost:3306/db2020?characterEncoding=UTF-8&useUnicode=true&useSSL=false
    username: root
    password: root

mybatis:
  mapper-locations: classpath:/mapper/*Mapper.xml
  type-aliases-package: com.atguigu.springcloud.entity
i、默认的登录页面
地址:localhost:8080
请求方式:post
用户名:username
密码:password
13、自定义login登录页面和error页面
完善自定义登录页面
使用验证码功能(生成验证码,检查提交验证码)
13.1完善自定义登录页面
13.1.1、创建登录页面
登录页面:resource/static/myLogin.html
action:/login 可以自定义
method:post
参数:username,password可以自定义
可以使用 http对象.usernameParameter("myname").passwordParameter("mypwd")
错误提示页面:resource/static/error.html
内容:error.html 登录错误,请检查用户名和密码
13.1.2、设置自定义登录参数
重写protected void configure(HttpSecurity http)方法
设置访问的白名单,无需登录认证就可以访问的地址
.antMatchers("/index","/myLogin.html","/login","/error.html").permitAll()
13.1.3、指定登录页面,登录的uri地址
.loginPage("/myLogin.html") //设置自定义的登录页面
.loginProcessingUrl("/login") //form 中登录访问的uri地址
13.1.4、指定登录错误提示页面
.failureUrl("/error.html") //定义错误页面
13.1.5、关闭跨域访问的安全设置,先禁用
.csrf().disable();
上面的登录方式是基于form的,对于现在的前后端分离的方式不合适。如果要使用前后端分离,一般使用json作为数据的交互格式,需要使用另一种方式才可以。
13.2、ajax方式,用户端发起请求,springsecurity接收请求验证用户的用户名和密码,把验证结果返回给请求方(json数据)
api说明:
13.2.1、AuthenticationSuccessHandler:
当spring security框架验证用户信息成功后执行的接口,执行的是onAuthenticationSuccess()方法
13.2.2、AuthenticationFailureHandler
当springsecurity框架验证用户信息失败后执行的接口,
执行的是onAuthenticationFailure()方法
实现步骤:
1、加入jquery.js文件,在static目中中,创建js目录,拷贝jquery-3.4.1.js文件
2、修改ajaxlogin.html 文件,内容如下
<!DOCTYPE html>
<html lang="en">
<head>
    <meta charset="UTF-8">
    <title>Title</title>
    <script type="text/javascript" src="../js/jquery-3.4.1.js"></script>
</head>
<body>
    <p>前后端分离ajax请求方式</p>
    <div>
        用户名:<input type="text" id="username" value=""> <br/>
        密 码:<input type="text" id="password" value=""/><br/>
        <button id="btnLogin">使用ajax登录</button>
    </div>
</body>
<script type="text/javascript">
    $("#btnLogin").click(function () {
        //alert("1111");
        var uname = $("#username").val();
        var pwd = $("#password").val();
        $.ajax({
            url:"/login",
            type:"POST",
            data:{
                "username":uname,
                "password":pwd
            },
            dataType:"json",
            success:function(resp){
                alert("代码:"+resp.code+" 提示"+resp.msg)
            }
        })
    });
</script>
</html>
3、创建handler实现两个不同接口
success接口:
@Component
public class MySuccessHandler implements AuthenticationSuccessHandler {
    /**
     *
     * @param httpServletRequest    请求对象
     * @param httpServletResponse   应答对象
     * @param authentication        springsecurity框架验证用户信息成功后的封装类
     * @throws IOException
     * @throws ServletException
     */
    @Override
    public void onAuthenticationSuccess(HttpServletRequest httpServletRequest,
                                        HttpServletResponse httpServletResponse,
                                        Authentication authentication) throws IOException, ServletException {
        //登录的用户信息验证成功后执行的方法
        httpServletResponse.setContentType("text/json;charset=utf-8");
        Result result = new Result();
        result.setCode(0);
        result.setError(1000);
        result.setMsg("登录成功");
        ServletOutputStream outputStream = httpServletResponse.getOutputStream();
        ObjectMapper objectMapper = new ObjectMapper();
        objectMapper.writeValue(outputStream,result);
        outputStream.flush();
        outputStream.close();
//        PrintWriter writer = httpServletResponse.getWriter();
//        writer.println("{\"msg\":\"登录成功!\"}");
//        writer.flush();
//        writer.close();
    }
}
failed接口:
@Component
public class MyFailureHandler implements AuthenticationFailureHandler {
    /**
     *
     * @param httpServletRequest 请求对象
     * @param httpServletResponse  应答对象
     * @param e  springsecurity框架验证用户信息成功后的封装类
     * @throws IOException
     * @throws ServletException
     */
    @Override
    public void onAuthenticationFailure(HttpServletRequest httpServletRequest, HttpServletResponse httpServletResponse, AuthenticationException e) throws IOException, ServletException {
       //当框架验证用户信息失败时执行的方法
        httpServletResponse.setContentType("text/json;charset=utf-8");
        Result result = new Result();
        result.setCode(1);
        result.setError(1001);
        result.setMsg("登录失败");
        ServletOutputStream outputStream = httpServletResponse.getOutputStream();
        ObjectMapper objectMapper = new ObjectMapper();
        objectMapper.writeValue(outputStream,result);
        outputStream.flush();
        outputStream.close();


//        PrintWriter writer = httpServletResponse.getWriter();
//        writer.println("{\"msg\":\"登录失败!\"}");
//        writer.flush();
//        writer.close();

    }
}
4、在pom文件中加入jackson的依赖
<!-- https://mvnrepository.com/artifact/com.fasterxml.jackson.core/jackson-core -->
<dependency>
<groupId>com.fasterxml.jackson.core</groupId>
<artifactId>jackson-core</artifactId>
<version>2.9.8</version>
</dependency>
<!-- https://mvnrepository.com/artifact/com.fasterxml.jackson.core/jackson-databind -->
<dependency>
<groupId>com.fasterxml.jackson.core</groupId>
<artifactId>jackson-databind</artifactId>
<version>2.9.8</version>
</dependency>
————————————————
5、创建result返回结果封装类
public class Result {
    //code =0 成功,code =1 失败
    private int code;
    // 表示错误码
    private int error;
    private String msg;

    public int getCode() {
        return code;
    }

    public void setCode(int code) {
        this.code = code;
    }

    public int getError() {
        return error;
    }

    public void setError(int error) {
        this.error = error;
    }

    public String getMsg() {
        return msg;
    }

    public void setMsg(String msg) {
        this.msg = msg;
    }
}
6、配置handler
.formLogin()
.successHandler(successHandler)
.failureHandler(failureHandler)
13.3验证码:
使用字母和数字的组合,使用6位验证码。验证码给用户显示的是图片,在html页面中使用
指定一个图片,图片内容是验证码。
生成验证码:自定义实现,实现开源的库。
实现验证码:使用servlet,也可以使用controller。
实现:
13.3.1、创建Controller类,CaptchaController
创建图像类:BufferedImage
BufferedImage image = new BuffereImage(width,heigh,BuffereImage.TYPE_INT_RGB);
获取图像画笔
Graphics g = image.getGraphics();
使用Graphics在image上画内容,可以是文字,线条,图形等
给图形设置背景色
g.setColor(Color.white)
创建Font
Font font = new Font("宋体",Font.BOLD,16);;
g.setFont(font);
绘制文字
for(int i=0; i<charCount;i++){
            ran = new Random().nextInt(len);
            builder.append(chars[ran]);
            g.setColor(makeColor());
            g.drawString(chars[ran],(i+1)*space,drawY);
}
g.drawString(要绘制的文字,x,y)
生成颜色的方法
for(int m =0 ;m<4;m++){
    g.setColor(makeColor());
    int[] ints = makeLineDot();
    g.drawLine(ints[0],ints[1],ints[2],ints[3]);
}
划线的方法drawLine(x1,y1,x2,y2)
x1,y1是线的起点坐标
x2.y2是线的终点坐标
生成线端点的方法
private int [] makeLineDot(){
    Random random = new Random();
    int x1 = random.nextInt(width/2);
    int y1 = random.nextInt(height);

    int x2 = random.nextInt(width);
    int y2 = random.nextInt(height);

    return new int[]{x1,y1,x2,y2};
}
设置缓存,不要缓存
response.setHeader("Pragma","no-cache");
response.setHeader("Cache-Control","no-cache");
response.setDateHeader("Expires",0);
设置输出内容的类型
response.setContentType("image/png");
输出image
————————————————
OutputStream outputStream = null;
    try {
        outputStream = response.getOutputStream();
    } catch (IOException e) {
        e.printStackTrace();
    }
    /**
     * ReaderedImage im 输出图标
     * String formatName  图像格式,jpg,jpeg,png
     * ImageOutputStream output 输出到哪
     */
    ImageIO.write(image,"png",outputStream);
    outputStream.flush();
    outputStream.close();
}
把验证码存在session中
request.getSession().setAttribute("code",builder.toString());
修改登录页面,添加验证码代码:
<img id="imageCode" src="/captch/code"/> <a href="javascript:void(0)" onclick="changeCode()">重新获取</a>function changeCode(){
var url = "/captch/code?t="+new Date();
$("#imageCode").attr("src",url);
}
进行验证code
使用的是过滤器,整个springsecurity框架都是过滤器实现的
用户发起请求----> 过滤器---->过滤器-------->要访问的资源
目前使用表单登录,验证用户名和密码使用的过滤器是
UsernamePasswordAuthenticationFilter
在验证username,password的值之前,就应该先验证code是否正确,按照这个思路,在过滤器链条中,在UsernamePasswordAuthenticationFilter之前增加一个,让这个新加的过滤器验证session中的code是否一样,如果验证失败抛出异常,springsecurity框架根据异常决定身份认证是否正确。
实现自定义的过滤器方式:
1、直接实现Filter接口
2、继承OncePerRequestFilter
实现步骤:
1、创建异常类,继承AuthenticationException
public class VerificationException extends AuthenticationException {
    public VerificationException(String msg, Throwable t) {
        super(msg, t);
    }

    public VerificationException(String msg) {
        super(msg);
    }

    public VerificationException() {
        super("验证错误,请重新输入");
    }
————————————————
2、创建过滤器类,继承OncePerRequestFilter
public class VerificationCodeFilter extends OncePerRequestFilter {
    private MyFailureHandler failureHandler = new MyFailureHandler();

    @Override
    protected void doFilterInternal(HttpServletRequest httpServletRequest, HttpServletResponse httpServletResponse, FilterChain filterChain) throws ServletException, IOException {
        System.out.println("执行VerificationCodeFilter  doFilterInternal");
        // 只有是login操作,才需要这个过滤器参与验证码的使用
        String uri = httpServletRequest.getRequestURI();
        if(!"/login".equals(uri)){
            filterChain.doFilter(httpServletRequest,httpServletResponse);
        }else{
            try {
            // 验证:code是否正确
            verifcatioinCode(httpServletRequest);
            // 如果验证通过,过滤器正常执行
            filterChain.doFilter(httpServletRequest,httpServletResponse);
            }catch (VerificationException e){
                Result result = new Result();
                result.setCode(1);
                result.setError(1002);
                result.setMsg("验证码错误");
                failureHandler.setResult(result);
                failureHandler.onAuthenticationFailure(httpServletRequest,httpServletResponse,e);

            }
        }
    }

    private void verifcatioinCode(HttpServletRequest httpServletRequest){
        HttpSession session = httpServletRequest.getSession();
        // 获取请求中的验证码
        String code = httpServletRequest.getParameter("code");
        // 获取session中的验证码
        Object attr = session.getAttribute("code");
        String  sessionCode = "";
        if(attr != null ){
            sessionCode = (String) attr;
        }
        System.out.println("执行VerificationCodeFilter  doFilterInternal requestCode="+code+"|| sessionCode="+sessionCode);

        // 处理逻辑
        if(!StringUtils.isEmpty(sessionCode)){
            // 在session 中的有code,用户看到这个code了
            // 如果能到这段代码,说明用户已经发起了登录请求的
            // session中的现在的这个code便无用了
            session.removeAttribute("code");
        }

        // 判断验证码是否code
        if (StringUtils.isEmpty(code) || StringUtils.isEmpty(sessionCode) || !code.equals(sessionCode)){
            //失败
            throw new VerificationException();

        }
    }
}
————————————————
3、把自定义的过滤器添加到过滤器连中CustomSecurityConfig的configure中
http.addFilterBefore(new VerificationCodeFilter(), UsernamePasswordAuthenticationFilter.class);