首先要明白一个概念:
Intent 与 PendingIntent 的区别:
Intent:是意图,即告诉系统我要干什么,然后做Intent应该做的事,而intent是消息的内容
PendingIntent 为Intent的包装,这里是启动Intent的描述,PendingIntent.getActivity 返回的PendingIntent表示,此PendingIntent实例中的Intent是用于启动 Activity 的Intent。PendingIntent.getActivity的参数依次为:Context,发送者的请求码(可以填0),用于系统发送的 Intent,标志位。
包装Intent,intent是我们直接使用startActivity,startService,senbBroadcast启动某项工作的内容,而某些时候我们并不能直接调用 startActivity,startService,senbBroadcast,而是系统或者程序达到某一条件才发送intent,例如下面要学习的Notification,当用户点击Notification之后,由系统发出一条activity的intent。如果我们不用某种方法告诉系统的话,系统是不知道是使用startActivity(),startService还是senbBroadcast...来启动intent的,因此需要PendingIntent,对intent进行包装,调用getActivity()方法。
前面我们说过,NotificationManager是所有Notification的大管家,它的主要职责是加入/移除Notification。
NotificationManager类
通过获取系统服务来获取该对象:
NotificationManager mNotificationManager = (NotificationManager)getSystemServic(Context.NOTIFICATION_SERVICE) ;
常用方法:
public void cancelAll() 移除所有通知 (只是针对当前Context下的Notification)
public void cancel(int id) 移除标记为id的通知 (只是针对当前Context下的所有Notification)
public voidnotify(String tag ,int id, Notification notification) 将通知加入状态栏, 标签为tag,标记为id
public void notify(int id, Notification notification) 将通知加入状态栏,,标记为id
一般来说, 一个Notification应该传送的消息包括:
1 、一个状态条图标
2、在拉伸的状态栏窗口中显示额外的信息和启动一个Application的Intent
3、闪灯或LED
4、电话震动
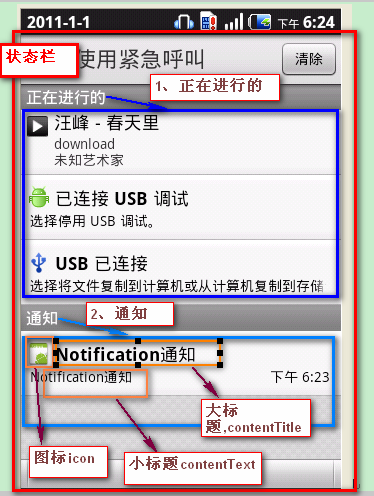
在状态栏(Status Bar)中,通知主要有两类(使用FLAG_标记,后面讲解到):
1、正在运行的事件
2、通知事件
Notification图解如下:
Notification类介绍:
常量:
//表示发送一个Notification的所携带的效果
DEFAULT_ALL 使用默认字段
DEFAULT_LIGHTS 默认闪光
DEFAULT_SOUND 默认声音(uri,指向路径)
DEFAULT_VIRATE 默认震动,后来得知需要添加震动权限VIBRATE: android.permission.VIBRATE
其中震动和闪光都需要在AndroidManifest.xml中添加权限
<!-- 添加操作闪光灯的权限 -->
<uses-permission android:name="android.permission.VIBRATE"/>
<!-- 添加操作震动的权限 -->
<uses-permission android:name="android.permission.FLASHLIGHT"/>
PS:以上的效果常量可以累加,即通过mNotifaction.defaults |=DEFAULT_SOUND (有些效果只能在真机上才有,比如震动)
//设置Flag位
FLAG_AUTO_CANCEL 该通知能被状态栏的清除按钮给清除掉
FLAG_NO_CLEAR 该通知不能被状态栏的清除按钮给清除掉
FLAG_ONGOING_EVENT 通知放置在正在运行
常用字段
contentView 通知在状态栏的显示View(自定义,具体请看下文) ,常与contentIntent配合使用,点击该通知后,
即触发contentIntent
contentIntent 设置PendingIntent对象,点击该通知时发送该Intent
flags 设置flag位,例如FLAG_NO_CLEAR等
defaults 添加效果
tickerText 显示在状态栏中的文字
when 发送此通知的时间戳
icon 设置图标
常用方法介绍:
void setLatestEventInfo(Context context , CharSequence contentTitle,CharSequence contentText,PendingIntent contentIntent)
功能: 显示在拉伸状态栏中的Notification属性,点击后将发送PendingIntent对象。
参数: context 上下文环境
contentTitle 状态栏中的大标题
contentText 状态栏中的小标题
contentIntent 点击后将发送PendingIntent对象
另外的就是Notification的几步不同构造方法了,其构造方法的参数含义如上,请参考SDK 。
注意,关于通知(Notification)的显示类型有两种:
第一种:使用默认的形式(效果图如上显示)。具体使用是为Notification对象设置setLatestEventInfo()方法(该方法内部创建
了默认的RemoteViews对象,因此为默认显示),否则程序会报异常 ;
第二种: 使用自定义的View(RemoteViews对象)显示(功能更加自由,强大),具体方法为设置Notification对象的
contentView 属性和contentIntent属性 ,此时不需要设置setLatestEventInfo()方法。具体使用方法如下:
第一种:例子:main.xml
<?xml version="1.0" encoding="utf-8"?>
<LinearLayout xmlns:android="http://schemas.android.com/apk/res/android"
android:layout_width="fill_parent"
android:layout_height="fill_parent"
android:orientation="vertical" >
<TextView
android:layout_width="fill_parent"
android:layout_height="wrap_content"
android:text="@string/hello" />
<Button android:id="@+id/showButton"
android:layout_width="fill_parent"
android:layout_height="wrap_content"
android:text="showNotification"/>
<Button android:id="@+id/cancelButton"
android:layout_width="fill_parent"
android:layout_height="wrap_content"
android:text="cancelNotification"/>
</LinearLayout>
Intent.FLAG_ACTIVITY_CLEAR_TOP :如果在当前Task中,有要启动的Activity,那么把该Acitivity之前的所有Activity都关掉,并把此Activity置前以避免创建Activity的实例
Intent.FLAG_ACTIVITY_NEW_TASK :系统会检查当前所有已创建的Task中是否有该要启动的Activity的Task,若有,则在该Task上创建Activity,若没有则新建具有该 Activity属性的Task,并在该新建的Task上创建Activity。更多请参见 “ (转载)Android下Affinities和Task ”
NotificationDemoActivity.java
package com.lp.ecjtu;
import android.app.Activity;
import android.app.Notification;
import android.app.NotificationManager;
import android.app.PendingIntent;
import android.content.Context;
import android.content.Intent;
import android.os.Bundle;
import android.view.View;
import android.view.View.OnClickListener;
import android.widget.Button;
public class NotificationDemoActivity extends Activity implements OnClickListener {
/** Called when the activity is first created. */
private Context mContext;
private Button showButton,cancelButton;
private Notification mNotification;
private NotificationManager mNotificationManager;
private static final int NOTIFICATION_ID = 0x0001;
@Override
public void onCreate(Bundle savedInstanceState) {
super.onCreate(savedInstanceState);
setContentView(R.layout.main);
setupViews();
}
private void setupViews() {
mContext = NotificationDemoActivity.this;
showButton = (Button) findViewById(R.id.showButton);
cancelButton = (Button) findViewById(R.id.cancelButton);
mNotification = new Notification(R.drawable.ic_launcher, "this is Notification", System.currentTimeMillis());
//将使用 默认的声音来提醒用户,添加震动,后来得知需要添加震动权限 : Virbate Permission
//mNotification.defaults = Notification.DEFAULT_SOUND;
//mNotification.defaults = Notification.DEFAULT_VIBRATE;
mNotification.defaults = Notification.DEFAULT_LIGHTS;
mNotificationManager = (NotificationManager) this.getSystemService(NOTIFICATION_SERVICE);
showButton.setOnClickListener(this);
cancelButton.setOnClickListener(this);
}
@Override
public void onClick(View v) {
if(v==showButton){
Intent intent = new Intent(mContext, NotificationDemoActivity.class);
//这里需要设置Intent.FLAG_ACTIVITY_NEW_TASK属性
intent.setFlags(Intent.FLAG_ACTIVITY_NEW_TASK );
PendingIntent mContentIntent = PendingIntent.getActivity(mContext, 0, intent, 0);
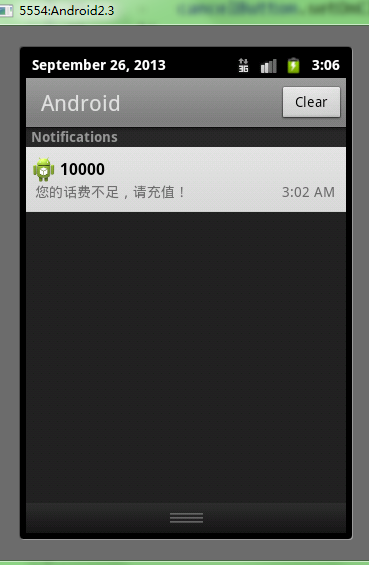
//这里必需要用setLatestEventInfo(上下文,标题,内容,PendingIntent)不然会报错.
mNotification.setLatestEventInfo(mContext, "10000", "您的话费不足,请充值!", mContentIntent);
//这里发送通知,消息ID,通知对象
mNotificationManager.notify(NOTIFICATION_ID,mNotification);
}else if(v==cancelButton){
mNotificationManager.cancel(NOTIFICATION_ID);
}
}
}
别忘了添加震动的权限:
<!-- 添加操作闪光灯的权限 -->
<uses-permission android:name="android.permission.VIBRATE"/>
效果图:

第二种:自定义view
代码如下:
view.xml
<?xml version="1.0" encoding="utf-8"?>
<RelativeLayout xmlns:android="http://schemas.android.com/apk/res/android"
android:layout_width="fill_parent"
android:layout_height="fill_parent"
android:orientation="horizontal" >
<ImageView android:id="@+id/image" android:layout_width="wrap_content"
android:layout_height="fill_parent" />
<TextView android:id="@+id/text" android:layout_width="wrap_content"
android:layout_toRightOf="@+id/image"
android:layout_height="wrap_content" android:textColor="#000" />
<ProgressBar android:id="@+id/progress_horizontal"
style="?android:attr/progressBarStyleHorizontal"
android:layout_below="@+id/text"
android:layout_toRightOf="@+id/image"
android:layout_width="fill_parent" android:layout_height="wrap_content"
android:max="100" android:progress="50" android:secondaryProgress="75" />
</RelativeLayout >
java 代码
NotificationRomoteViewActivity.java
package com.lp.ecjtu;
import android.app.Activity;
import android.app.Notification;
import android.app.NotificationManager;
import android.app.PendingIntent;
import android.content.Context;
import android.content.Intent;
import android.os.Bundle;
import android.widget.RemoteViews;
public class NotificationRomoteViewActivity extends Activity {
private Notification mNotification;
@Override
public void onCreate(Bundle savedInstanceState) {
super.onCreate(savedInstanceState);
setContentView(R.layout.main);
showViewNotification();
}
private void showViewNotification() {
// TODO Auto-generated method stub
mNotification = new Notification(R.drawable.ic_launcher, "自定义View", System.currentTimeMillis()+10000);
//1.创建一个自定义布局
//2.在程序代码中使用RemoteViews的方法来定义image和text。然后把RemoteViews对象传到contentView字段
mNotification.flags = Notification.FLAG_INSISTENT;
RemoteViews remoteViews = new RemoteViews(this.getPackageName(), R.layout.view);//自定义Notification
remoteViews.setImageViewResource(R.id.image, R.drawable.ic_launcher);
remoteViews.setTextViewText(R.id.text, "自定义View");
mNotification.contentView = remoteViews;
// 3、为Notification的contentIntent字段定义一个Intent(注意,使用自定义View不需要setLatestEventInfo()方法)
//点击启动setting
PendingIntent mPendingIntent = PendingIntent.getActivity(NotificationRomoteViewActivity.this,
0, new Intent("android.settings.SETTINGS"), 0);
mNotification.contentIntent = mPendingIntent;
NotificationManager mNotificationManager = (NotificationManager) getSystemService(Context.NOTIFICATION_SERVICE);
mNotificationManager.notify(0, mNotification);
}
}