Spring Cloud 声明式服务调用 Feign
一、简介
在上一篇中,我们介绍注册中心Eureka,但是没有服务注册和服务调用,服务注册和服务调用本来应该在上一章就应该给出例子的,但是我觉得还是和Feign一起讲比较好,因为在实际项目中,都是使用声明式调用服务。而不会在客服端和服务端存储2份相同的model和api定义。Feign在RestTemplate的基础上对其封装,由它来帮助我们定义和实现依赖服务接口的定义。Spring Cloud Feign 基于Netflix Feign 实现的,整理Spring Cloud Ribbon 与 Spring Cloud Hystrix,并且实现了声明式的Web服务客户端定义方式。
二、实践
在上一节中,我继续添加工程模块,最后的模块如下:

首先我们需要建一个工程,名为hello-service-api 在工程主要定义对外提供的model 和api。服务的提供方和服务的消费方都要依赖该工程jar,这样我们就可以只维护一份model 和api定义。在该例子中主要如下结构

非常简单,只有1个HelloServieRemoteApi 接口定义和User对象。
|
1
2
3
4
5
6
7
8
9
10
11
12
13
14
|
@RequestMapping("/hello-service-remote")public interface HelloServiceRemoteApi { @RequestMapping(value = "/hello1", method = RequestMethod.GET) String hello(@RequestParam("name") String name); @RequestMapping(value = "/hello2", method = RequestMethod.GET) User hello(@RequestHeader("name") String name,@RequestHeader("age") Integer age); @RequestMapping(value = "/hello3", method = RequestMethod.POST) String hello(@RequestBody User user); } |
在上面的接口定义中,我们非常的清晰,在接口上面我们主映射为/hello-service-remote,个人感觉已接口的名字通过“-”这样可以非常的区分不同的接口路径,防止多接口时发生重复。接下来具体方法的上面可以定义于方法名一样的路径映射,我这里已 /hello1,/hello2,/hello3为主。
|
1
2
3
4
5
6
7
8
9
10
11
12
13
14
15
16
17
18
19
20
21
22
23
24
25
26
27
28
29
30
31
32
33
34
35
36
37
38
39
40
41
42
43
44
45
46
47
48
49
|
public class User implements Serializable { private static final long serialVersionUID = -7233238826463139634L; private Long id; private String name; private Integer age; public User() { } public User(String name, Integer age) { this.name = name; this.age = age; } public Long getId() { return id; } public void setId(Long id) { this.id = id; } public String getName() { return name; } public void setName(String name) { this.name = name; } public Integer getAge() { return age; } public void setAge(Integer age) { this.age = age; } @Override public String toString() { return "User{" + "name='" + name + ''' + ", age=" + age + '}'; }} |
上面就是简单的一个User对象。
从上面的接口中发现,该api工程需要引入spring-web包。所以它的pom.xml如下:
|
1
2
3
4
5
6
7
8
9
10
11
12
13
14
15
16
17
18
|
<?xml version="1.0" encoding="UTF-8"?><project xmlns="http://maven.apache.org/POM/4.0.0" xmlns:xsi="http://www.w3.org/2001/XMLSchema-instance" xsi:schemaLocation="http://maven.apache.org/POM/4.0.0 http://maven.apache.org/xsd/maven-4.0.0.xsd"> <modelVersion>4.0.0</modelVersion> <artifactId>hello-service-api</artifactId> <version>1.0-SNAPSHOT</version> <groupId>com.qee.hello</groupId> <dependencies> <dependency> <groupId>org.springframework</groupId> <artifactId>spring-web</artifactId> <version>4.2.9.RELEASE</version> </dependency> </dependencies></project> |
从上面的pom.xml定义中,我们知道hello-service-api并不集成父工程micro-service-integration。一般作为api提供的工程jar,依赖越少越好。
接下来我们需要创建一个提供者工程,我们把它命名为hello-service-compose。该工程也是标准的Spring Boot工程。具体的目录如下:
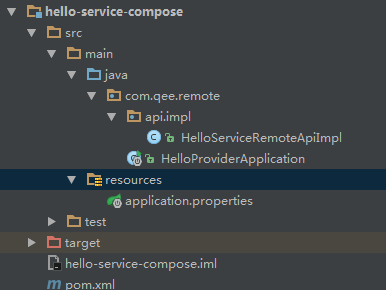
在工程中我们有一个刚才hello-service-api接口定义的实现。代码如下:
|
1
2
3
4
5
6
7
8
9
10
11
12
13
14
15
16
17
18
19
20
21
22
23
24
25
26
|
@RestControllerpublic class HelloServiceRemoteApiImpl implements HelloServiceRemoteApi { @Override public String hello(@RequestParam("name") String name) { return "hello " + name; } @Override public User hello(@RequestHeader("name") String name, @RequestHeader("age") Integer age) { try { name= URLDecoder.decode(name,"UTF-8"); } catch (UnsupportedEncodingException e) { e.printStackTrace(); } return new User(name, age); } @Override public String hello(@RequestBody User user) { if (user == null) { return "未知"; } return user.toString(); }} |
因为是测试工程,所以它没有复杂的业务逻辑。接下来就是HelloProviderApplication的启动main.
|
1
2
3
4
5
6
7
8
9
10
11
12
13
14
15
|
package com.qee.remote;import org.springframework.boot.SpringApplication;import org.springframework.boot.autoconfigure.SpringBootApplication;import org.springframework.cloud.client.discovery.EnableDiscoveryClient;@EnableDiscoveryClient@SpringBootApplicationpublic class HelloProviderApplication { public static void main(String[] args) { SpringApplication.run(HelloProviderApplication.class, args); }} |
在上面有2个注解,第一个 SpringBootApplication 就是Spring Boot 启动注解,EnableDiscoveryClient 该注解会把RestController修饰的类注册到注册中心去。
接下来我们来看下application.properties
|
1
2
3
4
5
6
7
8
9
10
11
12
13
14
15
16
|
server.port=8885spring.application.name=hello-service-composeeureka.instance.hostname=register.center.comeureka.instance.server.port=8881#默认的注册域eureka.client.serviceUrl.defaultZone=http://${eureka.instance.hostname}:${eureka.instance.server.port}/eureka/#控制台彩色输出spring.output.ansi.enabled=ALWAYS |
从上面信息我们知道,改工程启动端口为8885,注册中心地址为register.center.com:8881。
接下来我们查看一下该工程的pom.xml定义
|
1
2
3
4
5
6
7
8
9
10
11
12
13
14
15
16
17
18
19
20
21
22
23
24
25
26
27
28
29
30
31
32
33
34
35
36
37
38
39
40
41
42
43
44
45
46
47
|
<?xml version="1.0" encoding="UTF-8"?><project xmlns="http://maven.apache.org/POM/4.0.0" xmlns:xsi="http://www.w3.org/2001/XMLSchema-instance" xsi:schemaLocation="http://maven.apache.org/POM/4.0.0 http://maven.apache.org/xsd/maven-4.0.0.xsd"> <parent> <artifactId>micro-service-integration</artifactId> <groupId>spring.cloud</groupId> <version>1.0-SNAPSHOT</version> </parent> <modelVersion>4.0.0</modelVersion> <artifactId>hello-service-compose</artifactId> <properties> <project.build.sourceEncoding>UTF-8</project.build.sourceEncoding> <project.reporting.outputEncoding>UTF-8</project.reporting.outputEncoding> </properties> <dependencies> <dependency> <groupId>com.qee.hello</groupId> <artifactId>hello-service-api</artifactId> <version>1.0-SNAPSHOT</version> </dependency> <dependency> <groupId>org.springframework.boot</groupId> <artifactId>spring-boot-starter-web</artifactId> </dependency> <dependency> <groupId>org.springframework.cloud</groupId> <artifactId>spring-cloud-starter-eureka</artifactId> </dependency> <dependency> <groupId>org.springframework.cloud</groupId> <artifactId>spring-cloud-starter-ribbon</artifactId> </dependency> <dependency> <groupId>org.springframework.boot</groupId> <artifactId>spring-boot-starter-actuator</artifactId> </dependency> </dependencies></project> |
从pom.xml文件中知道该工程依赖了web,euraka,ribbon,actuator,hello-service-api 包。其中euraka为服务注册和发现包,ribbon为服务调用负载均衡包,actuator为工程元信息检测包。还有我们自己定义的hello-service-api包。
在上面的简单配置和编写后,我们就可以启动工程把该HelloServiceRemoteApi注册到注册中心去了。
现在有了服务接口定义包和服务提供工程,现在我们编写一下服务调用工程。命名为hello-service-web。该工程的目录结构如下:

首先我们来看下HelloBackgroundService 这个接口。
|
1
2
3
|
@FeignClient(value = "hello-service-compose")public interface HelloBackgroundService extends HelloServiceRemoteApi{} |
非常的简单,主要继承我们之前编辑的HelloServiceRemoteApi,并且在上面打上FeignClient注解,该注解指定服务名来绑定服务。该注解同时会使服务调用具有负载均衡的能力。
接下来我们来看下HelloController类
|
1
2
3
4
5
6
7
8
9
10
11
12
13
14
15
16
17
18
19
20
21
22
23
24
25
|
@RestControllerpublic class HelloController { @Autowired private HelloBackgroundService helloBackgroundService; @RequestMapping("/hello") public Map<String,Object> hello(){ Map<String,Object> ret = new HashMap<String, Object>(); StringBuffer sb = new StringBuffer(); String s1 = helloBackgroundService.hello("张三"); sb.append(s1).append("
"); User user = null; try { user = helloBackgroundService.hello(URLEncoder.encode("李四", "UTF-8"), 30); } catch (UnsupportedEncodingException e) { e.printStackTrace(); } sb.append(user.toString()).append("
"); String s3 = helloBackgroundService.hello(new User("王五", 19)); sb.append(s3).append("
"); ret.put("show",sb.toString()); return ret; }} |
从上面得知我们,我们就可以调用之前的我们编写的HelloBackgroundService了。接下来我们查看一下启动类HelloConsumerApp
|
1
2
3
4
5
6
7
8
9
10
11
12
13
14
15
16
17
18
19
20
21
22
23
24
|
package com.qee;import feign.Logger;import org.springframework.boot.SpringApplication;import org.springframework.boot.autoconfigure.SpringBootApplication;import org.springframework.cloud.client.discovery.EnableDiscoveryClient;import org.springframework.cloud.netflix.feign.EnableFeignClients;import org.springframework.context.annotation.Bean;@EnableFeignClients@EnableDiscoveryClient@SpringBootApplicationpublic class HelloConsumerApp { @Bean Logger.Level feginLoggerLevel(){ return Logger.Level.FULL; } public static void main(String[] args) { SpringApplication.run(HelloConsumerApp.class, args); }} |
在该启动了中又多了一个注解EnableFeignClients ,该注解开启Spring Cloud Feign的支持。接着我们来查看一下application.properties
|
1
2
3
4
5
6
7
8
9
10
11
12
13
14
15
16
17
18
19
20
21
22
23
24
25
26
27
28
29
30
31
|
server.port=8887spring.application.name=hello-service-webeureka.instance.hostname=register.center.comeureka.instance.server.port=8881#默认的注册域eureka.client.serviceUrl.defaultZone=http://${eureka.instance.hostname}:${eureka.instance.server.port}/eureka/#开启请求压缩功能feign.compression.request.enabled=true#开启响应压缩功能feign.compression.response.enabled=true#指定压缩请求数据类型feign.compression.request.mime-types=text/xml;application/xml;application/json#如果传输超过该字节,就对其进行压缩feign.compression.request.min-request-size=2048#控制台彩色输出spring.output.ansi.enabled=ALWAYS#日志配置,该接口的日志级别logging.level.com.qee.service.HelloBackgroundService=DEBUG |
从上面的注释中,我们已经可以知道具体的配置参数的作用,这里就不详细介绍了。从上面的配置和编写我们可以知道,该工程需要如下的依赖包,pom.xml文件如下
|
1
2
3
4
5
6
7
8
9
10
11
12
13
14
15
16
17
18
19
20
21
22
23
24
25
26
27
28
29
30
31
32
33
34
35
36
37
38
39
40
41
42
43
44
45
46
47
48
49
50
51
52
|
<?xml version="1.0" encoding="UTF-8"?><project xmlns="http://maven.apache.org/POM/4.0.0" xmlns:xsi="http://www.w3.org/2001/XMLSchema-instance" xsi:schemaLocation="http://maven.apache.org/POM/4.0.0 http://maven.apache.org/xsd/maven-4.0.0.xsd"> <parent> <artifactId>micro-service-integration</artifactId> <groupId>spring.cloud</groupId> <version>1.0-SNAPSHOT</version> </parent> <modelVersion>4.0.0</modelVersion> <artifactId>hello-service-web</artifactId> <properties> <project.build.sourceEncoding>UTF-8</project.build.sourceEncoding> <project.reporting.outputEncoding>UTF-8</project.reporting.outputEncoding> </properties> <dependencies> <dependency> <groupId>com.qee.hello</groupId> <artifactId>hello-service-api</artifactId> <version>1.0-SNAPSHOT</version> </dependency> <dependency> <groupId>org.springframework.boot</groupId> <artifactId>spring-boot-starter-web</artifactId> </dependency> <dependency> <groupId>org.springframework.cloud</groupId> <artifactId>spring-cloud-starter-eureka</artifactId> </dependency> <dependency> <groupId>org.springframework.cloud</groupId> <artifactId>spring-cloud-starter-ribbon</artifactId> </dependency> <dependency> <groupId>org.springframework.cloud</groupId> <artifactId>spring-cloud-starter-feign</artifactId> </dependency> <dependency> <groupId>org.springframework.boot</groupId> <artifactId>spring-boot-starter-actuator</artifactId> </dependency> </dependencies></project> |
该服务消费端,比服务提供方多了一个jar依赖,就是feign。该jar的作用就是提供声明式的服务调用。到这里我们本章的内容大致结束,最后我们来运行这几个工程。查看如下结果:
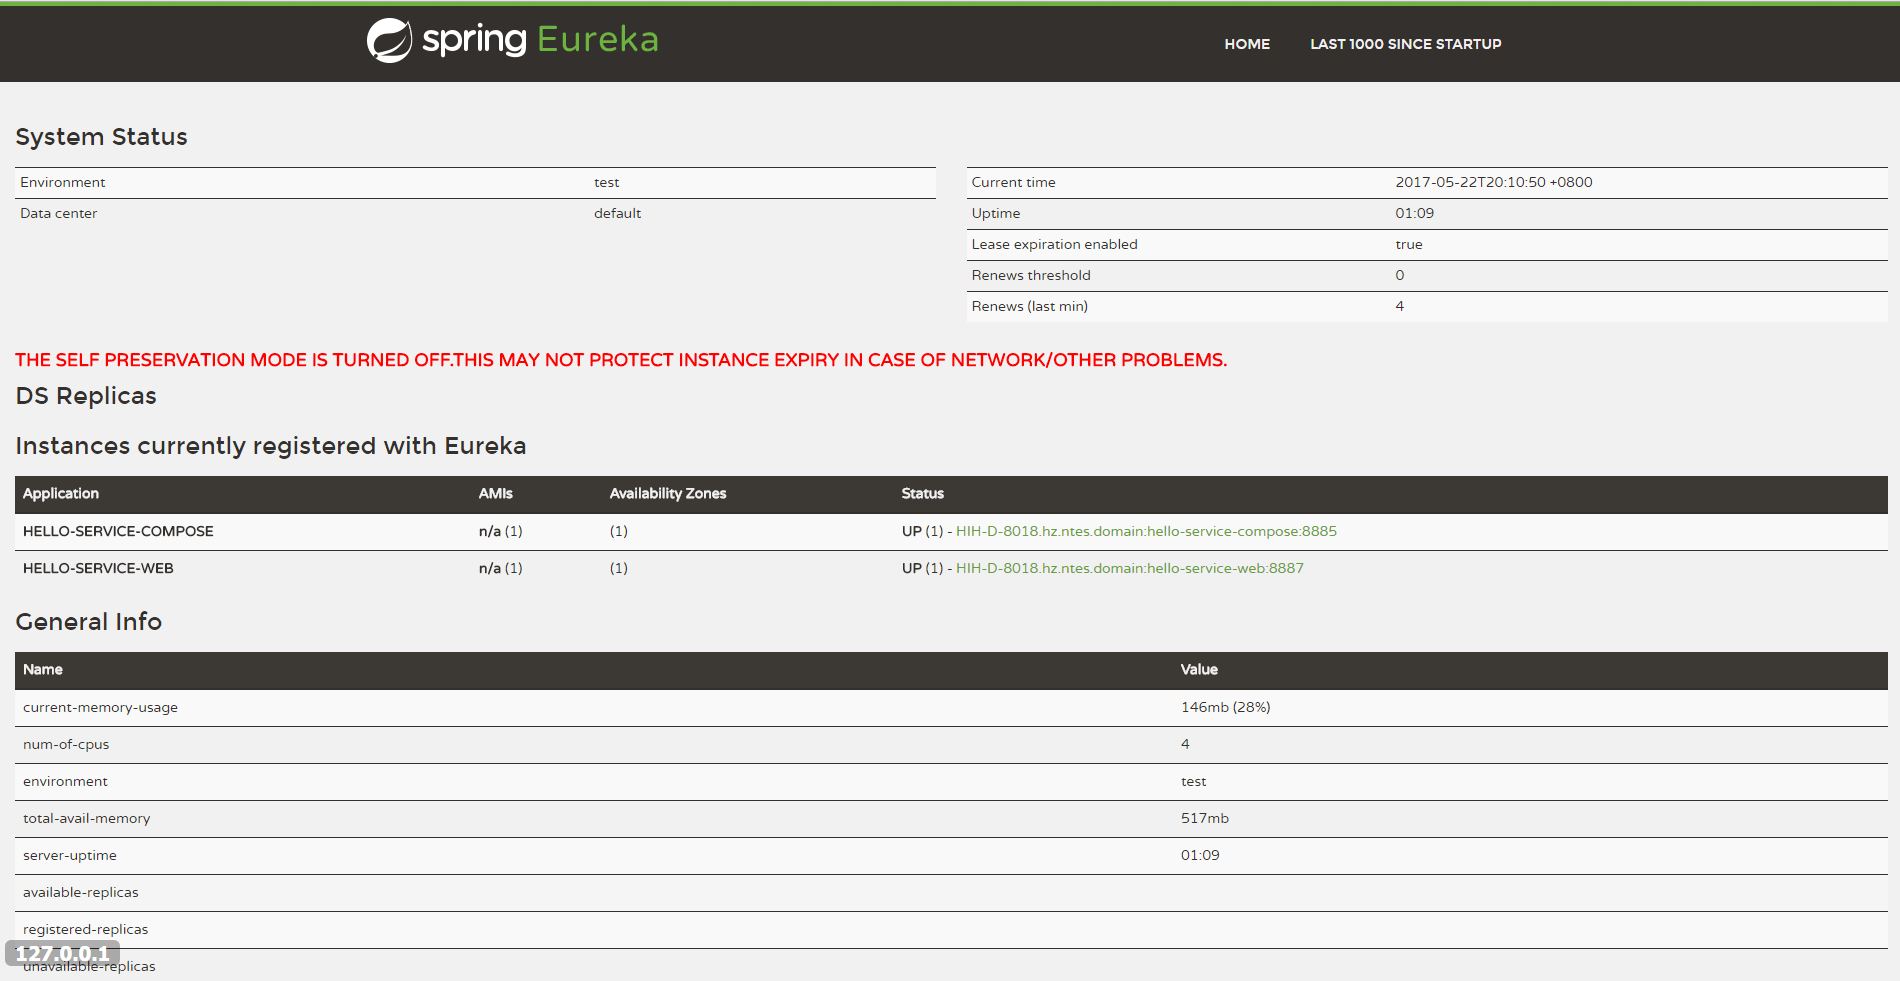
从上面我们可以看到2个工程hello-service-compose 和hello-service-web都已经注册到注册中心eureka上了。接下来看一下调用结果:

到这里服务注册中心启动,服务注册,服务消费大致都已完成,之后会向大家一起学习服务调用的负载均衡Ribbon和服务容错保护Hystrix.