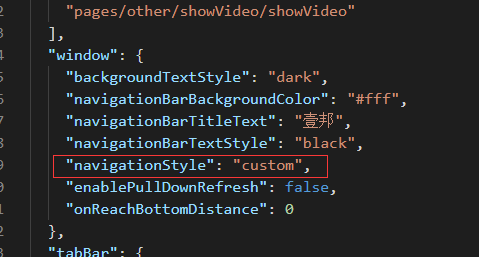
第一步:在app.json中设置

目前微信小程序不支持单个页面设置,一旦决定要使用自定义导航栏后,那么每个页面都需要设置
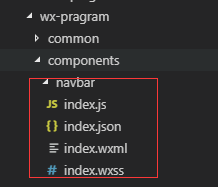
导航栏组件目录:

index.wxml 文件
<view class='nav-wrap' style='height: {{height*2 + 20}}px;'>
    <!-- 导航栏 中间的标题 -->
  <view class='nav-title' style='line-height: {{height*2 + 44}}px;'>{{navbarData.title}}</view>
  <view style='display: flex; justify-content: space-around;flex-direction: column'>
      <!-- 导航栏  左上角的返回按钮 和home按钮 -->
      <!-- 其中wx:if='{{navbarData.showCapsule}}' 是控制左上角按钮的显示隐藏,首页不显示 -->
    <view class='nav-capsule' style='height: {{height*2 + 44}}px;' wx:if='{{navbarData.showCapsule}}'>
       <!-- 左上角的返回按钮,wx:if='{{!share}}'空制返回按钮显示 -->
       <!-- 从分享进入小程序时 返回上一级按钮不应该存在 -->
      <view bindtap='_navback' wx:if='{{!share}}'>
        <image src='/common/image/nav-back.png' mode='aspectFit' class='back-pre'></image>
      </view>
      <!-- <view class='navbar-v-line' wx:if='{{share}}'></view> -->
      <view bindtap='_backhome' wx:if='{{share}}'>
        <image src='/common/image/nav-home.png' mode='aspectFit' class='back-home'></image>
      </view>
    </view>
  </view>
</view>
index.wxss 文件
/* 顶部要固定定位   标题要居中   自定义按钮和标题要和右边微信原生的胶囊上下对齐 */
.nav-wrap {
    position: fixed;
    width: 100%;
    top: 0;
    background: #fff;
    color: #000;
    z-index: 9999999;
}
/* 标题要居中 */
.nav-title {
    position: absolute;
    text-align: center;
    max-width: 400rpx;
    overflow: hidden;
    text-overflow: ellipsis;
    white-space: nowrap;
    top: 0;
    left: 0;
    right: 0;
    bottom: 0;
    margin: auto;
    font-size: 30rpx;
    color: #2c2b2b;
    font-weight: normal;
}

.nav-capsule {
    display: flex;
    align-items: center;
    margin-left: 30rpx;
    width: 140rpx;
    justify-content: space-between;
    height: 100%;
}

.navbar-v-line {
    width: 1px;
    height: 32rpx;
    background-color: #e5e5e5;
}

.back-pre, .back-home {
    width: 36rpx;
    height: 36rpx;
    margin-top: 8rpx;
    padding: 10rpx;
}
.nav-capsule .back-home {
    width: 36rpx;
    height: 40rpx;
    margin-top: 3rpx;
}
index.json文件(自定义组件必须)
{
    "component": true
}
index.js 文件
const app = getApp()
Component({
  properties: {
    navbarData: {   //navbarData   由父页面传递的数据,变量名字自命名
      type: Object,
      value: {},
      observer: function (newVal, oldVal) {}
    }
  },
  data: {
    height: '',
    //默认值  默认显示左上角
    navbarData: {
      showCapsule: 1
    }
  },
  attached: function () {
    // 获取是否是通过分享进入的小程序
    this.setData({
      share: app.globalData.share
    })
    // 定义导航栏的高度   方便对齐
    this.setData({
      height: app.globalData.height
    })
  },
  methods: {
    // 返回上一页面
    _navback(event) {
      // 当前页面为“编辑收货地址”时,对返回按钮进行劫持
      if(this.data.navbarData.pageName === 'edit-address'){
        wx.showModal({
          content: '当前页面尚未保存,是否确认返回?',
          cancelColor: '#909399',
          confirmColor: '#3888FF',
          success: function(res){
              if(res.confirm){
                wx.navigateBack()
              }
          }
        })
        return ;
      }
      wx.navigateBack()
    },
    //返回到首页
    _backhome() {
      wx.switchTab({
        url: '/pages/home/home',
      })
    }
  }

})
app.js 文件
App({
  onLaunch: function (options) {
    // 判断是否由分享进入小程序
    if (options.scene == 1007 || options.scene == 1008) {
      this.globalData.share = true
    } else {
      this.globalData.share = false
    };
    // 获取设备顶部窗口的高度(不同设备窗口高度不一样,根据这个来设置自定义导航栏的高度)
    wx.getSystemInfo({
        success: (res) => {
          this.globalData.height = res.statusBarHeight
        }
    })
  },
  globalData: {
    appid: "xxxxxxxxx",
    share: false,  // 分享默认为false
    height: 0 // 导航栏高度
  }
})
app.wxss 文件
page{
  position: relative;
  z-index: 9999998;
}
自此,导航栏组件已搭建完成,让我们来使用它吧

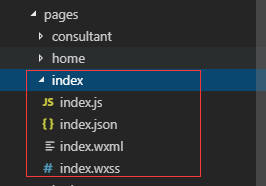
在小程序页面中:
index.wxml 文件
<!-- 引入自定义组价。'navbar-data'中navbar是自定义名字,决定了组件中'navbarData'的名字 -->
<nav-bar navbar-data='{{nvabarData}}'></nav-bar>
<view style='margin-top: {{height}}px'>

</view>
index.json 文件
{
    "usingComponents": {
      "nav-bar": "/components/navbar/index"
    }
}
index.js文件
//获取应用实例
const app = getApp()
Page({
  data:{
    // 组件所需的参数
    nvabarData: {
      showCapsule: 1, //是否显示左上角图标   1表示显示    0表示不显示
      title: '我的页面', //导航栏 中间的标题
    },
    height: app.globalData.height * 2 + 20  // 此页面 页面内容距最顶部的距离
  }
}