哈喽兄弟们
之前经常编写Python脚本来进行数据处理、数据传输和模型训练。随着数据量和数据复杂性的增加,运行脚本可能需要一些时间。在等待数据处理完成时可以同时做一些其他工作。
为了达到这个目的,编写了一组用于解决这个问题的Python脚本。使用这些脚本向手机发送流程更新、可视化和完成通知。当偶尔拥有这些自由的时刻,你可以享受而不是担心模型的进度。

第一个问题是,需要知道什么?这取决于你正在做的工作。对于笔者来说主要有有三个可能会占用时间的处理任务:
- 模型训练
- 数据处理和/或传输
- 金融模型
我们需要对于每一种情况具体分析。

更新每n个epoch,必须包括关键指标。例如,训练和验证集的损失和准确性。接着完成通知,包括:
-
训练期间关键指标的可视化(同样,训练和验证集的损失和准确性)
-
其他不太重要但仍然有用的信息,如本地模型目录、训练时间、模型架构等
-
预测输出,对于文本生成来说输出生成的文本(或它的一个样本);对于图像生成
来说,输出结果是一个(希望)很酷的可视化
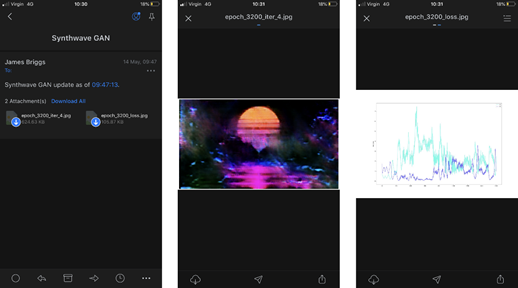
以训练一个神经网络来重现给定的艺术风格为例。我们需要重点从模型中生成的图像,损失和精度图,当前的训练时间,和一个模型的名称。
import notify
             START= datetime.now()  # this line would be placed before modeltraining begins
      MODELNAME="SynthwaveGAN"  # giving us ourmodel name
      NOTIFY=100  # so we send an update notification every100 epochs
             # for each epoch e,we would include the following code
      if e % notify_epoch ==0and e !=0:
          # here we createthe email body message
         txt = (f"{MODELNAME} update as of "
                f"{datetime.now().strftime( %H:%M:%S )}.")
                 # we build theMIME message object with notify.message
         msg = notify.message(
             subject= Synthwave GAN ,
             text=txt,
             img=[
                 f ../visuals/{MODELNAME}/epoch_{e}_loss.png ,
                 f ../visuals/{MODELNAME}/epoch_{e}_iter_{i}.png
             ]
         )  # note that weattach two images here, the loss plot and
          #    ...a generated image output from our model
                    notify.send(msg)  # we then send the message
每隔100个epoch,就会发送一封包含上述所有内容的电子邮件。以下是其中一封邮件:

这点不是很有趣,但在时间消耗方面,它排第一名。
以使用Python将批量数据上传到SQLServer为例(对于没有BULK INSERT的人)。在上传脚本的最后,会有一个简单的消息通知上传完成。
import os
      import notify
      from data importSql  # seehttps://jamescalam.github.io/pysqlplus/lib/data/sql.html
             dt =Sql( database123 ,  server001 )  # setup theconnection to SQL Server
             for i, file inenumerate(os.listdir( ../data/new )):
          dt.push_raw(f ../data/new/{file} )  # push a file to SQL Server
             # once the upload is complete, send a notification
      # first we create the message
      msg = notify.message(
          subject= SQL Data Upload ,
          text=f Data upload complete, {i} filesuploaded. ,
      )
             # send the message
      notify.send(msg)
如果偶尔抛出错误,还可以添加一个try-except语句来捕获错误,并将其添加到一个列表中,以包含在更新和/或完成电子邮件中。

金融建模中运行的所有东西实际上都非常快,所以此处只能提供一个示例。
以现金流动模型工具 为例。现实中,这个过程只需要10-20秒,但现在假设你是华尔街炙手可热的定量分析师,正在处理几百万笔贷款。在这封电子邮件中,可能想要包含一个高级概要分析的投资组合。可以随机选择一些贷款,并在给定的时间段内可视化关键值——给定一个小样本来交叉检验模型的性能。
end = datetime.datetime.now()  # get the ending datetime
             # get the total runtime in hours:minutes:seconds
                      hours,rem =divmod((end - start).seconds, 3600)
                      mins,secs =divmod(rem, 60)
                      runtime= {:02d}:{:02d}:{:02d} .format(hours, mins,secs)
             # now built our message
                      notify.msg(
                          subject="Cashflow Model Completion",
                          text=(f {len(model.output)} loansprocessed.
                                f Total runtime:{runtime} ),
                          img=[
                               ../vis/loan01_amortisation.png ,
                               ../vis/loan07_amortisation.png ,
                               ../vis/loan01_profit_and_loss.png ,
                               ../vis/loan07_profit_and_loss.png
                          ]
                      )
             notify.send(msg)  # and send it
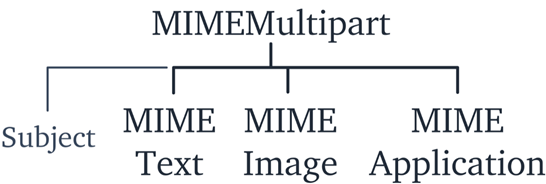
上面的所有功能节选自一个名为notify.py的脚本。在示例代码中将使用Outlook。这里需要两个Python库,email和smtplib:
· email :用于管理电子邮件消息。有了这个库就可以设置电子邮件消息本身,包括主题、正文和附件。
· smtplib :处理SMTP连接。简单邮件传输协议(SMTP)是大多数电子邮件系统使用的协议,允许邮件通过互联网发送。

消息本身是使用来自email模块的MIMEMultipart对象构建的。还需要使用三个MIME子类,并将它们附加到MIMEMultipart对象上:
-
mimetext:这将包含电子邮件“有效负载”,即电子邮件正文中的文本。
-
mimeimage :这是用于在电子邮件中包含图像。
-
mimeapplication:用于MIME消息应用程序对象。也就是文件附件。
除了这些子类之外,还有其他参数,比如MimeMultipart中的Subject值。所有这些加在一起就形成了下面的结构。
把它们都放在一起会发生什么:
import os
      from email.mime.text importMIMEText
      from email.mime.image importMIMEImage
      from email.mime.application importMIMEApplication
      from email.mime.multipart importMIMEMultipart
             defmessage(subject="PythonNotification", text="", img=None, attachment=None):
          # build messagecontents
          msg =MIMEMultipart()
          msg[ Subject ] = subject  # add in thesubject
          msg.attach(MIMEText(text))  # add text contents
                 # check if wehave anything given in the img parameter
          if img isnotNone:
              # if we do, wewant to iterate through the images, so let s check that
              # what we haveis actually a list
              iftype(img) isnot list:
                  img = [img]  # if it isn t alist, make it one
              # now iteratethrough our list
              for one_img in img:
                  img_data =open(one_img,  rb ).read()  # read the imagebinary data
                  # attach theimage data to MIMEMultipart using MIMEImage, we add
                  # the givenfilename use os.basename
                  msg.attach(MIMEImage(img_data, name=os.path.basename(one_img)))
                 # we do the samefor attachments as we did for images
          if attachment isnotNone:
              iftype(attachment) isnot list:
                  attachment = [attachment]  # if it isn t a list, make it one
                          for one_attachment in attachment:
                  withopen(one_attachment, rb ) as f:
                      # read in theattachment using MIMEApplication
                      file =MIMEApplication(
                          f.read(),
                          name=os.path.basename(one_attachment)
                      )
                  # here we editthe attached file metadata
                  file[ Content-Disposition ] =f attachment; filename="{os.path.basename(one_attachment)}"
                  msg.attach(file)  # finally, addthe attachment to our message object
          return msg
这个脚本相当简单。在顶部,有导入(这是以前介绍过的MIME部分)以及Python的os库。
接下来定义一个名为message的函数。这允许使用不同的参数调用函数并轻松地构建一个电子邮件消息对象。例如,可以这样写一封带有多张图片和附件的邮件:
email_msg= message(
    text="Model processing complete,please see attached data.",
    img=[ accuracy.png ,  loss.png ],
    attachments=[ data_in.csv ,  data_out.csv ]
)
首先,初始化MIMEMultipart对象,并将其分配给msg;然后,使用“subject”键设置电子邮件主题。attach方法向MIMEMultipart对象添加不同的MIME子类。你可以使用MIMEText子类添加电子邮件正文。
对于图像img和attachment附件,可以什么都不传递,只传递一个文件路径,或者传递一组文件路径。我们通过首先检查参数是否为None来处理它,如果参数为None,则传递;否则,检查给定的数据类型,不是一个list,就创建一个,这就使得可以用下面的for循环来遍历项。
接着,使用MIMEImage和MIMEApplication子类分别附加图像和文件。使用os.basename从给定的文件路径中获取文件名,附件名包括该文件名。

现在已经构建好电子邮件消息对象,下一步就是发送它。这就是smtplib模块发挥作用的地方。代码同样非常简单,只有一处例外。
由于直接处理不同的电子邮件供应商和他们各自的服务器,需要不同的SMTP地址。在谷歌中输入“outlook smtp”。不需要单击页面,你就可以得到服务器地址smtp-mail.outlook.com和端口号587。
当使用smtplib.SMTP初始化SMTP对象时,这两种方法都需要用。SMTP -接近开始的send函数:
import smtplib
       import socket
             defsend(server= smtp-mail.outlook.com , port= 587 , msg):
           # contain followingin try-except in case of momentary network errors
           try:
               # initialiseconnection to email server, the default is Outlook
               smtp = smtplib.SMTP(server, port)
               # this is the Extended Hello  command, essentially greeting our SMTP or ESMTP server
               smtp.ehlo()
               # this is the Start Transport Layer Security  command, tells the server we will
               # becommunicating with TLS encryption
               smtp.starttls()
                          # read email andpassword from file
               withopen( ../data/email.txt ,  r ) as fp:
                   email = fp.read()
               withopen( ../data/password.txt ,  r ) as fp:
                   pwd = fp.read()
                        # login tooutlook server
               smtp.login(email, pwd)
               # sendnotification to self
               smtp.sendmail(email, email, msg.as_string())
               # disconnectfrom the server
               smtp.quit()
           except socket.gaierror:
               print("Network connection error, email notsent.")
smtp.ehlo()和smtp.starttls()都是SMTP命令。ehlo(扩展Hello)本质上是向服务器打招呼。starttls通知服务器,将使用加密传输级别安全(TLS)连接进行通信。
在此之后,只需从文件中读取电子邮件和密码,分别存储在email和pwd中。然后,使用smtp.login登录到SMTP服务器。登录并使用smtp.sendmail发送电子邮件。
笔者总是给自己发送通知,但在自动报告的情况下,可能希望将电子邮件发送到其他地方。为此,我会更改destination_address: smtp.sendmail(email、destination_address、 msg.as_string)。
最后,终止会话并关闭与smtp.quit的连接。
将所有这些都放在try-except语句中。在瞬间网络连接丢失的情况下,将无法连接到服务器。导致socket.gaierror。使用try-except语句可以防止程序在网络连接失败的情况下崩溃。
笔者将其用于ML模型培训更新和数据传输完成。如果邮件没有被发送,那也没有关系。这种简单、被动地处理连接丢失是合适的。

现在已经写了代码的两部分,我们就可以发送电子邮件了:
 # builda message object
msg = message(text="See attached!", img= important.png ,
             attachment= data.csv )send(msg)  #send the email (defaults to Outlook)
# 兄弟们学习python,有时候不知道怎么学,从哪里开始学。掌握了基本的一些语法或者做了两个案例后,不知道下一步怎么走,不知道如何去学习更加高深的知识。
# 那么对于这些大兄弟们,我准备了大量的资料,PDF电子书籍,以及源代码!
# Python学习基地 279199867 都放在这个君羊了
这是所有的电子邮件通知和/或使用Python的自动化的全过程。感谢email和smptlib库,设置过程变得非常容易。

还有一点请注意,公共电子邮件提供程序服务器地址和TLS端口。
对于任何耗费大量时间的处理或训练任务,进度更新和完成通知通常才是真正的解放。Python,让工作更美好!
好了兄弟们,今天的分享就到这里,给大家推荐一套Python教程,涵盖了常见的大部分案例实战,希望对 大家有所帮助!