一、前言
由上篇文章我们得知,SpringBoot启动时,就是有很简单的一行代码。那我们可以很清楚的看到这行代码的主角便是SpringApplication了,本文我们就来聊一聊这货,来探寻SpringBoot的一站式启动流程。
其实SpringApplication 是将一个典型的Spring应用的启动流程”模板化”了,在没有特殊定制需求的情况下,默认的模板化后的执行流程就能满足我们的需求了。即便是我们有了特殊的需求也没有太大关系,SpringApplication在内部合适的启动节点给我们提供了一系列不同类型的扩展点,我们就可以通过这些开放的扩展点来对SpringBoot程序的启动和关闭过程来进行定制和扩展。
二、关于定制
SpringApplication中提供的最简单的定制方式当属设置方法(Setters)定制了。例如,我们可以把启动类改成如下的方式来扩展启动行为:
@SpringBootApplication
public class DemoApplication {
    public void main(String[] args) {
        // SpringApplication.run(DemoApplication.class, args);
        SpringApplication bootstrap = new SpringApplication(DemoApplication.class);
        bootstrap.setBanner(new Banner() {
            @Override
            public void printBanner(Environment environment, Class<?> aClass, PrintStream printStream) {
                System.out.println("My custom banner...");
            }
        });
        bootstrap.setBannerMode(Bannder.Mode.CONSOLE);
        bootstrap.run(args);
    }
}
大多数的情况下,SpringApplication默认已经提供好了设置,我们基本不需要再对这些表层进行研究了,对表象之下的本质才是我们最应该探究的课题。
三、揭秘SpringApplication的执行流程
因为启动程序的代码中运行的就是SpringApplication的run方法,所以我们执行流程当然就要从这个run方法开始,先上源码:
public class SpringApplication {
    public SpringApplication(Object... sources) {
        initialize(sources);
    }
    public static ConfigurableApplicationContext run(Object source, String... args) {
        return run(new Object[] { source }, args);
    }
    public static ConfigurableApplicationContext run(Object[] sources, String[] args) {
        return new SpringApplication(sources).run(args);
    }
}
可以看出,启动时:调用run方法先创建一个SpringApplication对象实例,然后调用创建好的SpringApplication的实例的run方法。在SpringApplication实例化的时候,它又会运行以下代码:
private static final String[] WEB_ENVIRONMENT_CLASSES = { "javax.servlet.Servlet",
            "org.springframework.web.context.ConfigurableWebApplicationContext" };
private void initialize(Object[] sources) {
    if (sources != null && sources.length > 0) {
        this.sources.addAll(Arrays.asList(sources));
    }
    this.webEnvironment = deduceWebEnvironment(); // 1
    setInitializers((Collection) getSpringFactoriesInstances(
                ApplicationContextInitializer.class)); // 2
    setListeners((Collection) getSpringFactoriesInstances(ApplicationListener.class)); // 3
    this.mainApplicationClass = deduceMainApplicationClass(); // 4
}
private boolean deduceWebEnvironment() {
    for (String className : WEB_ENVIRONMENT_CLASSES) {
        if (!ClassUtils.isPresent(className, null)) {
            return false;
        }
    }
    return true;
}
private <T> Collection<? extends T> getSpringFactoriesInstances(Class<T> type) {
    return getSpringFactoriesInstances(type, new Class<?>[] {});
}
public void setInitializers(
            Collection<? extends ApplicationContextInitializer<?>> initializers) {
    this.initializers = new ArrayList<ApplicationContextInitializer<?>>();
    this.initializers.addAll(initializers);
}
public void setListeners(Collection<? extends ApplicationListener<?>> listeners) {
    this.listeners = new ArrayList<ApplicationListener<?>>();
    this.listeners.addAll(listeners);
}
- 首先运行deduceWebEnvironment方法(代码中标记1处),该方法的作用是根据classpath里面是否存在某些特征类({“javax.servlet.Servlet”, “org.springframework.web.context.ConfigurableWebApplicationContext” })来决定是创建一个Web类型的ApplicationContext还是创建一个标准Standalone类型的ApplicationContext.
- 使用SpringFactoriesLoader在应用的classpath中查找并加载所有可用的
ApplicationContextInitializer(代码中标记2处)。 - 使用
SpringFactoriesLoader在应用的classpath中查找并加载所有可用的ApplicationListener(代码中标记3处)。 - 推断并设置main方法的定义类(代码中标记4处)。
这样,SpringApplication就完成了实例化并且完成了设置。然后就开始执行SpringApplication实例的run方法的逻辑了:
public ConfigurableApplicationContext run(String... args) {
    StopWatch stopWatch = new StopWatch();
    stopWatch.start();
    ConfigurableApplicationContext context = null;
    FailureAnalyzers analyzers = null;
    configureHeadlessProperty();
    SpringApplicationRunListeners listeners = getRunListeners(args); // 1
    listeners.starting(); // 2
    try {
        ApplicationArguments applicationArguments = new DefaultApplicationArguments(
                args);
        ConfigurableEnvironment environment = prepareEnvironment(listeners,
                applicationArguments); // 3
        Banner printedBanner = printBanner(environment); // 5
        context = createApplicationContext(); // 6
        analyzers = new FailureAnalyzers(context);
        prepareContext(context, environment, listeners, applicationArguments,
                printedBanner);
        refreshContext(context); // 13
        afterRefresh(context, applicationArguments); // 15
        listeners.finished(context, null); // 16
        stopWatch.stop();
        if (this.logStartupInfo) {
            new StartupInfoLogger(this.mainApplicationClass)
                    .logStarted(getApplicationLog(), stopWatch);
        }
        return context;
    }
    catch (Throwable ex) {
        handleRunFailure(context, listeners, analyzers, ex); // 17
        throw new IllegalStateException(ex);
    }
}
private ConfigurableEnvironment prepareEnvironment(
        SpringApplicationRunListeners listeners,
        ApplicationArguments applicationArguments) {
    // Create and configure the environment
    ConfigurableEnvironment environment = getOrCreateEnvironment();
    configureEnvironment(environment, applicationArguments.getSourceArgs());
    listeners.environmentPrepared(environment); // 4
    if (!this.webEnvironment) {
        environment = new EnvironmentConverter(getClassLoader())
                .convertToStandardEnvironmentIfNecessary(environment);
    }
    return environment;
}
private void prepareContext(ConfigurableApplicationContext context,
        ConfigurableEnvironment environment, SpringApplicationRunListeners listeners,
        ApplicationArguments applicationArguments, Banner printedBanner) {
    context.setEnvironment(environment); // 7
    postProcessApplicationContext(context); // 8
    applyInitializers(context); // 9
    listeners.contextPrepared(context); // 10
    if (this.logStartupInfo) {
        logStartupInfo(context.getParent() == null);
        logStartupProfileInfo(context);
    }

    // Add boot specific singleton beans
    context.getBeanFactory().registerSingleton("springApplicationArguments",
            applicationArguments);
    if (printedBanner != null) {
        context.getBeanFactory().registerSingleton("springBootBanner", printedBanner);
    }

    // Load the sources
    Set<Object> sources = getSources();
    Assert.notEmpty(sources, "Sources must not be empty");
    load(context, sources.toArray(new Object[sources.size()])); // 11
    listeners.contextLoaded(context); // 12
}
private void refreshContext(ConfigurableApplicationContext context) {
    refresh(context);
    if (this.registerShutdownHook) { // 14
        try {
            context.registerShutdownHook();
        }
        catch (AccessControlException ex) {
            // Not allowed in some environments.
        }
    }
}
- 该方法中,首先通过
SpringFactoriesLoader查找并加载SpringApplicationRunListener(代码标记1处),然后接着调用它们的started()方法(代码标记2处),告诉这些SpringApplicationRunListener说:“Hello, SpringBoot应用要开始执行喽”。 - 接着,创建和配置当前SpringBoot应用将要使用的Environment(包括配置要使用到的
PropertySource和Profile)(代码标记3处). - 然后遍历所有的
SpringApplicationRunListener的environmentPrepared()方法,告诉他们:“当前SpringBoot应用使用的Environment已经准备好了哈”(代码标记4处)。 - 如果
SpringApplication的showBanner属性为true的话,则打印banner(这里是基于Banner.Mode来决定banner的打印行为)(代码标记5处)。这个步骤其实我们不用过多关心,个人感觉它的用途纯粹是为了好玩。 - 根据用户是否明确设置了applicationContextClass类型以及初始化
SpringApplication类阶段的推断结果,决定该为当前的SpringBoot应用创建什么类型的ApplicationContext,并完成创建(代码标记6处)。 - 然后将之前准备好的
Environment设置给创建好的ApplicationContext,供以后使用(代码标记7处)。 - 根据条件来决定是否使用自定义的
BeanNameGenerator,决定是否使用自定义的ResourceLoader(代码标记8处)。 - 完成后,
SpringApplication会再次借助SpringFactoriesLoader查找并加载classpath中所有可用的ApplicationContextInitializer,然后遍历调用它们的initialize(applicationContext)方法来对已经创建好的ApplicationContext进行进一步的处理(代码标记9处)。 - 接着,遍历所有
SpringApplicationRunListener的contextPrepared()方法,通知它们:“SpringBoot应用的ApplicationContext准备好啦哈~”(代码标记10处)。 - 非常最要的一步,将之前通过
@EnableAutoConfiguration获取的所有配置类以及其他形式的IoC容器配置类加载到已经准备完毕的ApplicationContext中(代码标记11处)。 - 遍历所有的
SpringApplicationRunListener并调用它们的contextLoaded()方法,告诉所有的SpringApplicationRunListener说:“ApplicationContext装填完毕啦”(代码标记12处)。 - 调用
ApplicationContext的refresh()方法,完成IoC容器初始化的最后一步流程(代码标记13处)。 - 然后再根据条件来决定是否需要添加
ShutdownHook(代码标记14处)。 - 查找当前
ApplicationContext中是否注册有ApplicationRunner以及CommandLineRunner,如果有,则遍历执行它们。 - 不出意外的情况下,遍历所有的
SpringApplicationRunListener并执行finished()方法,告诉他们:“启动大功告成了!”(代码标记16处),如果整个启动过程中出现了异常,则依然调用所有的SpringApplicationRunListener的finished()方法,这种情况下会将所有的异常信息一起传入并处理(代码标记17处)。
经过以上的这些步骤以后,一个完整的SpringBoot应用就启动完毕了!整个过程虽然看起来冗长无比,但其实很多都是一些事件通知的扩展点,如果我们将这些逻辑暂时的忽略掉的话,那整个SpringBoot应用启动的逻辑就可以压缩到极其精简的几步了,如下图:
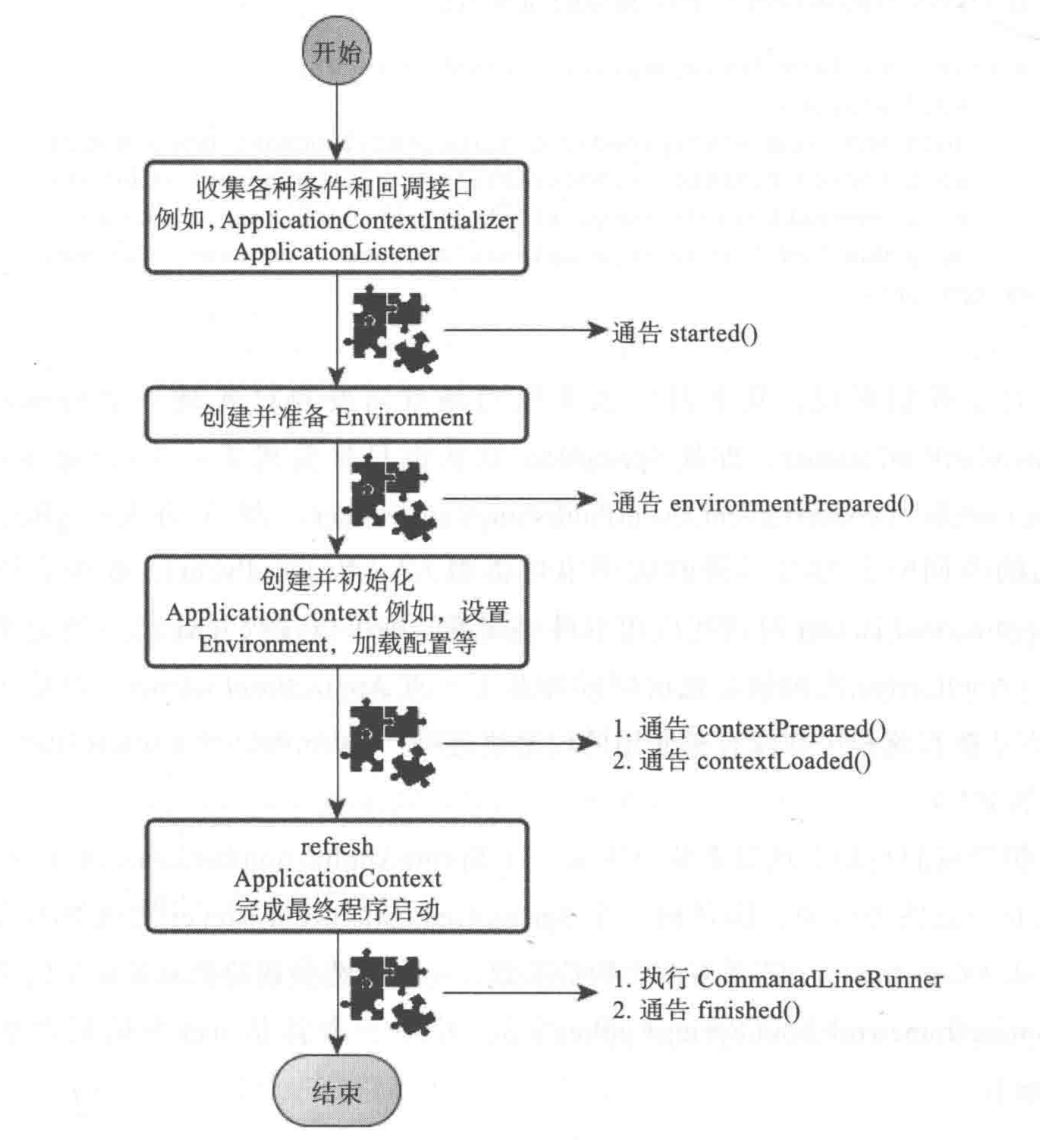
这样我们对比以后就会发现,其实SpringApplication提供的这些各种扩展点有点”喧宾夺主”的味道,它们占据了整个SpringBoot应用启动逻辑的大部分,除了初始化准备好ApplicationContext,剩下的绝大部分工作均是通过这些扩展点来完成的。
四、总结
本文,我们通过源码的方式来解析了整个SpringBoot应用程序的启动过程,我们发现了大部分工作都是由SpringApplication提供的扩展点来完成的,那我们下一篇文章就来逐一解析这些扩展点组件,这样的话,我们就可以在需要的时候可以很轻松的为我所用!