1、安装环境
1)依赖的基础环境
64位CPU
linux kernel(内核)3.10+
linux kernel cgroups and namespace
2)查看自己服务器的环境
使用的服务器的版本
[root@hackerlin ~]# cat /etc/redhat-release
CentOS Linux release 7.7.1908 (Core)
内核版本
[root@hackerlin ~]# uname -r
3.10.0-1062.el7.x86_64
IP地址
[root@hackerlin ~]# hostname -I
192.168.72.200
2、安装docker
实际上就是下载一个安装脚本,再执行安装(但是此方法不推荐,因为不能选择版本安装)
[root@hackerlin ~]# curl -fsSL https://get.docker.com | bash -s docker --mirror Aliyun
1)centos7(使用yum进行安装,推荐)
添加docker-ce源信息
wget -O /etc/yum.repos.d/docker-ce.repo https://mirrors.tuna.tsinghua.edu.cn/docker-ce/linux/centos/docker-ce.repo
修改源信息里的地址,让下载速度更快
sed -i 's@download.docker.com@mirrors.tuna.tsinghua.edu.cn/docker-ce@g' /etc/yum.repos.d/docker-ce.repo
更新并安装呢dicker-ce
yum makecache fast
yum -y install docker-ce #安装的是默认最新版本
安装指定版本的docker
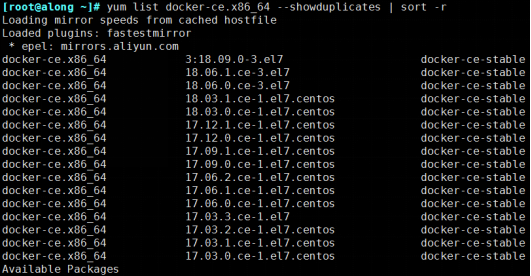
查看都有哪些版本
yum list docker-ce.x86_64 --showduplicates | sort -r
下载指定版本,我这里下载稳定版
yum -y install docker-ce-17.03.2.ce
安装可能会报错(如果没有遇到请忽略)
Error: Package: docker-ce-18.03.1.ce-1.el7.centos.x86_64 (docker-ce-stable)
Requires: container-selinux >= 2.9
报错原因: docker-ce-selinux 版本过低
解决办法:在https://mirrors.tuna.tsinghua.edu.cn/docker-ce/linux/centos/7/x86_64/stable/Packages/网站下载对应版本的docker-ce-selinux,安装即可
yum -y install https://mirrors.tuna.tsinghua.edu.cn/docker-ce/linux/centos/7/x86_64/stable/Packages/docker-ce-selinux-17.03.3.ce-1.el7.noarch.rpm
再次安装docker 成功
yum -y install docker-ce-17.03.2.ce
2) CentOS 7 (二进制安装,推荐)
到 https://download.docker.com/linux/static/stable/x86_64/ 页面下载自己需要版本的发布包:
这次安装文档版本 docker-18.03.1-ce
下载安装
mkdir /data
wget -P /data/ https://download.docker.com/linux/static/stable/x86_64/docker-18.03.1-ce.tgz
cd /data/
tar -xvf docker-18.03.1-ce.tgz
配置启动脚本
vim /etc/systemd/system/docker.service
[Unit]

Description=Docker Application Container Engine

Documentation=http://docs.docker.io


[Service]

Environment="PATH=/data/docker/:/bin:/sbin:/usr/bin:/usr/sbin"

EnvironmentFile=-/run/flannel/docker

ExecStart=/data/docker/dockerd --log-level=error $DOCKER_NETWORK_OPTIONS

ExecReload=/bin/kill -s HUP $MAINPID

Restart=on-failure

RestartSec=5

LimitNOFILE=infinity

LimitNPROC=infinity

LimitCORE=infinity

Delegate=yes

KillMode=process


[Install]

WantedBy=multi-user.target
配置生效环境变量,方便使用docker命令
vim /etc/profile.d/docker.sh
export PATH=/data/docker:$PATH

source /etc/profile.d/docker.sh
配置docker命令补齐脚本
wget -O /usr/share/bash-completion/completions/docker https://raw.githubusercontent.com/alonghub/Docker/master/Resource/docker
配置dockerfile 语法高亮脚本
wget -O /usr/share/vim/vimfiles/doc/dockerfile.txt https://raw.githubusercontent.com/alonghub/Docker/master/Resource/dockerfile.txt
wget -O /usr/share/vim/vimfiles/ftdetect/dockerfile.vim https://raw.githubusercontent.com/alonghub/Docker/master/Resource/dockerfile2.vim
wget -O /usr/share/vim/vimfiles/syntax/dockerfile.vim https://raw.githubusercontent.com/alonghub/Docker/master/Resource/dockerfile3.vim
3) Ubuntu 14.04 16.04 (使用apt-get进行安装)
安装最新版本
# step 1: 安装必要的一些系统工具
sudo apt-get update

sudo apt-get -y install apt-transport-https ca-certificates curl software-properties-common
# step 2: 安装GPG证书
curl -fsSL http://mirrors.aliyun.com/docker-ce/linux/ubuntu/gpg | sudo apt-key add -
# Step 3: 写入软件源信息
sudo add-apt-repository "deb [arch=amd64] http://mirrors.aliyun.com/docker-ce/linux/ubuntu $(lsb_release -cs) stable"
# Step 4: 更新并安装 Docker-CE
sudo apt-get -y update

sudo apt-get -y install docker-ce
安装指定版本的Docker-CE:
Step 1: 查找Docker-CE的版本:
apt-cache madison docker-ce
docker-ce | 17.03.1~ce-0~ubuntu-xenial | http://mirrors.aliyun.com/docker-ce/linux/ubuntu xenial/stable amd64 Packages
docker-ce | 17.03.0~ce-0~ubuntu-xenial | http://mirrors.aliyun.com/docker-ce/linux/ubuntu xenial/stable amd64 Packages
Step 2: 安装指定版本的Docker-CE: (VERSION 例如上面的 17.03.1~ce-0~ubuntu-xenial)
sudo apt-get -y install docker-ce=[VERSION]
3、 配置docker镜像加速
多种加速方式:
- docker cn
- 阿里云加速器
- 中国科技大学
- ... ...
(1)docker cn 加速
mkdir -p /etc/docker

sudo tee /etc/docker/daemon.json <<-'EOF'

{

  "registry-mirrors": ["https://registry.docker-cn.com"]

}

EOF
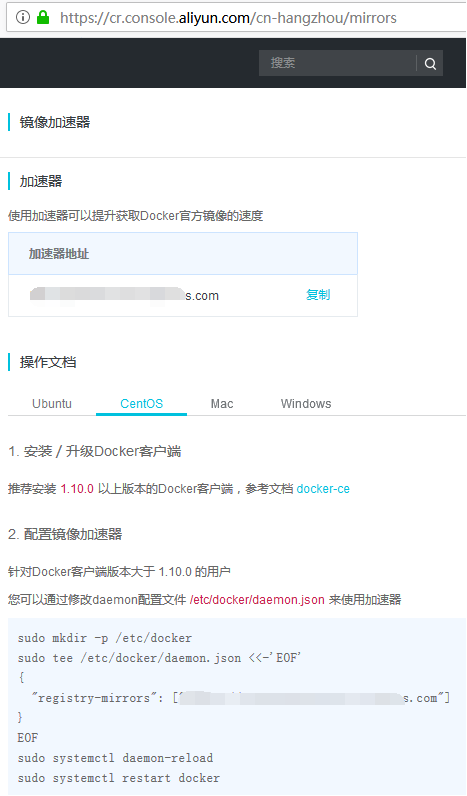
(2)阿里云加速器
注册阿里云账号,专用加速器地址获得路径:
https://cr.console.aliyun.com/#/accelerator
添加加速器到配置文件
sudo tee /etc/docker/daemon.json <<-'EOF'

{

  "registry-mirrors": ["https://xxxxxxx.mirror.aliyuncs.com"]

}

EOF
阿里云页面有操作步骤
4、 配置清空防火墙规则
systemctl stop firewalld && systemctl disable firewalld
/usr/sbin/iptables -F && /usr/sbin/iptables -X && /usr/sbin/iptables -F -t nat && /usr/sbin/iptables -X -t nat
/usr/sbin/iptables -P FORWARD ACCEPT
5、 启动docker服务
1)重载docker启动配置
systemctl daemon-reload
2)将docker设为开机自启
systemctl start docker.service
3)启动docker服务
systemctl enable docker.service
4)查看docker版本
 docker version

Client:

 Version:      17.03.2-ce

 API version:  1.27

 Go version:   go1.7.5

 Git commit:   f5ec1e2

 Built:        Tue Jun 27 02:21:36 2017

 OS/Arch:      linux/amd64


Server:

 Version:      17.03.2-ce

 API version:  1.27 (minimum version 1.12)

 Go version:   go1.7.5

 Git commit:   f5ec1e2

 Built:        Tue Jun 27 02:21:36 2017

 OS/Arch:      linux/amd64

 Experimental: false